User guide

Get fluent with Playbook AI in one sitting.

Every feature in the system, grouped by the job you actually do each day. Each entry explains why you would use it, the exact clicks, and what you get at the end.

01 / 4 features

Getting started: account and app install

Everything for the first 10 minutes: the owner creates the account, staff activate theirs from the invitation email, everyone signs in and installs the app on a phone or computer.

Create a shop owner account

Login pageCreate one

Steps

  1. 1Open the login page and click "Create one" next to "Don't have an account?" (or "Create your free account →" in the free-trial box).
  2. 2Step 1/2 · Account details: fill in "Shop name", "Owner full name", "Phone number (username)" and "Email".
  3. 3Enter "Password" and "Confirm password". The checklist below turns into green ✓ marks as each rule is met: at least 8 characters, an uppercase letter, a lowercase letter, a number and a special character.
  4. 4Click "Continue" to go to Step 2/2 · Starter categories.
  5. 5Choose your industry so ready-made script categories are created for you - you can type to search (e.g. fashion, spa, real estate). If your industry is not listed, choose "Decide later". One of the two is required.
  6. 6Click "Create account". To change something from step 1, click "Back".
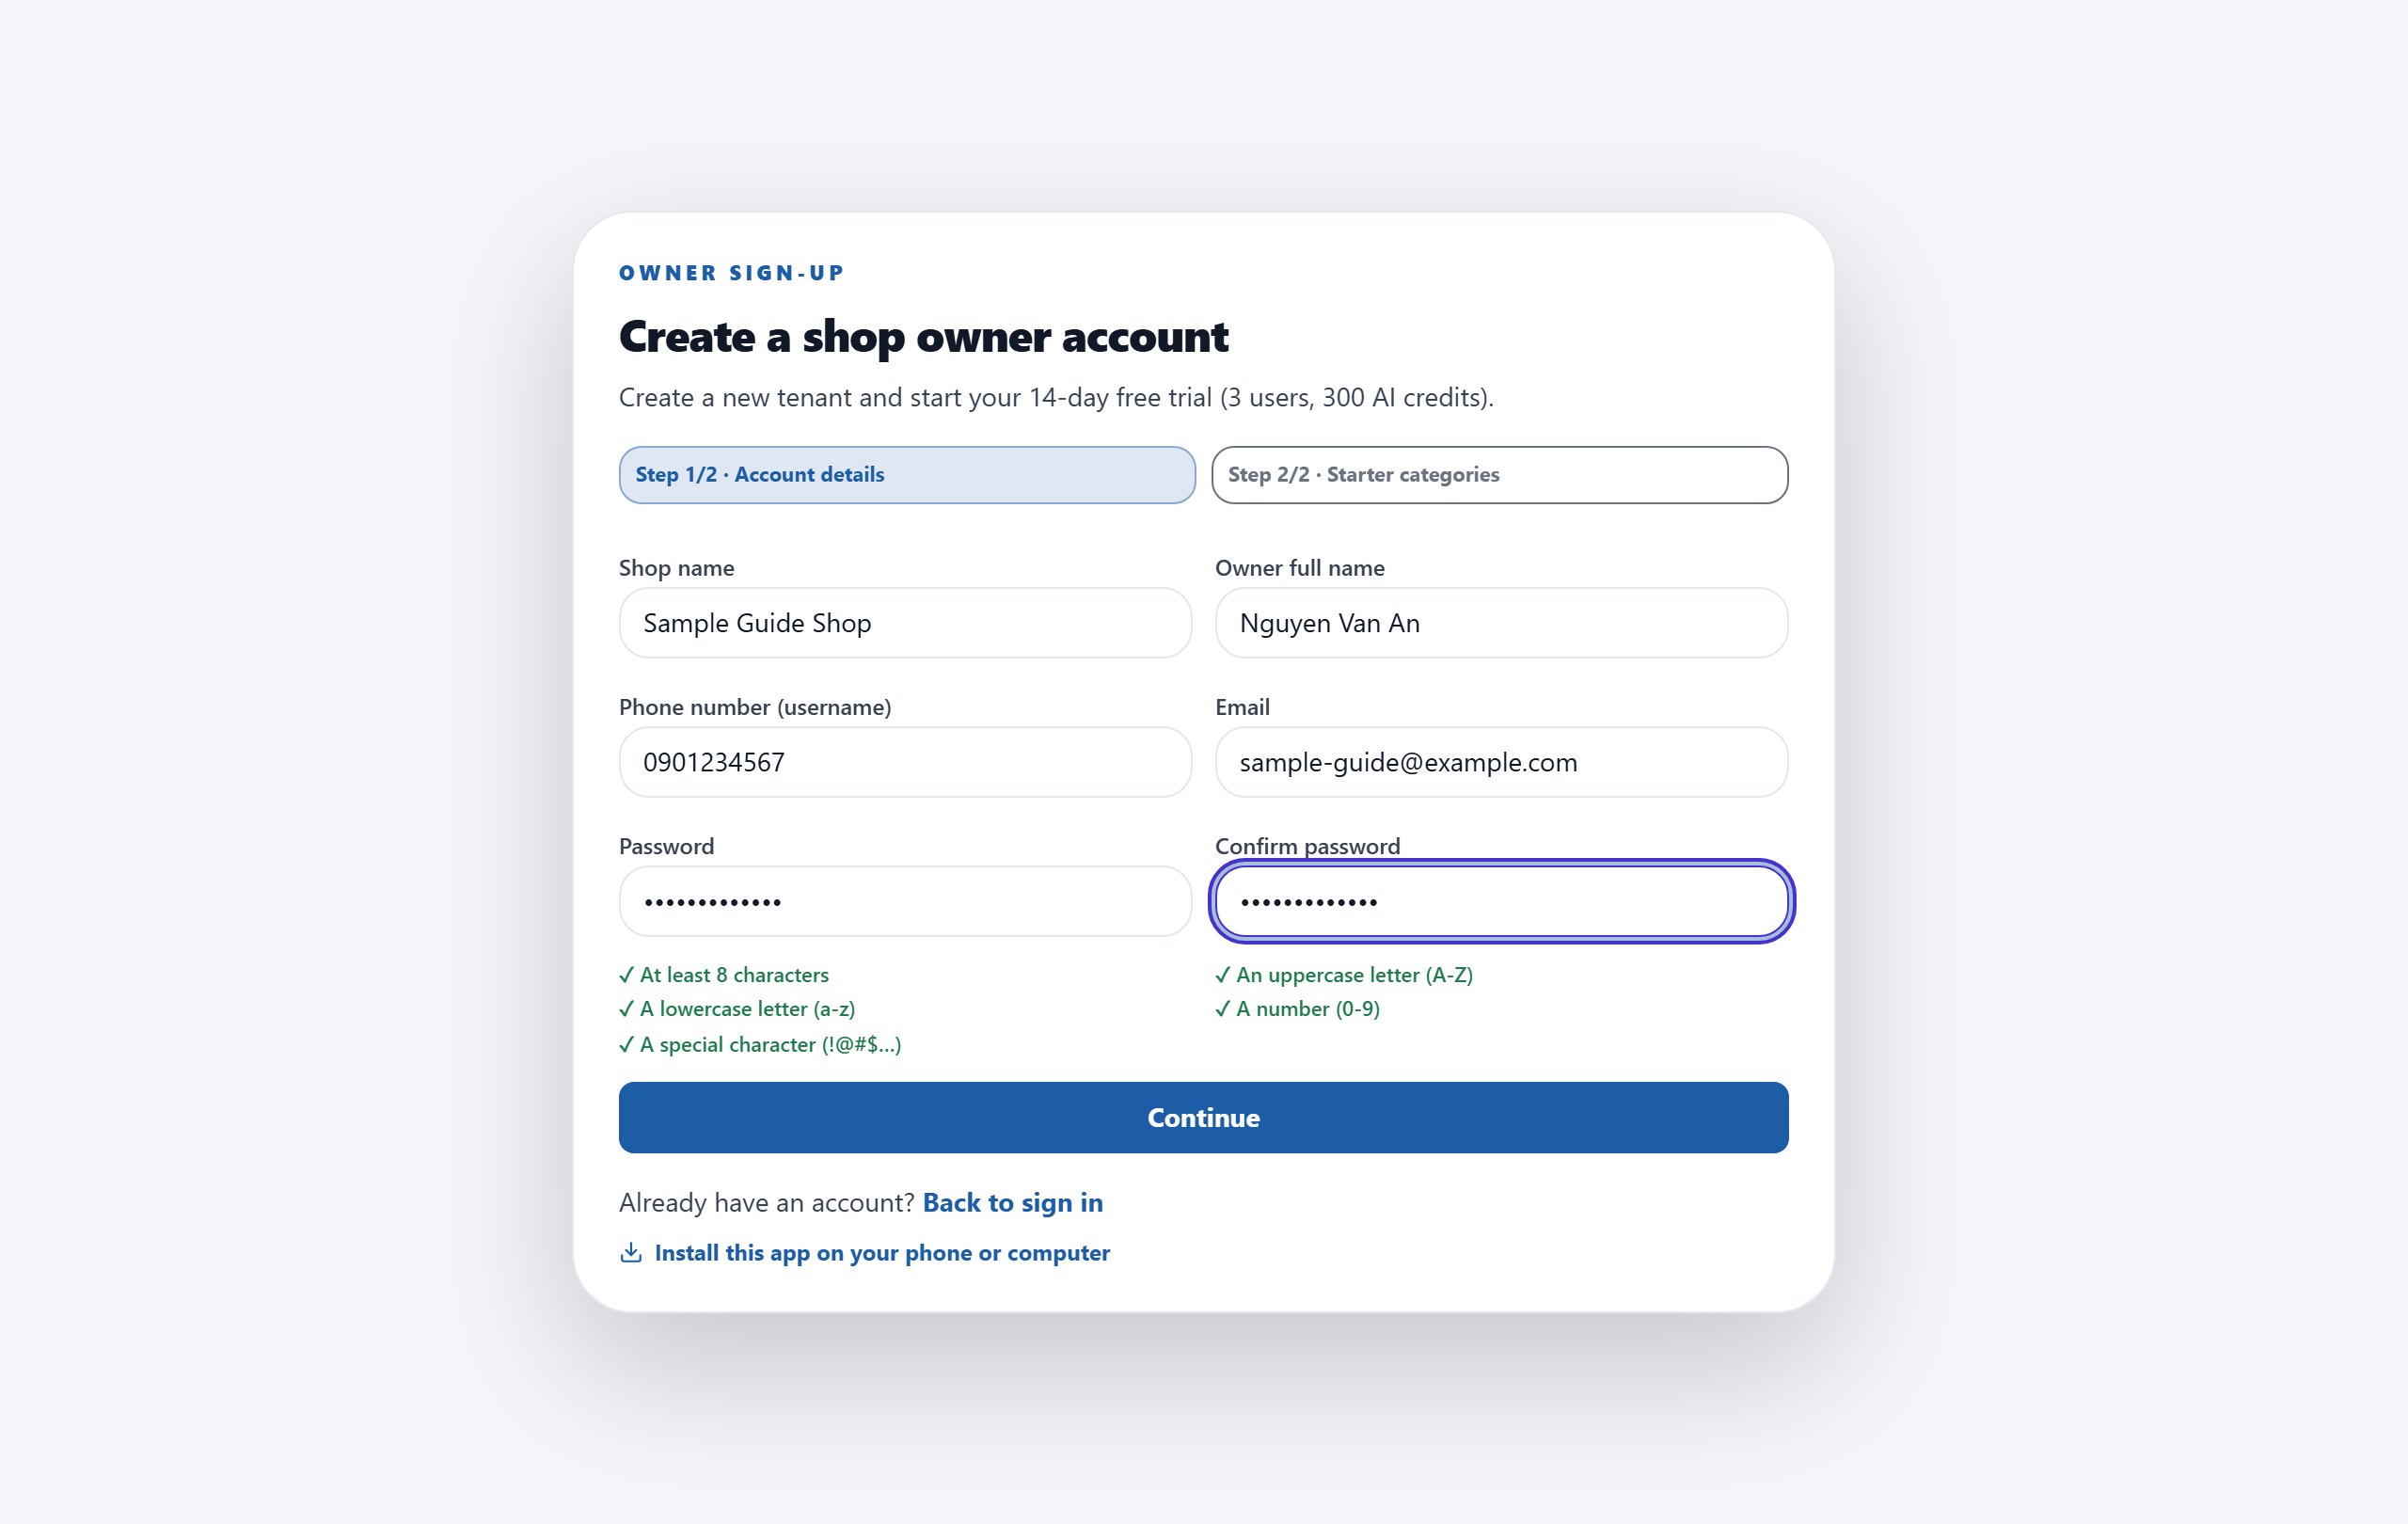
Create a shop owner account page, step 1/2 filled in with shop name, owner name, phone number, email and password
Step 1/2 is complete when every password rule has a green ✓ - click "Continue" to choose starter categories.

Activate a staff account from the invitation email

Email linkSet up your new account password

Steps

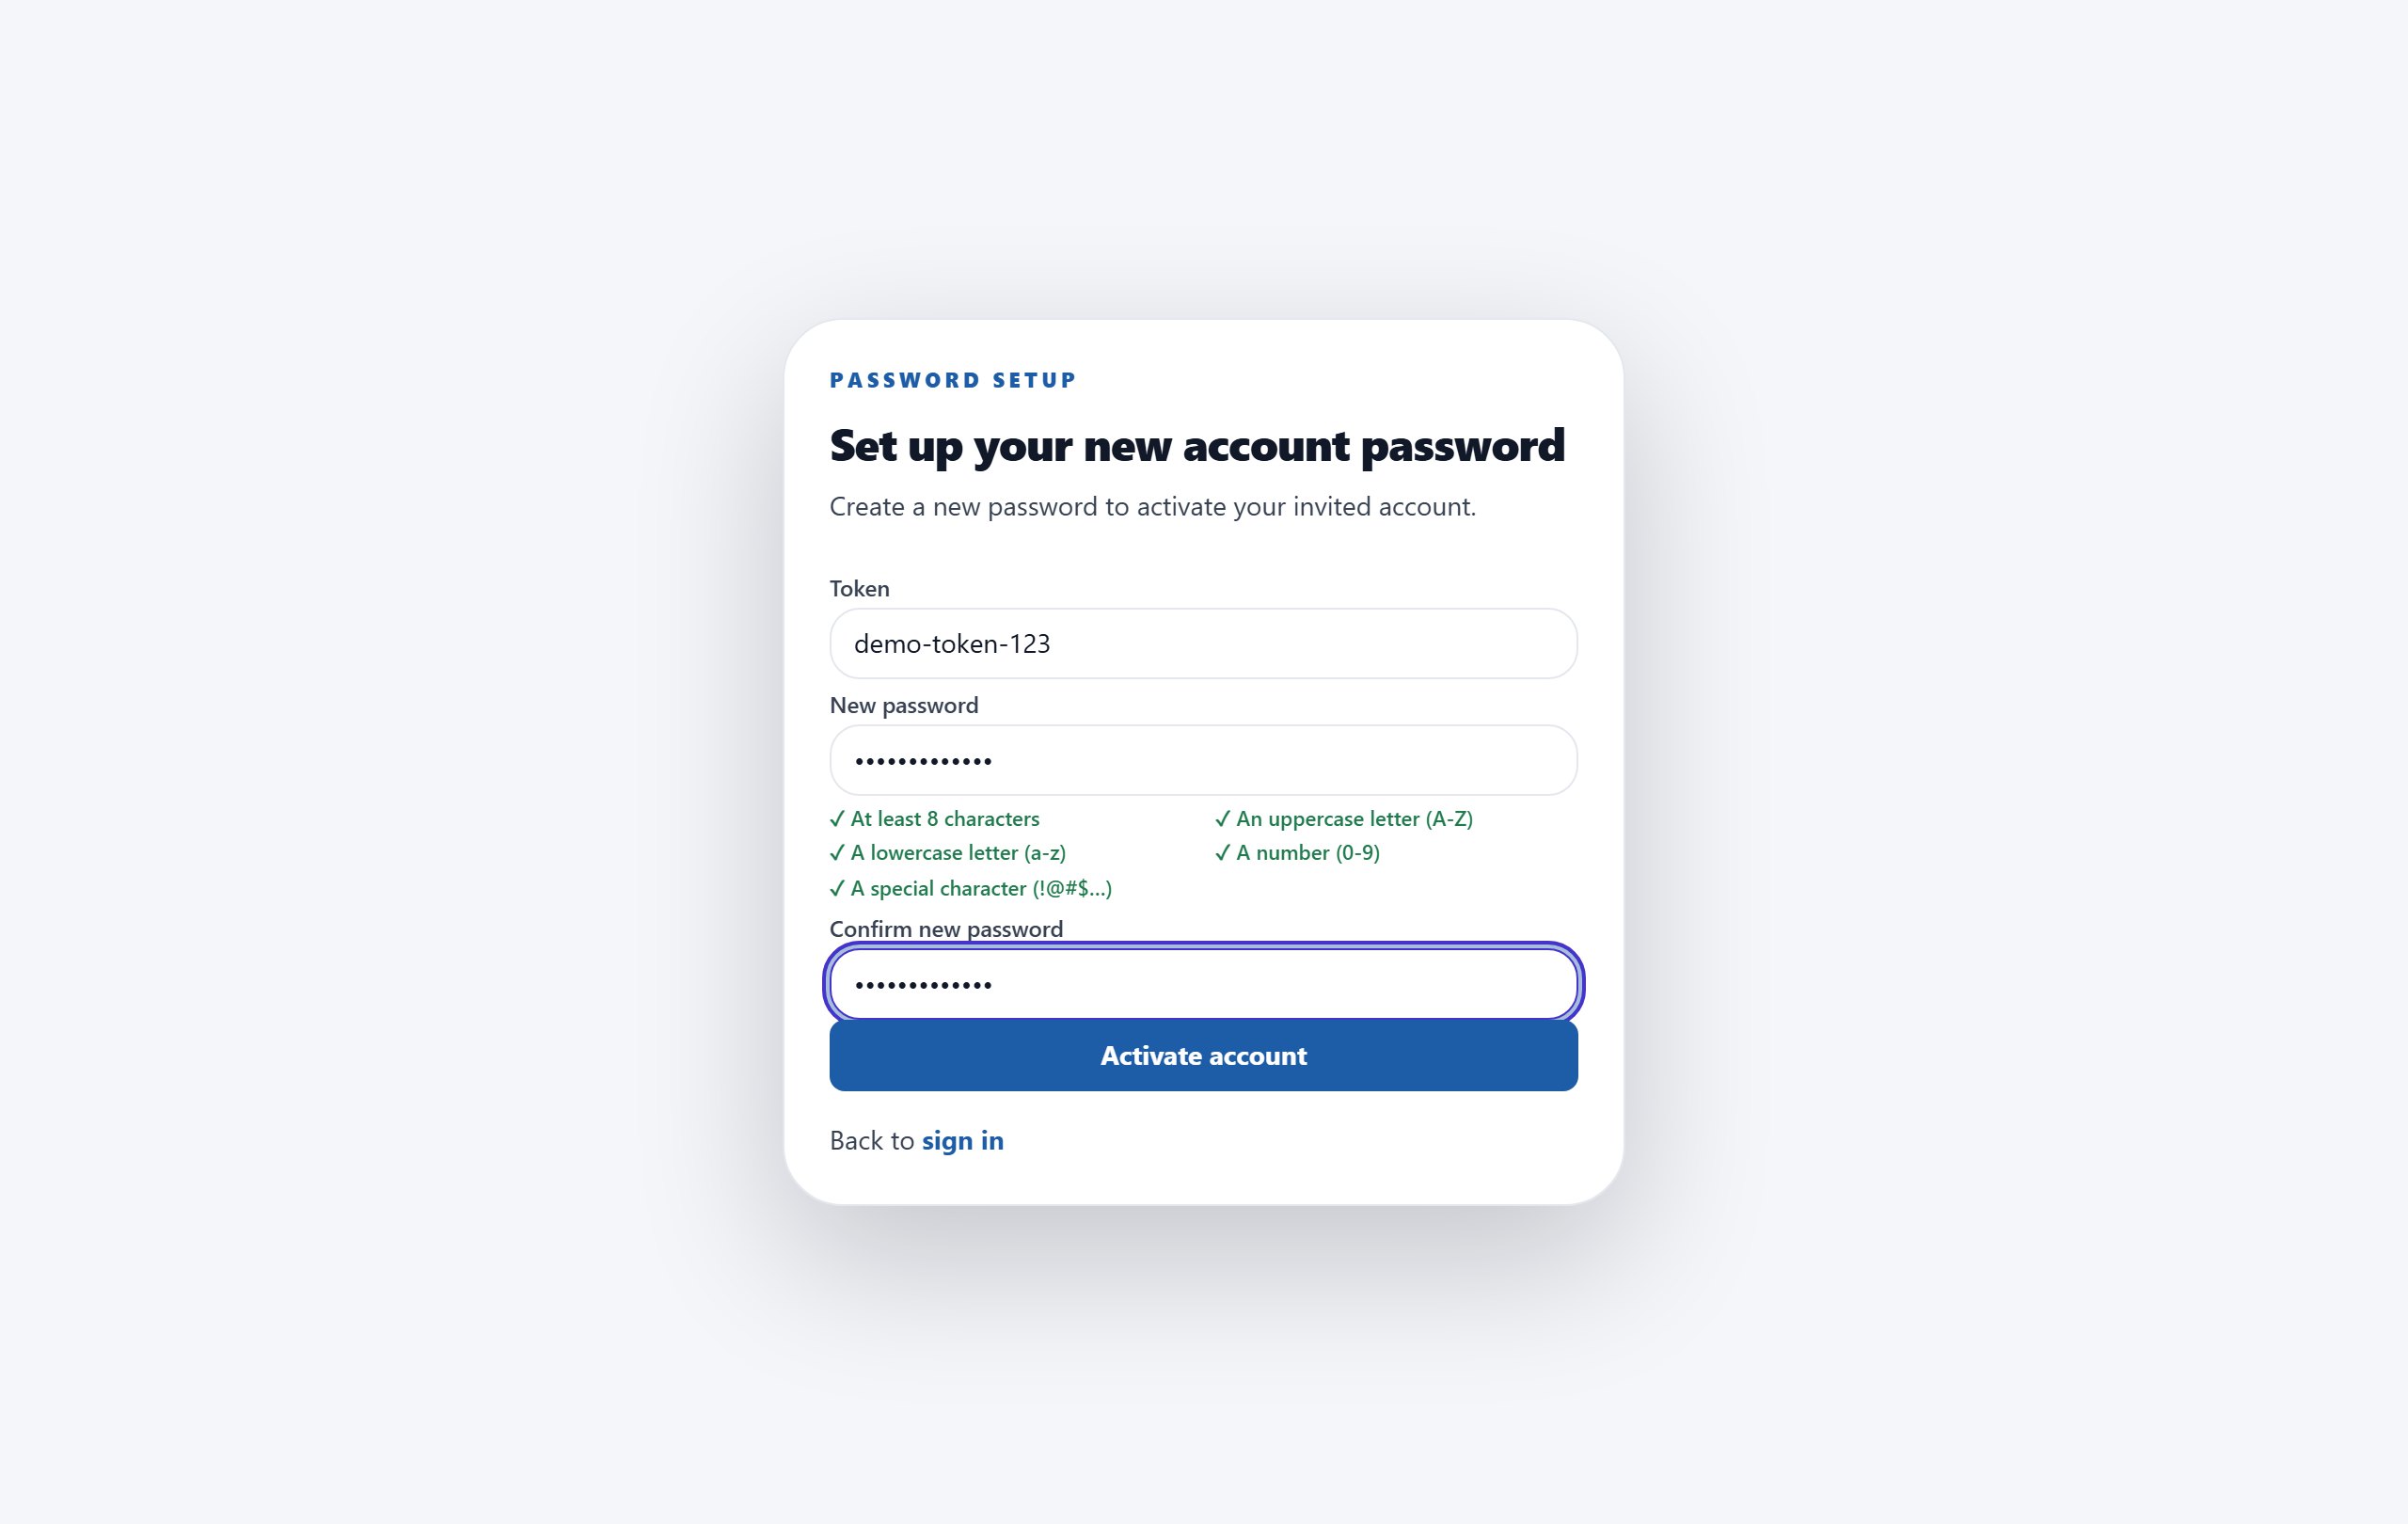
  1. 1Open the invitation email and click the activation link. The "Set up your new account password" page opens with the "Token" field already filled in.
  2. 2If the page says the token was not found, reopen the link from the email or paste the token into the "Token" field.
  3. 3Enter a "New password" (at least 8 characters with an uppercase letter, a lowercase letter, a number and a special character) and repeat it in "Confirm new password".
  4. 4Click "Activate account".
  5. 5When you see "Account activated successfully", click "Go to sign in page".
Set up your new account password page with Token, New password and Confirm new password fields and the Activate account button
The Token comes pre-filled from the email link; just set a password and click "Activate account".

Sign in and recover your password

Login page

Steps

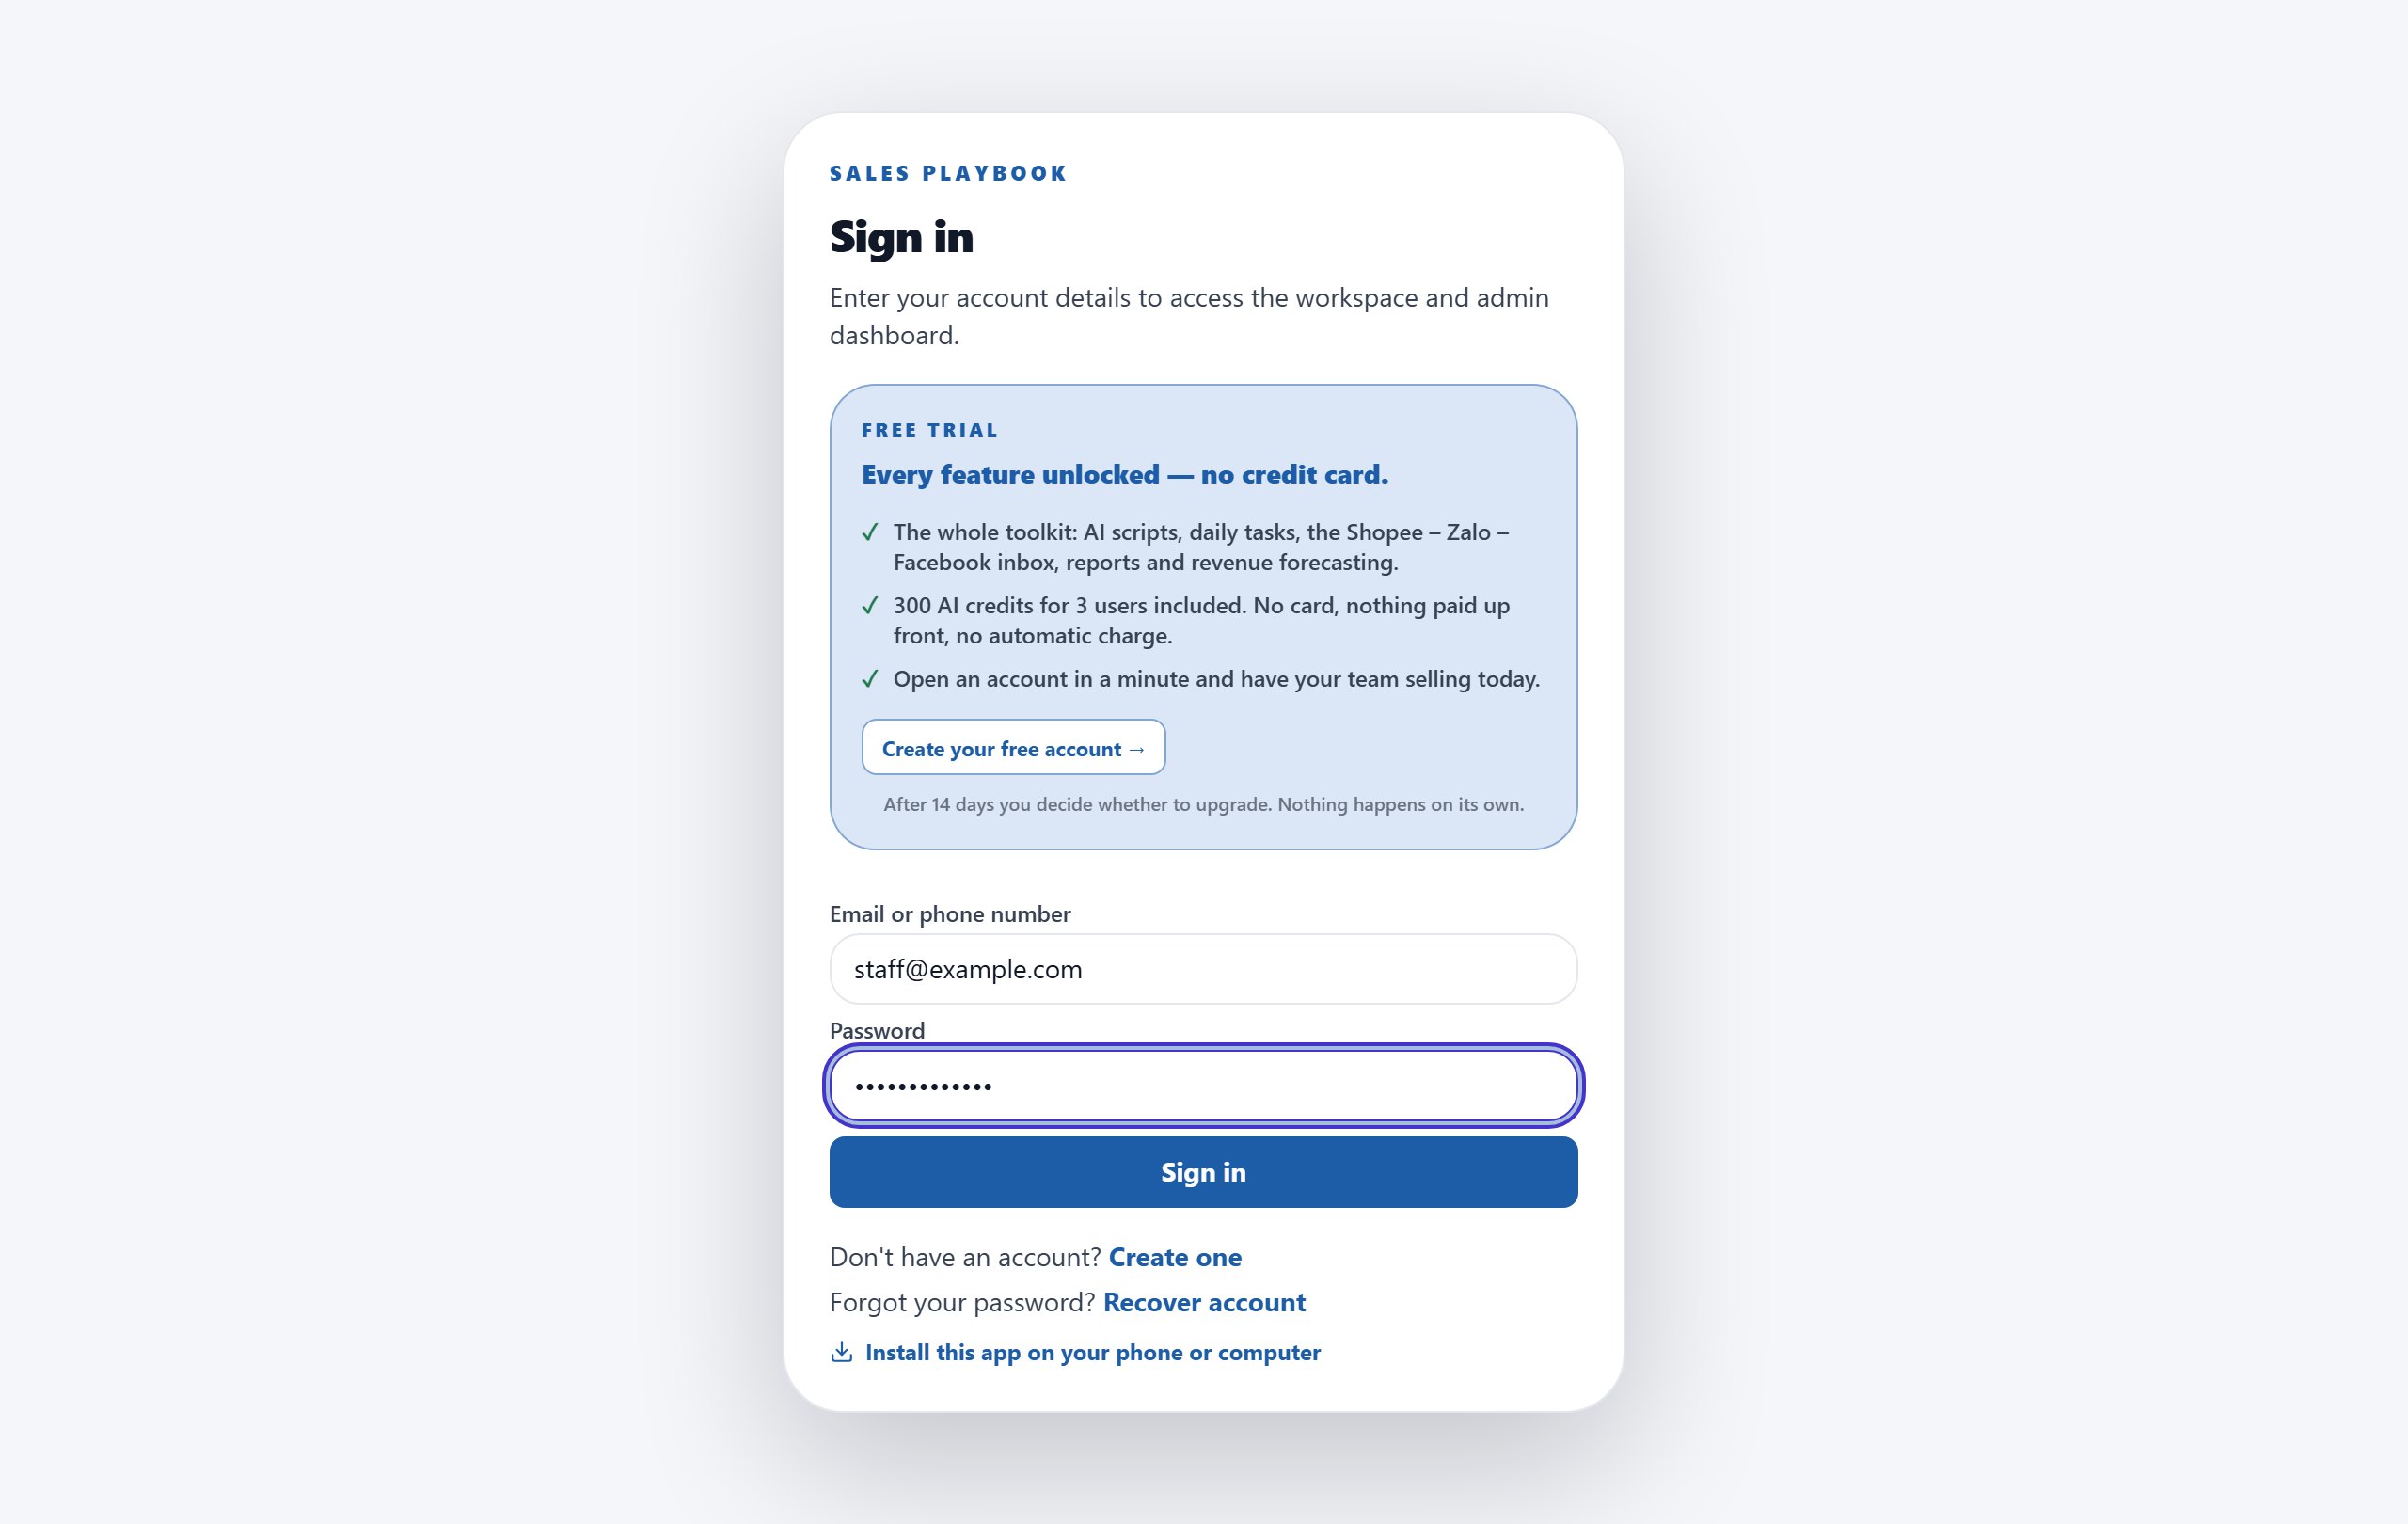
  1. 1Enter "Email or phone number" (the email you registered or were invited with, or your phone number) and "Password", then click "Sign in".
  2. 2Forgot your password: click "Recover account" next to "Forgot your password?".
  3. 3Enter your email and click "Send reset link". You see "If the account exists, instructions to reset the password have been sent."
  4. 4Open the email and click the link. On the "Reset password" page, enter the new password, confirm it and click "Reset password".
  5. 5Click "Go to sign in page" and sign in again with the new password.
Sign in page with Email or phone number and Password fields, the Sign in button and the Create one and Recover account links
"Recover account" and "Install this app on your phone or computer" sit right under the Sign in button.

Install the app on your phone or computer

Login pageInstall this app on your phone or computer

Steps

  1. 1On the login or sign-up page, click "Install this app on your phone or computer". The first time you open the page, an "Install this app" hint also appears - tap "Show me how".
  2. 2Already signed in? Click your avatar in the top-right corner and choose "Install app".
  3. 3If your browser supports one-tap install, click "Install now" and confirm.
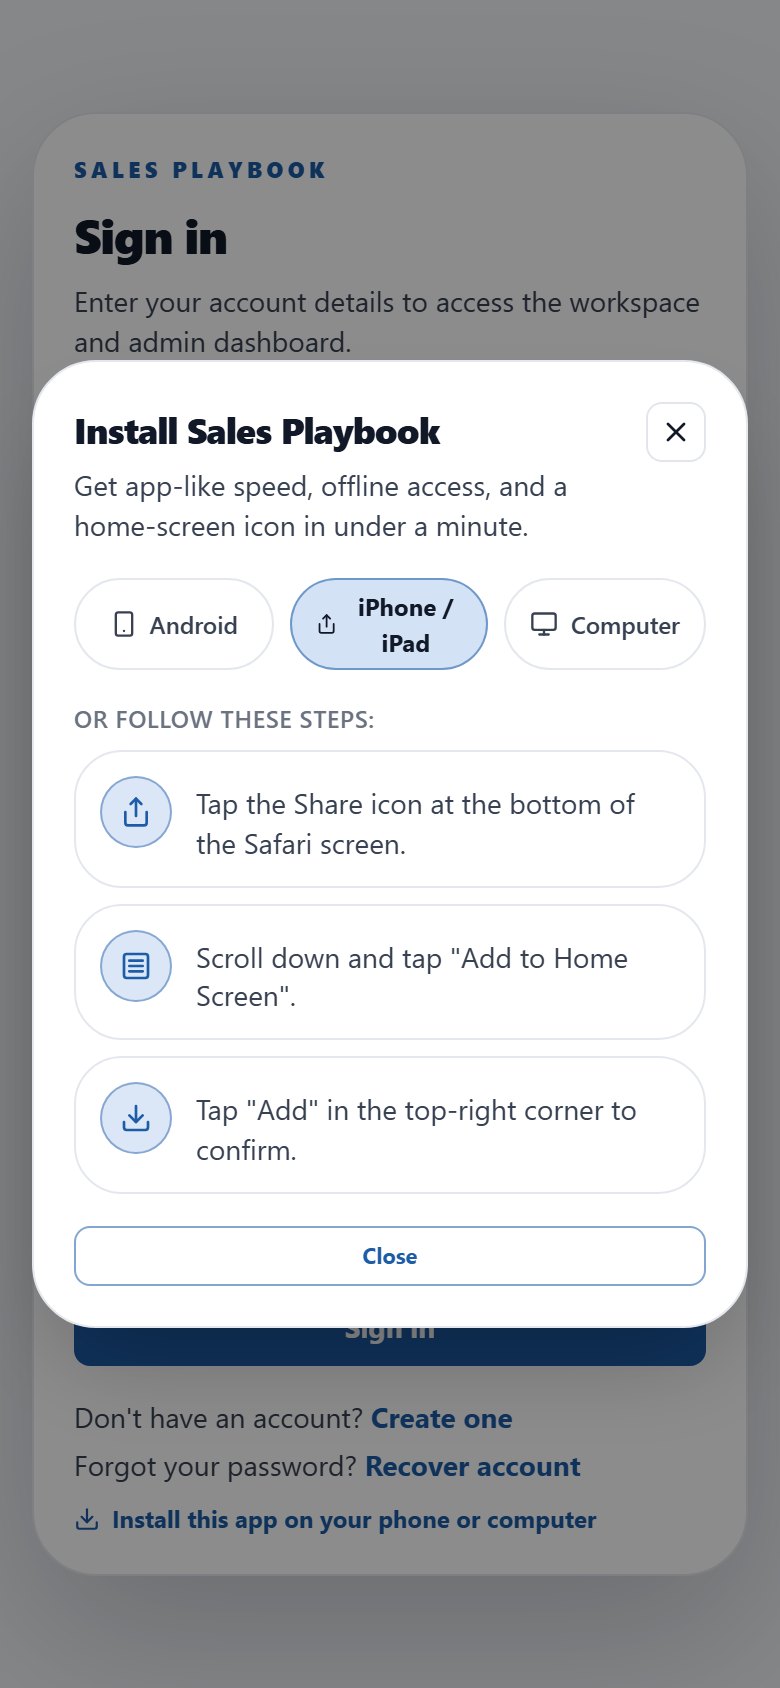
  4. 4Otherwise pick the right tab - "Android", "iPhone / iPad" or "Computer" - and follow the 3 steps in that tab.
Install Sales Playbook dialog on a phone with the iPhone / iPad tab open showing 3 steps
Pick the tab for your device; the iPhone / iPad tab walks you through Add to Home Screen in Safari.

02 / 6 features

Find your way around: computer and phone

The app has two layouts for the same set of features: Desktop (computer, menu on the left) and Workspace (phone, bottom tab bar). This section helps you reach the right screen in seconds and tune the interface to your liking.

Find screens with Ctrl+K and use keyboard shortcuts

Top barSearch screens, features…

Steps

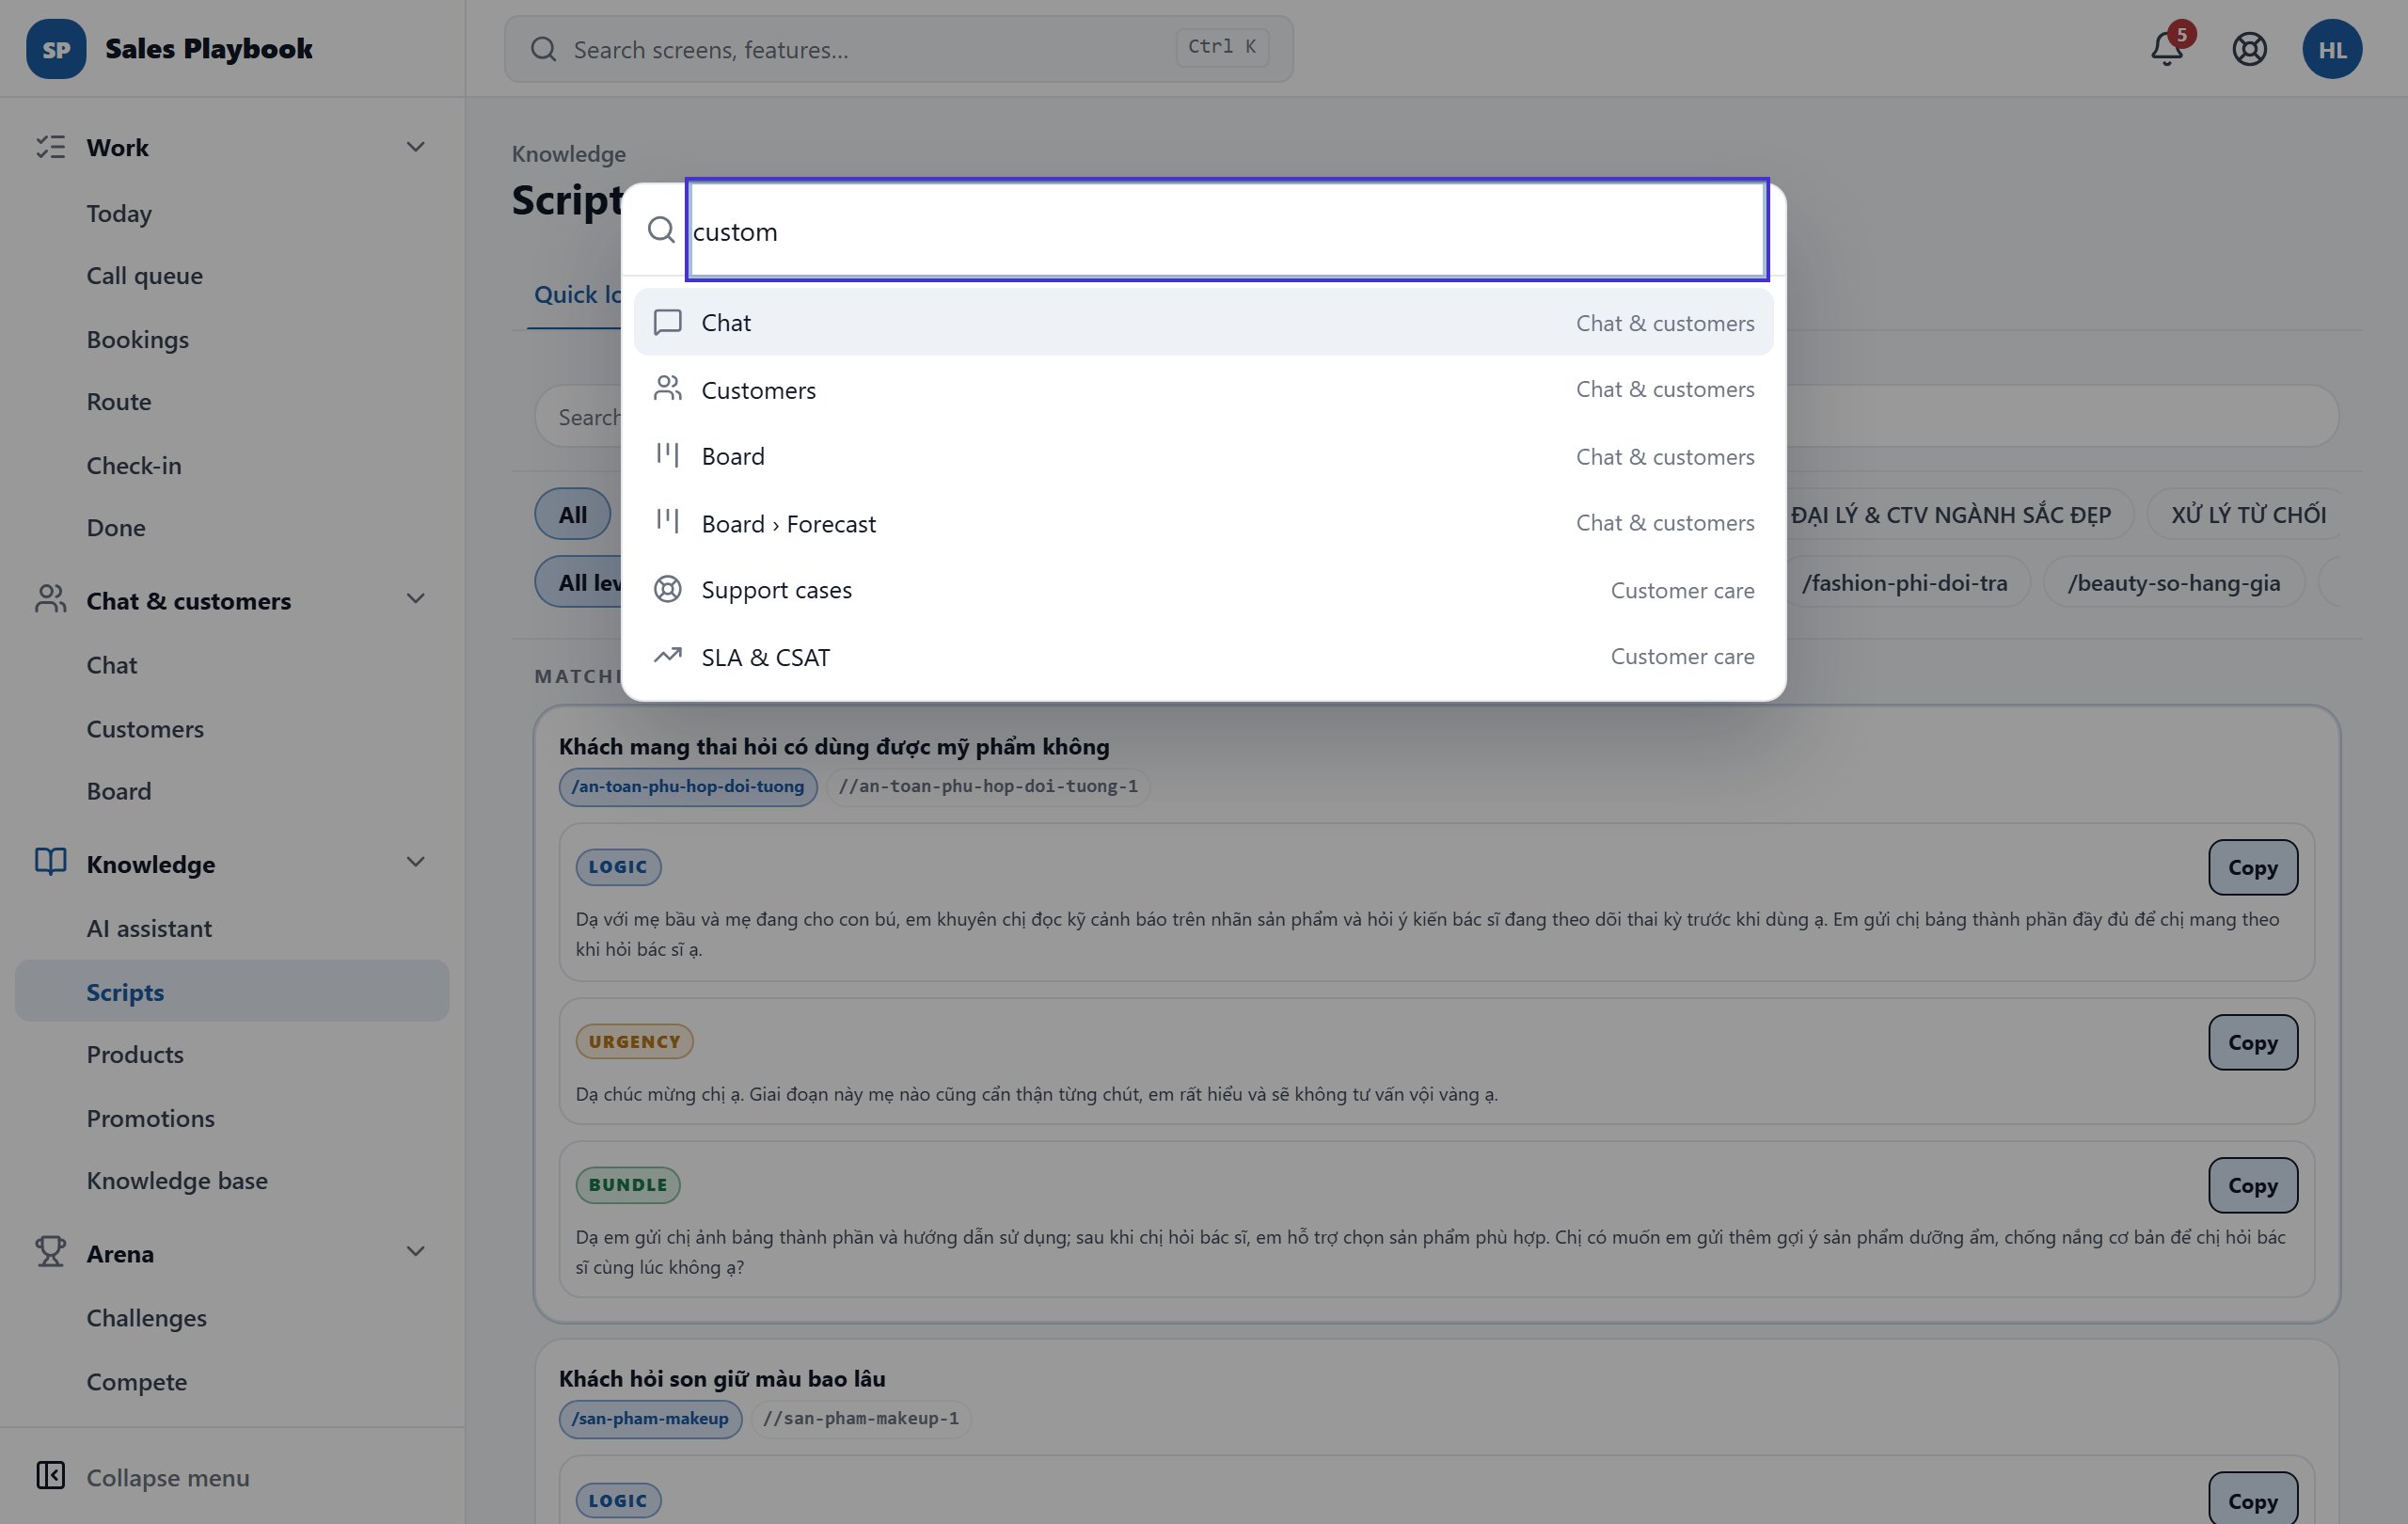
  1. 1Press Ctrl+K (⌘+K on Mac) or click the "Search screens, features…" box in the top bar.
  2. 2Type a few letters (e.g. "custom"). The list shows both screens and view tabs, with the group name on the right (e.g. "Board › Forecast").
  3. 3Use the up/down arrow keys to choose, Enter to open, Esc to close.
  4. 4In Knowledge › Scripts › Quick lookup: use up/down to pick a script, Enter to copy its content, Esc to clear the search box and start again.
  5. 5In the Chat composer: Enter sends, Shift+Enter adds a new line. Type "/" plus a keyword to call up a script, pick it with the arrow keys and press Enter or Tab to insert it.
Ctrl+K search open with the keyword "custom", results Chat, Customers, Board, Board › Forecast, Support cases, SLA & CSAT
A few letters are enough; the group name appears on the right of each result.

Get to know the phone layout

PhoneTop barBottom tab bar

Steps

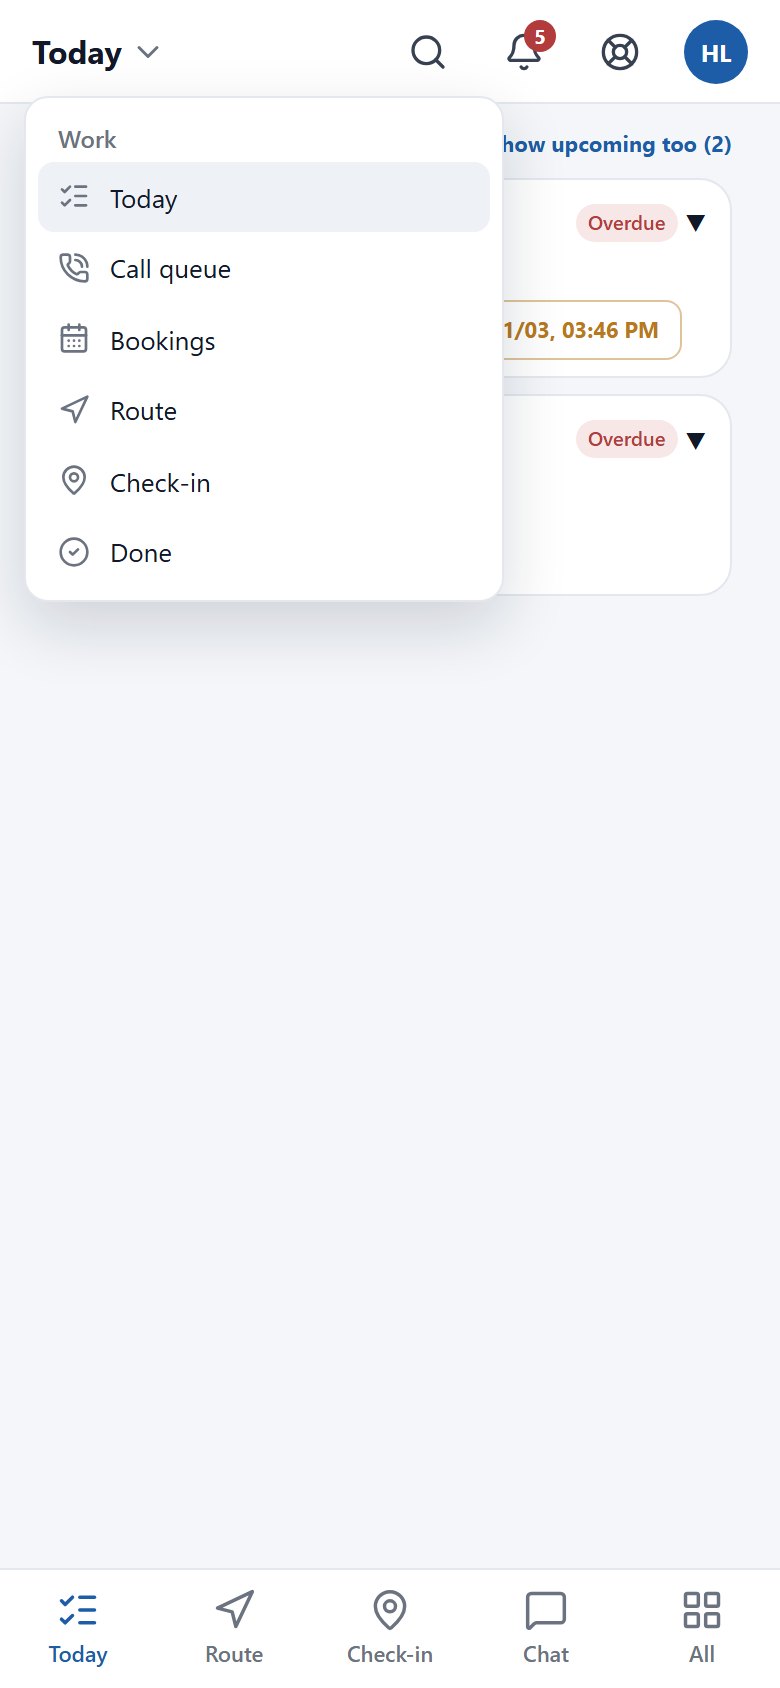
  1. 1Look at the bottom tab bar: 4 pinned items (depending on your role, e.g. "Today", "Chat", "Customers", "Check-in") and "All" at the end. The red number on Chat is your unread message count.
  2. 2Tap the screen name in the top-left corner (with the ▾ arrow) to switch between items in the same group - e.g. in "Work": "Today", "Check-in". "Today" has the tabs "To do", "Route", "Bookings", "Done".
  3. 3The icons on the right of the top bar: magnifier (find a feature), notification bell, life buoy (support) and your avatar.
  4. 4If a screen has several parts, its view tabs sit right under the top bar, just like on a computer.
  5. 5When you scroll down, the top bar and the bottom tab bar hide to make room; scroll up and they come back.
Phone layout: the Work section switcher open in the top corner, bottom tab bar with Today, Route, Check-in, Chat and All
Tap "Today ▾" to switch within the group; the bottom bar keeps 4 pinned items plus "All".

Open any feature from "All" on your phone

PhoneBottom tab barAll

Steps

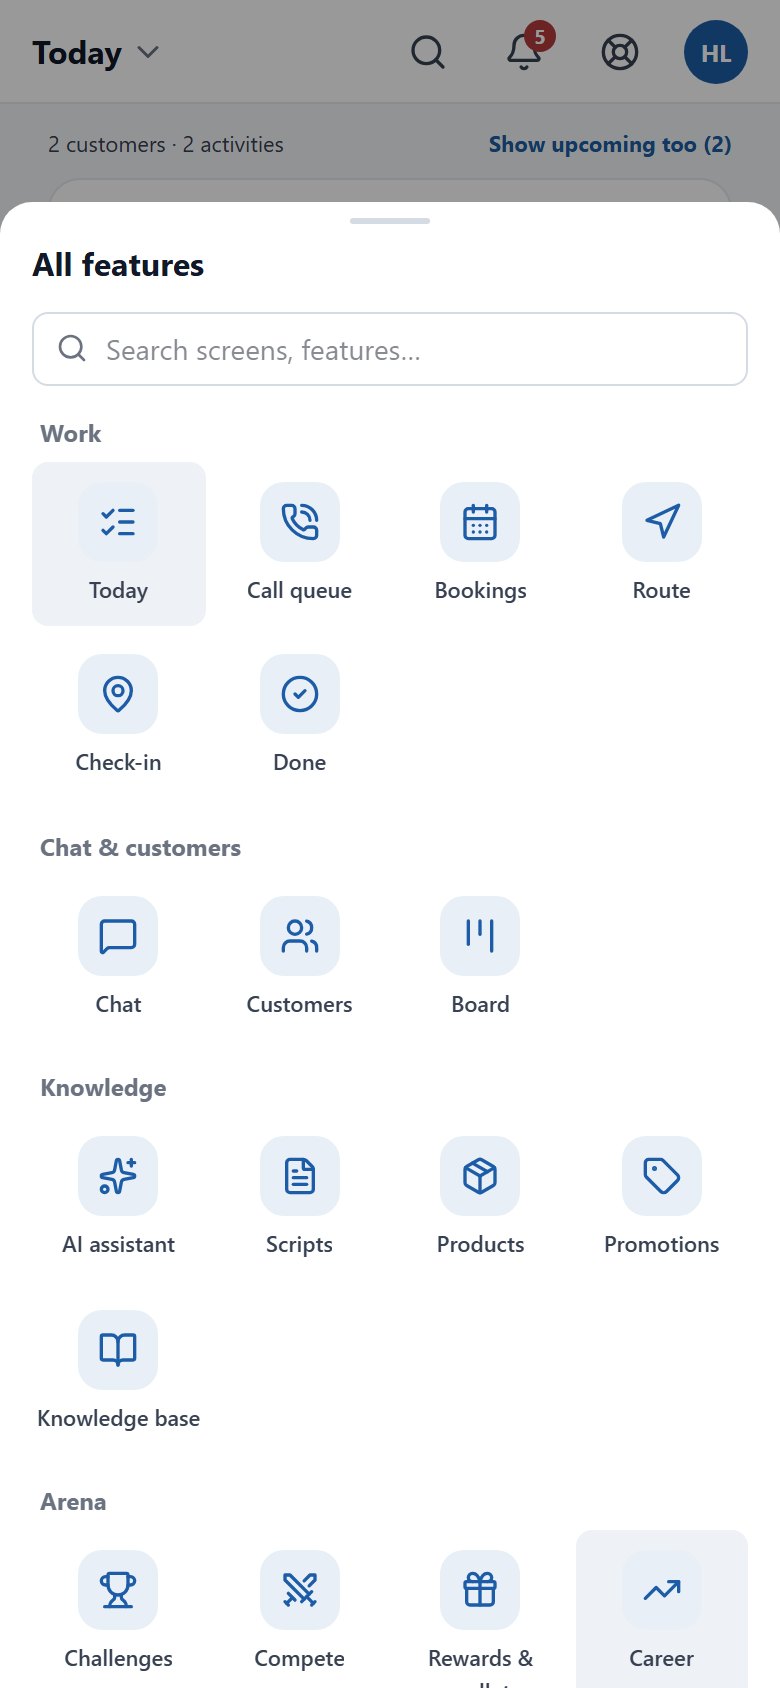
  1. 1Tap "All" at the right end of the bottom tab bar. The "All features" sheet slides up.
  2. 2Features are listed by group, each as an icon tile. Swipe up to see more groups.
  3. 3Type in the "Search screens, features…" box at the top of the sheet to filter quickly.
  4. 4Tap a tile to open it; the sheet closes by itself.
All features sheet on a phone with a search box and the Work, Chat & customers, Knowledge and Arena groups
Every feature you may use, grouped, with a search box at the top.

Choose the 4 pinned bottom tabs

PhoneAvatarPin bottom tabs

Steps

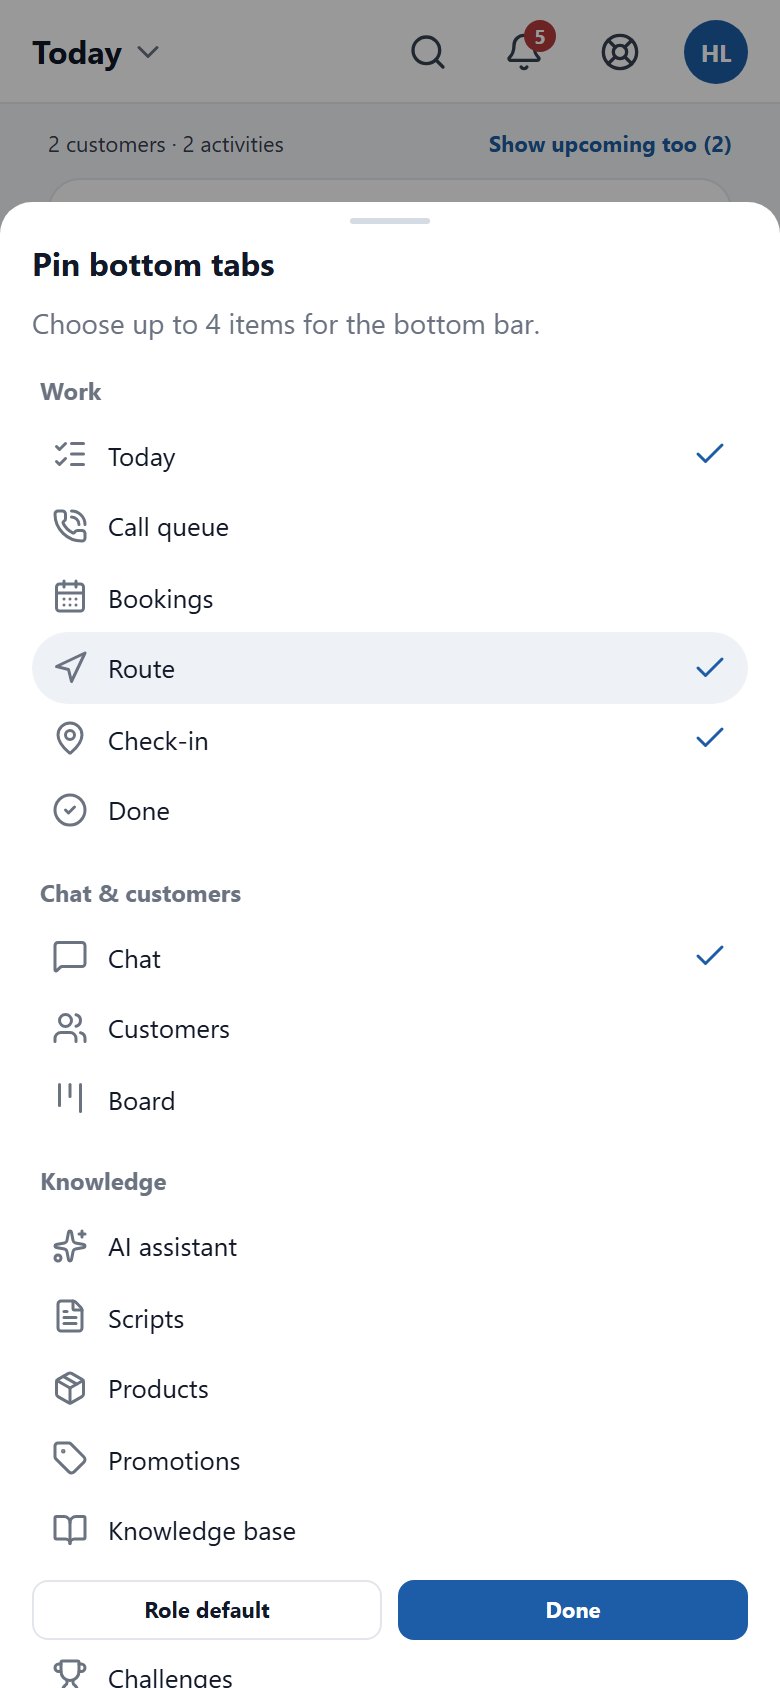
  1. 1On your phone, tap your avatar in the top-right corner and choose "Pin bottom tabs".
  2. 2In the "Pin bottom tabs" sheet, tap the items you want - selected items get a ✓. Up to 4 items; picking a 5th drops the one you picked earliest.
  3. 3Tap "Done" to save.
  4. 4To go back to the default set, open the sheet again and tap "Role default".
Pin bottom tabs sheet on a phone, Today, Route, Check-in and Chat ticked, with the Role default and Done buttons
Pick up to 4 items (✓), then tap "Done".

03 / 6 features

Daily work: call, message and log results

One screen: today's work ranked in the order to do it, one customer at a time, your bookings, route and finished work. An activity can only be logged once you pick the script you used.

Today: your work, already in order

WorkTodayTo do

Steps

  1. 1Open "Work" › "Today" (tab "To do"). The top block shows how many things to do now and "Done x/y today" with a progress bar.
  2. 2The numbered list is the order to work in: activities in progress, callbacks that are due, SLA breaches and appointments about to start come first; then deals about to close, churn risk, repurchase, new leads, high priority and overdue work.
  3. 3Each row carries reason chips taken from the data, e.g. "Callback 10:00", "Overdue 2 days", "Expected close 20/11", "Best hours: 9–11h". With the AI morning brief, rows also show a ✨ reason and follow the AI order.
  4. 4Filter with "All", "Calls", "Meetings / visits", "Messages & other". "Appointments today" at the top lists visits and meetings with a fixed time.
  5. 5Calls that cannot be made now (callback set for later, quiet hours, outside 08:00–17:00…) sit under "Cannot call right now" at the bottom, with the time they open.

Work an activity: call, message and log the result

WorkTodayActivity card

Steps

  1. 1Open the customer's activity card. The top shows the title, kind, customer name · phone and "Due".
  2. 2Click "Call" to call (the card shows "Calling... Ns"; click "End call" when you hang up to record the duration), or "SMS", or "Copy number (Zalo)". Open "Customer summary" for a quick look at the customer's context.
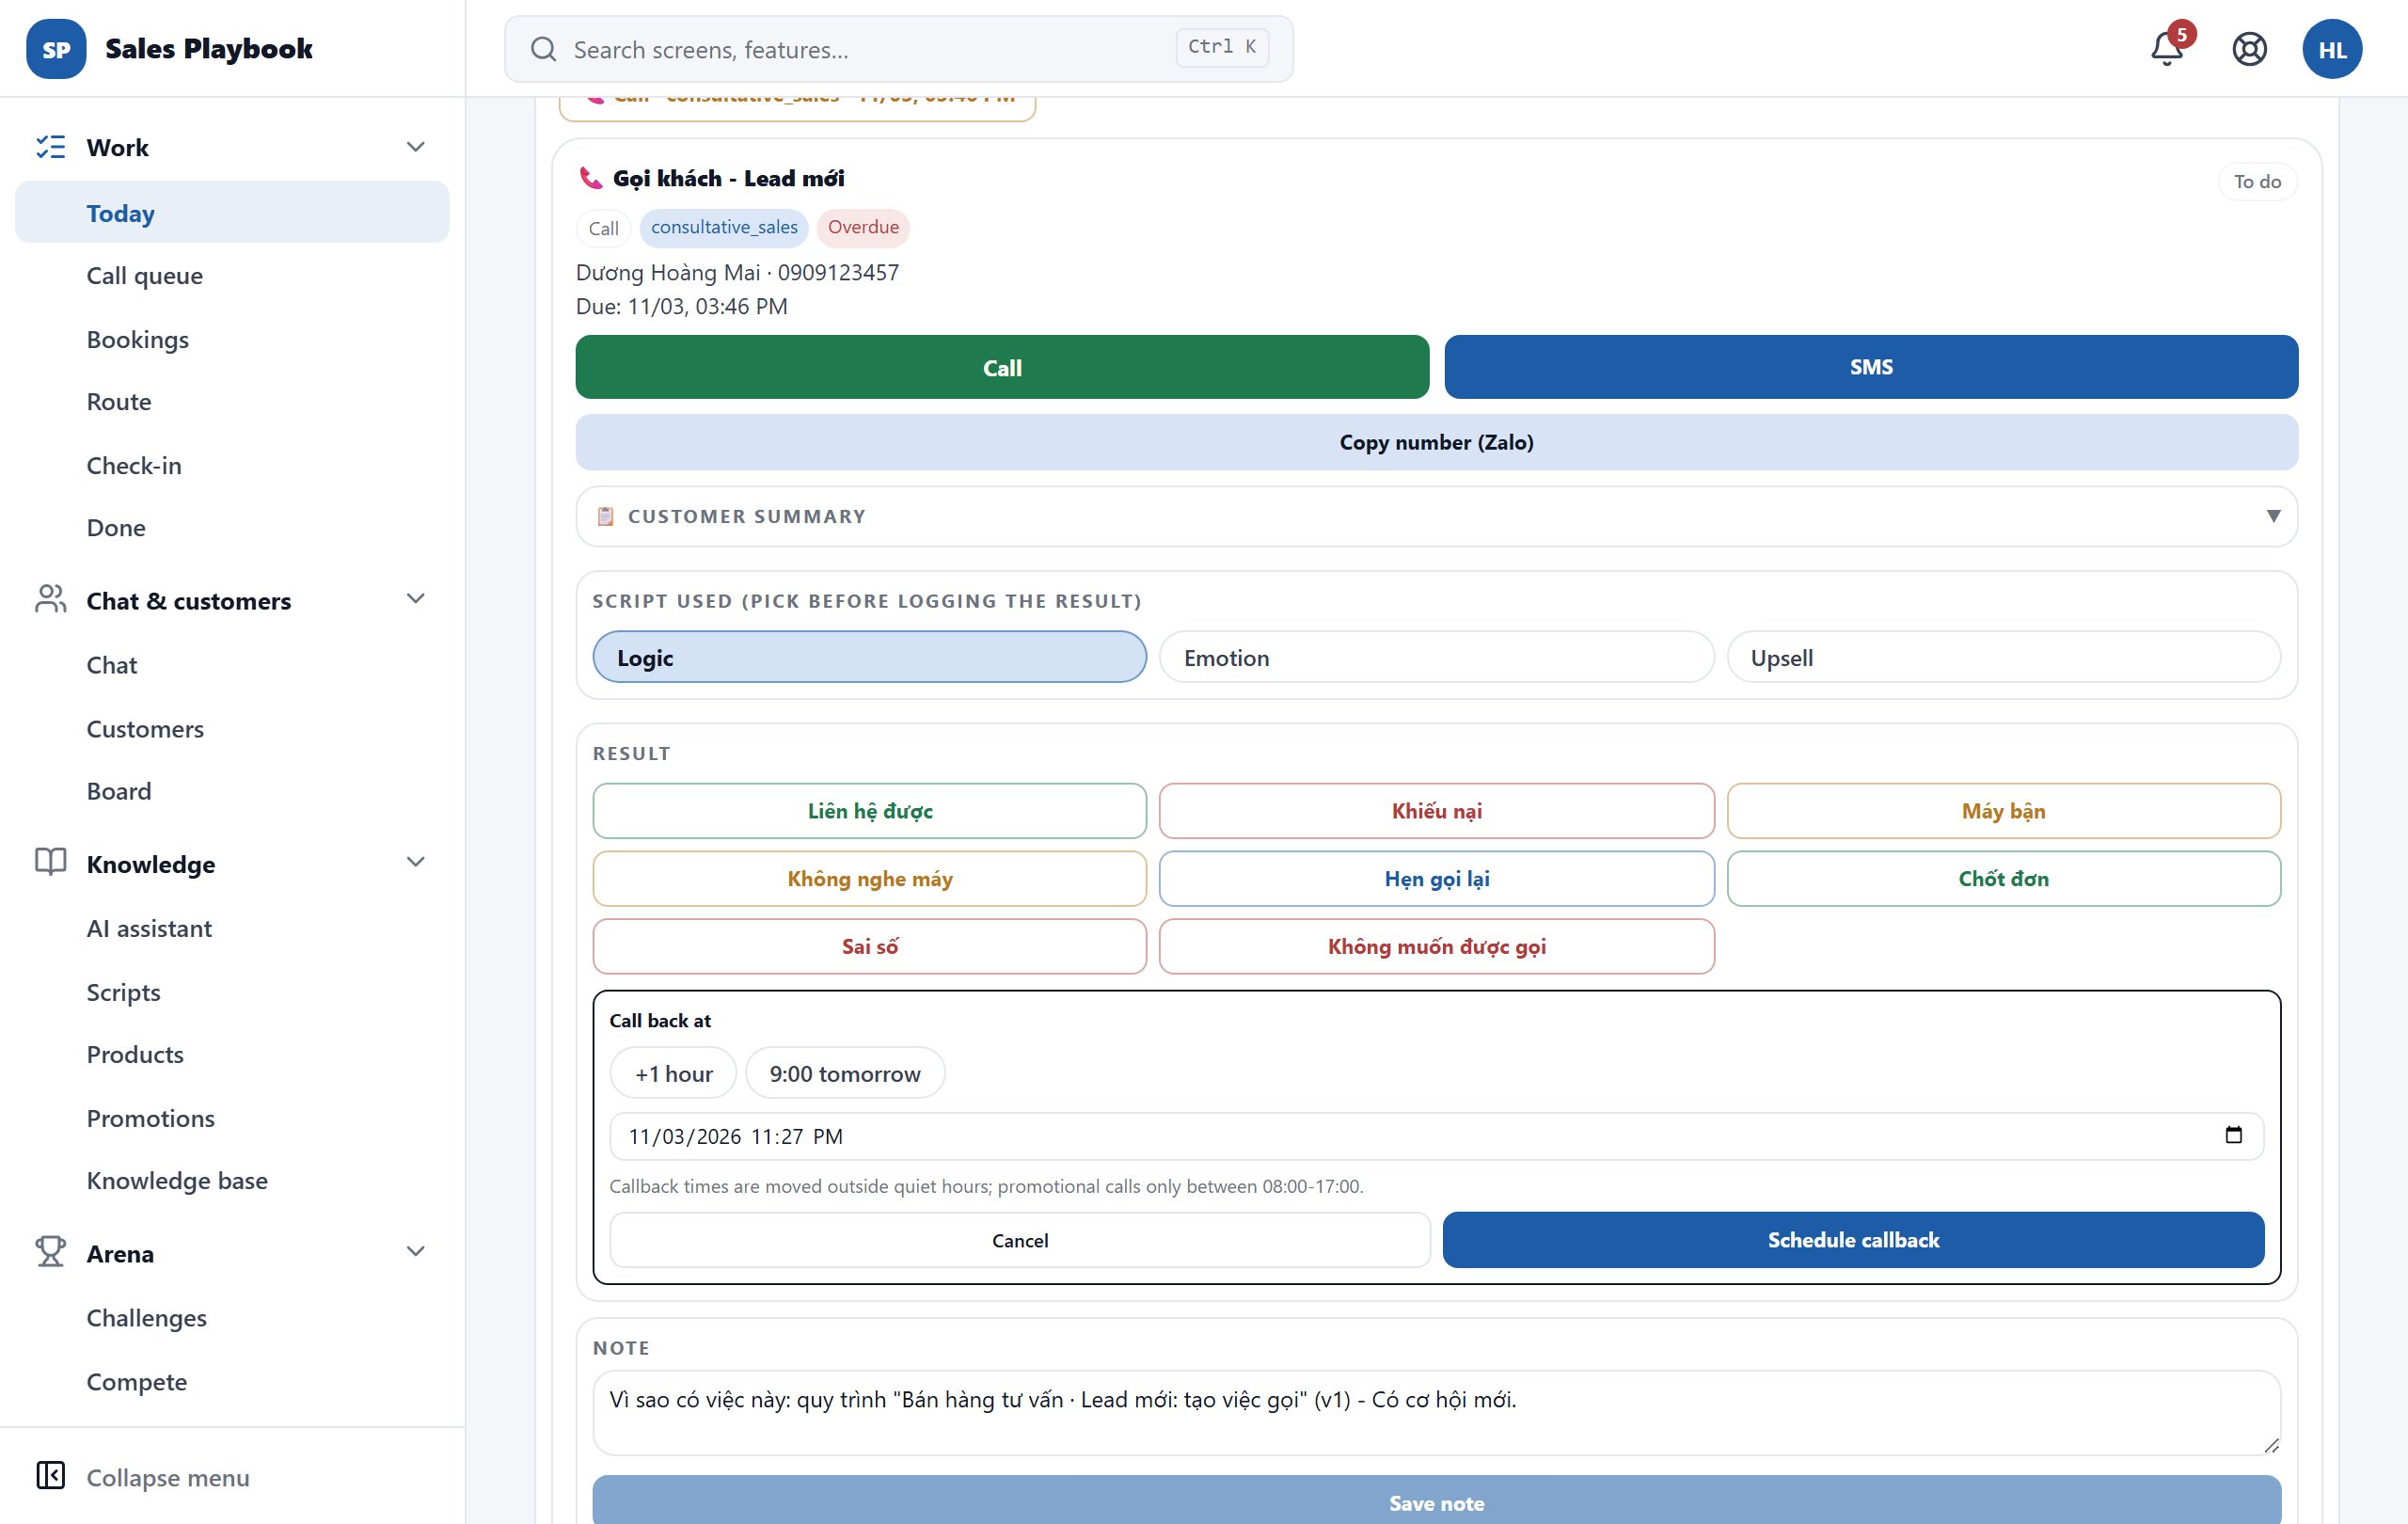
  3. 3Under "Script used (pick before logging the result)", pick "Logic", "Emotion" or "Upsell".
  4. 4Under "Result", click the call outcome. These buttons are shown in Vietnamese, e.g. "Liên hệ được" (reached), "Máy bận" (busy), "Không nghe máy" (no answer), "Chốt đơn" (order closed), "Khiếu nại" (complaint), "Sai số" (wrong number) or "Không muốn được gọi" (do not call).
  5. 5Click "Hẹn gọi lại" (call back) to open the "Call back at" box: pick "+1 hour", "9:00 tomorrow" or a date and time, then click "Schedule callback".
  6. 6To add more detail, type in "Note" and click "Save note".
  7. 7Buttons at the bottom of the card: "View customer" opens the customer record, "AI assistant" and "Chat" open that same customer; "Details · Why does this exist?" shows which flow or person created the activity.
Activity card "Gọi khách - Lead mới" with the Logic script picked and the Call back at box open
"Logic" is picked, so the "Result" buttons are unlocked; "Hẹn gọi lại" opens the callback time picker.

One at a time: "Start", and the next customer loads by itself

WorkTodayStart

Steps

  1. 1On "Today", press the green "▶ Start" button (or tap a row to start from that customer). To make calls only, choose the "Calls" filter first.
  2. 2The screen shows "Task 1 / N", a "Why now" box (reason chips, the AI ✨ reason and "Suggested opening line" when there is one - press "Copy opening line") and the customer's full activity card.
  3. 3Call and log the result on the card as usual (pick the script first, then the result) - or press "AI ghi kết quả" and say in 10 seconds what happened.
  4. 4After the result the screen says "Result saved - loading the next task…" and opens the next customer. "Skip" / "Later" moves the current one to the end; "✕ Exit" goes back to the list.
  5. 5For a visit, "Visit steps" guide you: "Open map" → "Check-in" on site → log the result.

Shift wrap and the report for your manager

WorkTodayShift wrap

Steps

  1. 1Scroll to the bottom of "Today" (from 16:30 or when the queue is empty it opens by itself).
  2. 2See "Done today", "Callbacks tomorrow", "Still open today" and the count per result.
  3. 3Press "Copy report (Zalo)" and paste it into the Zalo group with your manager; "Open My report" shows your KPIs.

Follow up and update your bookings

WorkTodayBookings

Steps

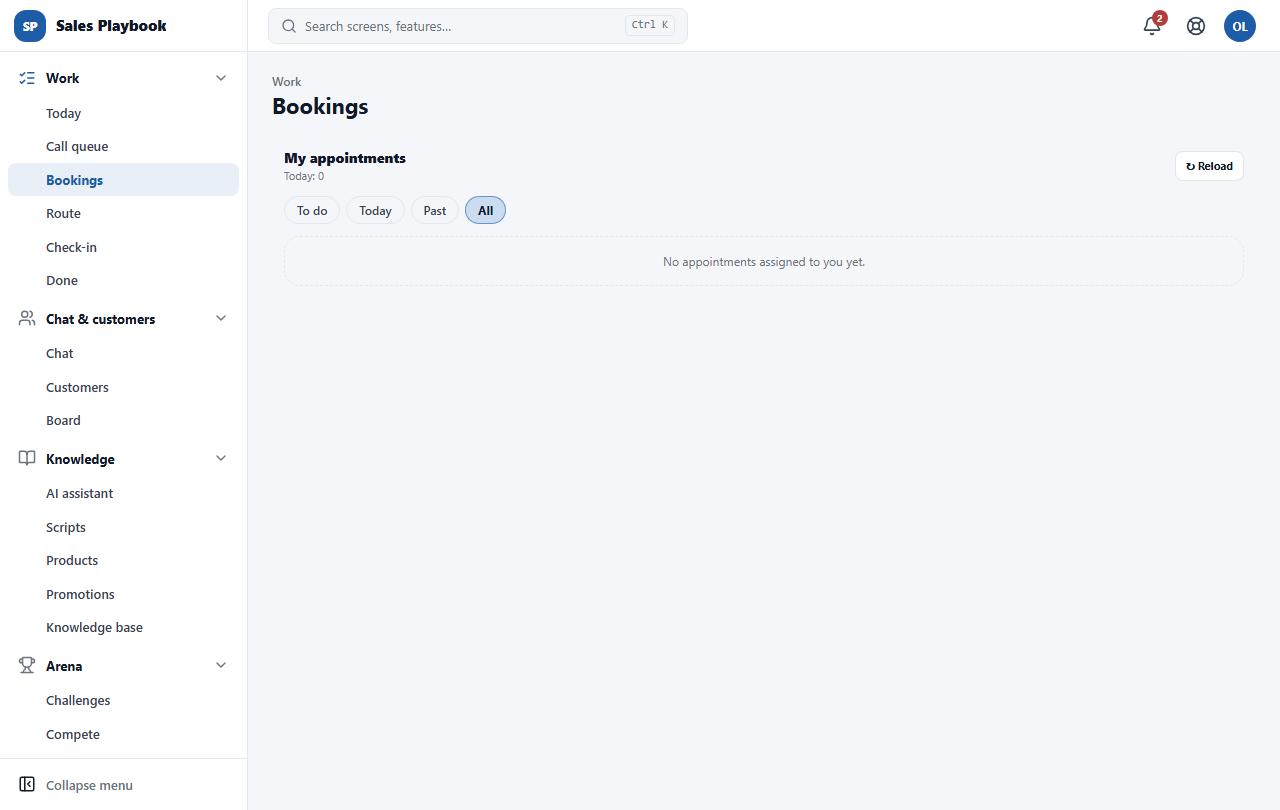
  1. 1Open "Work" › "Today" › tab "Bookings". The "My appointments" header shows how many are booked for today.
  2. 2Filter with "To do", "Today", "Past" or "All"; click "↻ Reload" to refresh.
  3. 3Click an appointment to open "Appointment details": use "Call", "Message" or "Profile" to reach the customer.
  4. 4Before the appointment, click "Confirm appointment". To change the time, click "Reschedule" and pick a free time, or "Copy reschedule link" so the customer can pick one.
  5. 5After the appointment, click "Completed" or "No-show". To cancel, click "Cancel" and enter a reason (the reason is sent to the customer).
Work › Bookings with the My appointments block and the To do, Today, Past and All filters
The filters sit just below "My appointments"; click an appointment to confirm, reschedule or record the result.

Look back at finished work

WorkTodayDone

Steps

  1. 1Open "Work" › "Today" › tab "Done" (or tap the "Done x/y today" line).
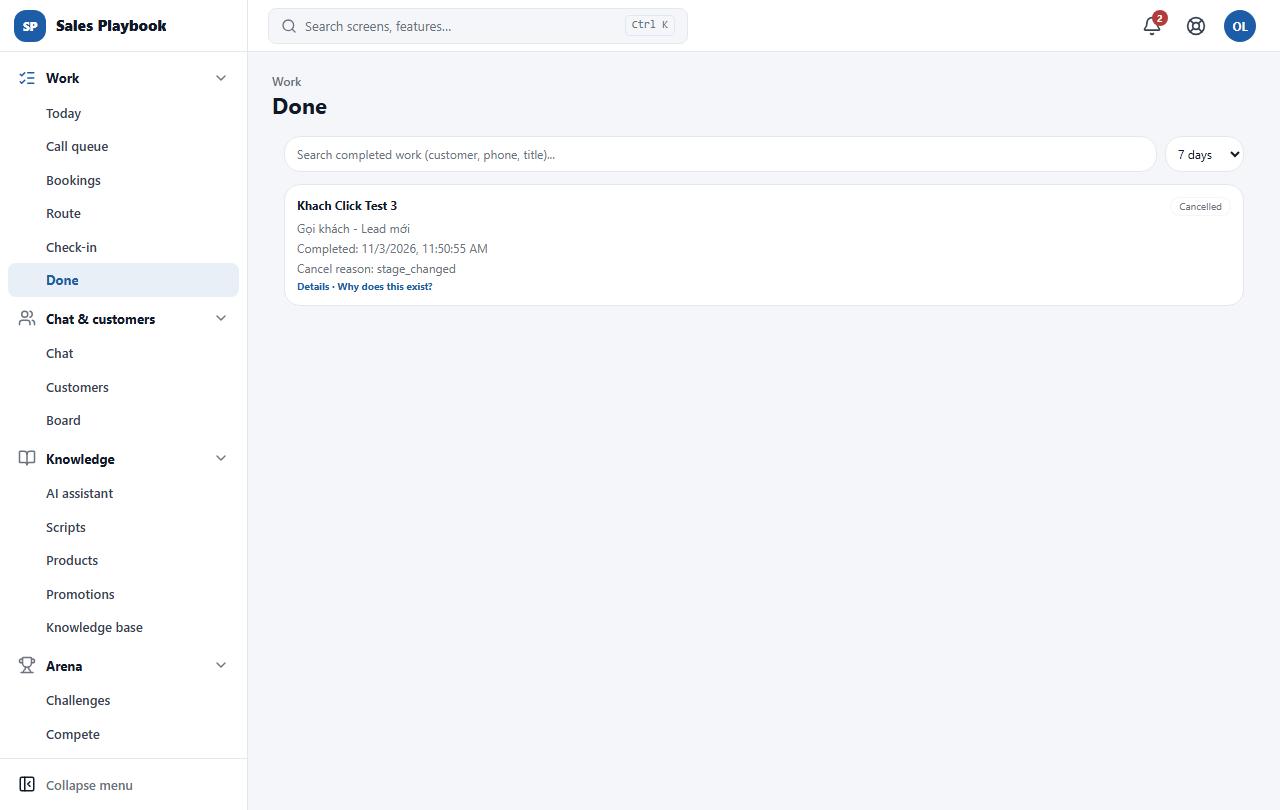
  2. 2Pick the period in the box on the right: "2 days", "7 days" or "30 days".
  3. 3Type a customer name, phone number or title in "Search completed work (customer, phone, title)..." to filter.
  4. 4Each card shows the status, result, completion time and cancel reason (if any); click "Details · Why does this exist?" for the full record.
Work › Done with the search box, the 7 days selector and one cancelled activity
Pick "7 days" on the right and search by name, phone number or title.

04 / 9 features

Field routes and on-site check-ins

For field reps: see the day's visit route, check in with GPS, photo, fingerprint/Face ID and a voice report, keep working offline and submit field expenses.

See today's visit route

WorkRoute

Steps

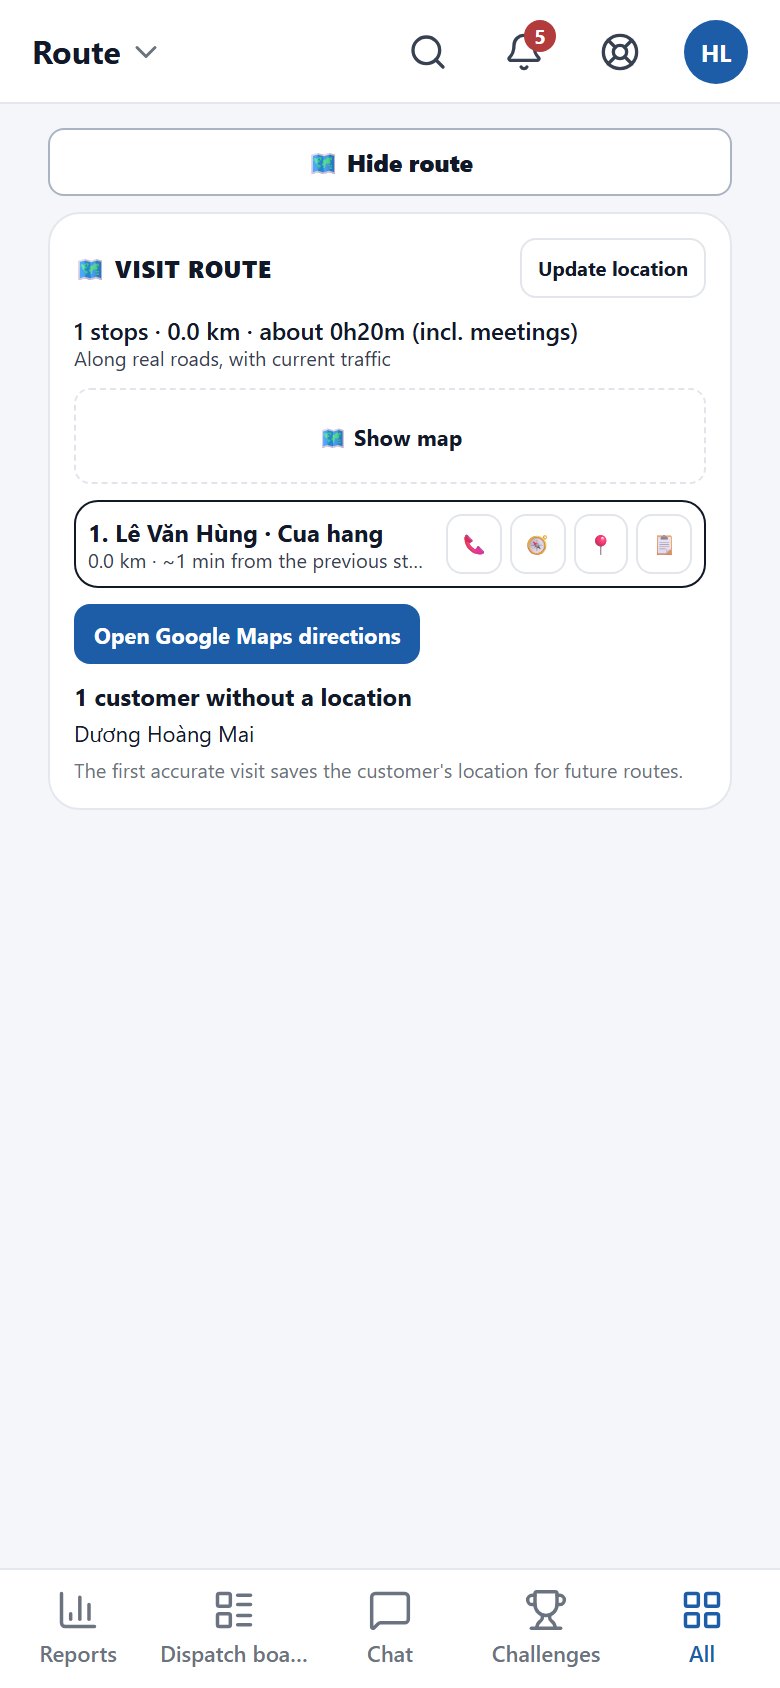
  1. 1Open "Work" › "Route". The route opens by default; if it is collapsed, click "Today's route (N tasks)".
  2. 2Allow the app to use your location. The "Visit route" block numbers the stops and shows the total km and estimated time (meetings included); click "Update location" if you have moved.
  3. 3Click "Show map" to see it on a map.
  4. 4At each stop: 📞 to call ahead, 🧭 for directions, 📍 to check in when you arrive, 📋 for the customer summary. Tap "Directions to stop 1" to start navigating in your phone's map app.
  5. 5A stop marked "estimated from the address" was located from the customer's address — the first check-in there confirms the real position.
  6. 6Customers with no location are listed under "N customers without a location"; the first visit with good GPS saves their location for future routes.
Route screen on a phone: a 1-stop route, Show map, Directions to stop 1 and 1 customer without a location
The 📞 🧭 📍 📋 buttons sit to the right of each stop; customers without a location are listed at the bottom.

Check in at the customer from a visit activity

WorkTodayActivity cardCheck in at customer

Steps

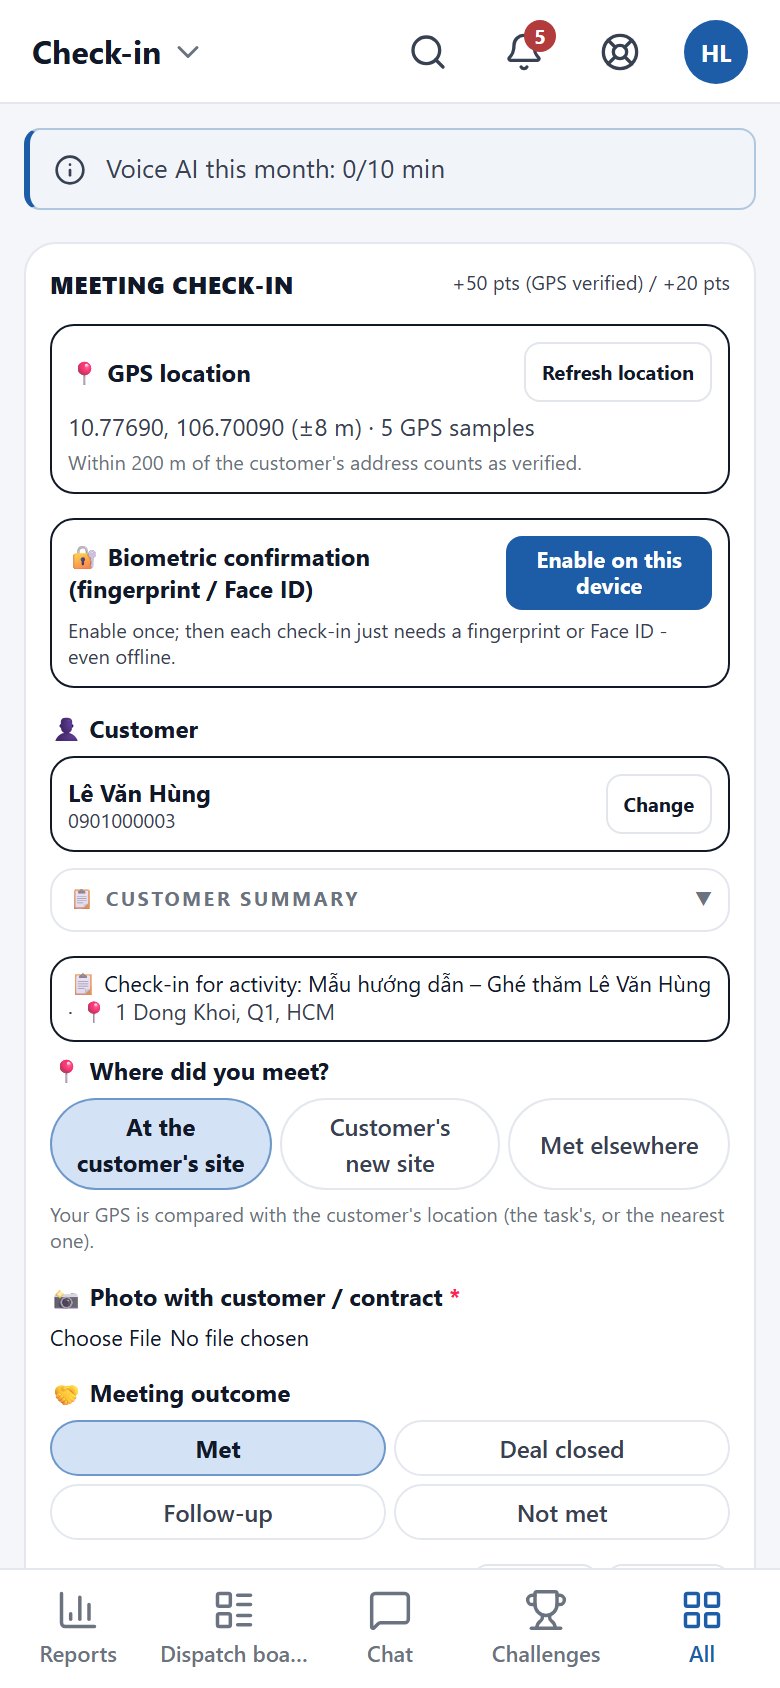
  1. 1On a visit activity card (or the 📍 button at a stop on "Route"), click "📍 Check in at customer".
  2. 2The "Check-in" screen opens with the customer filled in, a "Check-in for activity: …" line and the address to visit.
  3. 3Under "Where did you meet?", keep "At the customer's site" (the default), or choose "Customer's new site" / "Met elsewhere" if that is what happened.
  4. 4Take the "Photo with customer / contract", pick the "Meeting outcome" and speak or type the "Short report".
  5. 5Click "Check in & earn points" and confirm with fingerprint/Face ID if asked.
Check-in screen on a phone, pre-filled with customer Le Van E3 and the visit activity, with the Where did you meet? options
The customer and the "Check-in for activity: …" line are filled in; "At the customer's site" is selected by default.

Check in a meeting yourself and read the verification result

WorkCheck-in

Steps

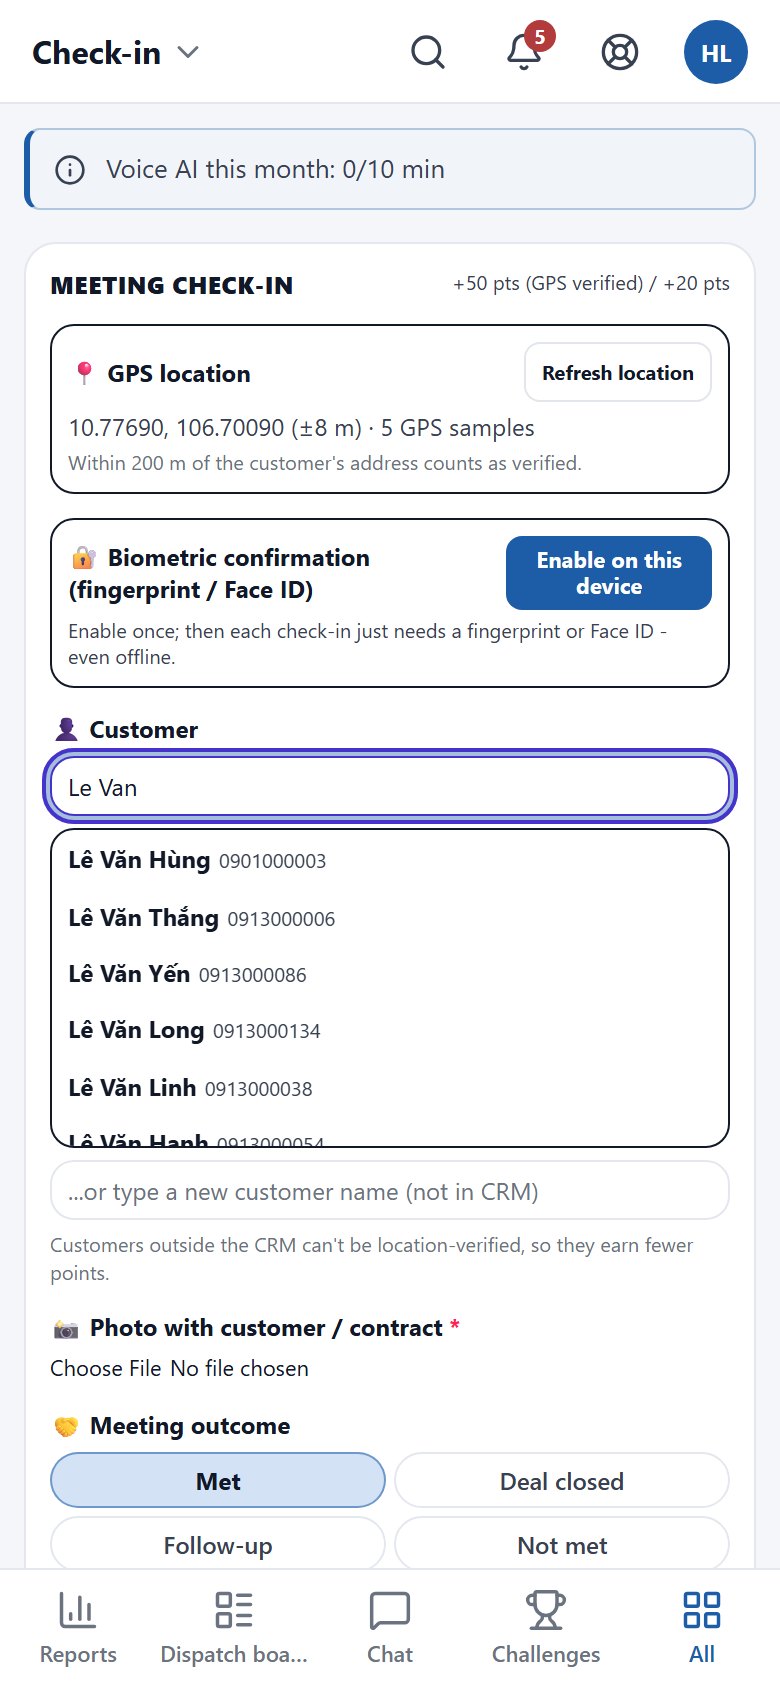
  1. 1Open "Work" › "Check-in". The app reads your GPS position; if you see "weak signal - move somewhere open", move to an open spot and click "Refresh location".
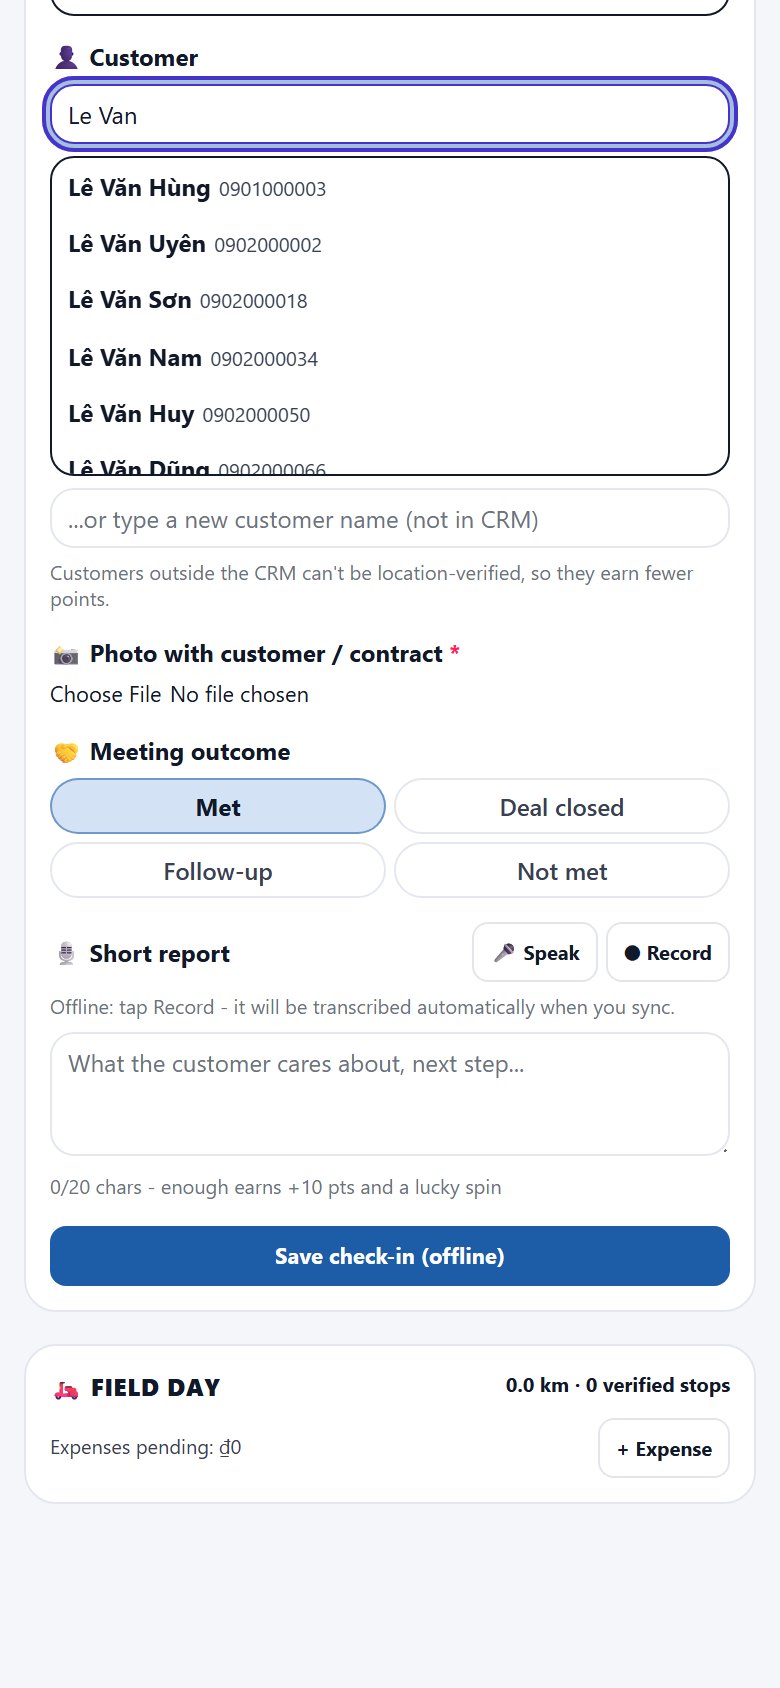
  2. 2Type in "Search CRM customers (name / phone)..." and pick the customer. For someone not in the system yet, type the name in "...or type a new customer name (not in CRM)".
  3. 3Take the "Photo with customer / contract" on the spot (required).
  4. 4Pick the "Meeting outcome": "Met", "Deal closed", "Follow-up" or "Not met".
  5. 5Type or speak the "Short report"; the line under the box shows how many characters earn the report bonus and a lucky spin.
  6. 6Click "Check in & earn points".
Check-in screen on a phone: GPS location, biometric confirmation, the customer search with "Le Van" typed and the Le Van E3 suggestion
GPS has 5 samples (±8 m); type the customer name and pick from the suggestions.

Turn on fingerprint / Face ID for check-ins

WorkCheck-inBiometric confirmation (fingerprint / Face ID)

Steps

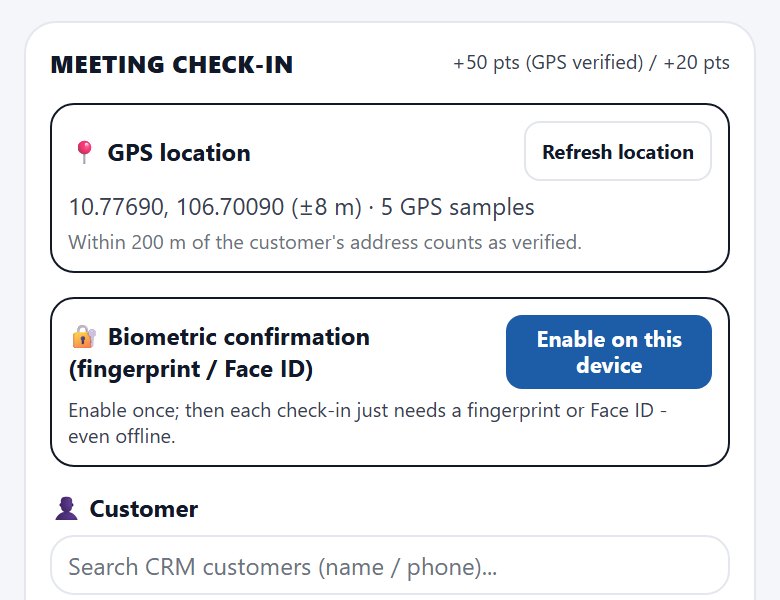
  1. 1Go online, open "Work" › "Check-in" and find the "Biometric confirmation (fingerprint / Face ID)" block.
  2. 2Click "Enable on this device" and scan your fingerprint or Face ID when the phone asks.
  3. 3Once you see "Enabled on this device", every later check-in only needs a fingerprint or Face ID — even offline.
The Biometric confirmation (fingerprint / Face ID) block with the Enable on this device button
Click "Enable on this device" once while online.

Report on a meeting by voice

WorkCheck-inShort report

Steps

  1. 1In "Short report", click "🎤 Speak" and talk normally; online, the text appears as you speak. Click "■ Stop" when done.
  2. 2To be able to speak offline too, click "Download offline voice" once (only shown on browsers that support it).
  3. 3If you are offline and the device has no offline voice, click "⏺ Record", speak, then click "■ Stop".
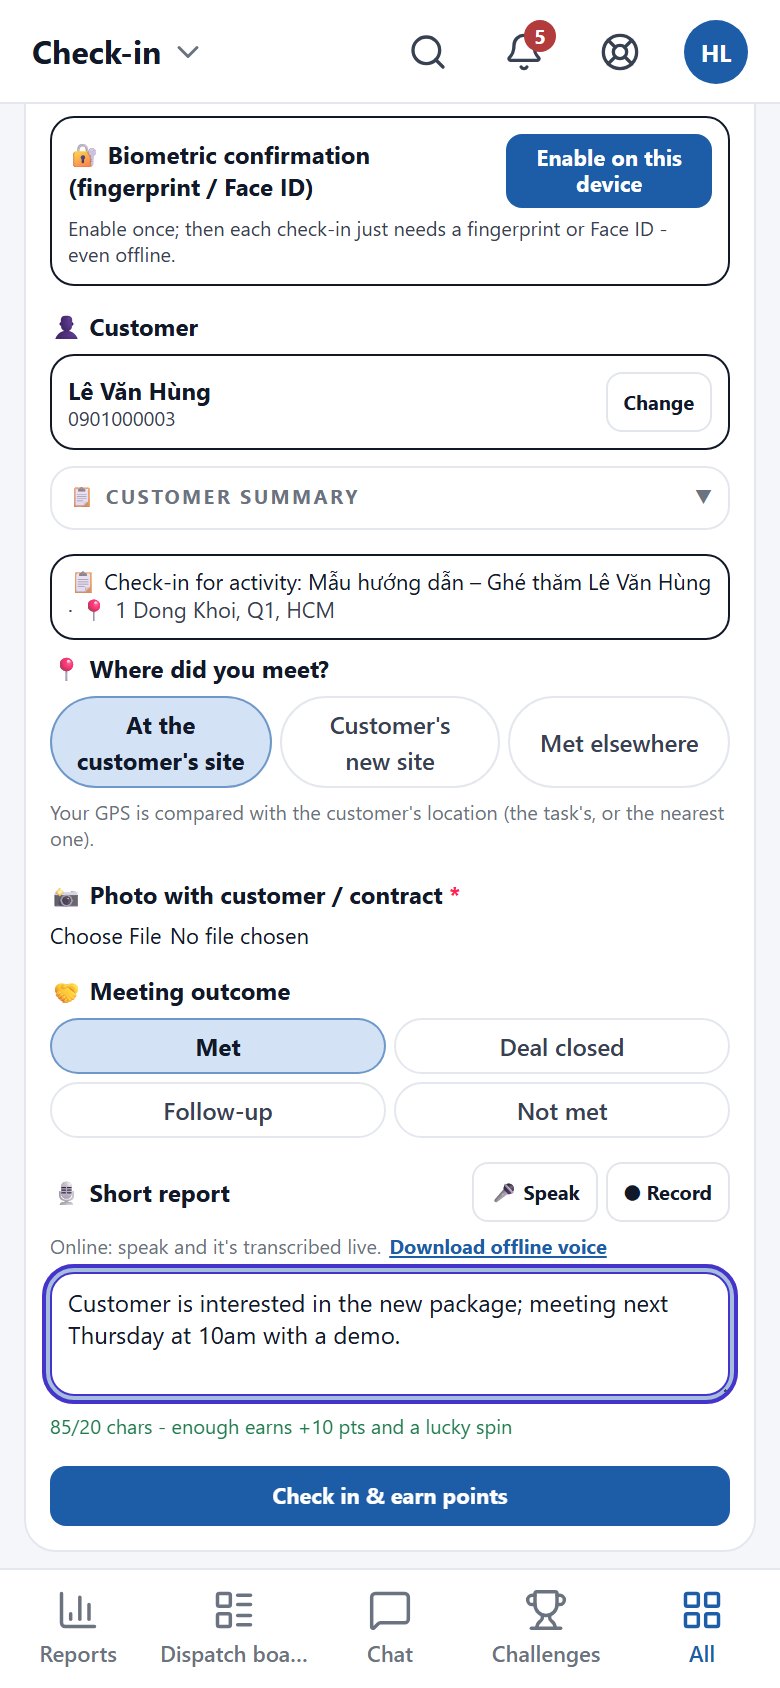
  4. 4Read the text back and fix it if needed; the "N/20 chars" line turns green when it is long enough for the report bonus. Then submit the check-in as usual.
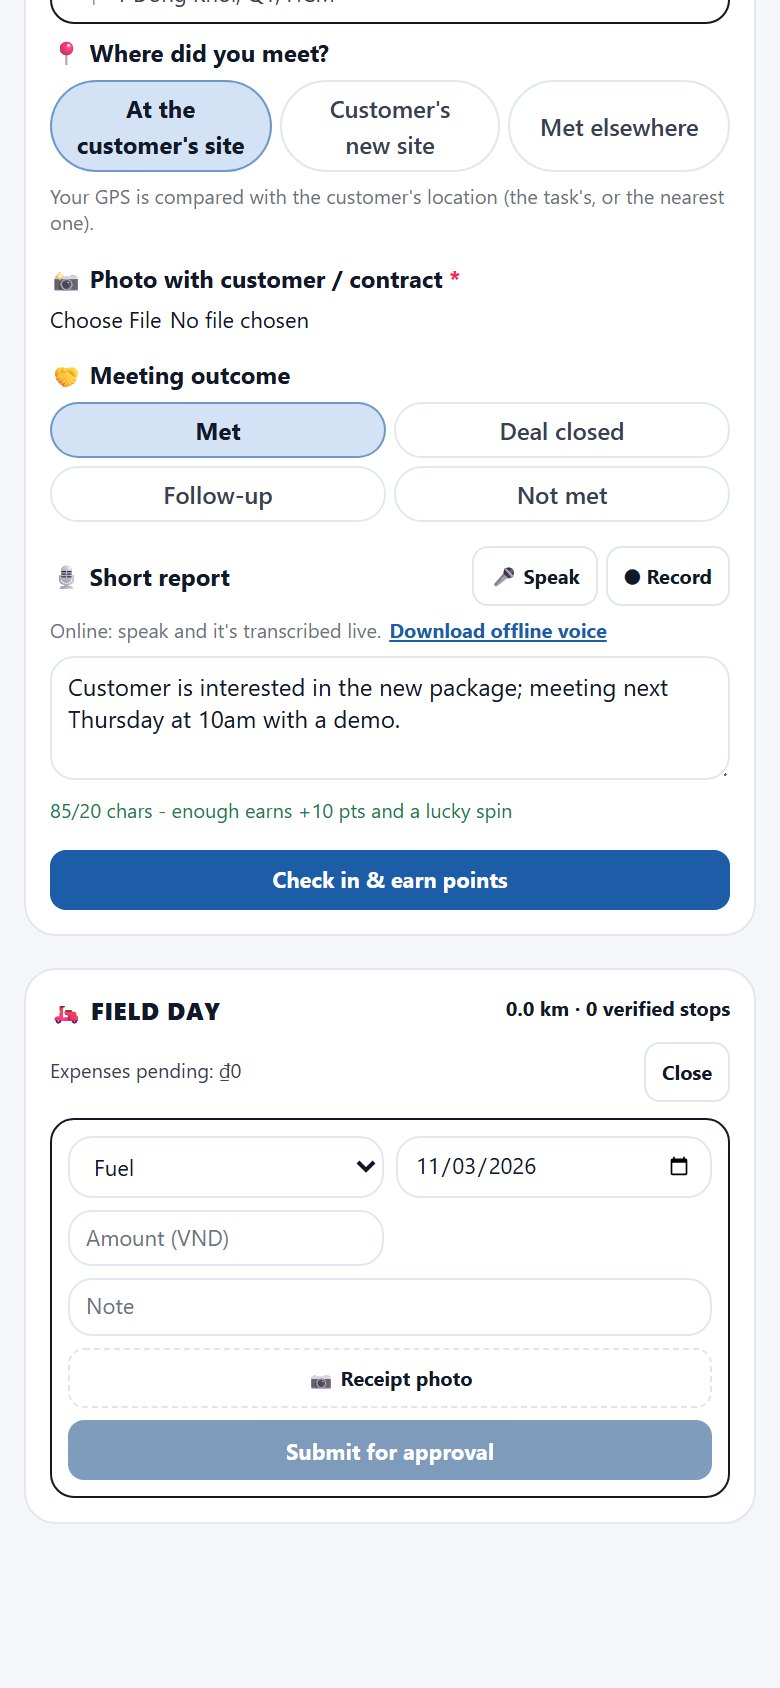
The Short report box filled in, with the Speak and Record buttons and a green 85/20 chars line
"🎤 Speak" and "⏺ Record" are at the top right; the green line confirms the report earns +10 pts.

Propose a new customer location

WorkCheck-inWhere did you meet?

Steps

  1. 1Standing at the customer's new location, open "Check-in" and pick the customer.
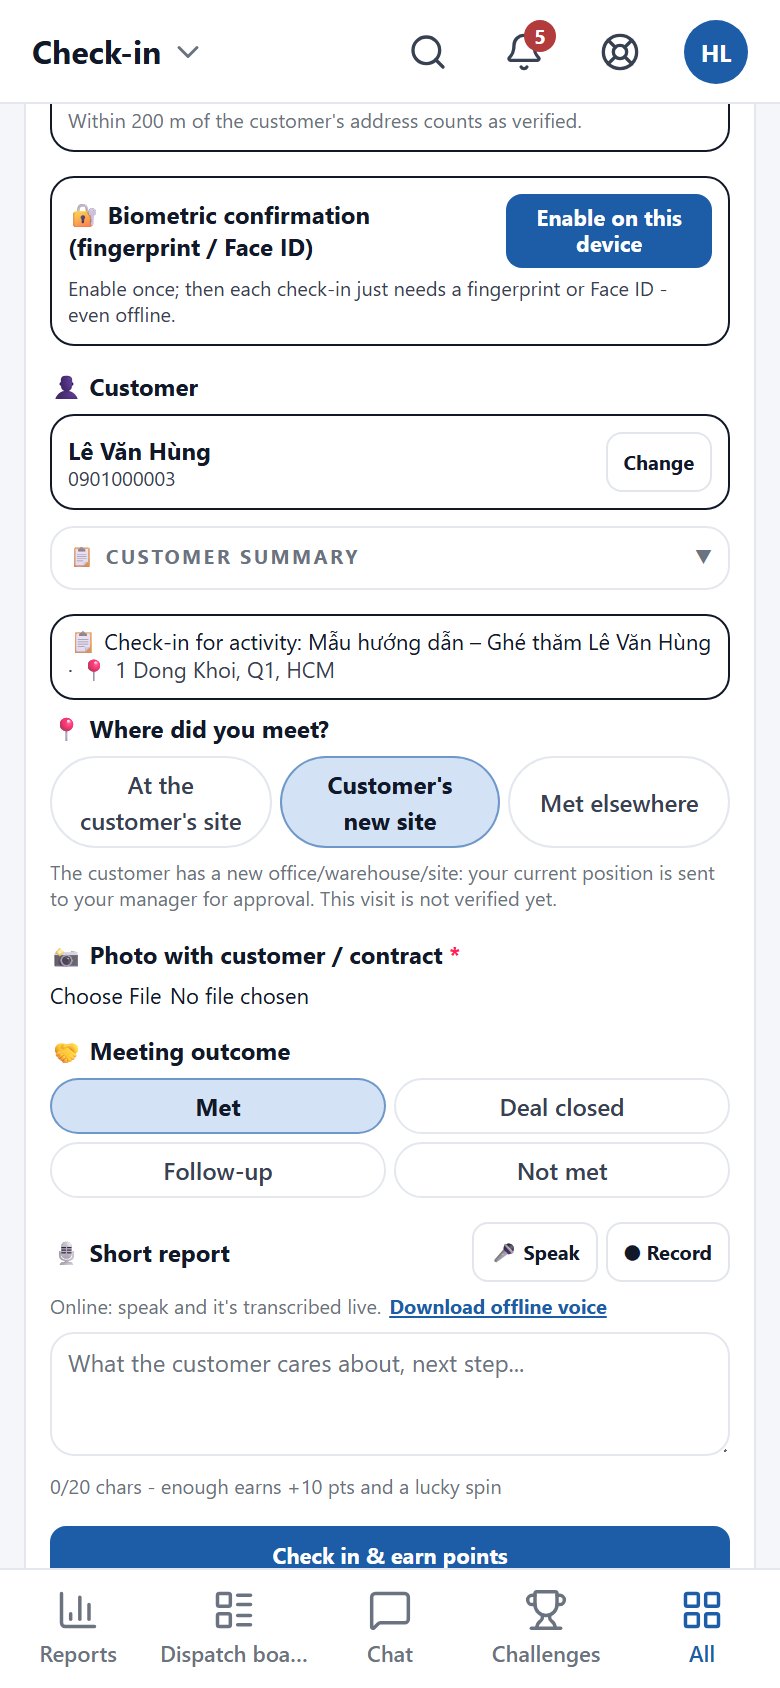
  2. 2Under "Where did you meet?", choose "Customer's new site".
  3. 3Wait for the GPS to settle, take the photo and finish the check-in as usual.
Where did you meet? with Customer's new site selected and the line explaining it is sent for manager approval
With "Customer's new site" selected, the small text below says the position goes to your manager for approval.

Record a deal closed during the meeting

WorkCheck-inMeeting outcomeDeal closed

Steps

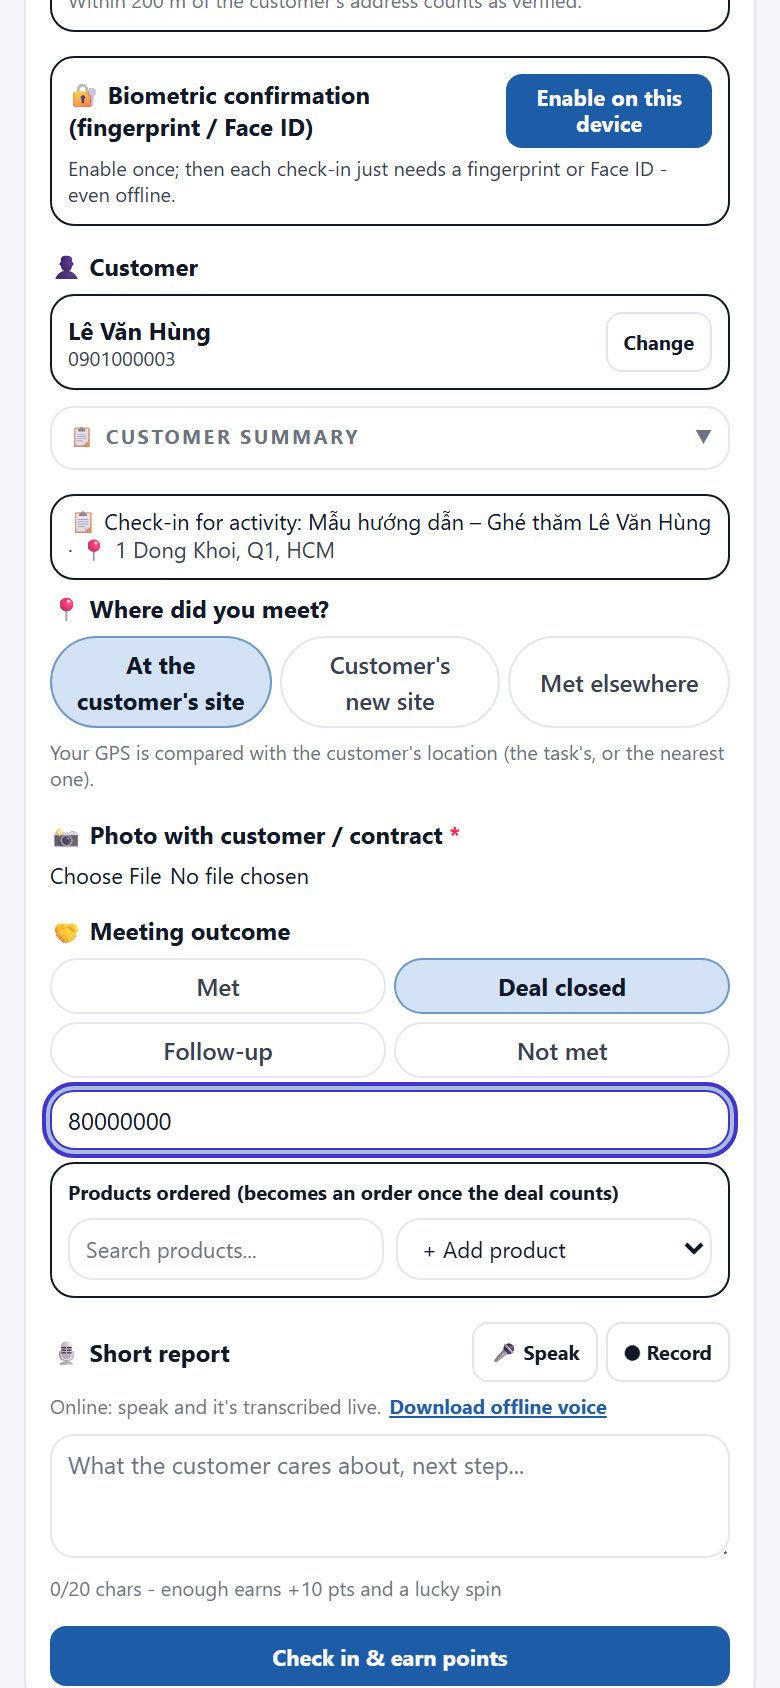
  1. 1Check in as usual and choose "Deal closed" under "Meeting outcome".
  2. 2Enter the "Contract value (VND)" (required).
  3. 3In the "Products ordered (becomes an order once the deal counts)" block, search for and add the products the customer ordered, if any.
  4. 4Take a photo of the contract / paperwork, write the short report and click "Check in & earn points".
Meeting outcome set to Deal closed, value 80000000 and the Products ordered block
After choosing "Deal closed", enter the value and add the products ordered.

Check in offline and follow the sync queue

WorkCheck-inSync queue

Steps

  1. 1Check in as usual; offline, the submit button becomes "Save check-in (offline)" and the report section says "Offline: tap Record…".
  2. 2The top of the screen shows "Offline · N waiting to sync" while check-ins are unsent.
  3. 3When you are back online the app sends them automatically. To send now, open the "Sync queue (N)" block and click "Sync now".
  4. 4Follow each row's status: "Pending", "Sending", "Synced" or "Failed".
Check-in screen while offline with the Save check-in (offline) button and the hint to tap Record
Offline, the submit button becomes "Save check-in (offline)".

Track your field day and submit expenses

WorkCheck-inField day

Steps

  1. 1Scroll to the bottom of "Check-in" to the "🛵 Field day" block: the top right shows the day's km and verified stops, with "Expenses pending" below.
  2. 2Click "+ Expense".
  3. 3Pick the expense type (Fuel, Meals, Mileage allowance (km), Parking, Phone, Tolls, Other) and the date.
  4. 4Enter "Amount (VND)" and "Note"; for "Mileage allowance (km)", the km and amount are calculated from the day's verified check-ins (you can still change them with a note).
  5. 5Click "📷 Receipt photo" to photograph the receipt, then click "Submit for approval".
Field day block with the expense form: type Fuel, date, amount, note, receipt photo and Submit for approval
Click "+ Expense" to open the form; photograph the receipt, then click "Submit for approval".

05 / 4 features

Chat with customers

One shared inbox for every channel (Zalo, Shopee, Facebook…): pick a customer, open a conversation, reply, look up scripts, and let AI read the customer's mood and suggest the next action.

Pick a customer, open a conversation and reply

Chat & customersChat

Steps

  1. 1Open "Chat". Pick a customer in the "Select a customer..." box (the list shows name, phone number and channels). If you can see the whole inbox, type in "Search customers by name, phone or email..." to filter first.
  2. 2The "Conversations" section lists the customer's conversations. Filter with "All", "Open", "Completed", "Archived", or click "Search" to search by content; click a conversation to open it.
  3. 3To start a new conversation, click "New". If the customer has several channel accounts, you are asked which one to message on.
  4. 4The top of the conversation can show warning badges such as "⏰ Customer waiting … min - SLA breached" (the customer has waited past the reply deadline) and the satisfaction score the customer gave (e.g. "CSAT 5/5"). "Handover summary" summarises the conversation so a colleague can take over.
  5. 5Type in "Type a message... (Type / to insert a script)" and click "Send". Typing / in the box lets you insert an approved script quickly.
  6. 6Need a price, policy or voucher while replying? Click "🔍 Look up", search questions, knowledge, products, vouchers or scripts, then click "Insert into reply".
  7. 7Use "Search messages" at the top of the conversation to find an older message. Click "← Conversations" to go back to the list.
  8. 8When you are done, click "Complete conversation". A completed conversation can be archived with "Archive conversation" to tidy the list.
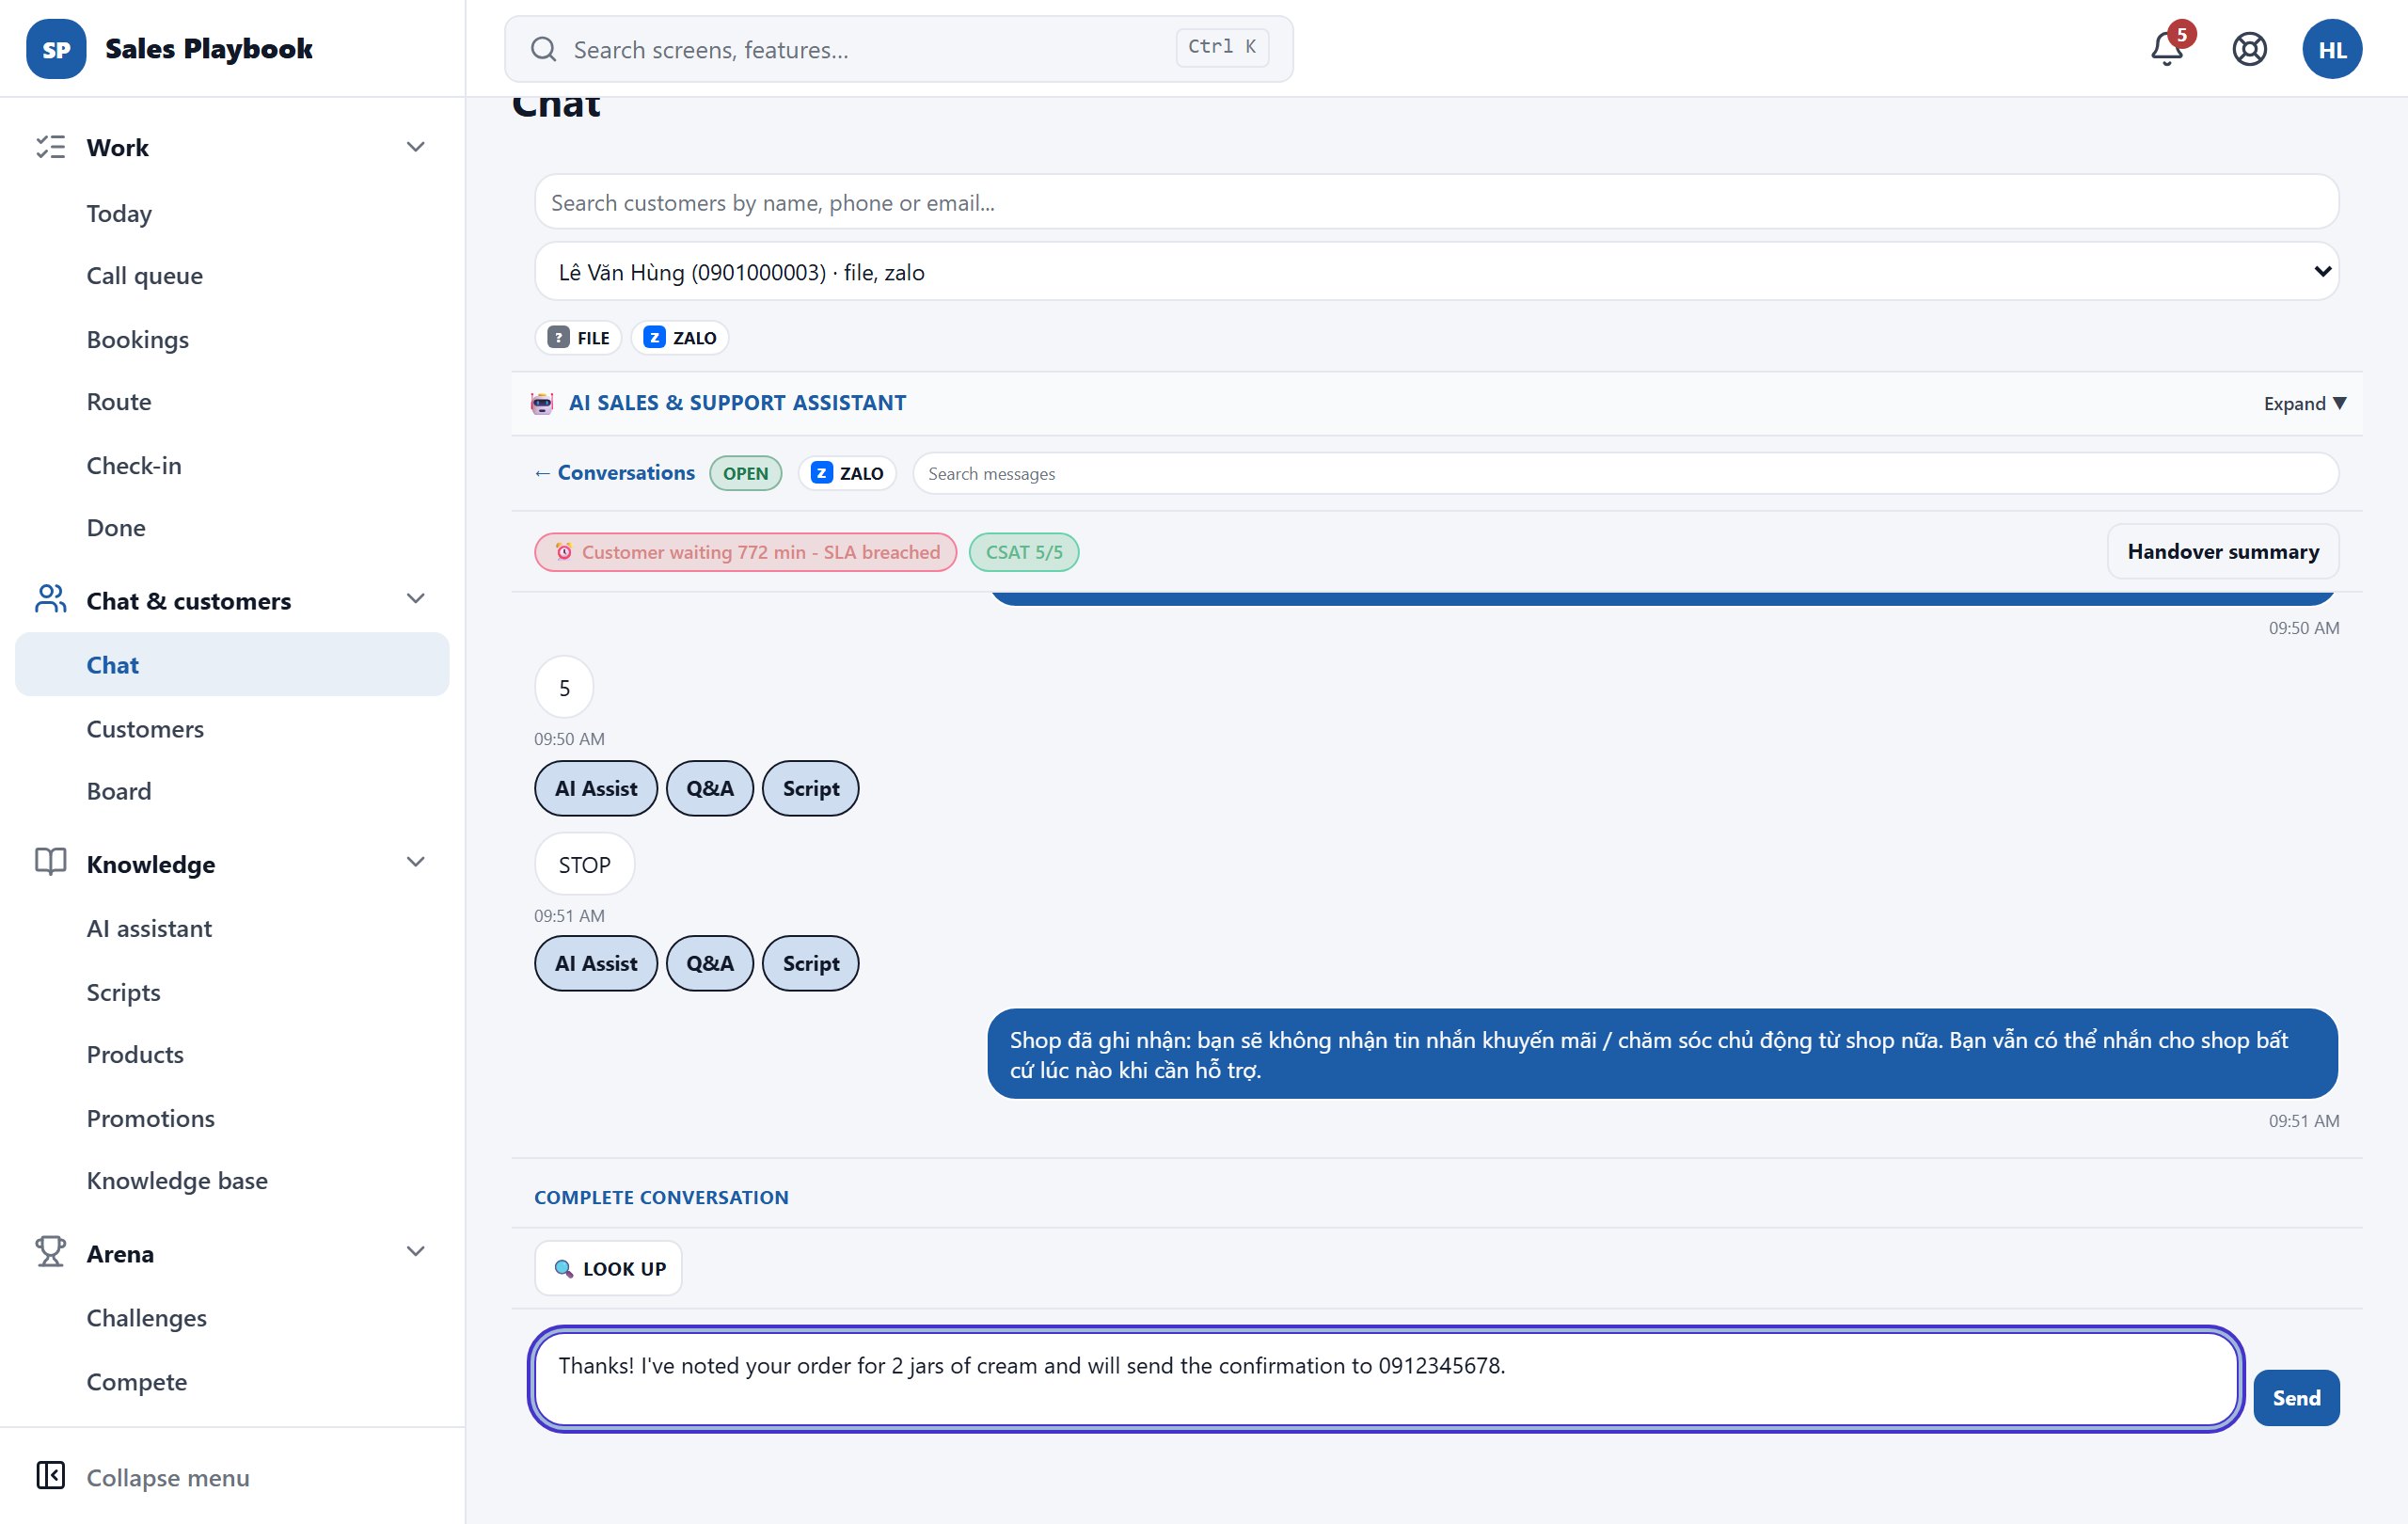
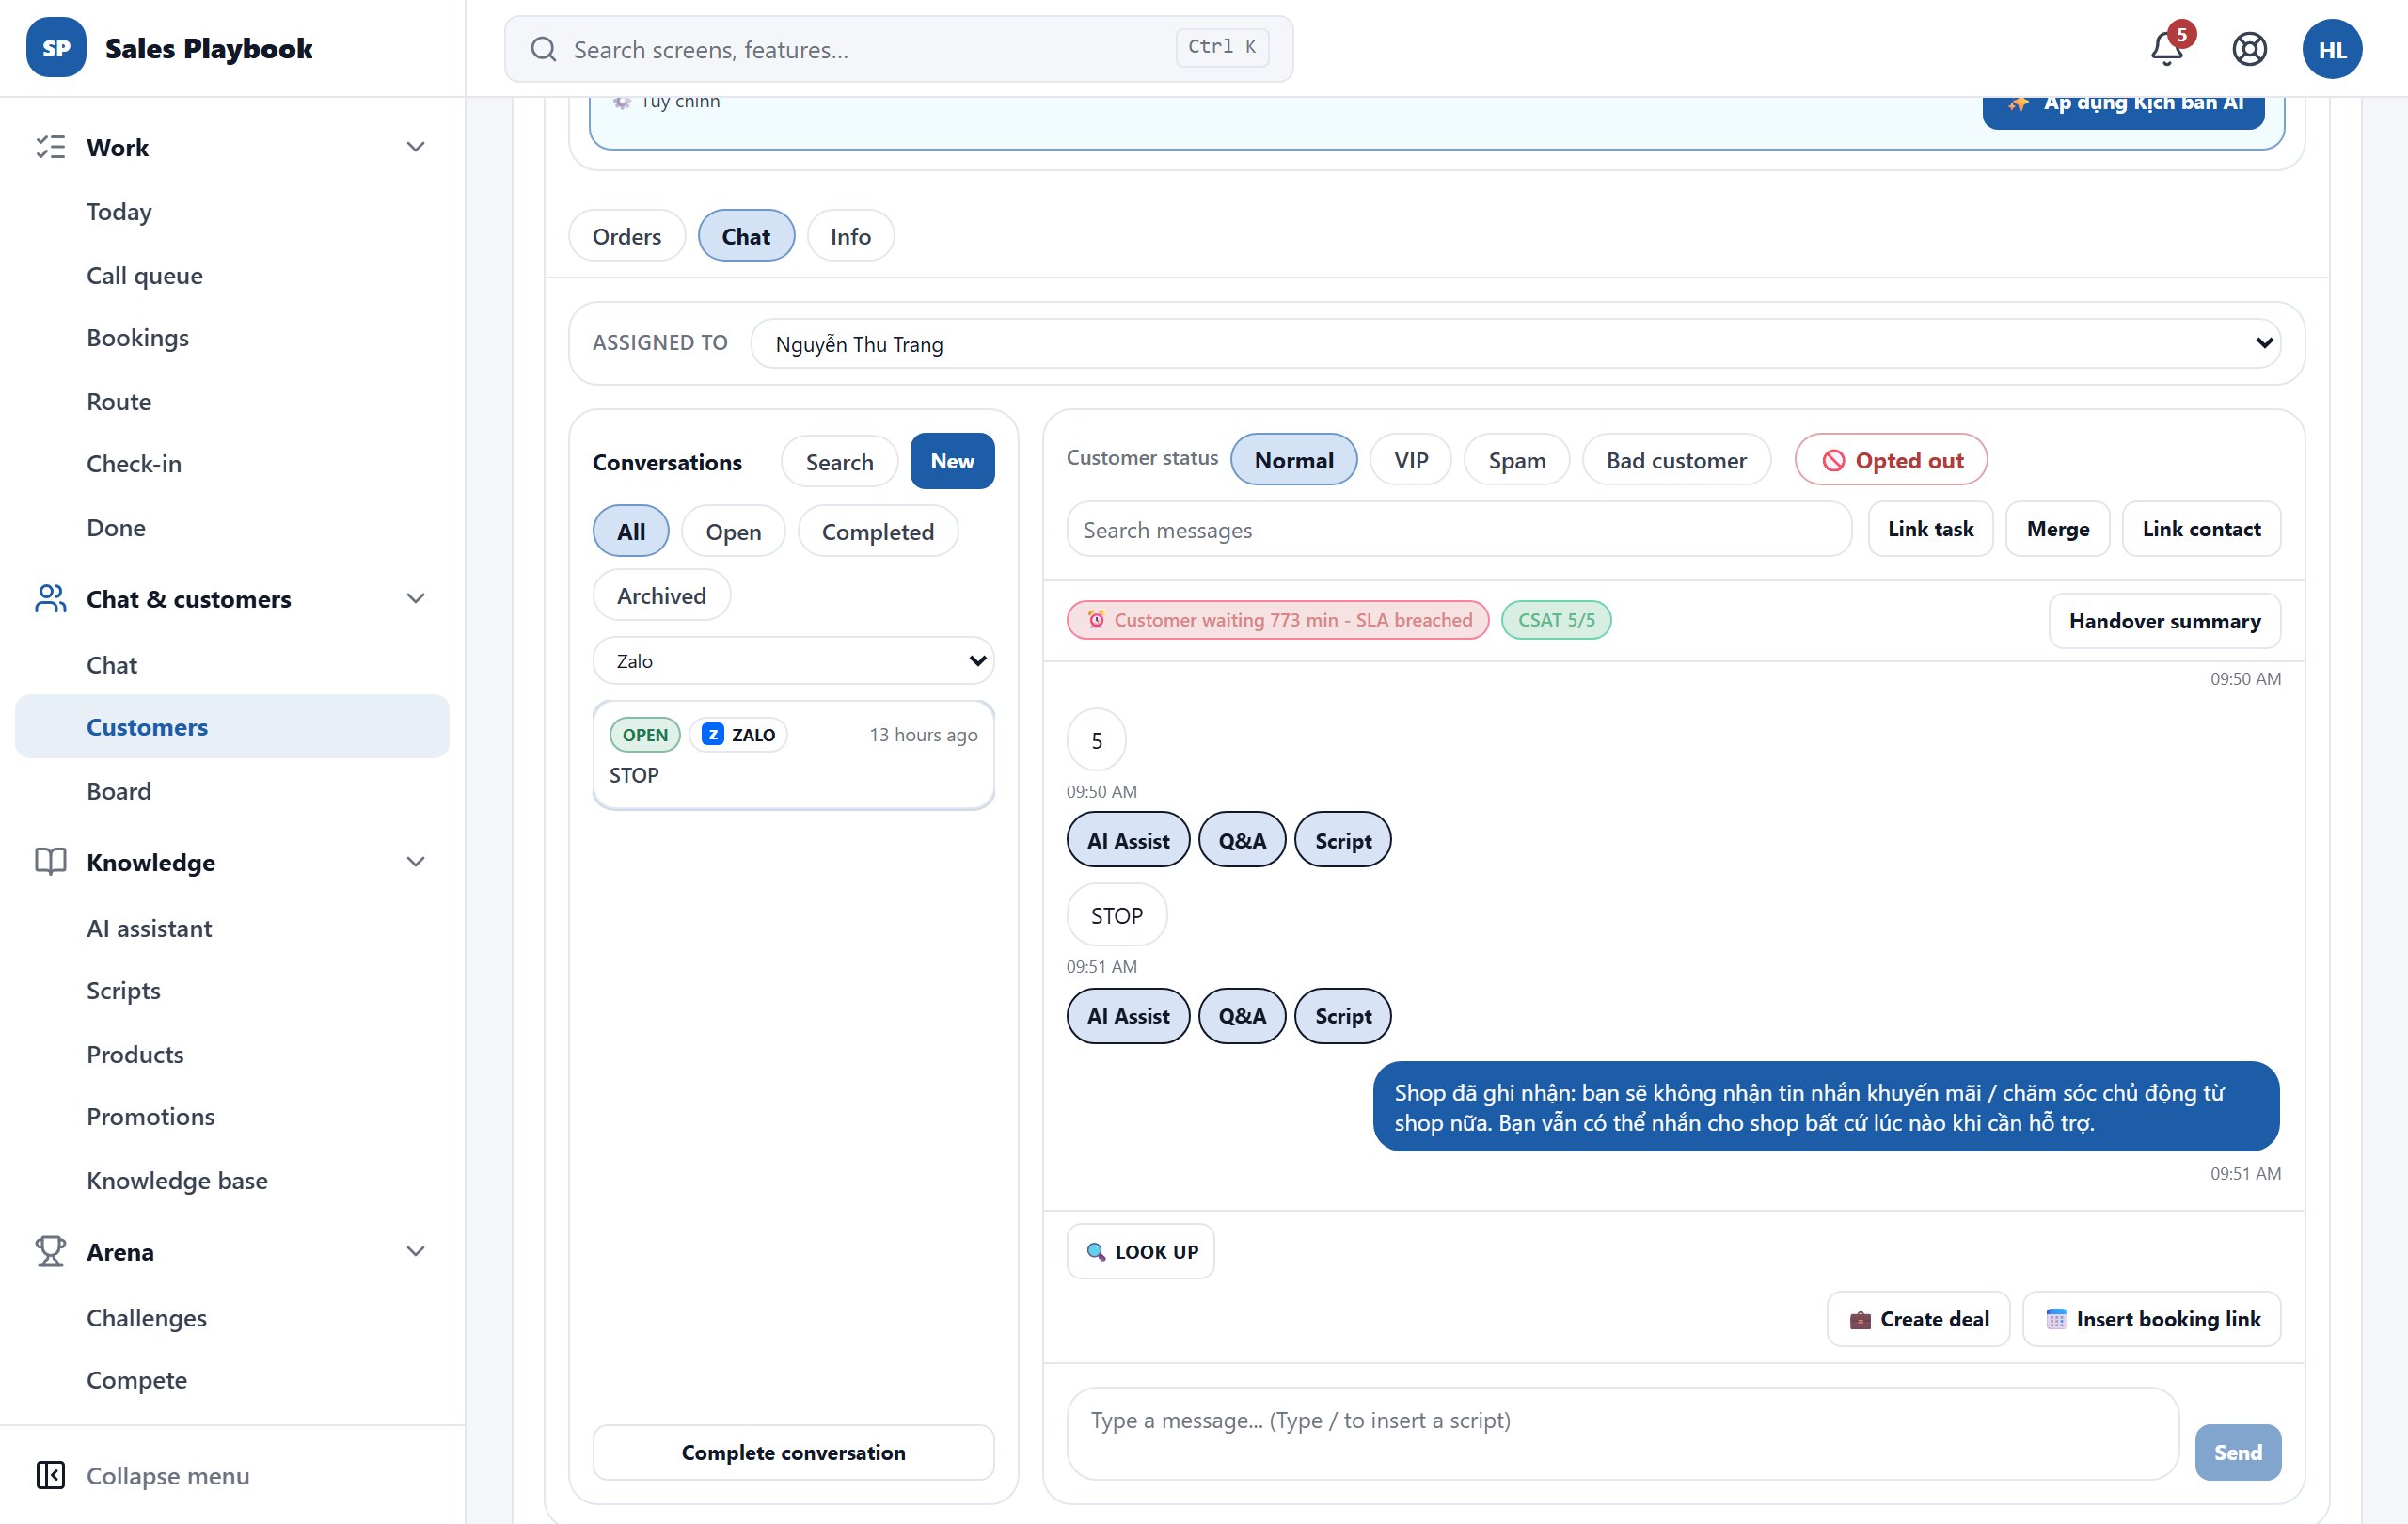
Chat screen with a Zalo conversation for customer Le Van E3, an SLA-breached badge, CSAT 5/5 and a reply typed in the message box
The "Customer waiting … min - SLA breached" badge sits at the top; each customer message has three action buttons; "🔍 Look up" and the message box are at the bottom.

Use AI, save a question or create a script from a customer message

Chat & customersChat

Steps

  1. 1Open a conversation. Under each customer message are three buttons: "AI Assist", "Q&A" and "Script".
  2. 2"AI Assist": AI offers three options, "Logic", "Emotion" and "Upsell". Click "Use as reply" on the one you like to put it in the message box, edit if needed, then click "Send".
  3. 3"Q&A" (Convert to FAQ): click "Generate AI answers" to register the question and get a draft, edit the "Answer" box, then click "Save answer".
  4. 4"Script" (Create draft script): enter a "Script title" and a "Shortcut" (at least 3 characters: letters, numbers, - and _), choose a "Category", click "Generate AI answers", then "Pin as draft".
  5. 5Click "Close ×" to close the panel.
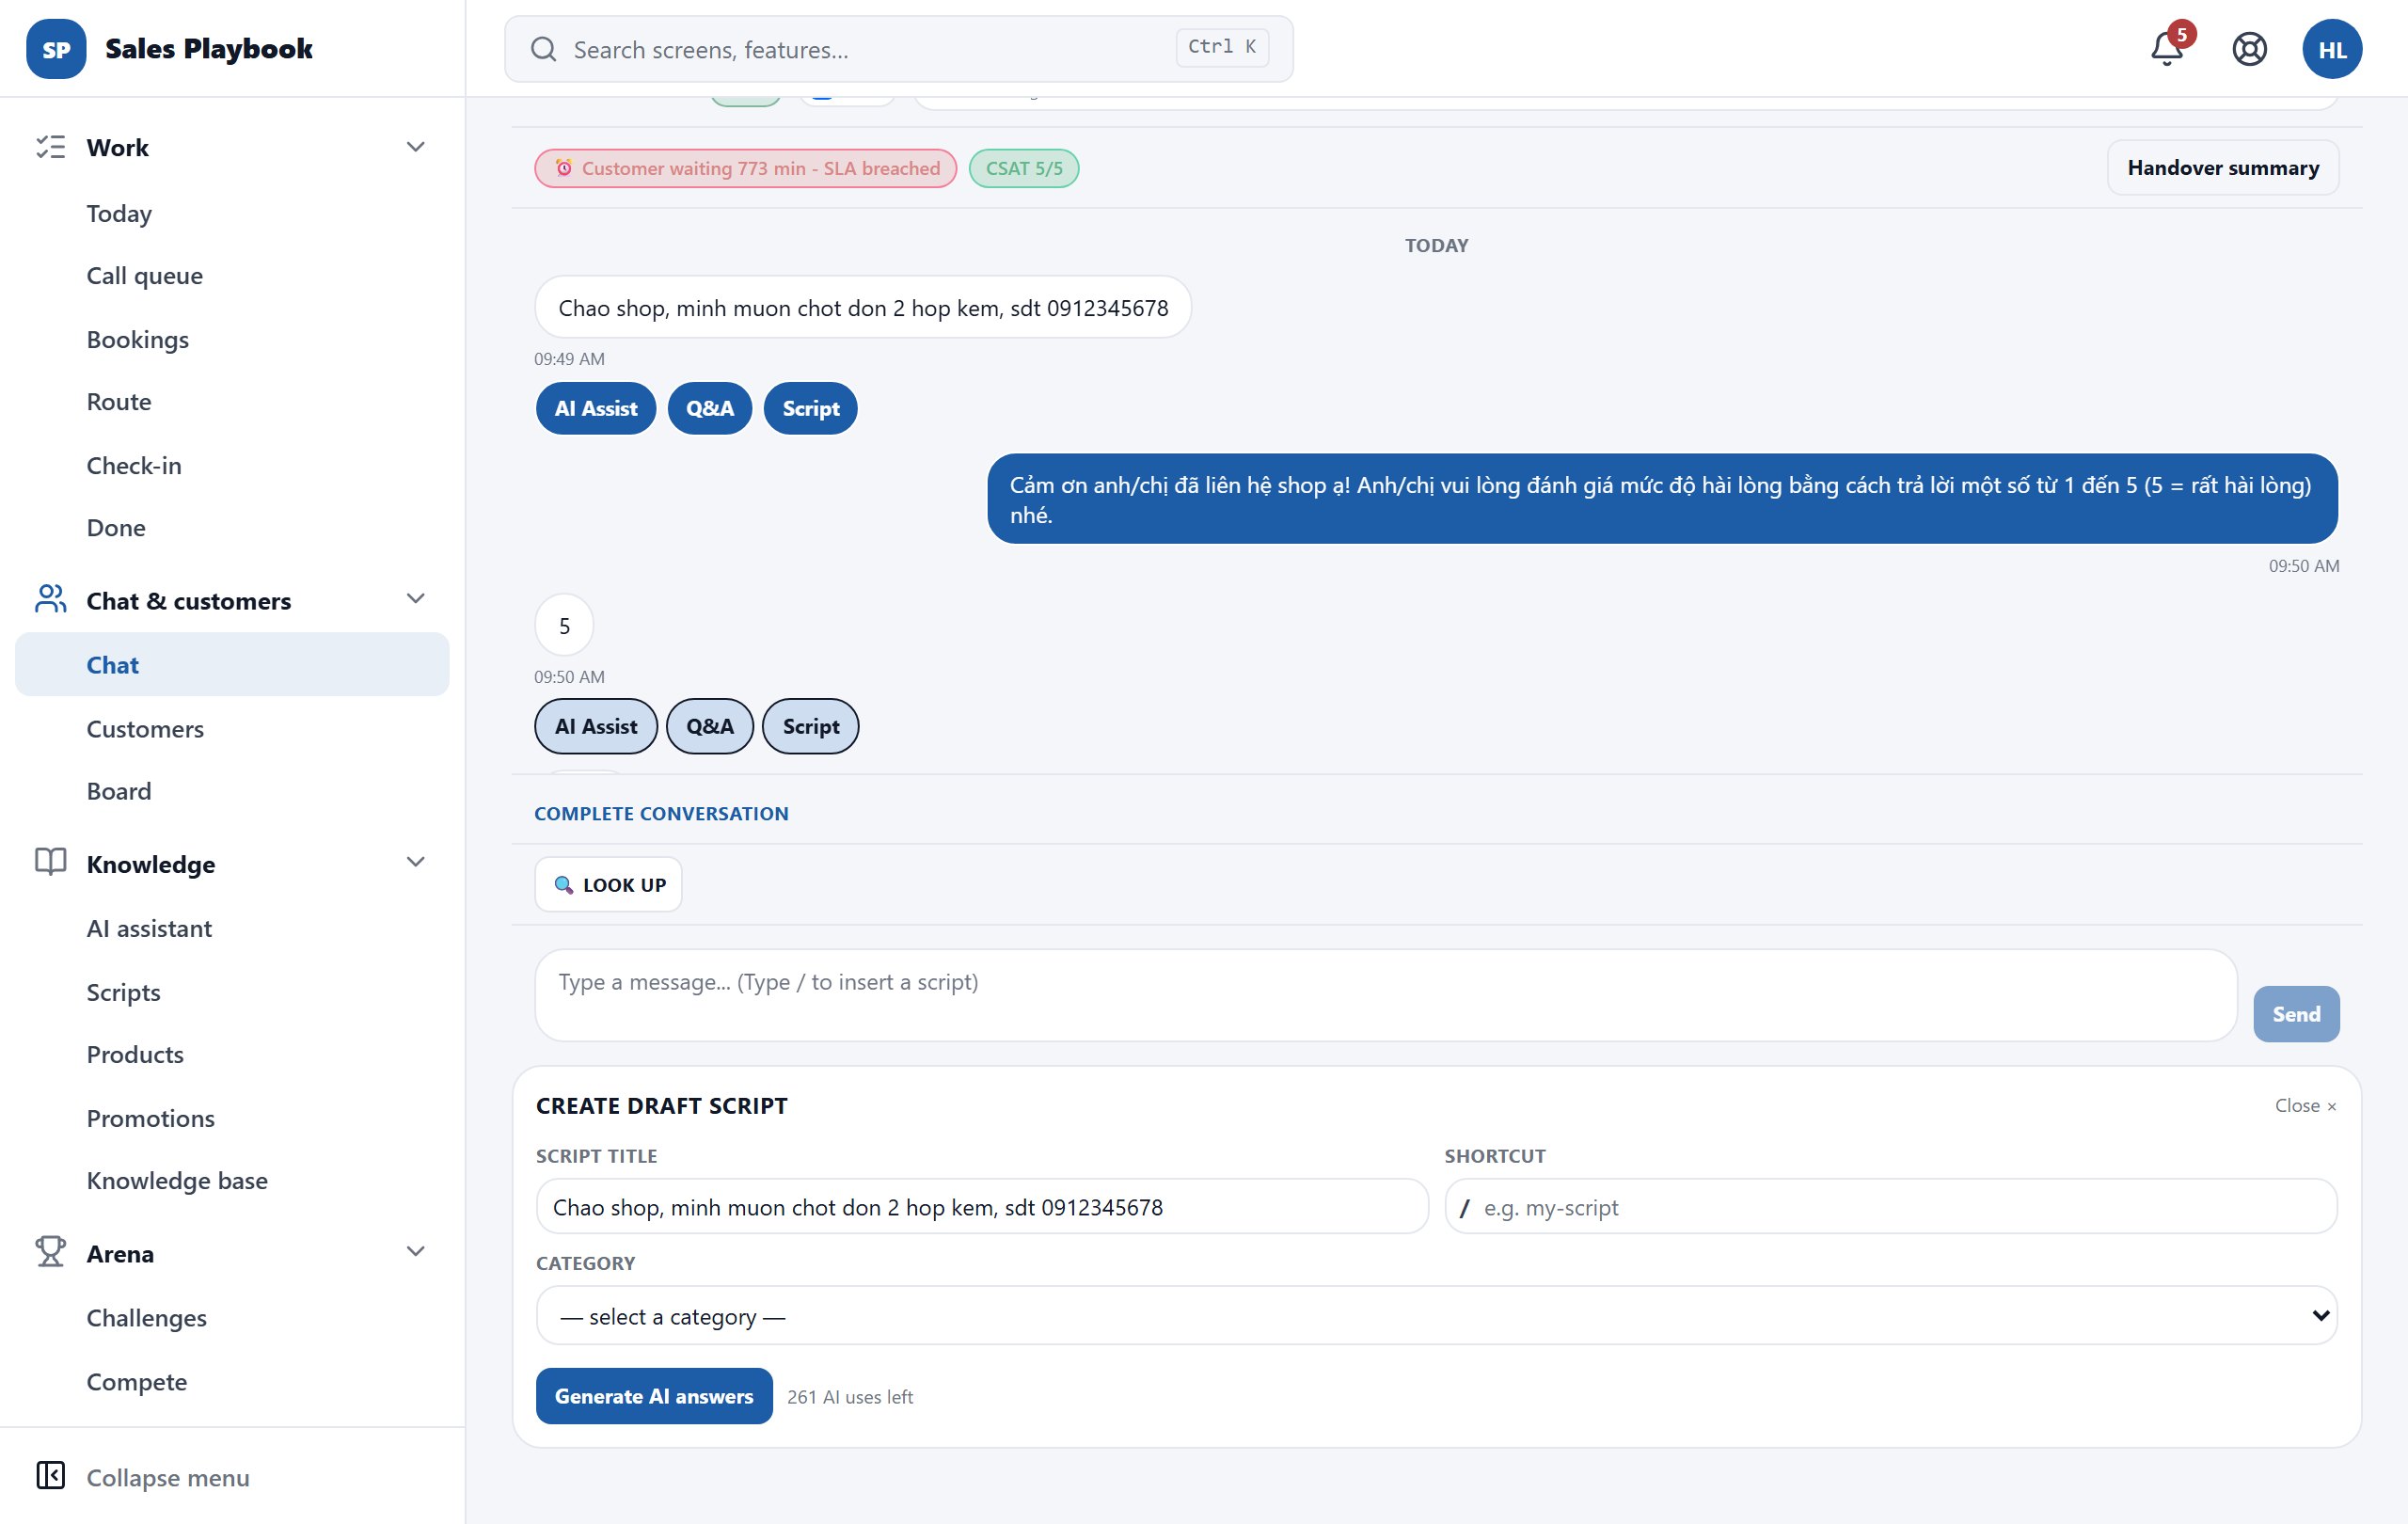
The Create draft script panel open under the message box after clicking Script on the customer's order message
Click "Script" under the customer's message: the title is pre-filled from the message; choose a category, then click "Generate AI answers".

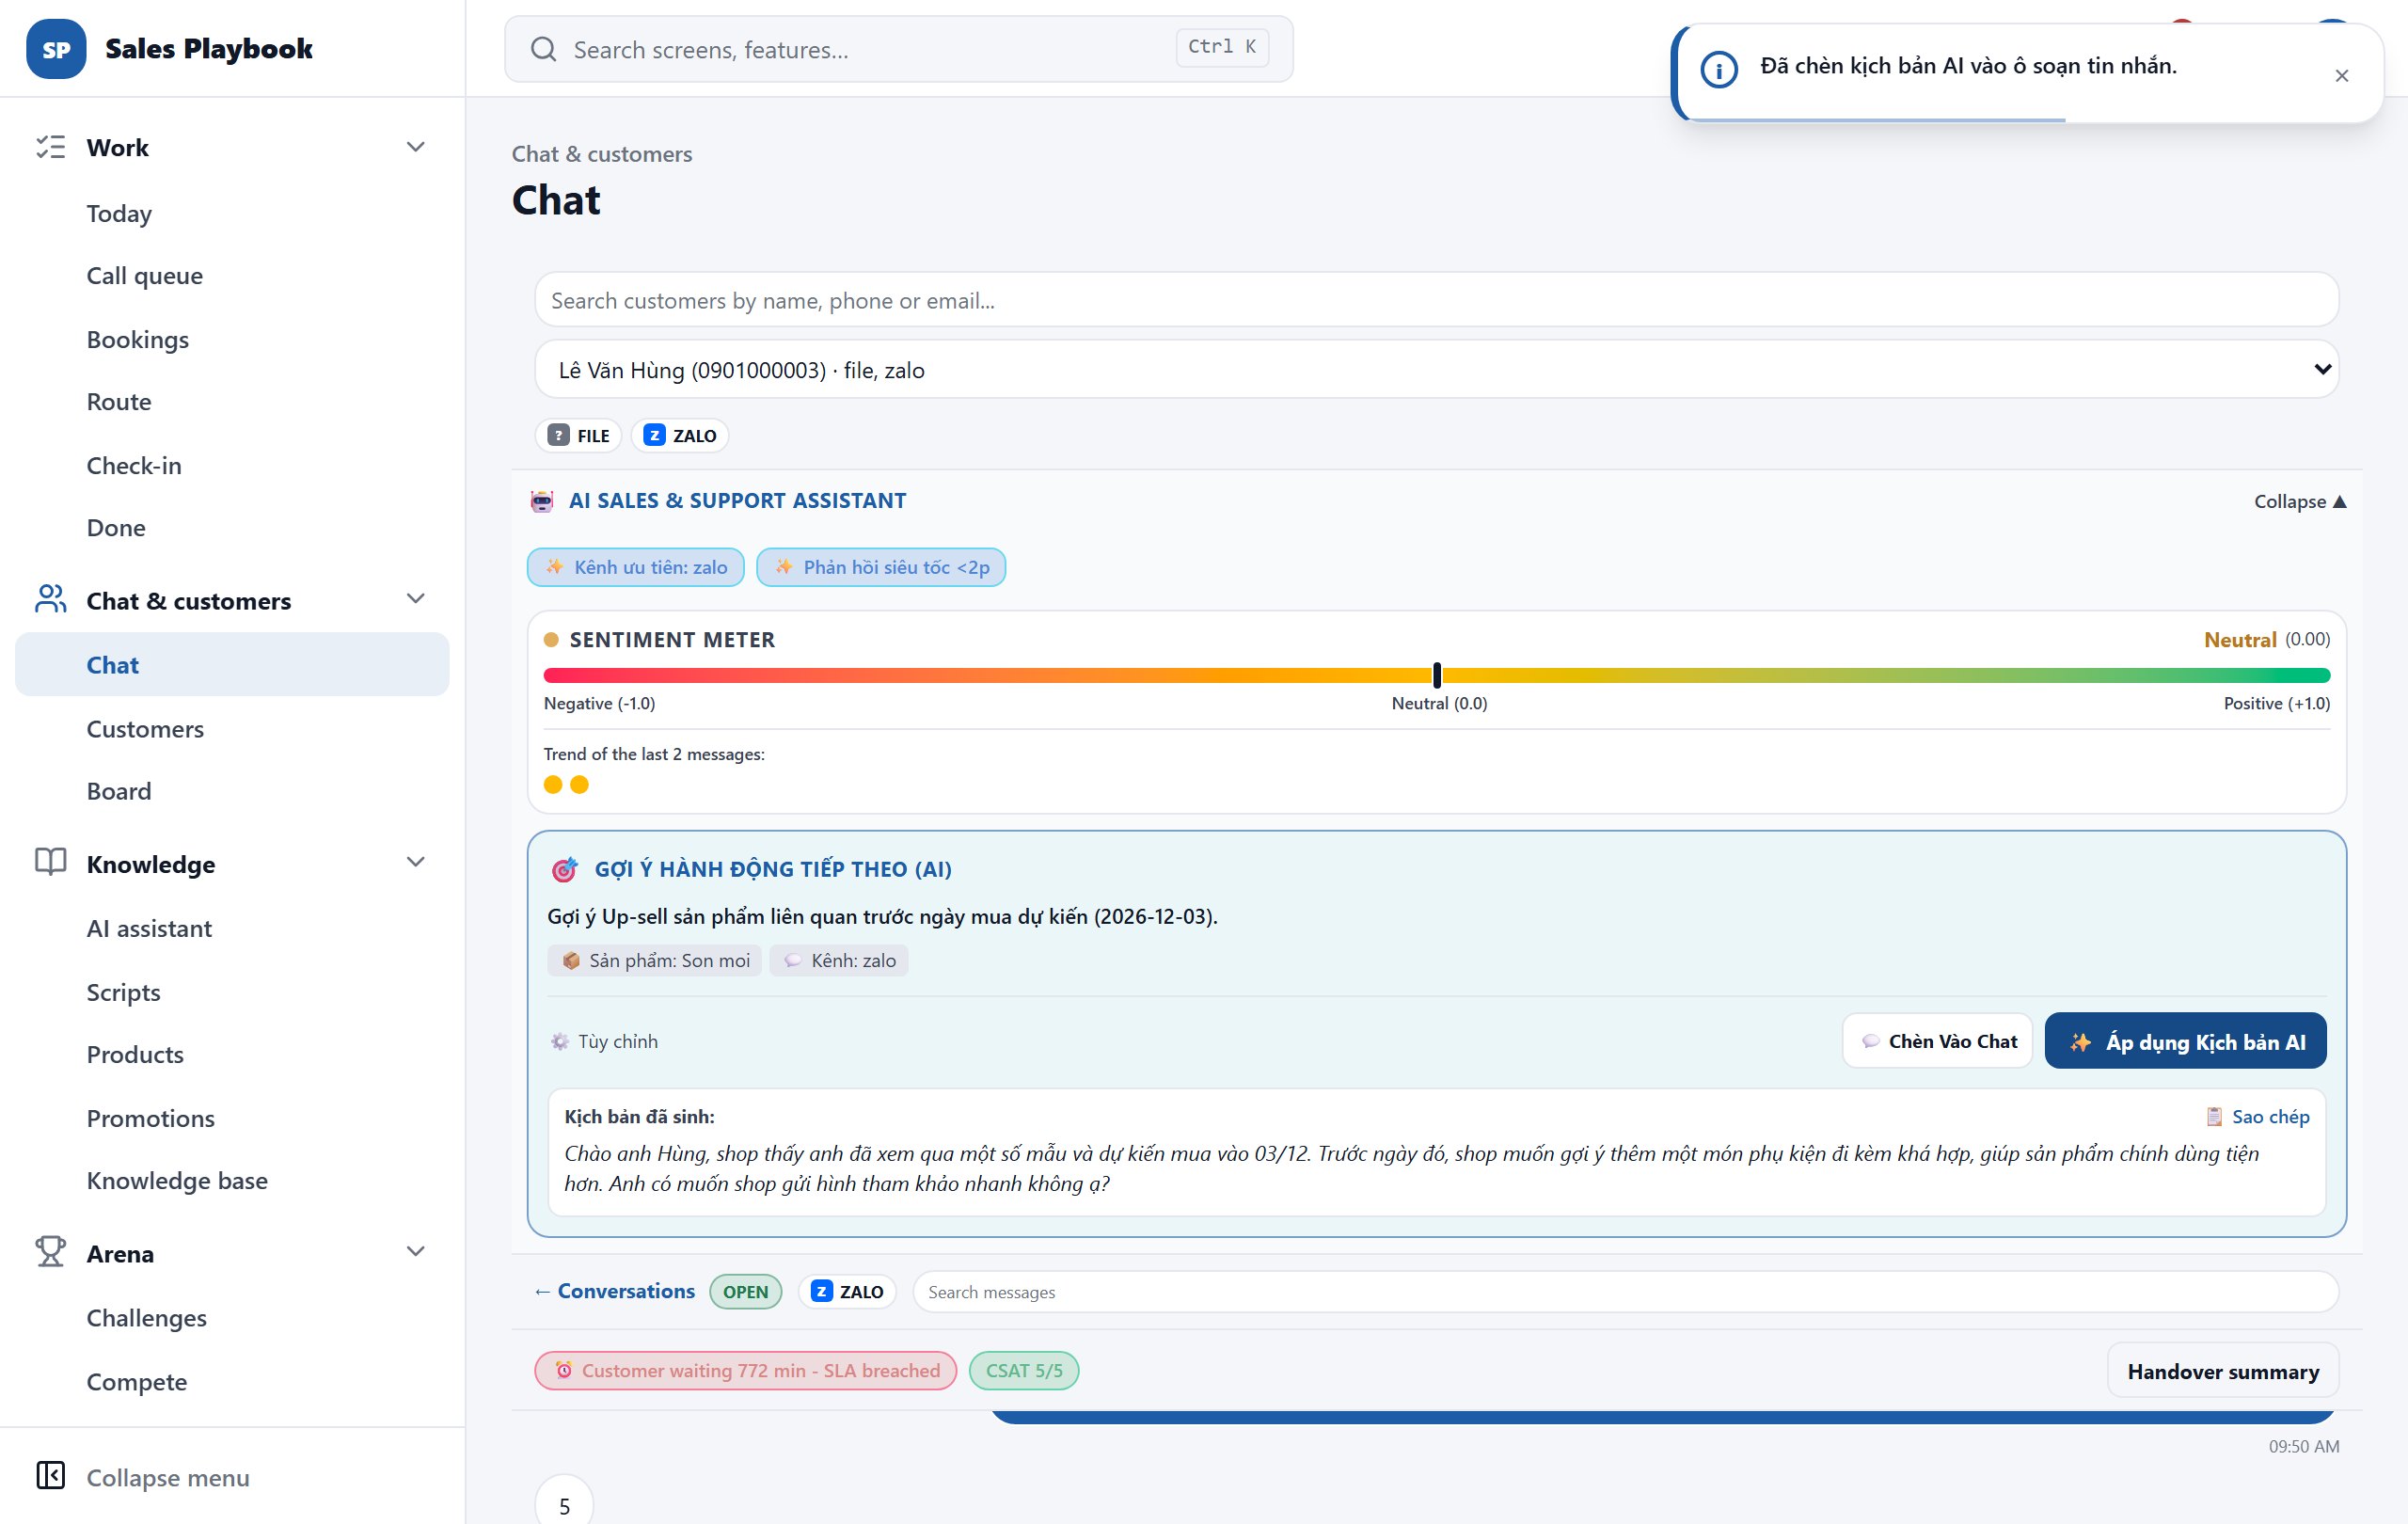
Read the sentiment meter and churn warnings

Chat & customersChat

Steps

  1. 1Pick a customer in "Select a customer...". The "AI sales & support assistant" block appears right under the customer.
  2. 2Read the behaviour tags on the first line (e.g. "Kênh ưu tiên: zalo", "Phản hồi siêu tốc <2p" — these tags are shown in Vietnamese).
  3. 3The "Sentiment Meter" bar scores from "Negative (-1.0)" to "Positive (+1.0)"; the label and score show on the right (e.g. "Neutral (0.00)").
  4. 4The coloured dots under "Trend of the last … messages:" show whether the mood is rising or falling. When the churn risk is high, a red line appears: "WARNING: …% churn risk (customer is about to leave the shop)".
  5. 5Click "Collapse ▲" to hide the block when you need more room for the conversation, and "Expand ▼" to show it again.
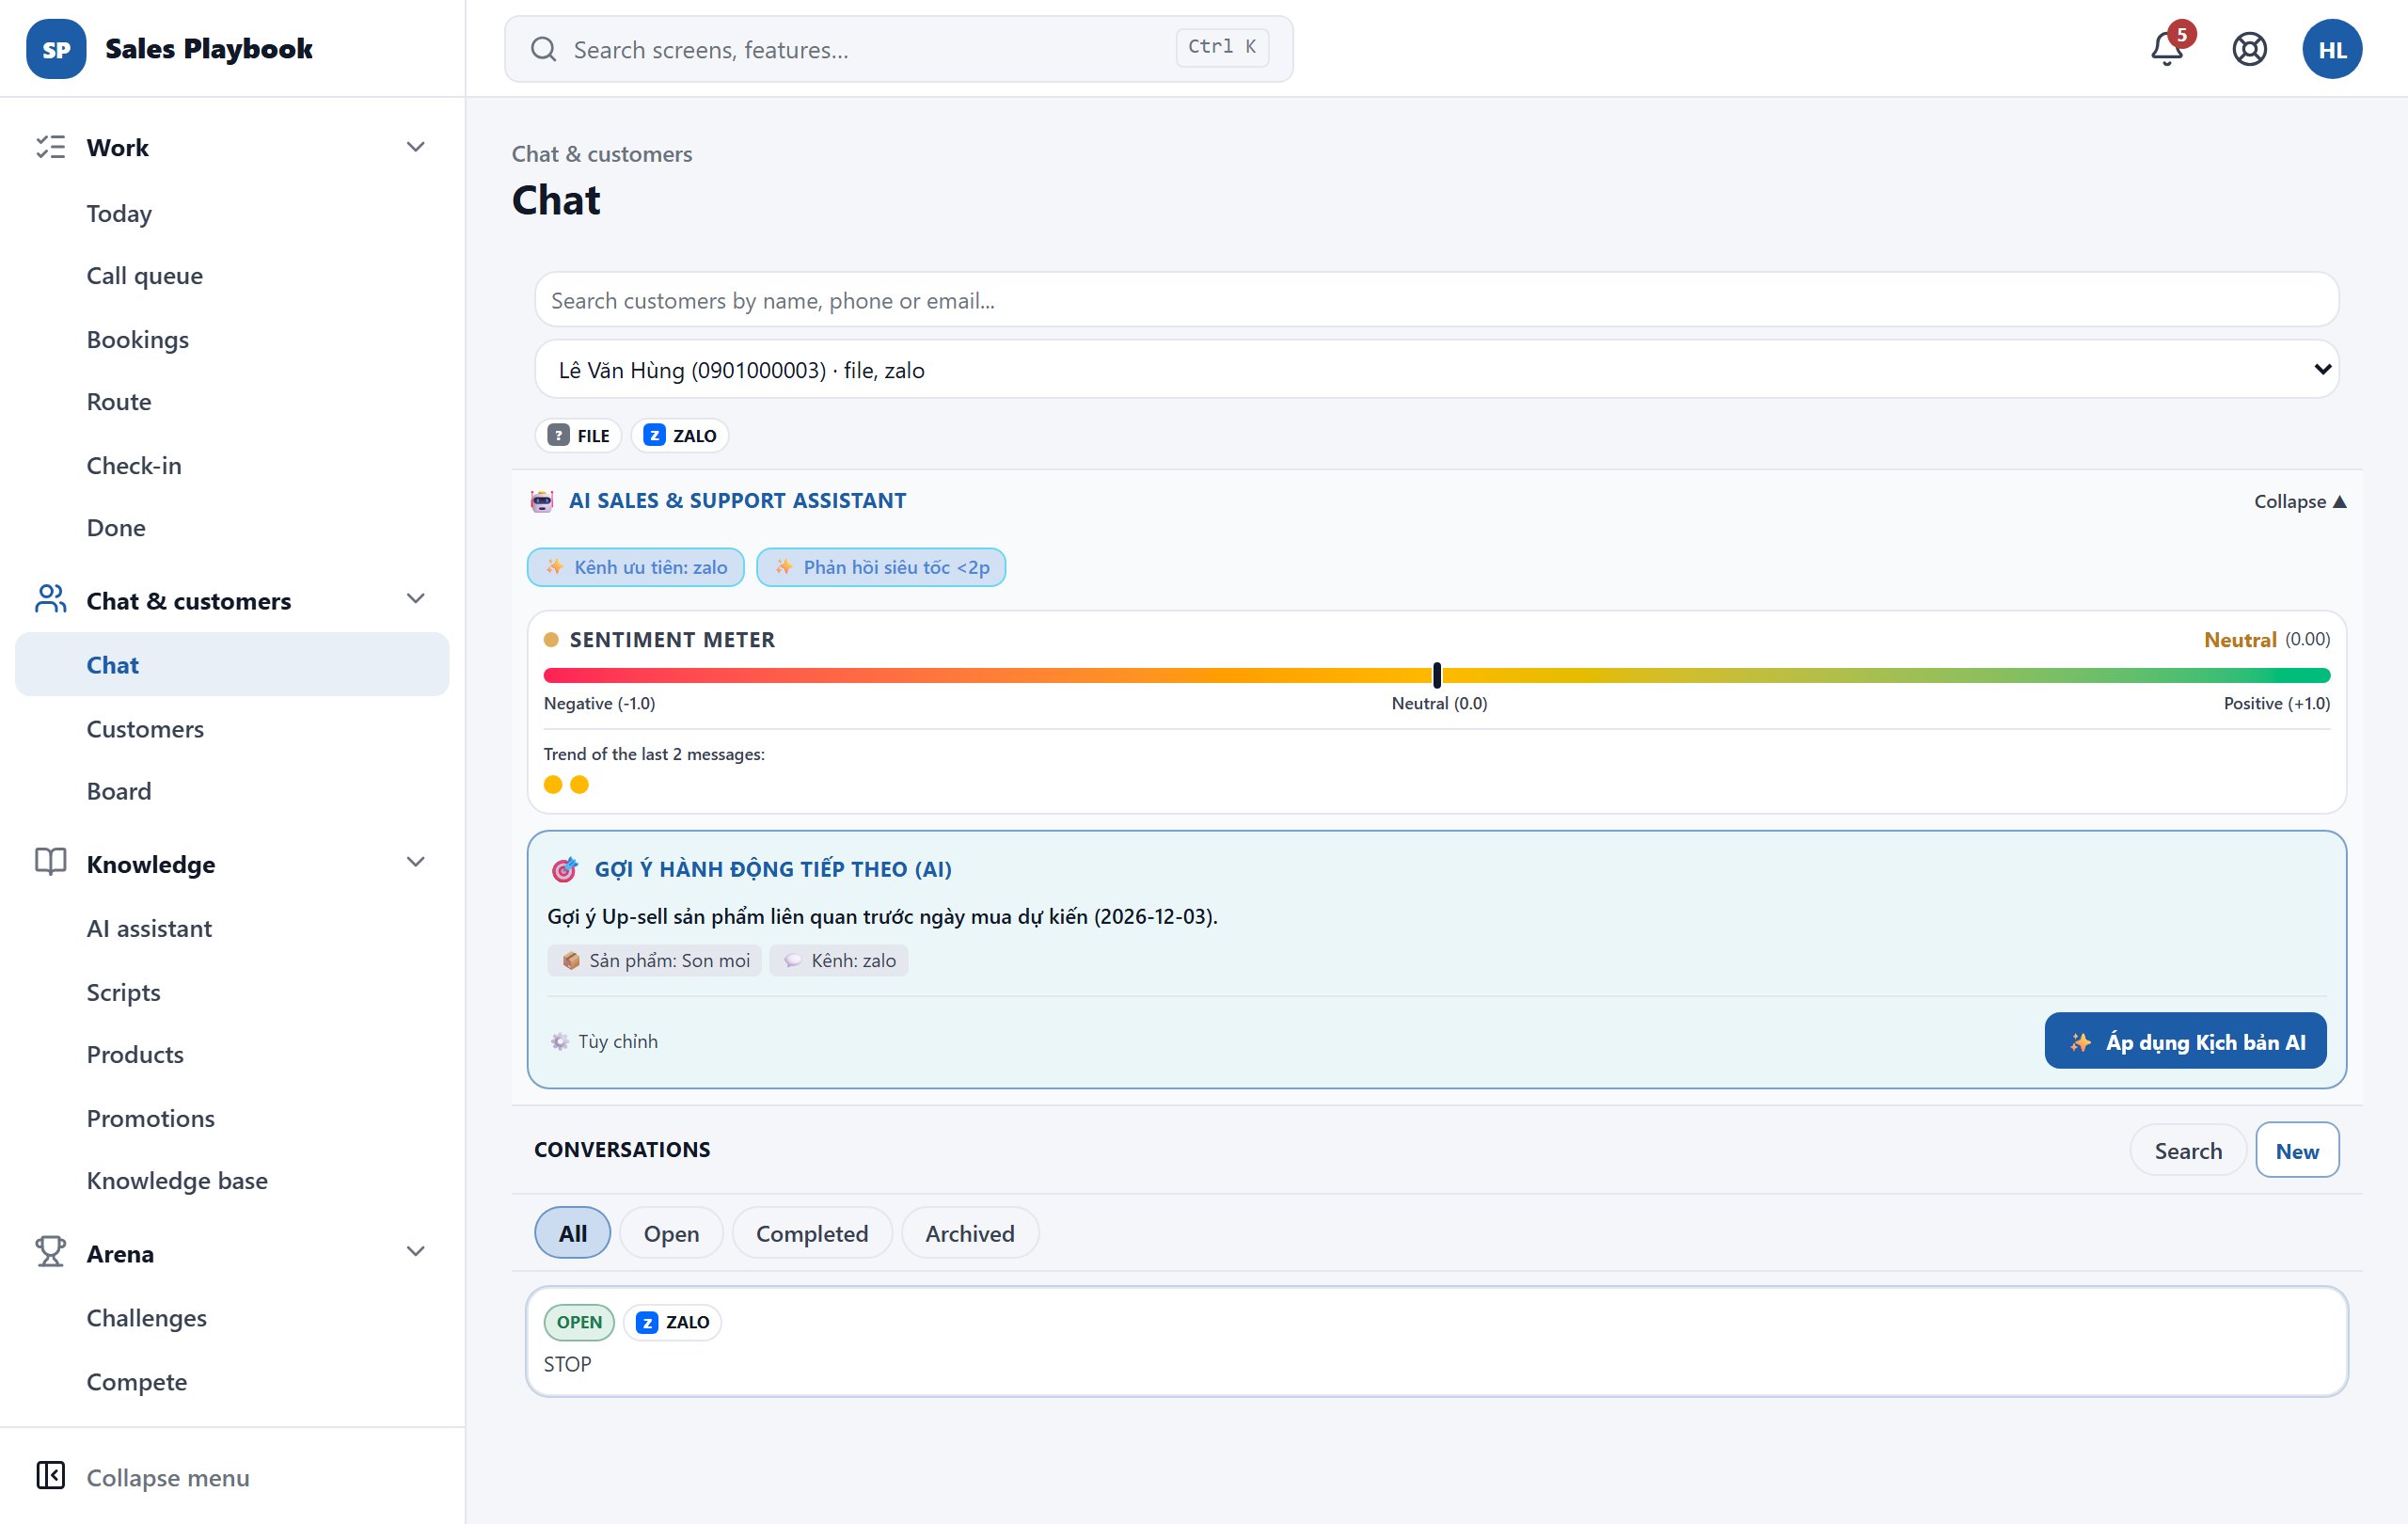
The AI sales & support assistant block with two behaviour tags, the sentiment meter at Neutral and the next-action suggestion card
Behaviour tags on the first line, the needle in the middle (Neutral 0.00); no churn warning because the customer shows no negative signs.

Apply the AI next-action suggestion

Chat & customersChat

Steps

  1. 1Pick a customer. In the "AI sales & support assistant" block, look at the "Gợi Ý Hành Động Tiếp Theo (AI)" card (next-action suggestion). When the customer is at risk of leaving, the card becomes "Gợi Ý Cứu Đơn & Giữ Chân" (save-the-order suggestion). This card is shown in Vietnamese.
  2. 2Read the suggestion and the details that come with it when available: "📦 Sản phẩm" (product), "💬 Kênh" (channel), a voucher code ("🎁 Mã: …"), "🏷️ Ưu đãi" (offer).
  3. 3To steer the AI, click "⚙️ Tùy chỉnh" (customise) and type your instruction (e.g. stress free shipping today).
  4. 4Click "Áp dụng Kịch bản AI" (apply AI script). The drafted message appears under "Kịch bản đã sinh" (generated script) and is inserted into the message box of the open conversation.
  5. 5You can click "📋 Sao chép" (copy) or "💬 Chèn Vào Chat" (insert into chat) to insert it again, then edit it and click "Send".
The next-action suggestion card proposing an up-sell, with product, channel and the generated script section
After clicking "Áp dụng Kịch bản AI": the drafted message appears under "Kịch bản đã sinh" and is already in the message box.

06 / 1 features

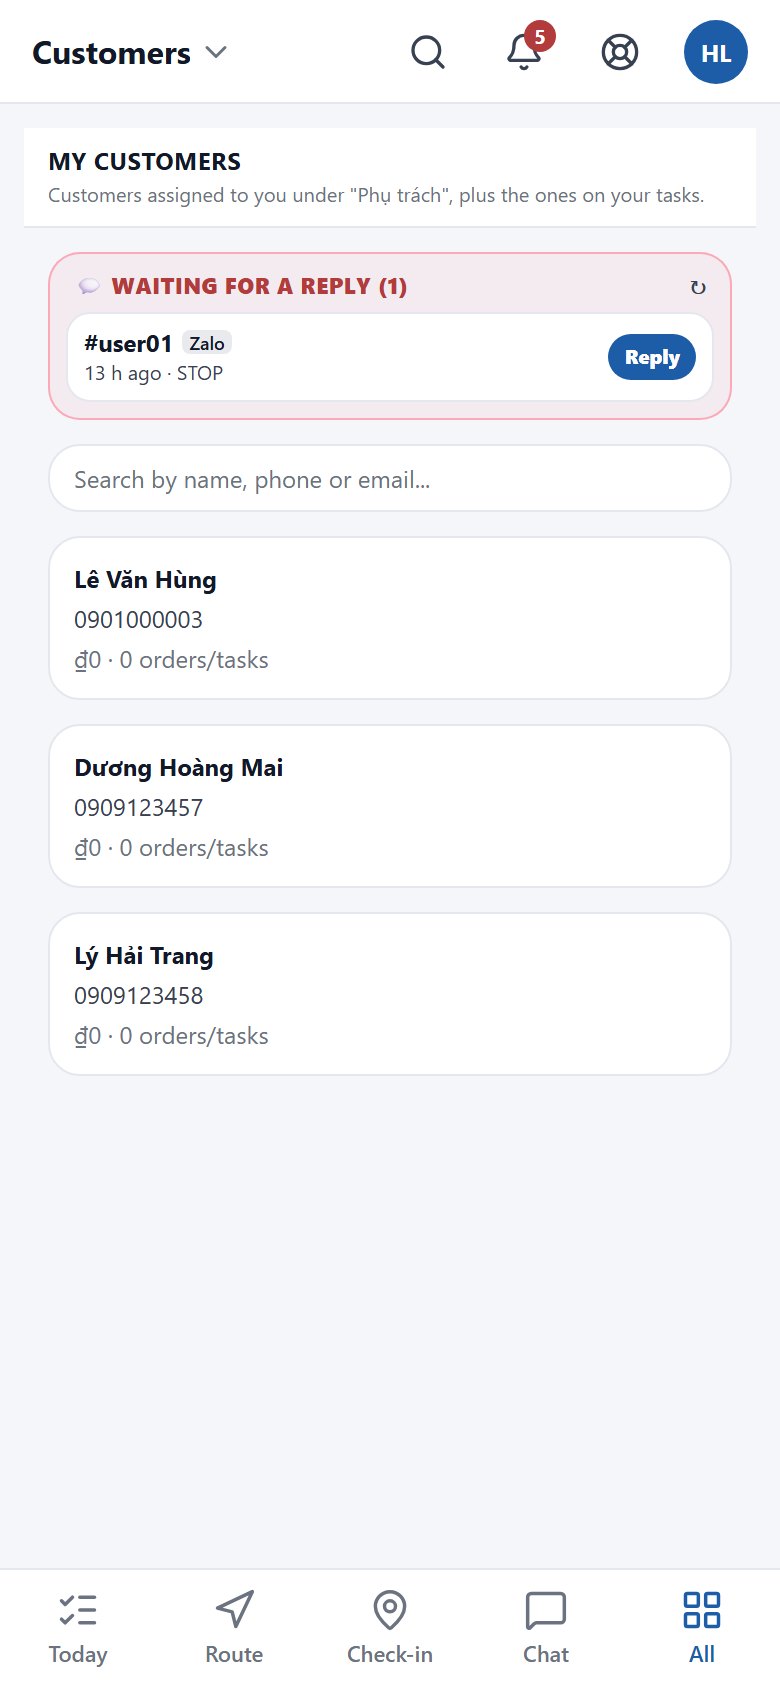
My customers

Staff see the customers they look after, who is waiting for a reply, and open a chat with a customer in one tap.

Find your customers and reply to the ones waiting

Chat & customersCustomers

Steps

  1. 1Open "Customers". The heading "My customers" tells you that you are looking at customers assigned to you (under "Phụ trách", the assignee field) and customers on your tasks.
  2. 2The "Waiting for a reply (…)" block lists customers who messaged and have not been answered yet, with channel, time and last message. Click "Reply" to open that exact conversation in Chat; click ↻ to reload.
  3. 3Type in "Search by name, phone or email..." to find a customer.
  4. 4Click a customer to see the full profile; click "Chat" (shown for customers with a chat account) to switch to the Chat screen with that customer.
My customers screen on a phone with the Waiting for a reply block and the customer list
The "Waiting for a reply" block is at the top; click "Reply" to jump straight into the customer's conversation.

07 / 3 features

Knowledge: look up scripts, products and policies

The three lookup screens staff use most while chatting with customers: approved reply scripts, a product guide with ready-made objection answers, and the shop's policy / FAQ articles. The data is stored on your device, so you can still look things up when offline.

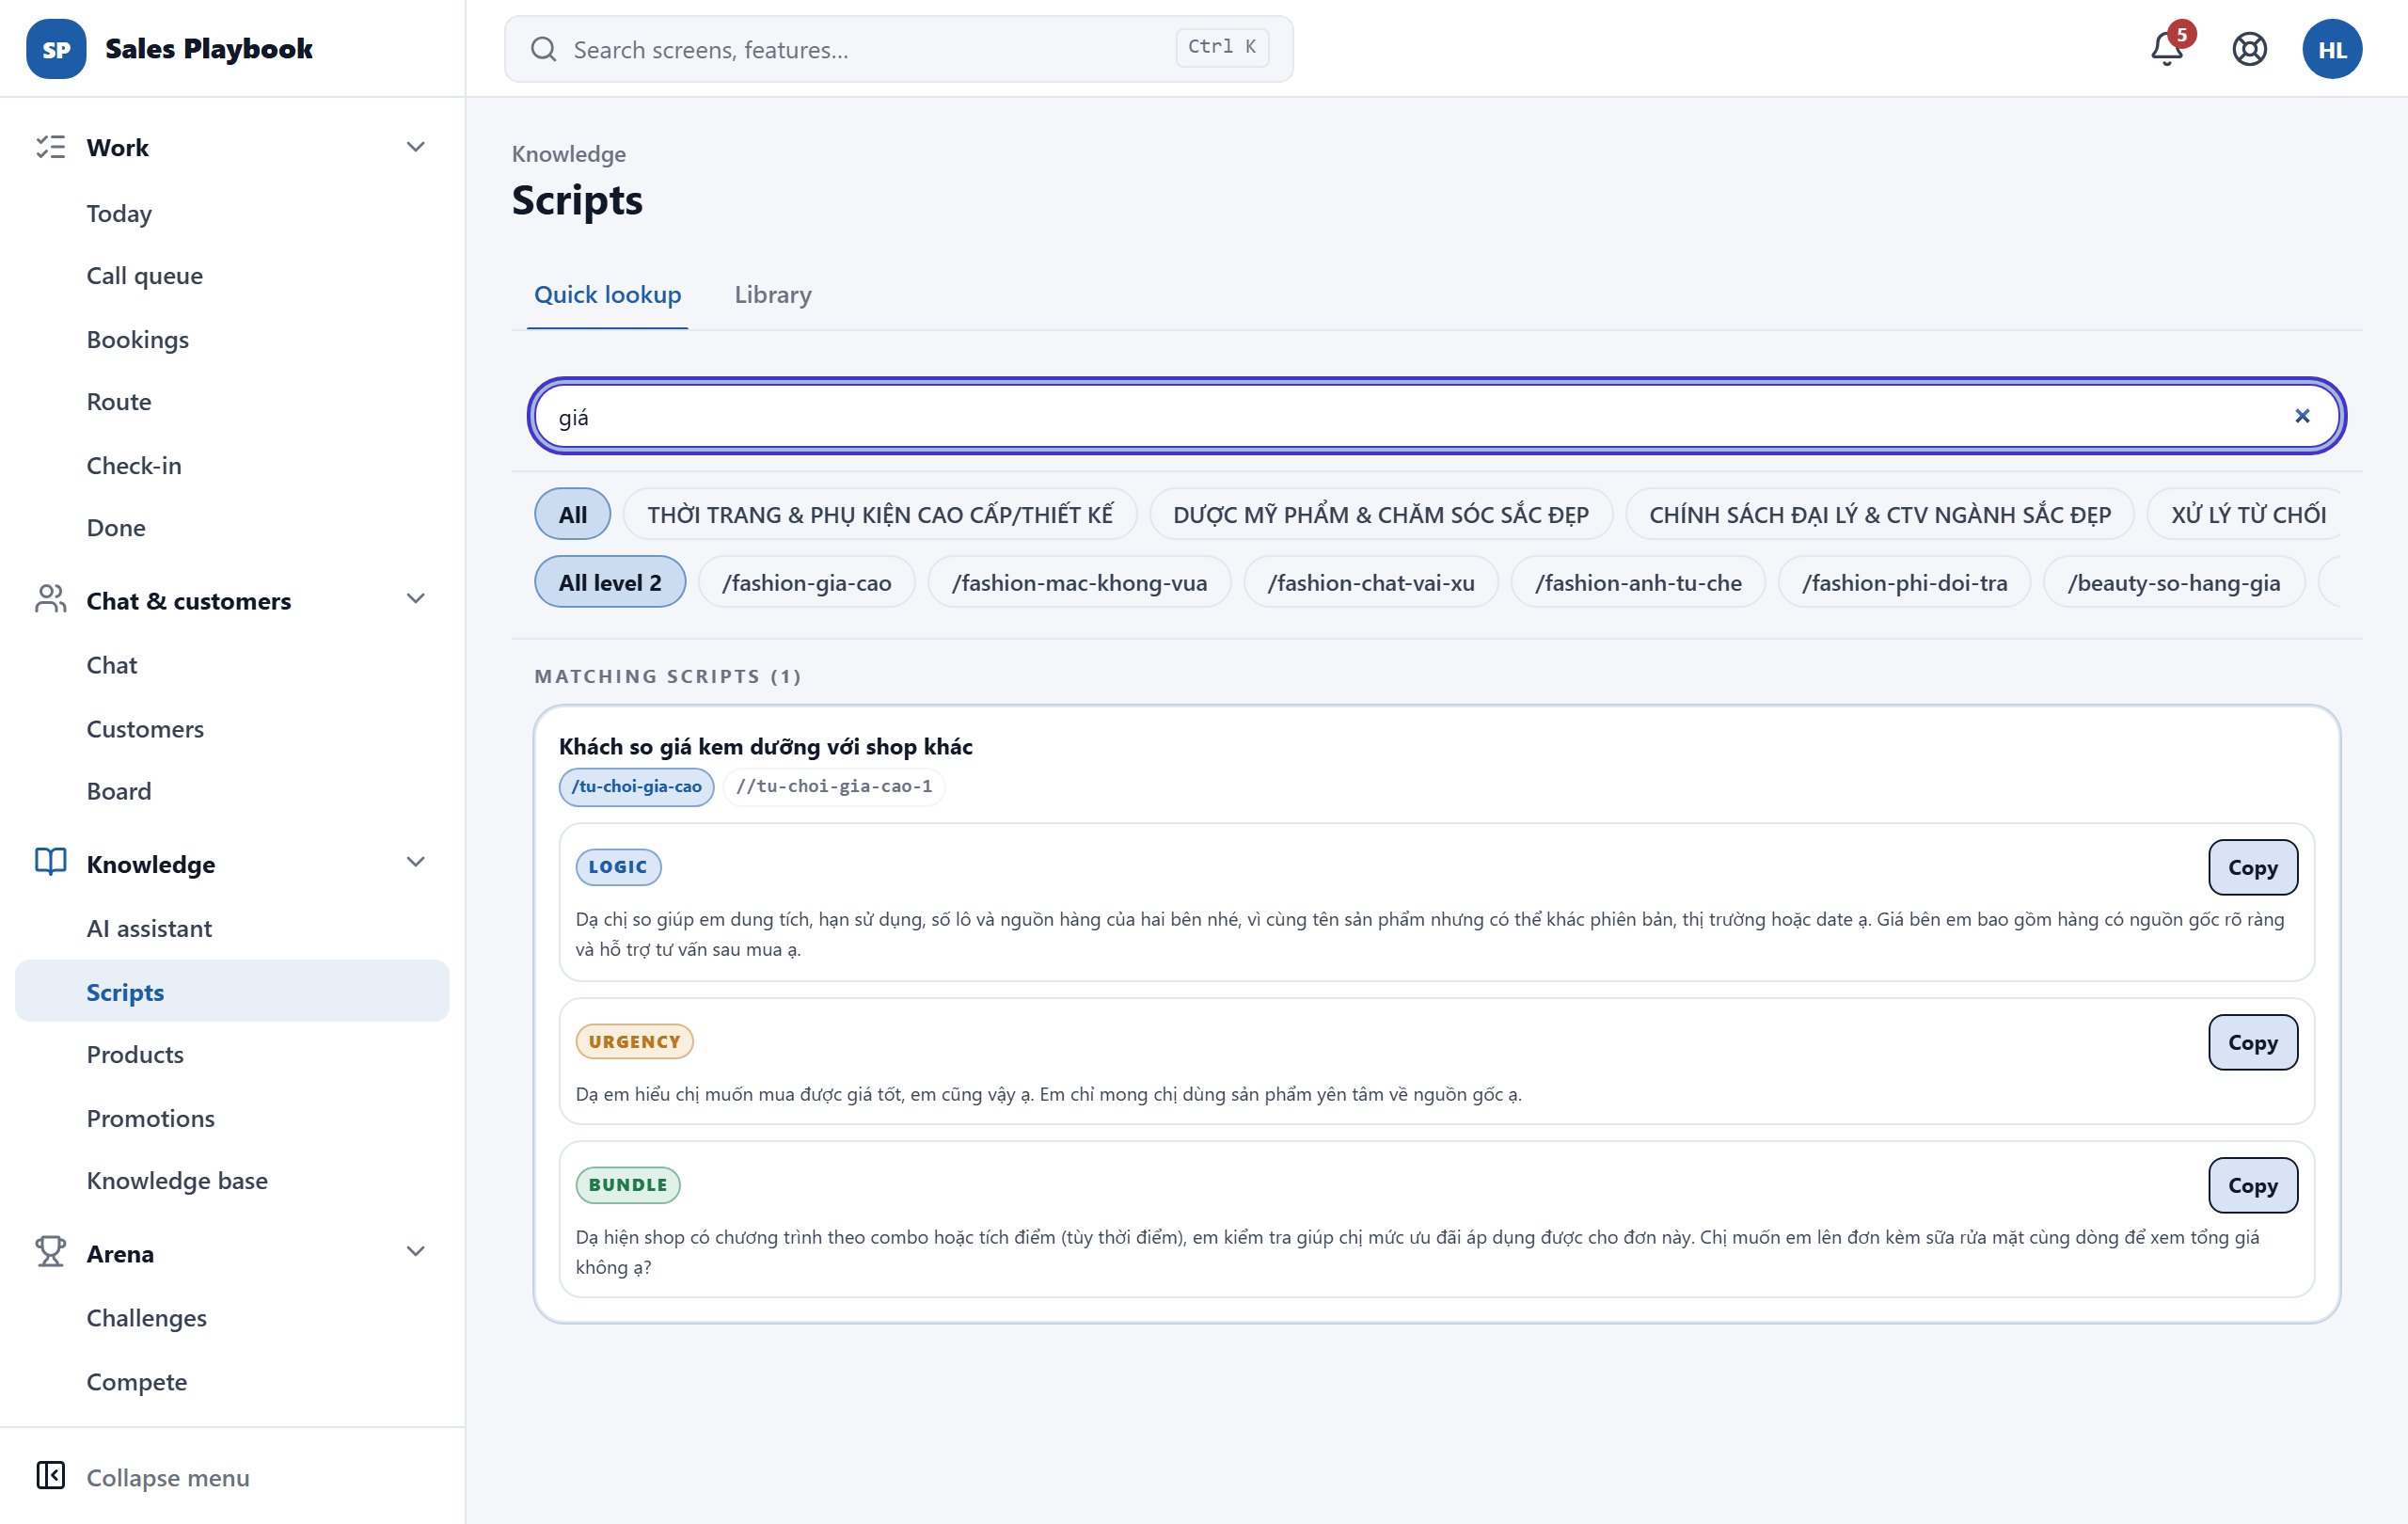
Find and copy a reply script

KnowledgeScriptsQuick lookup

Steps

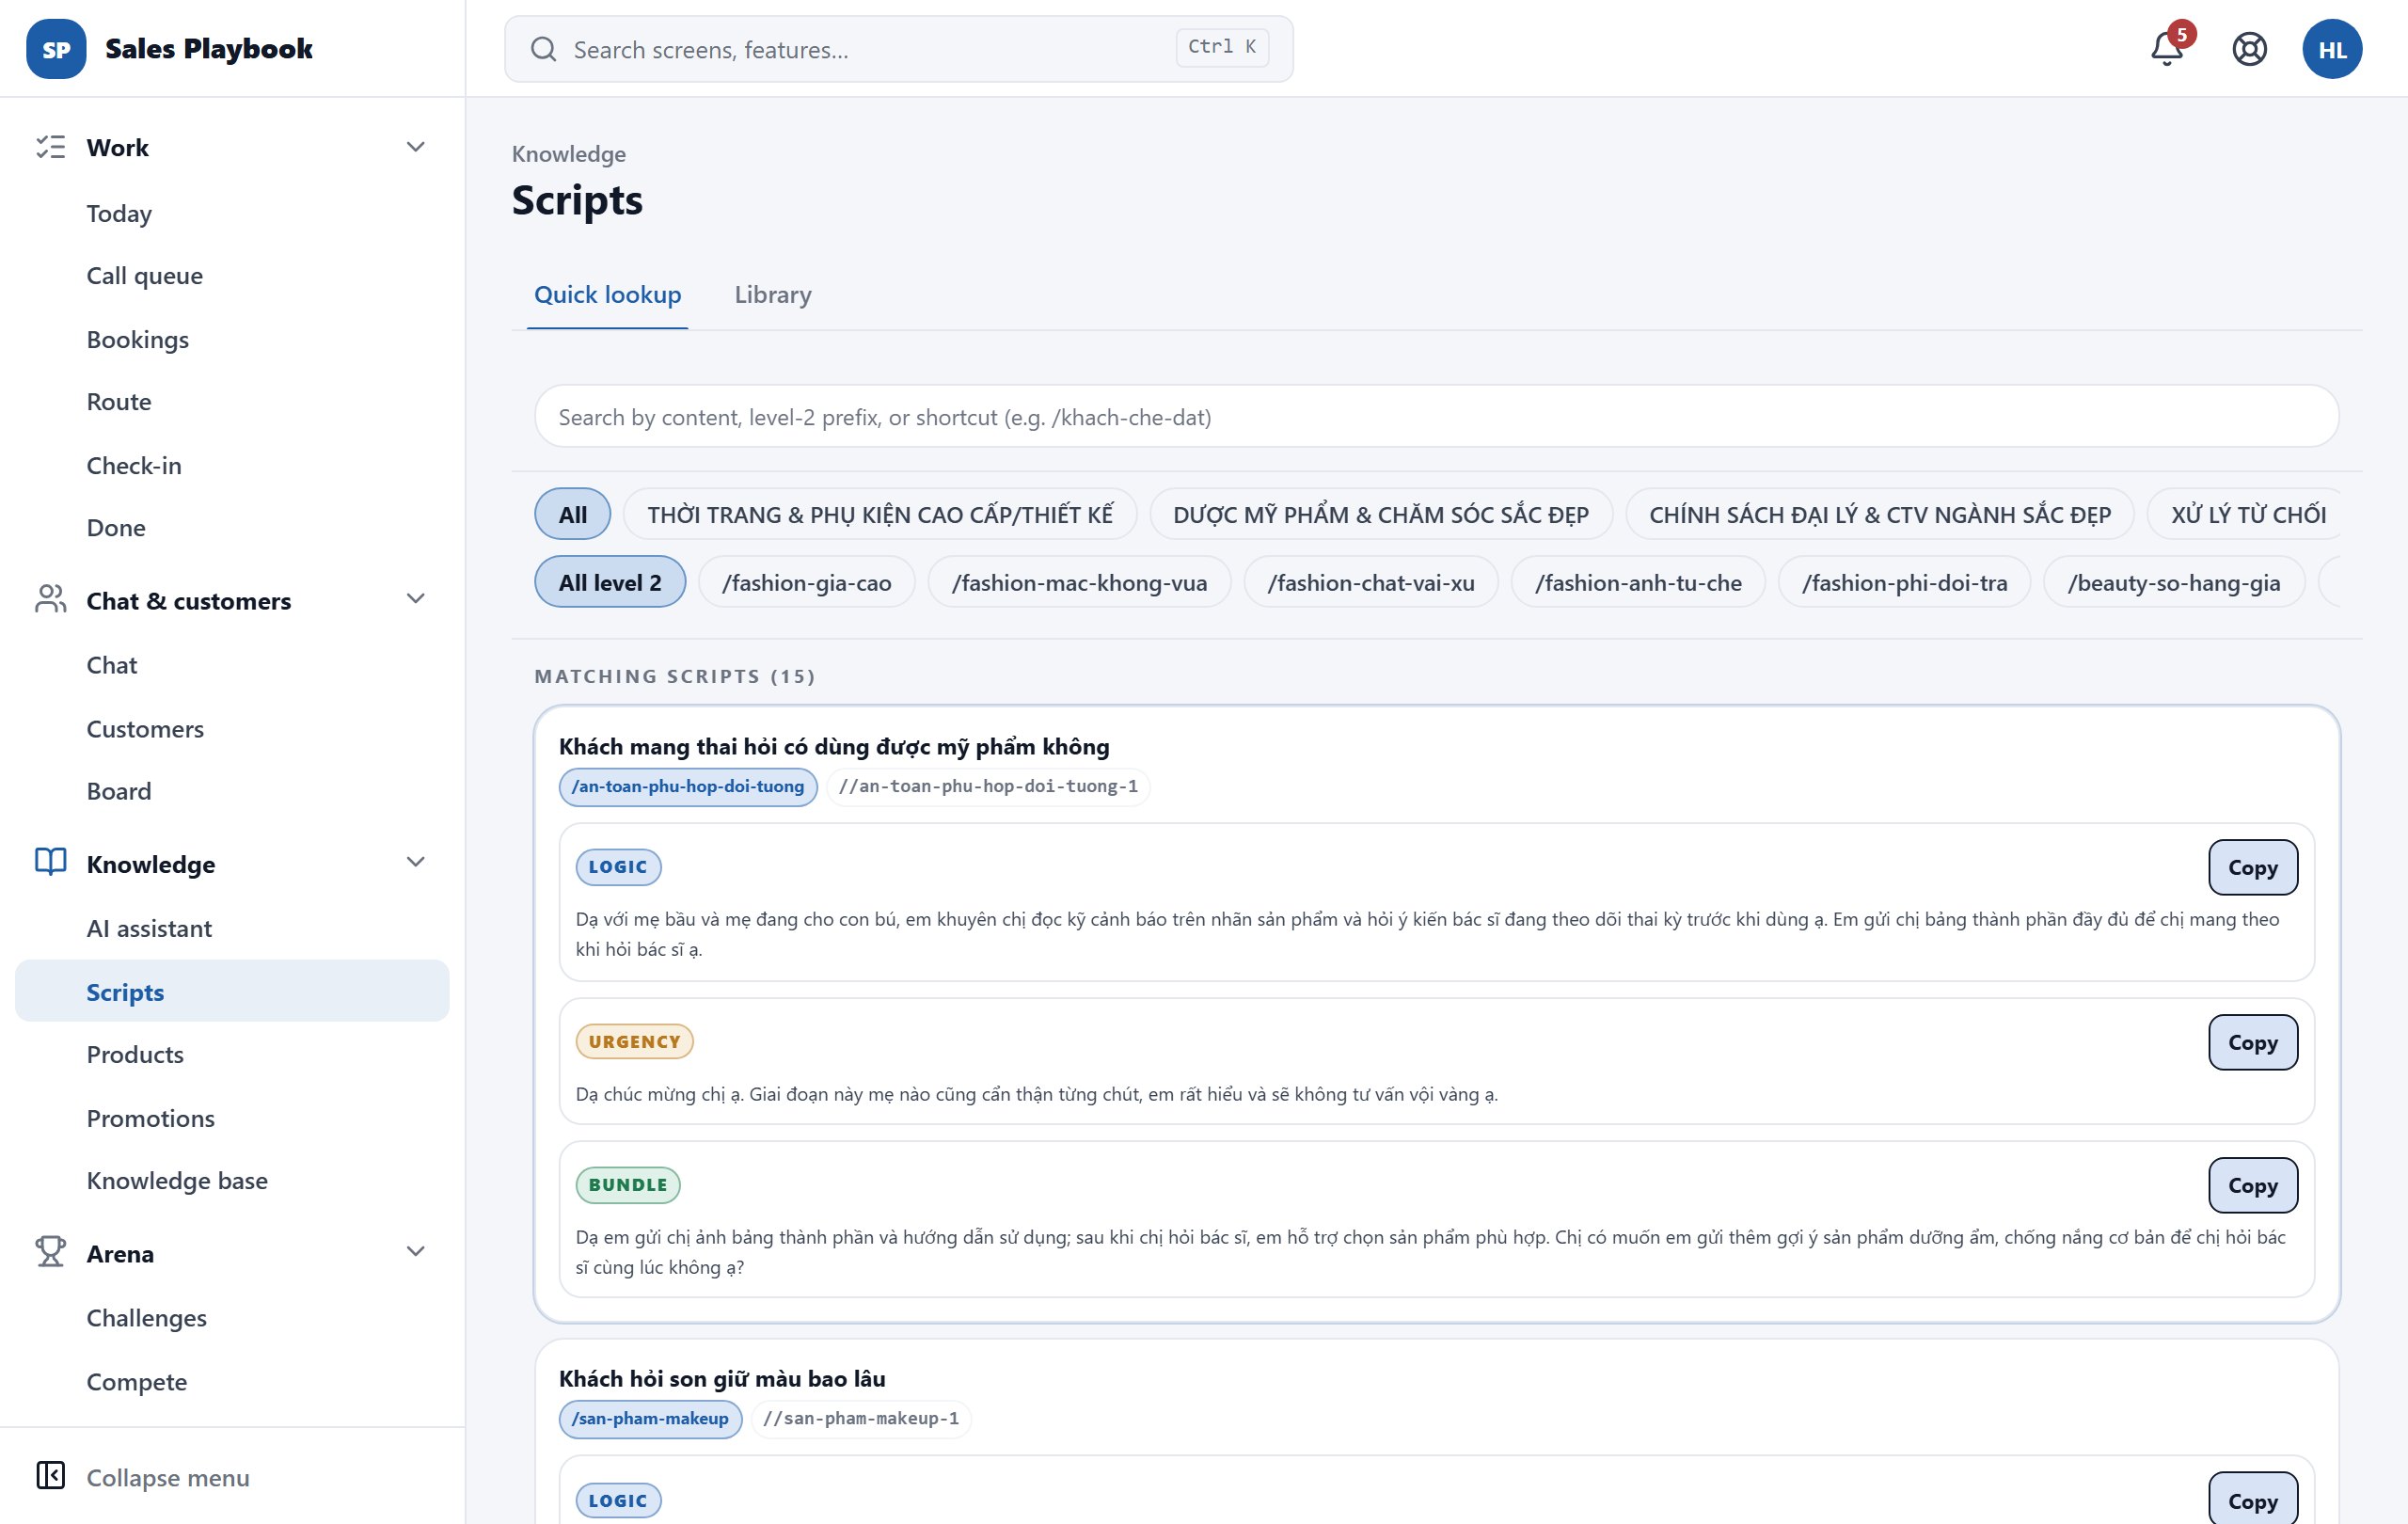
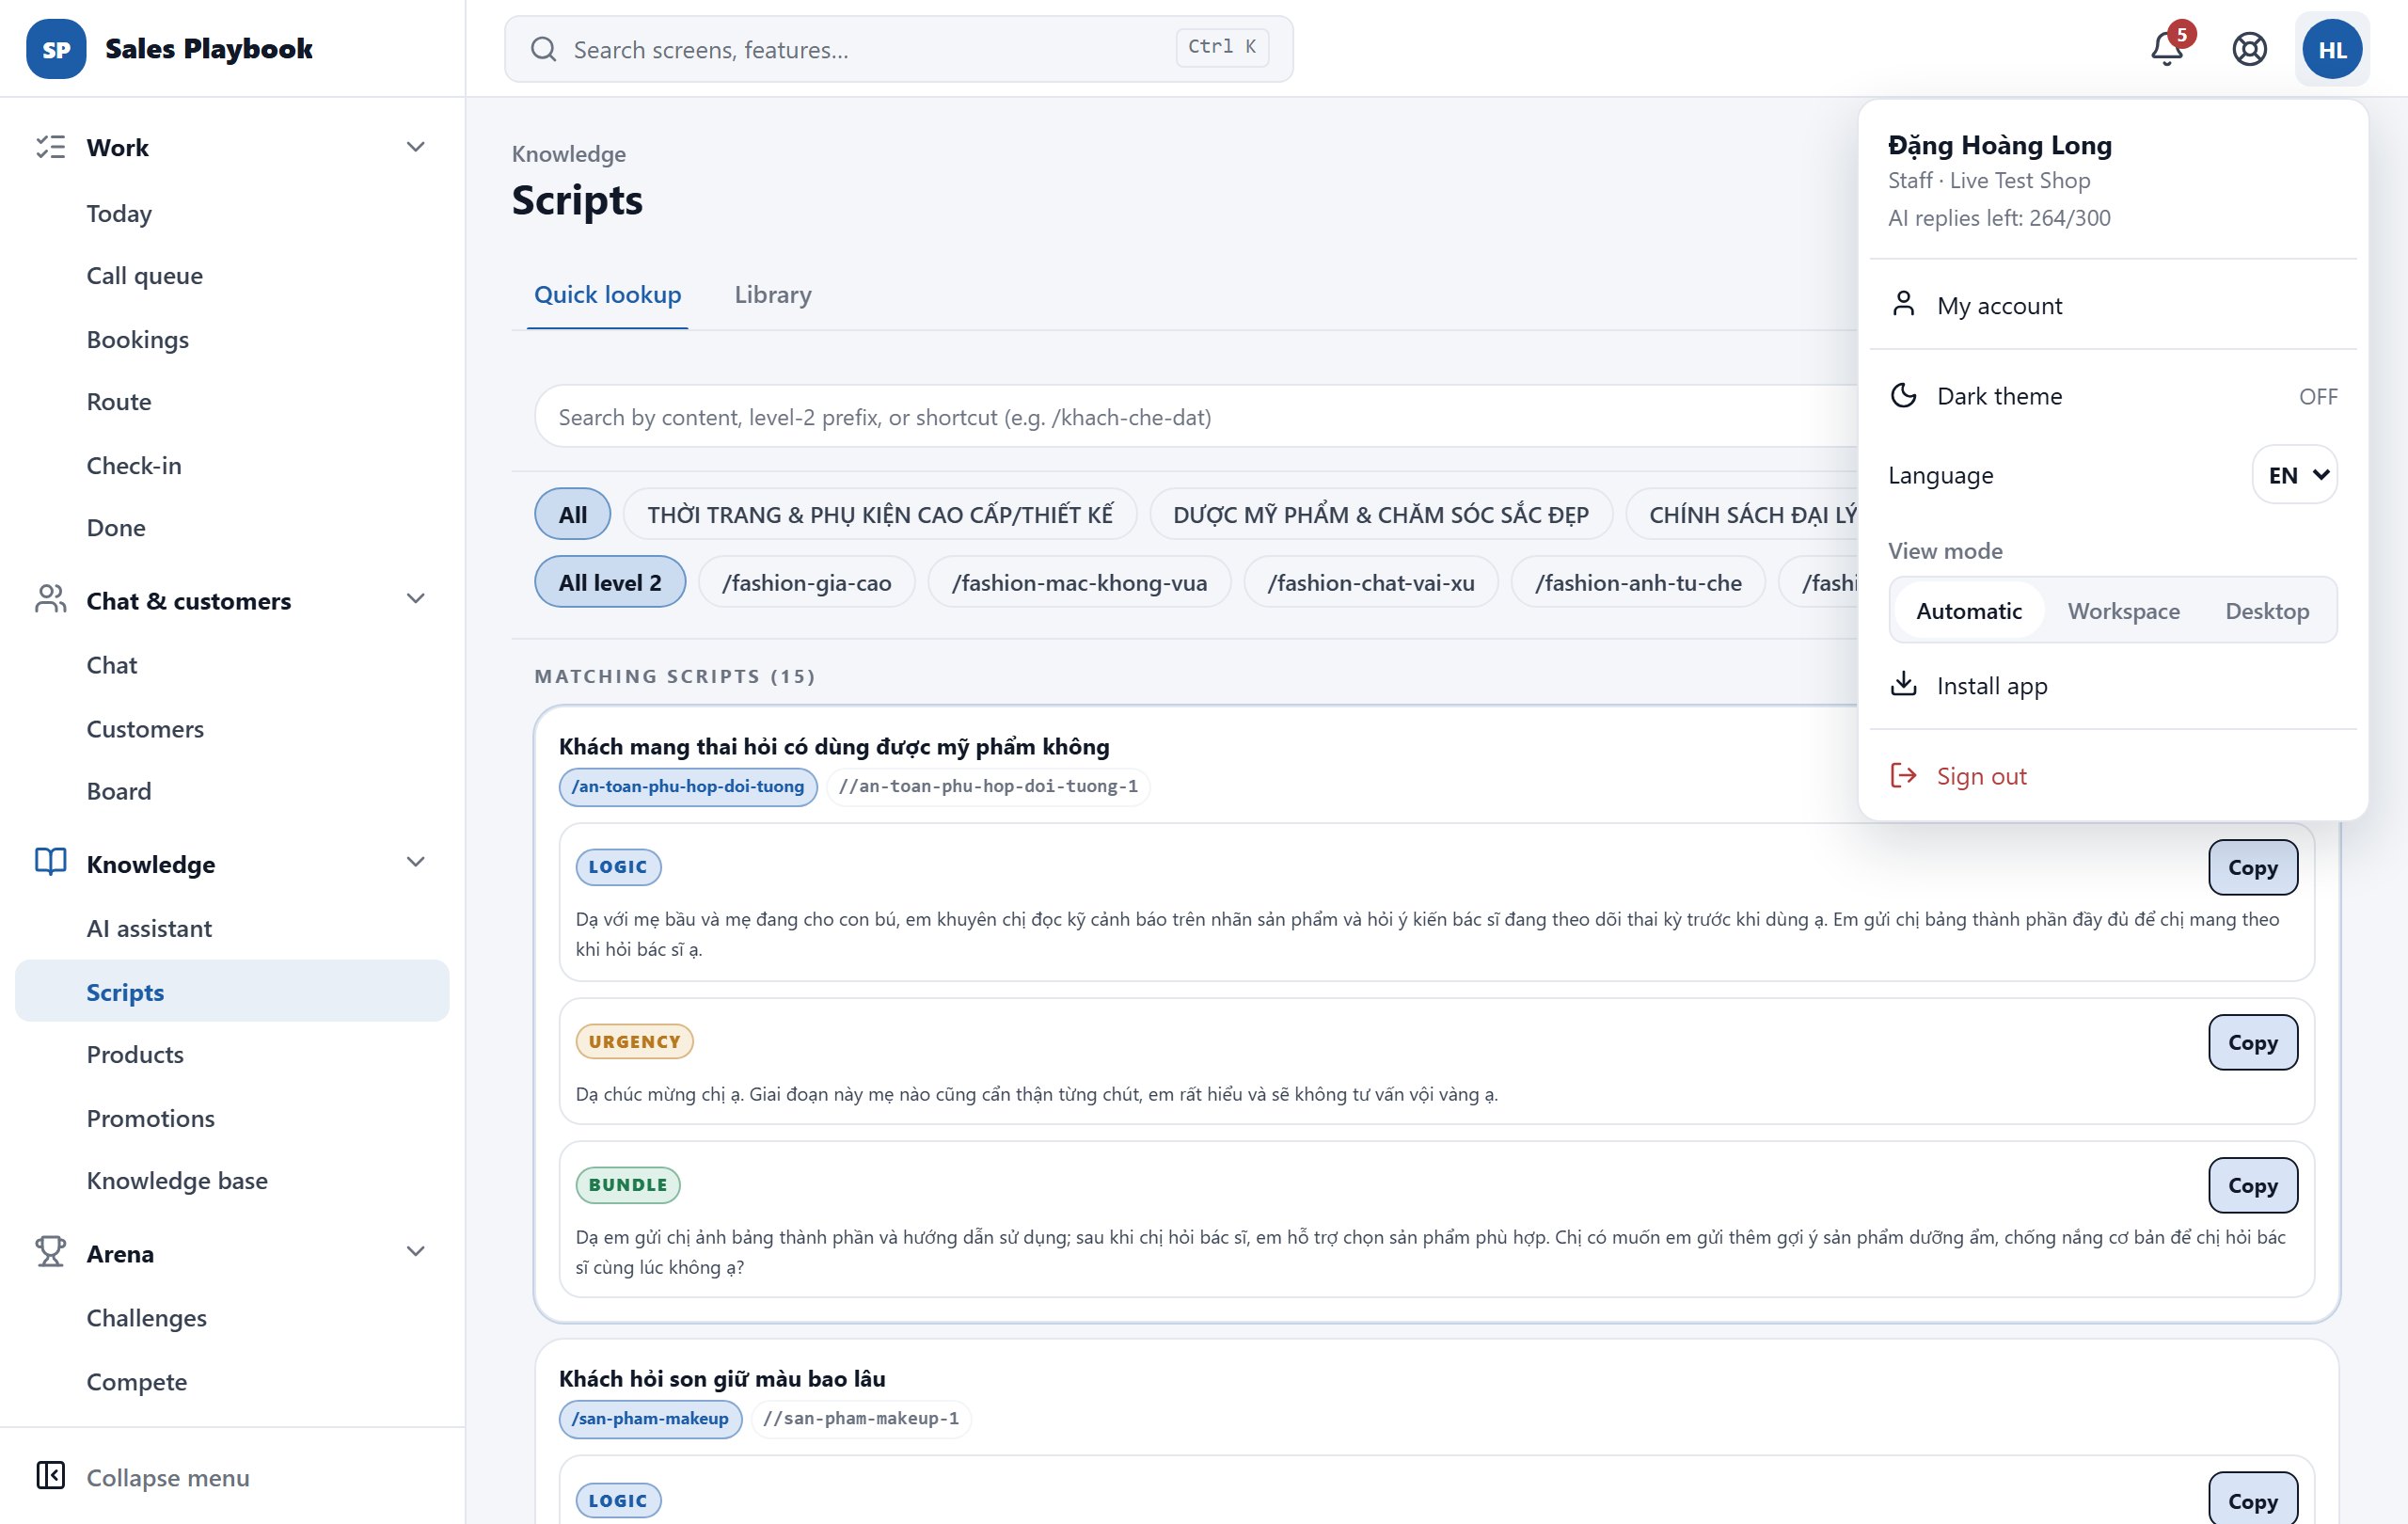
  1. 1Open "Scripts" in the "Knowledge" group of the left sidebar. The "Quick lookup" tab opens with the cursor already in the search box.
  2. 2Type a keyword from the customer's question, a level-2 category prefix or the script shortcut (for example /tu-choi-gia-cao). The "Matching scripts (…)" list filters as you type.
  3. 3To narrow it down, click a level-1 category in the first row of buttons (default "All"), then a level-2 category in the second row (default "All level 2").
  4. 4Each script has up to three options: "Logic" (reasoned explanation), "Urgency" (a reason to decide now) and "Bundle" (an add-on suggestion). Read them and pick the one that fits the customer.
  5. 5Click "Copy" on that option, then paste it into the chat with the customer.
  6. 6Click the × in the search box (or press Esc) to clear the keyword and search again.
Scripts screen, Quick lookup tab: the search box contains "giá", one matching script with Logic, Urgency and Bundle options and Copy buttons
Type a keyword, filter by level-1 / level-2 category, then click "Copy" on the option you want.

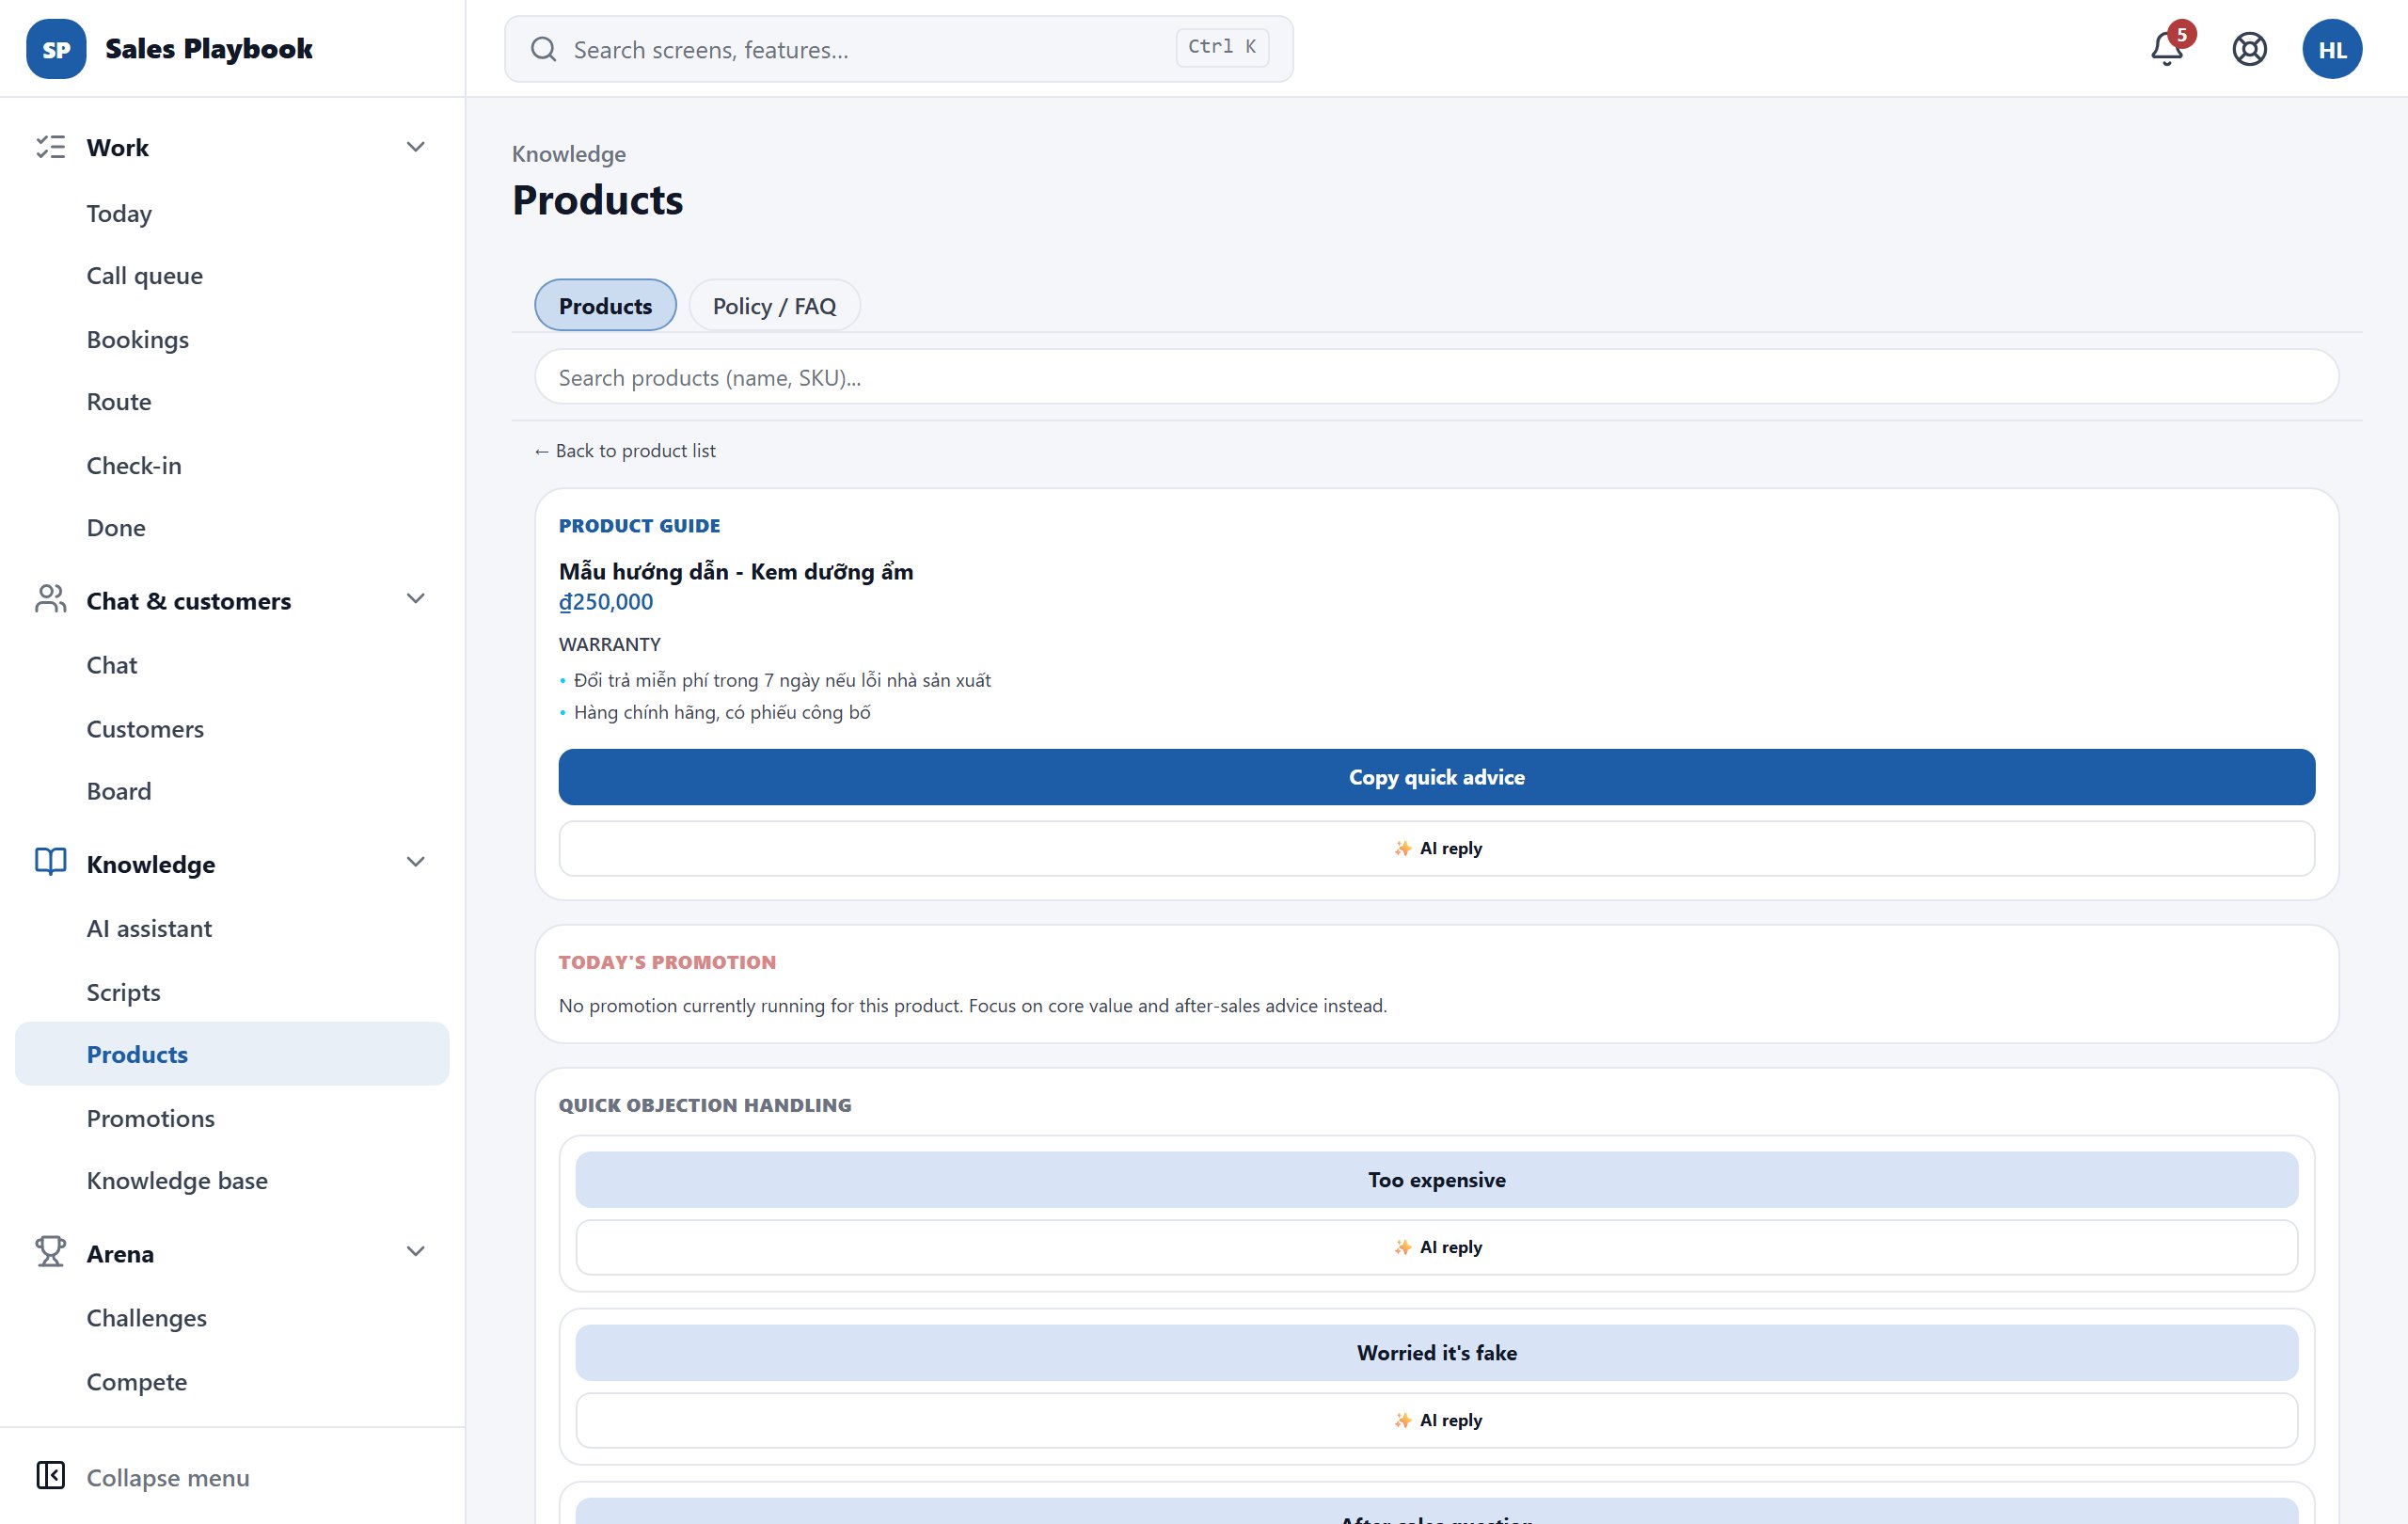
Look up a product and grab a quick objection answer

KnowledgeProductsLookup

Steps

  1. 1Open "Products" in the "Knowledge" group. Type a name or SKU in "Search products (name, SKU)..." and click the product.
  2. 2The "Product guide" block shows the name, price and warranty terms. Click "Copy quick advice [F1]" to copy a short introduction with name, price, warranty (and promo code, if any).
  3. 3"Today's promotion" shows the running campaign and time left; if it has a code, click "Apply code quickly [F2]" to copy the code and its condition for the customer.
  4. 4Under "Quick objection handling", click "Too expensive", "Worried it's fake" or "After-sales question" to copy an answer built from the product data.
  5. 5For a more tailored answer, click "AI reply" under that button. Read the result in "AI-generated reply — review before copying", then click "Copy this reply".
  6. 6The "Related policies" block lists the policy articles for this product (articles marked "suggested by tag" were picked automatically from the name/SKU). Click a title to open it and "Copy content" to copy it; click "View all policies →" to open the Knowledge base.
  7. 7Click "← Back to product list" to return to the list.
Staff Products screen: product guide for the sample product with price, warranty, Copy quick advice button, Today's promotion and Quick objection handling blocks
Pick a product to see its guide; every objection answer also has an "AI reply" button for a more tailored reply.

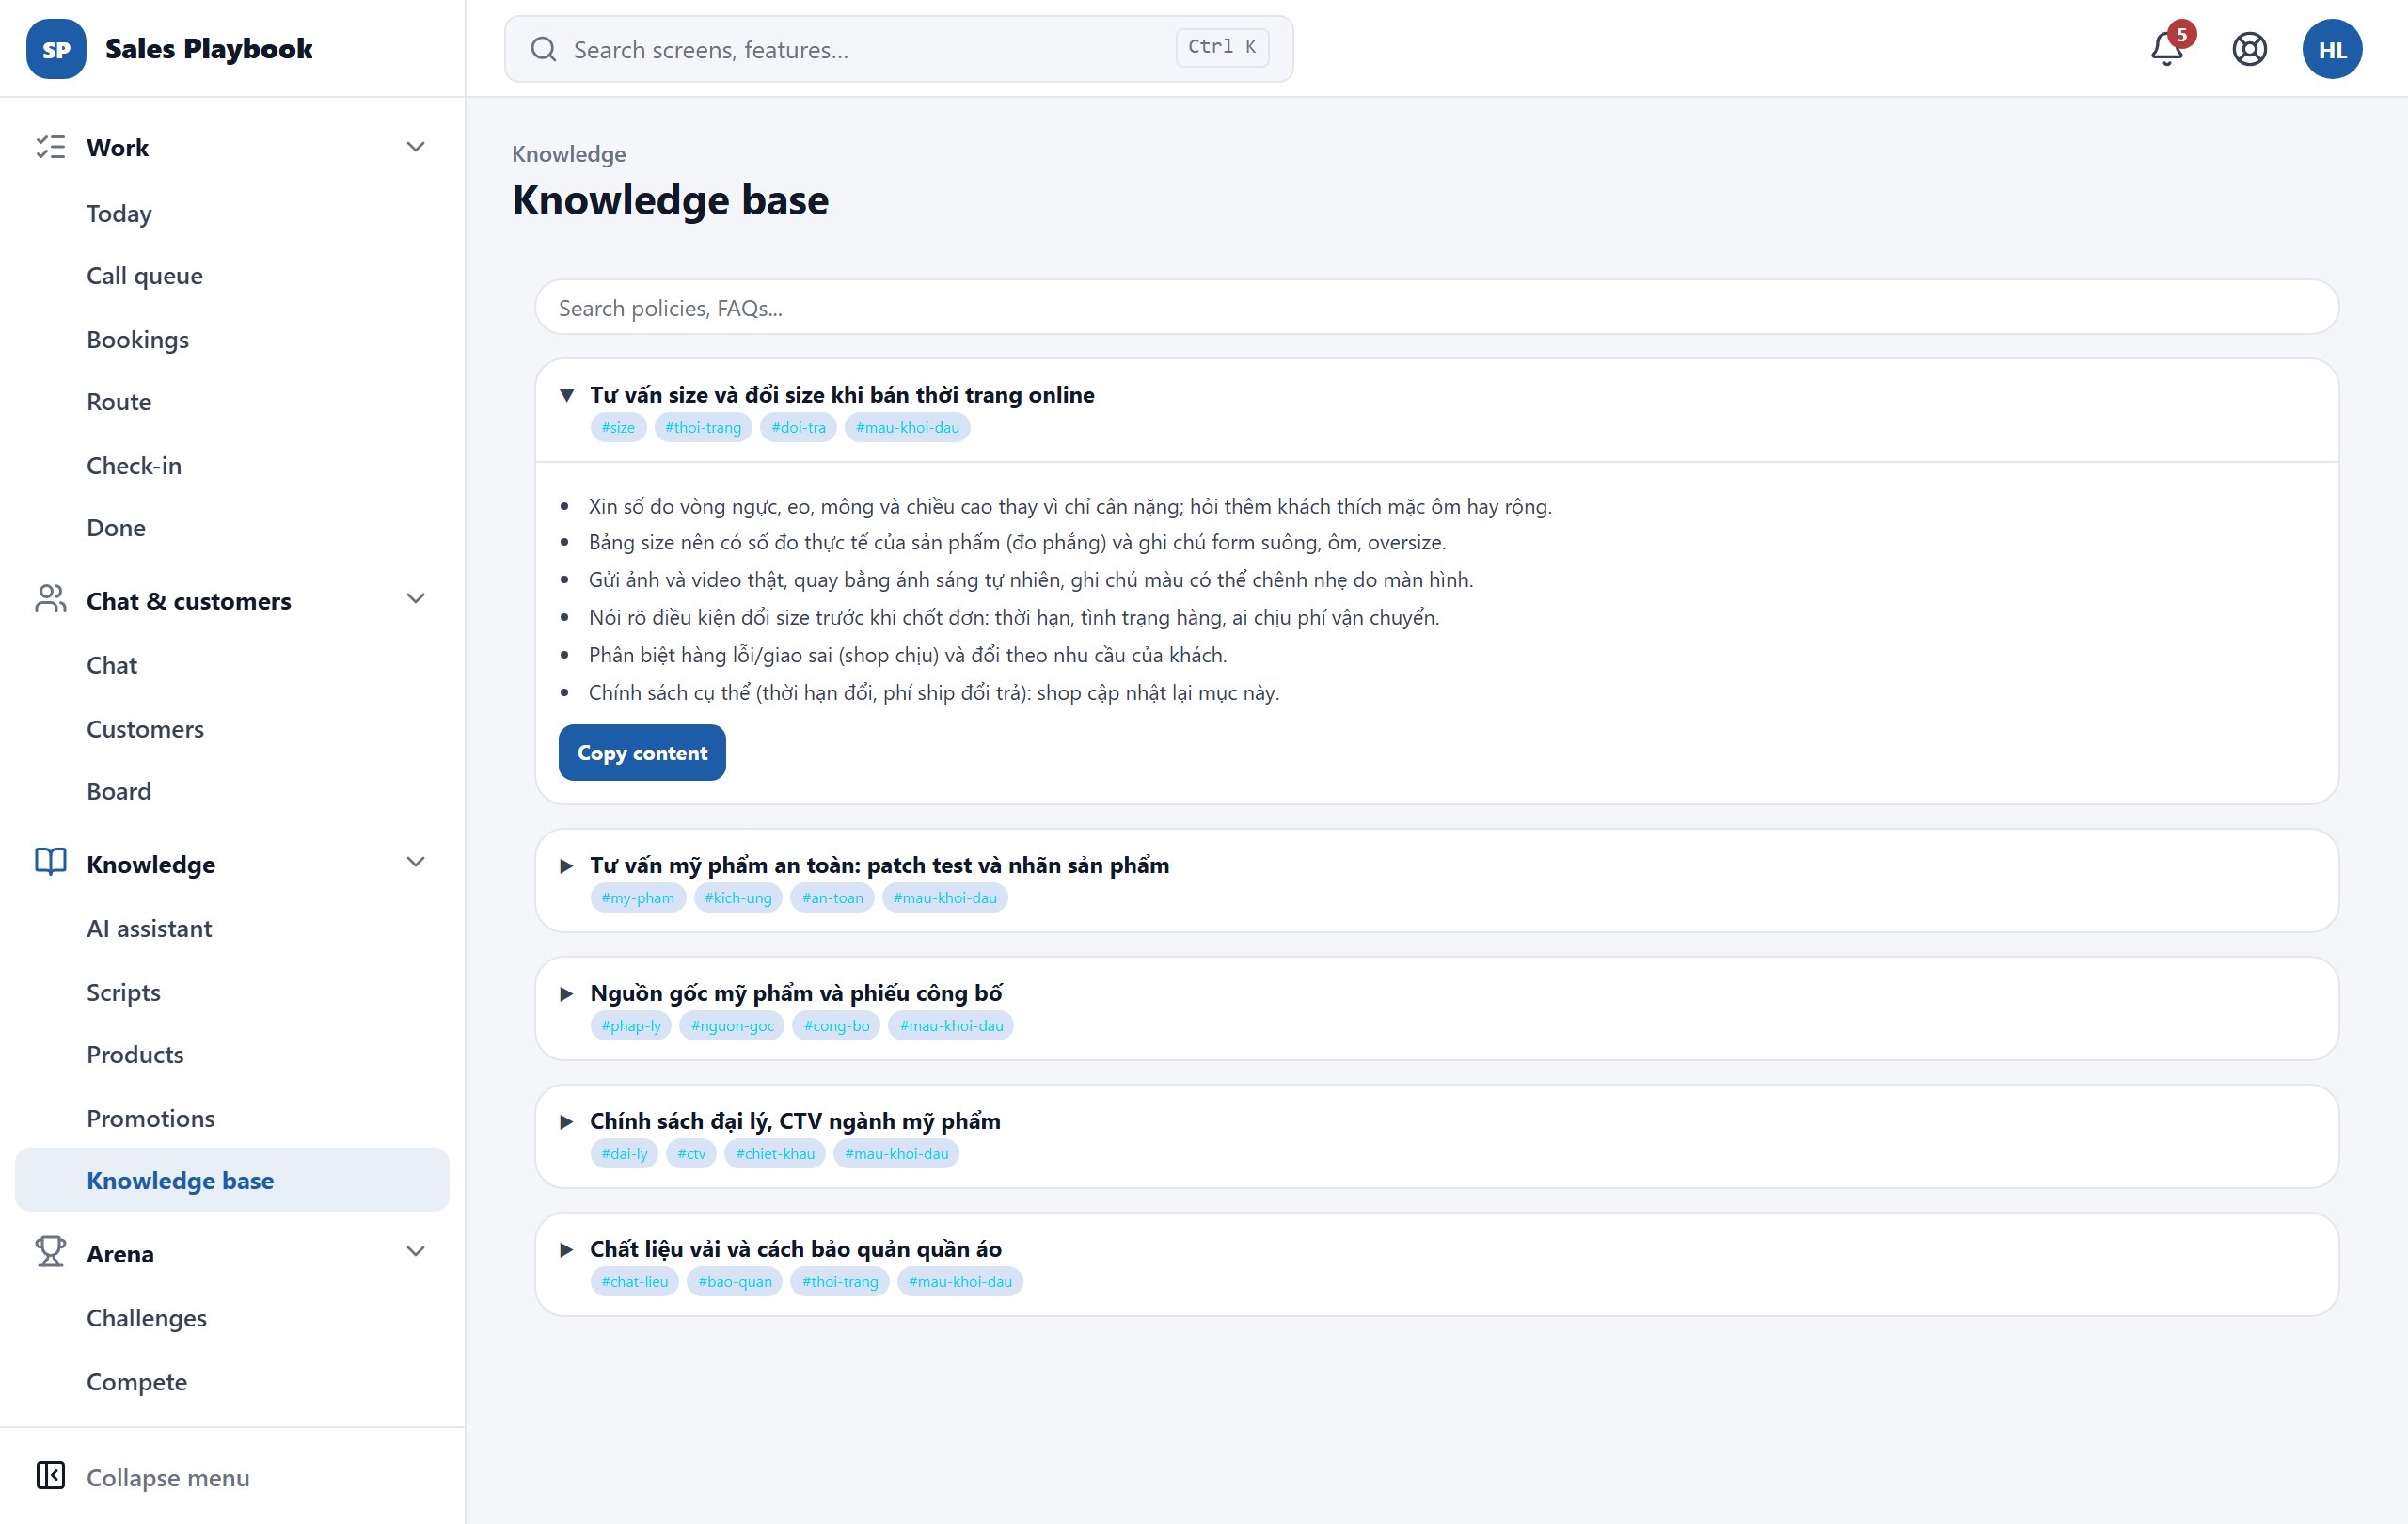
Look up policies and FAQs

KnowledgeKnowledge baseLookup

Steps

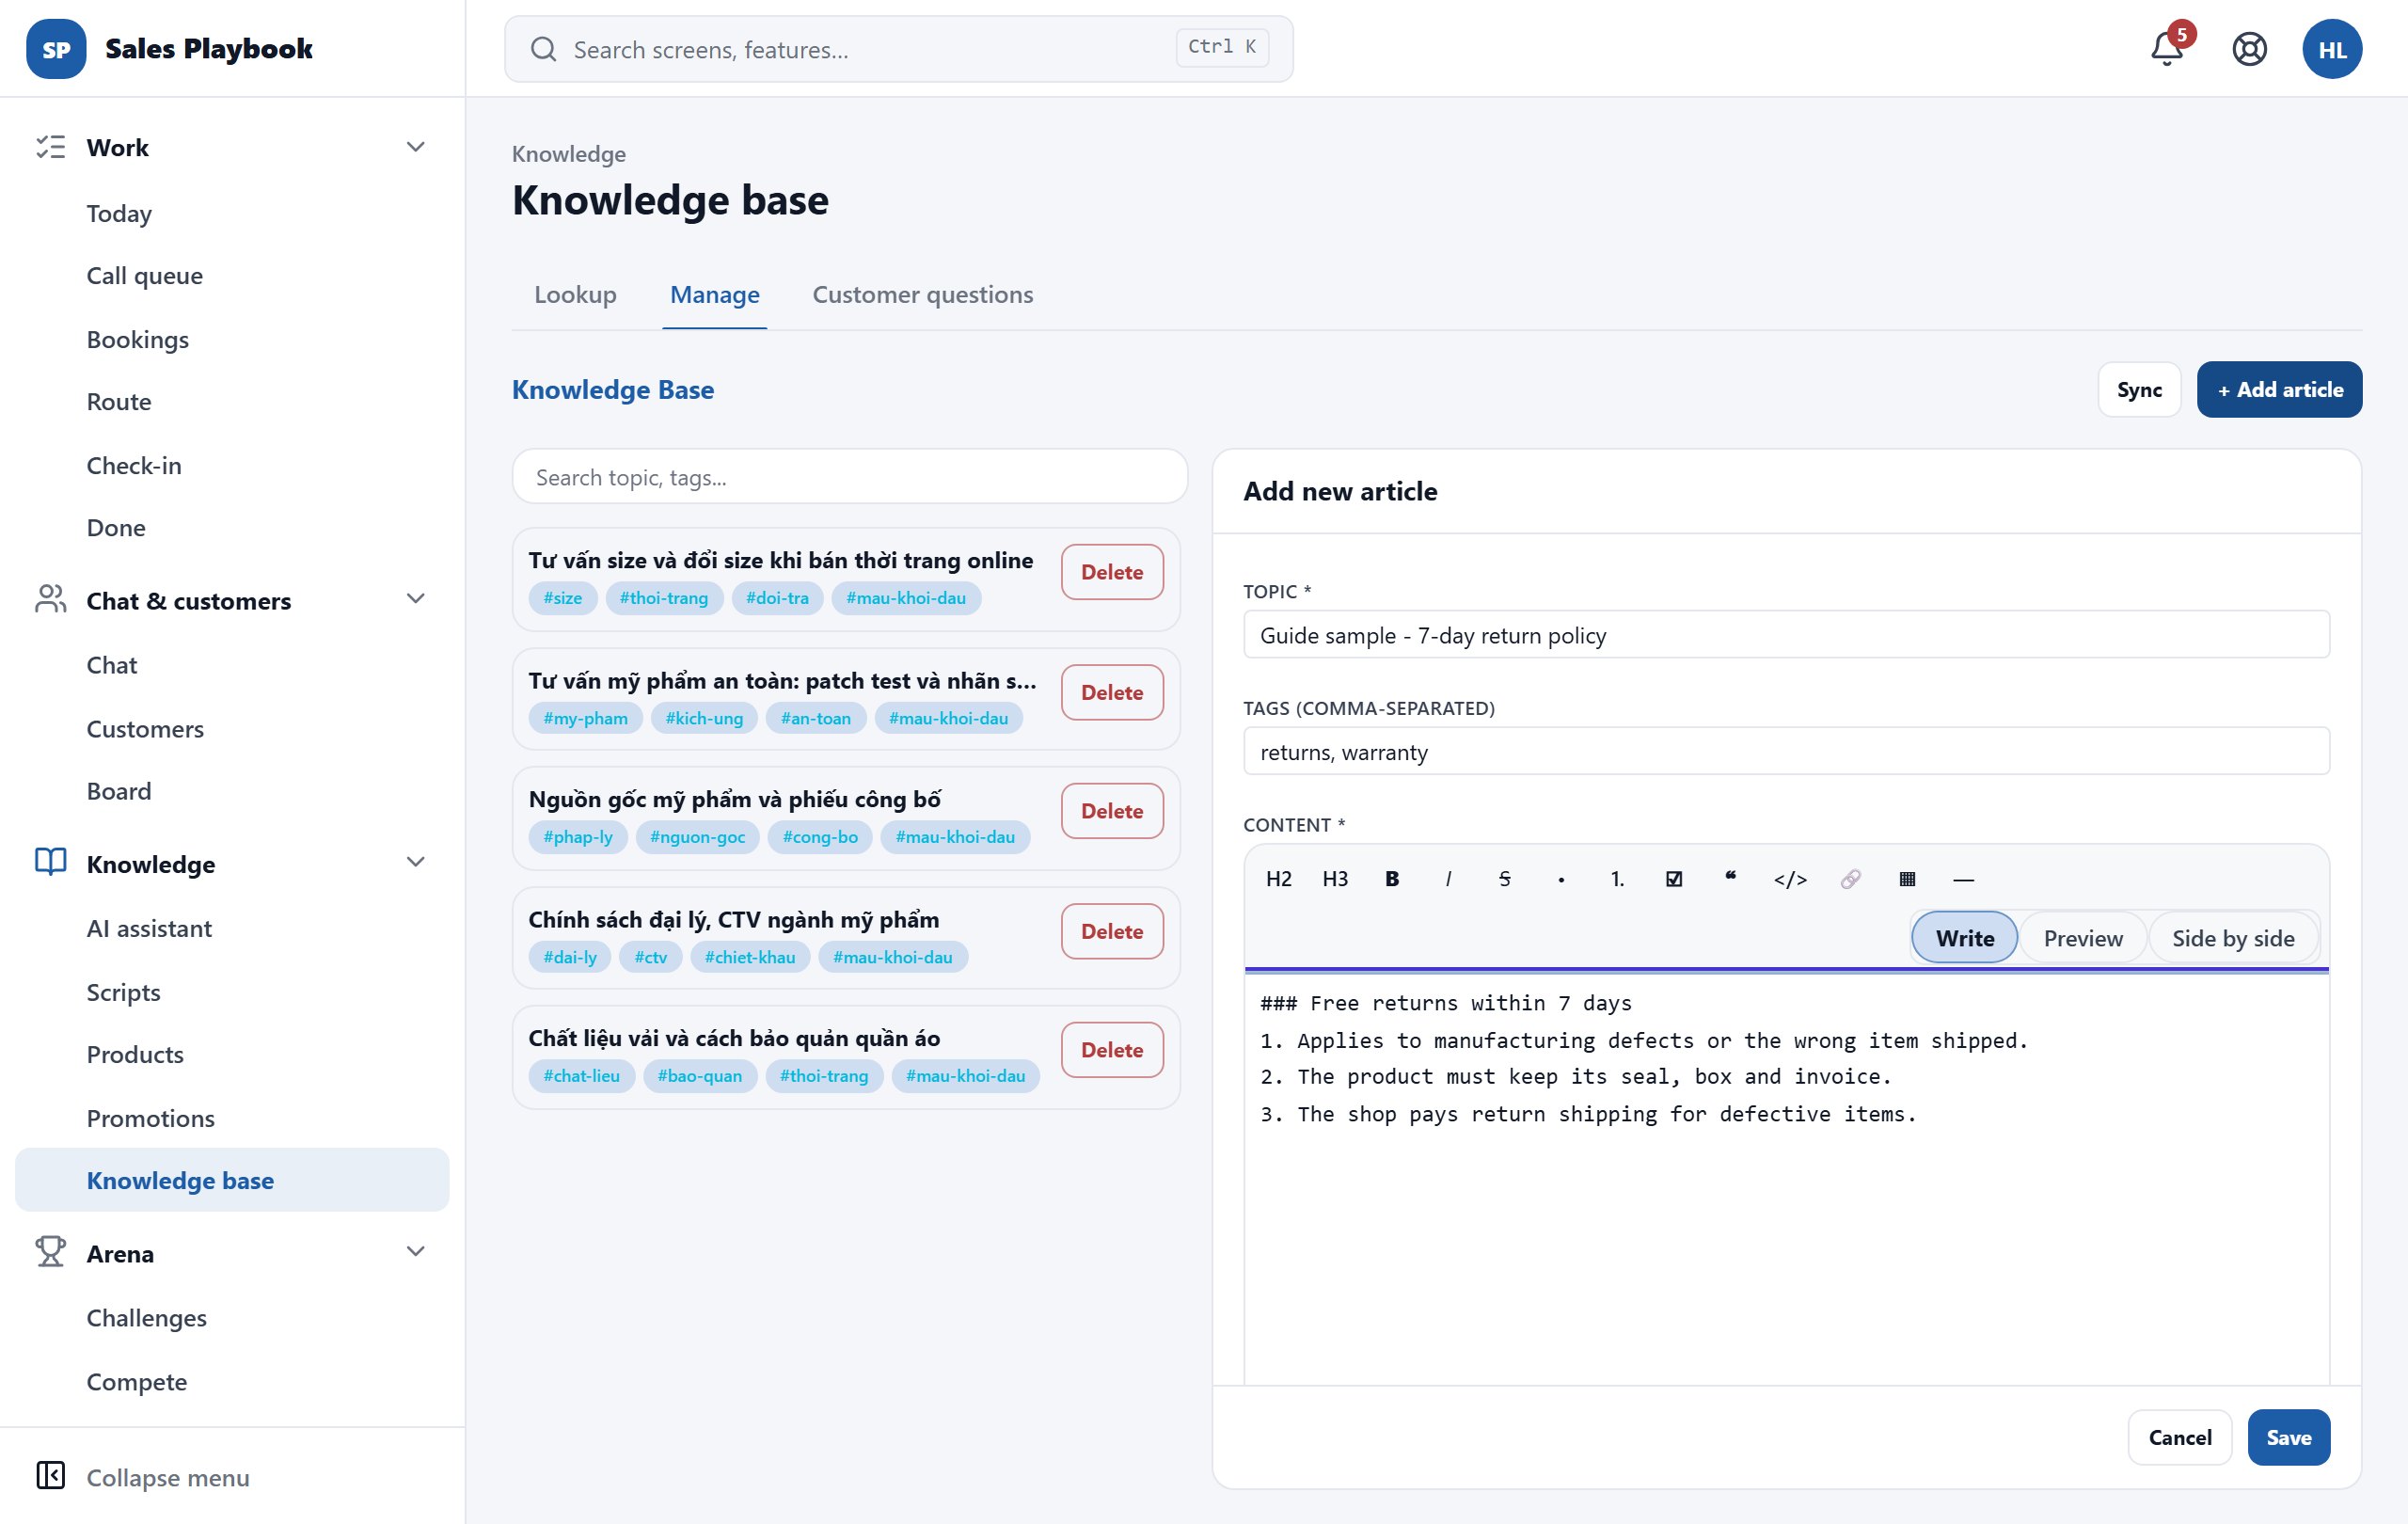
  1. 1Open "Knowledge base" in the "Knowledge" group.
  2. 2Type a keyword in "Search policies, FAQs..." — the list filters by topic, tag (#tag) and article content. Or click a #tag chip under the search box to see only articles with that tag (click "All" to clear it).
  3. 3Click an article title (the ▶ arrow) to expand the full text; click again to collapse it.
  4. 4Click "Copy content" to copy the whole article, then paste it and adjust it for the customer.
Staff Knowledge base screen: one article expanded with its key points and the Copy content button
Click a title to expand the article, then click "Copy content".

08 / 1 features

AI assistant for objections

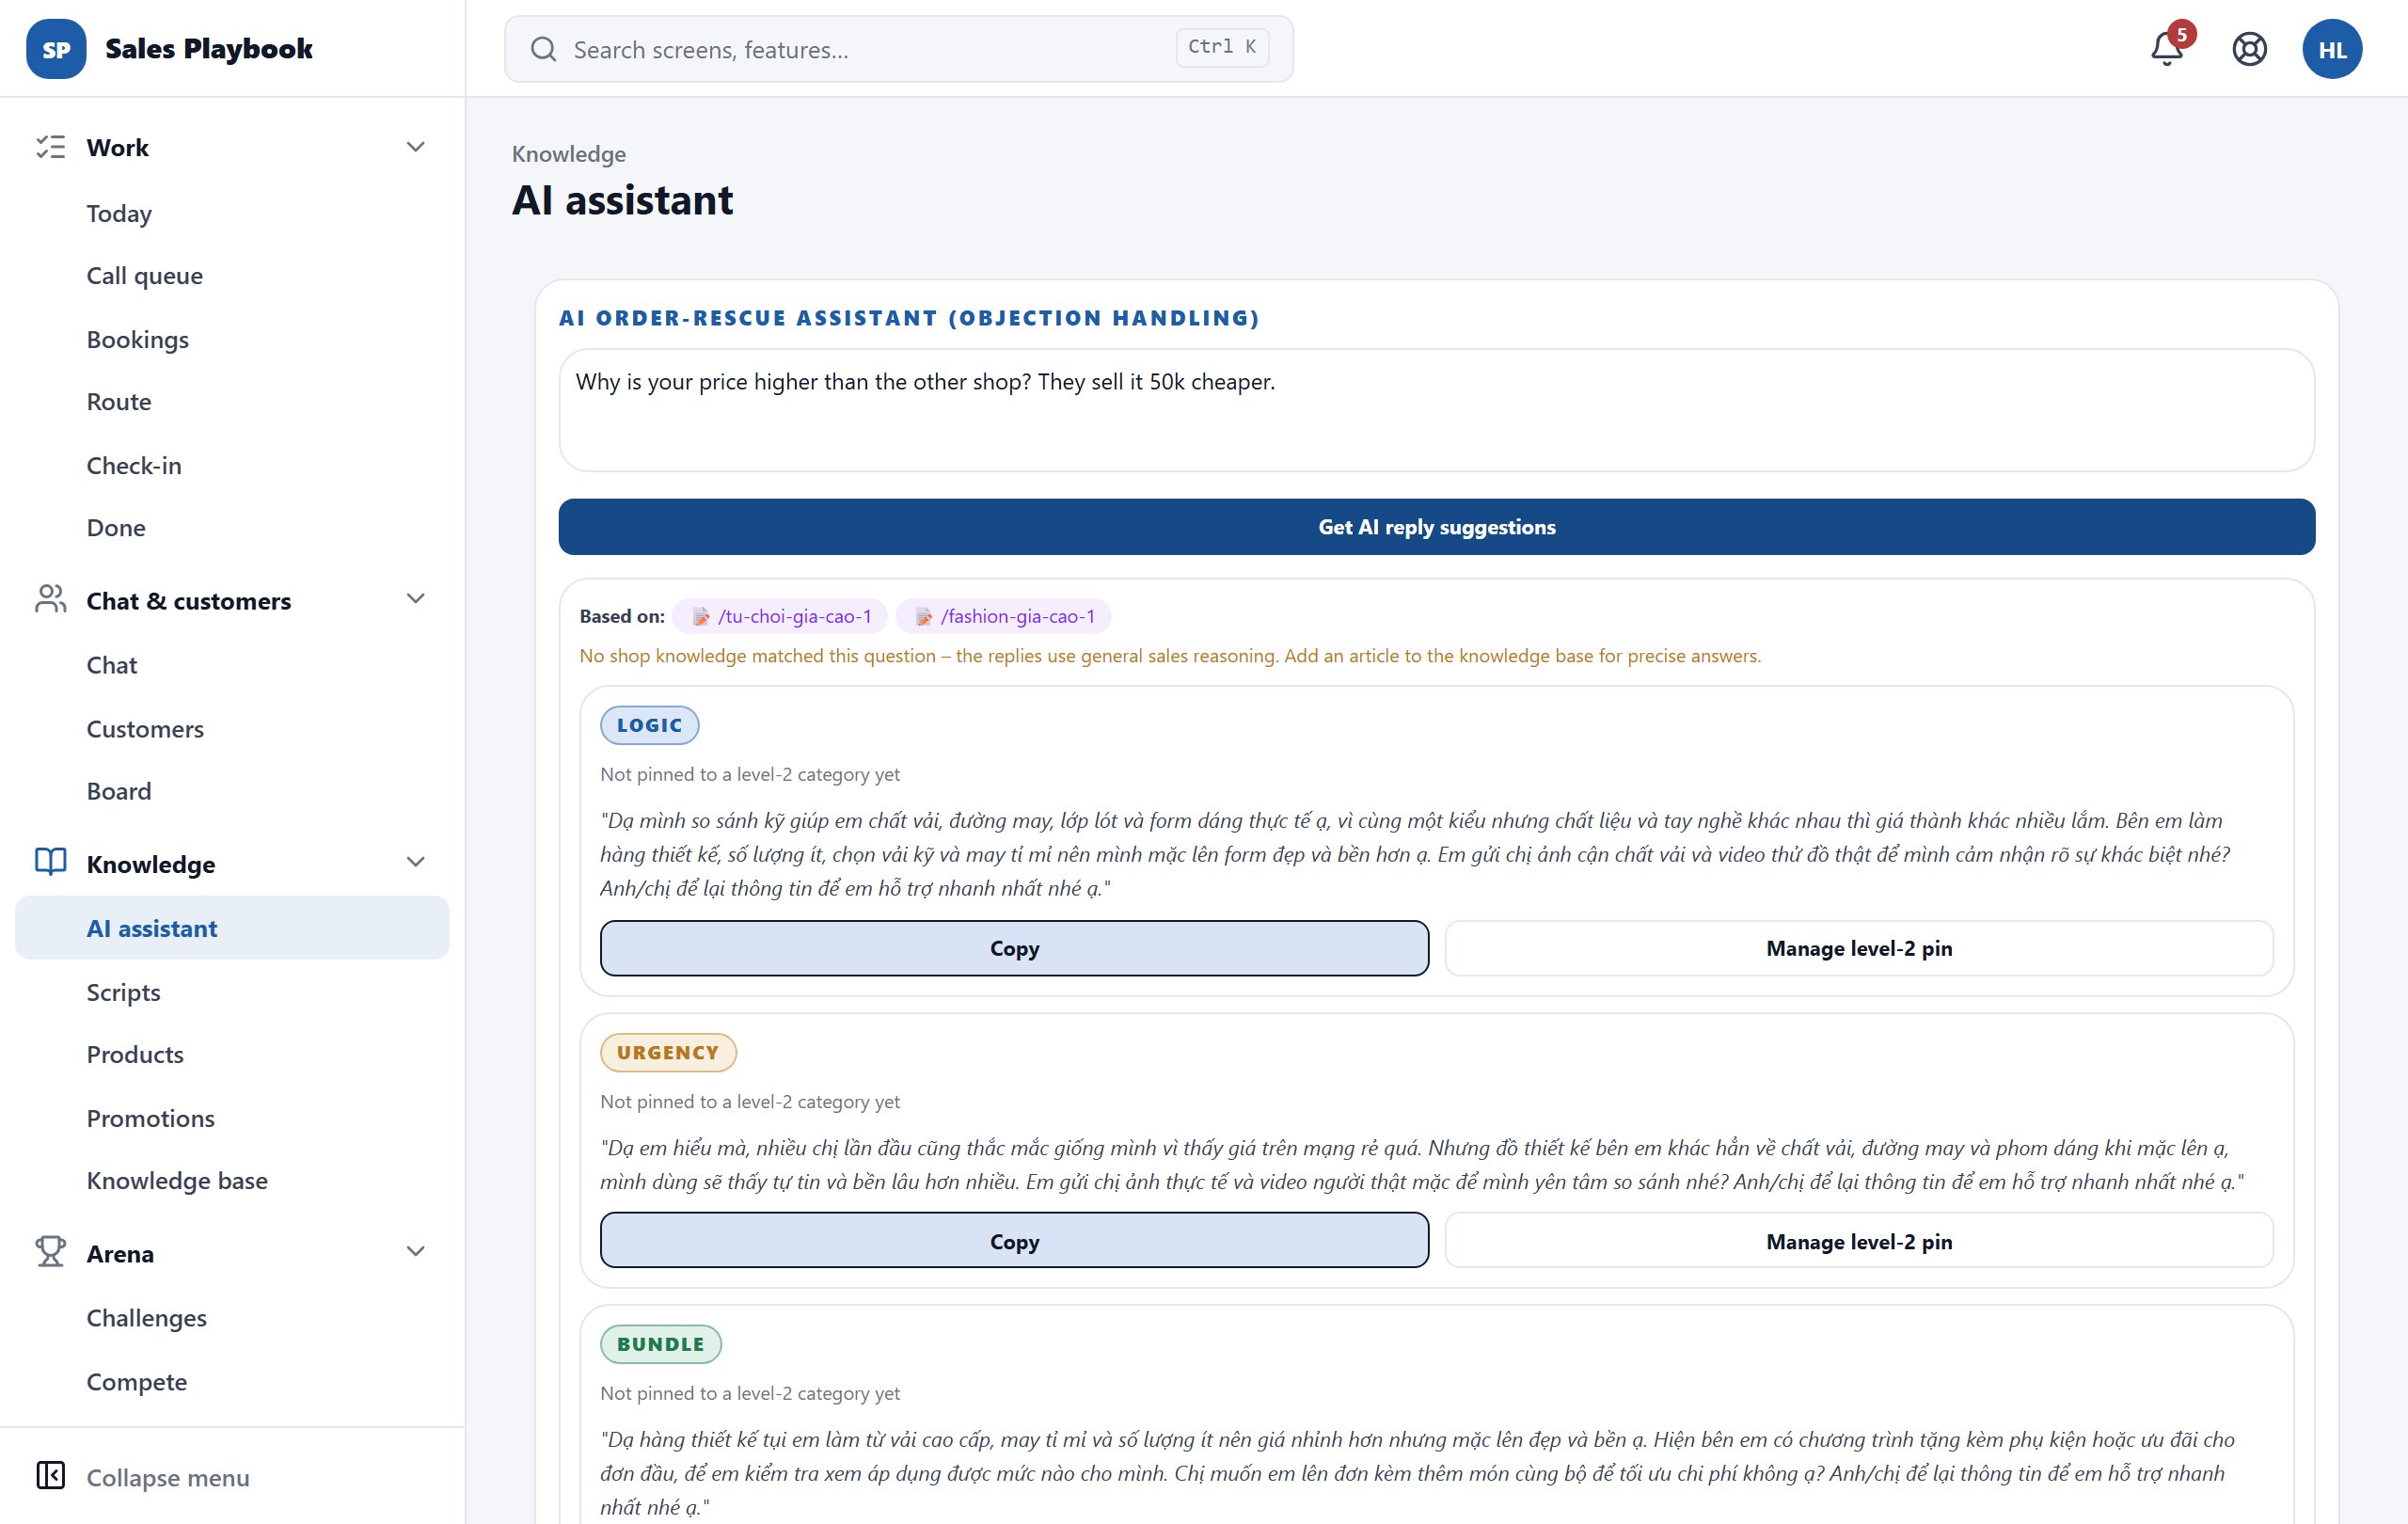
Paste a customer's complaint or objection and AI gives you three replies based on the shop's knowledge and scripts; good ones can be pinned as scripts.

Ask AI to suggest a reply to a customer objection

KnowledgeAI assistant

Steps

  1. 1Open "Knowledge" › "AI assistant". The "AI order-rescue assistant (objection handling)" panel appears; if you came from a task with a customer, the line "Customer: name (phone)" is already filled in.
  2. 2Type or paste the customer's exact words into "Paste the customer's objection/refusal here".
  3. 3Click "Get AI reply suggestions" and wait while "Getting AI suggestion..." shows.
  4. 4Read the three options "Logic", "Urgency" and "Bundle". The "Based on:" line shows which of the shop's knowledge, products, vouchers or scripts the AI used.
  5. 5Click "Copy" on the option you like and paste it into the conversation with the customer.
  6. 6To keep a good reply in the script library: click "Manage level-2 pin" under that option. The "Choose a level-2 category" list opens, grouped by level-1 category (e.g. "/tu-choi-gia-cao - Gia Cao"); type in "Search by name or industry..." or scroll, then click the category to save to. Click a pinned category again to unpin.
AI assistant screen with a price objection and three replies, Logic, Urgency and Bundle, each with Copy and Manage level-2 pin buttons
The "Based on:" line shows which scripts the AI used; each option has "Copy" and "Manage level-2 pin".

09 / 2 features

My targets and reward wallet

See your level, points and rank at a glance in Reports › Mine, and keep your voucher codes, reward history and reward earnings in your reward wallet.

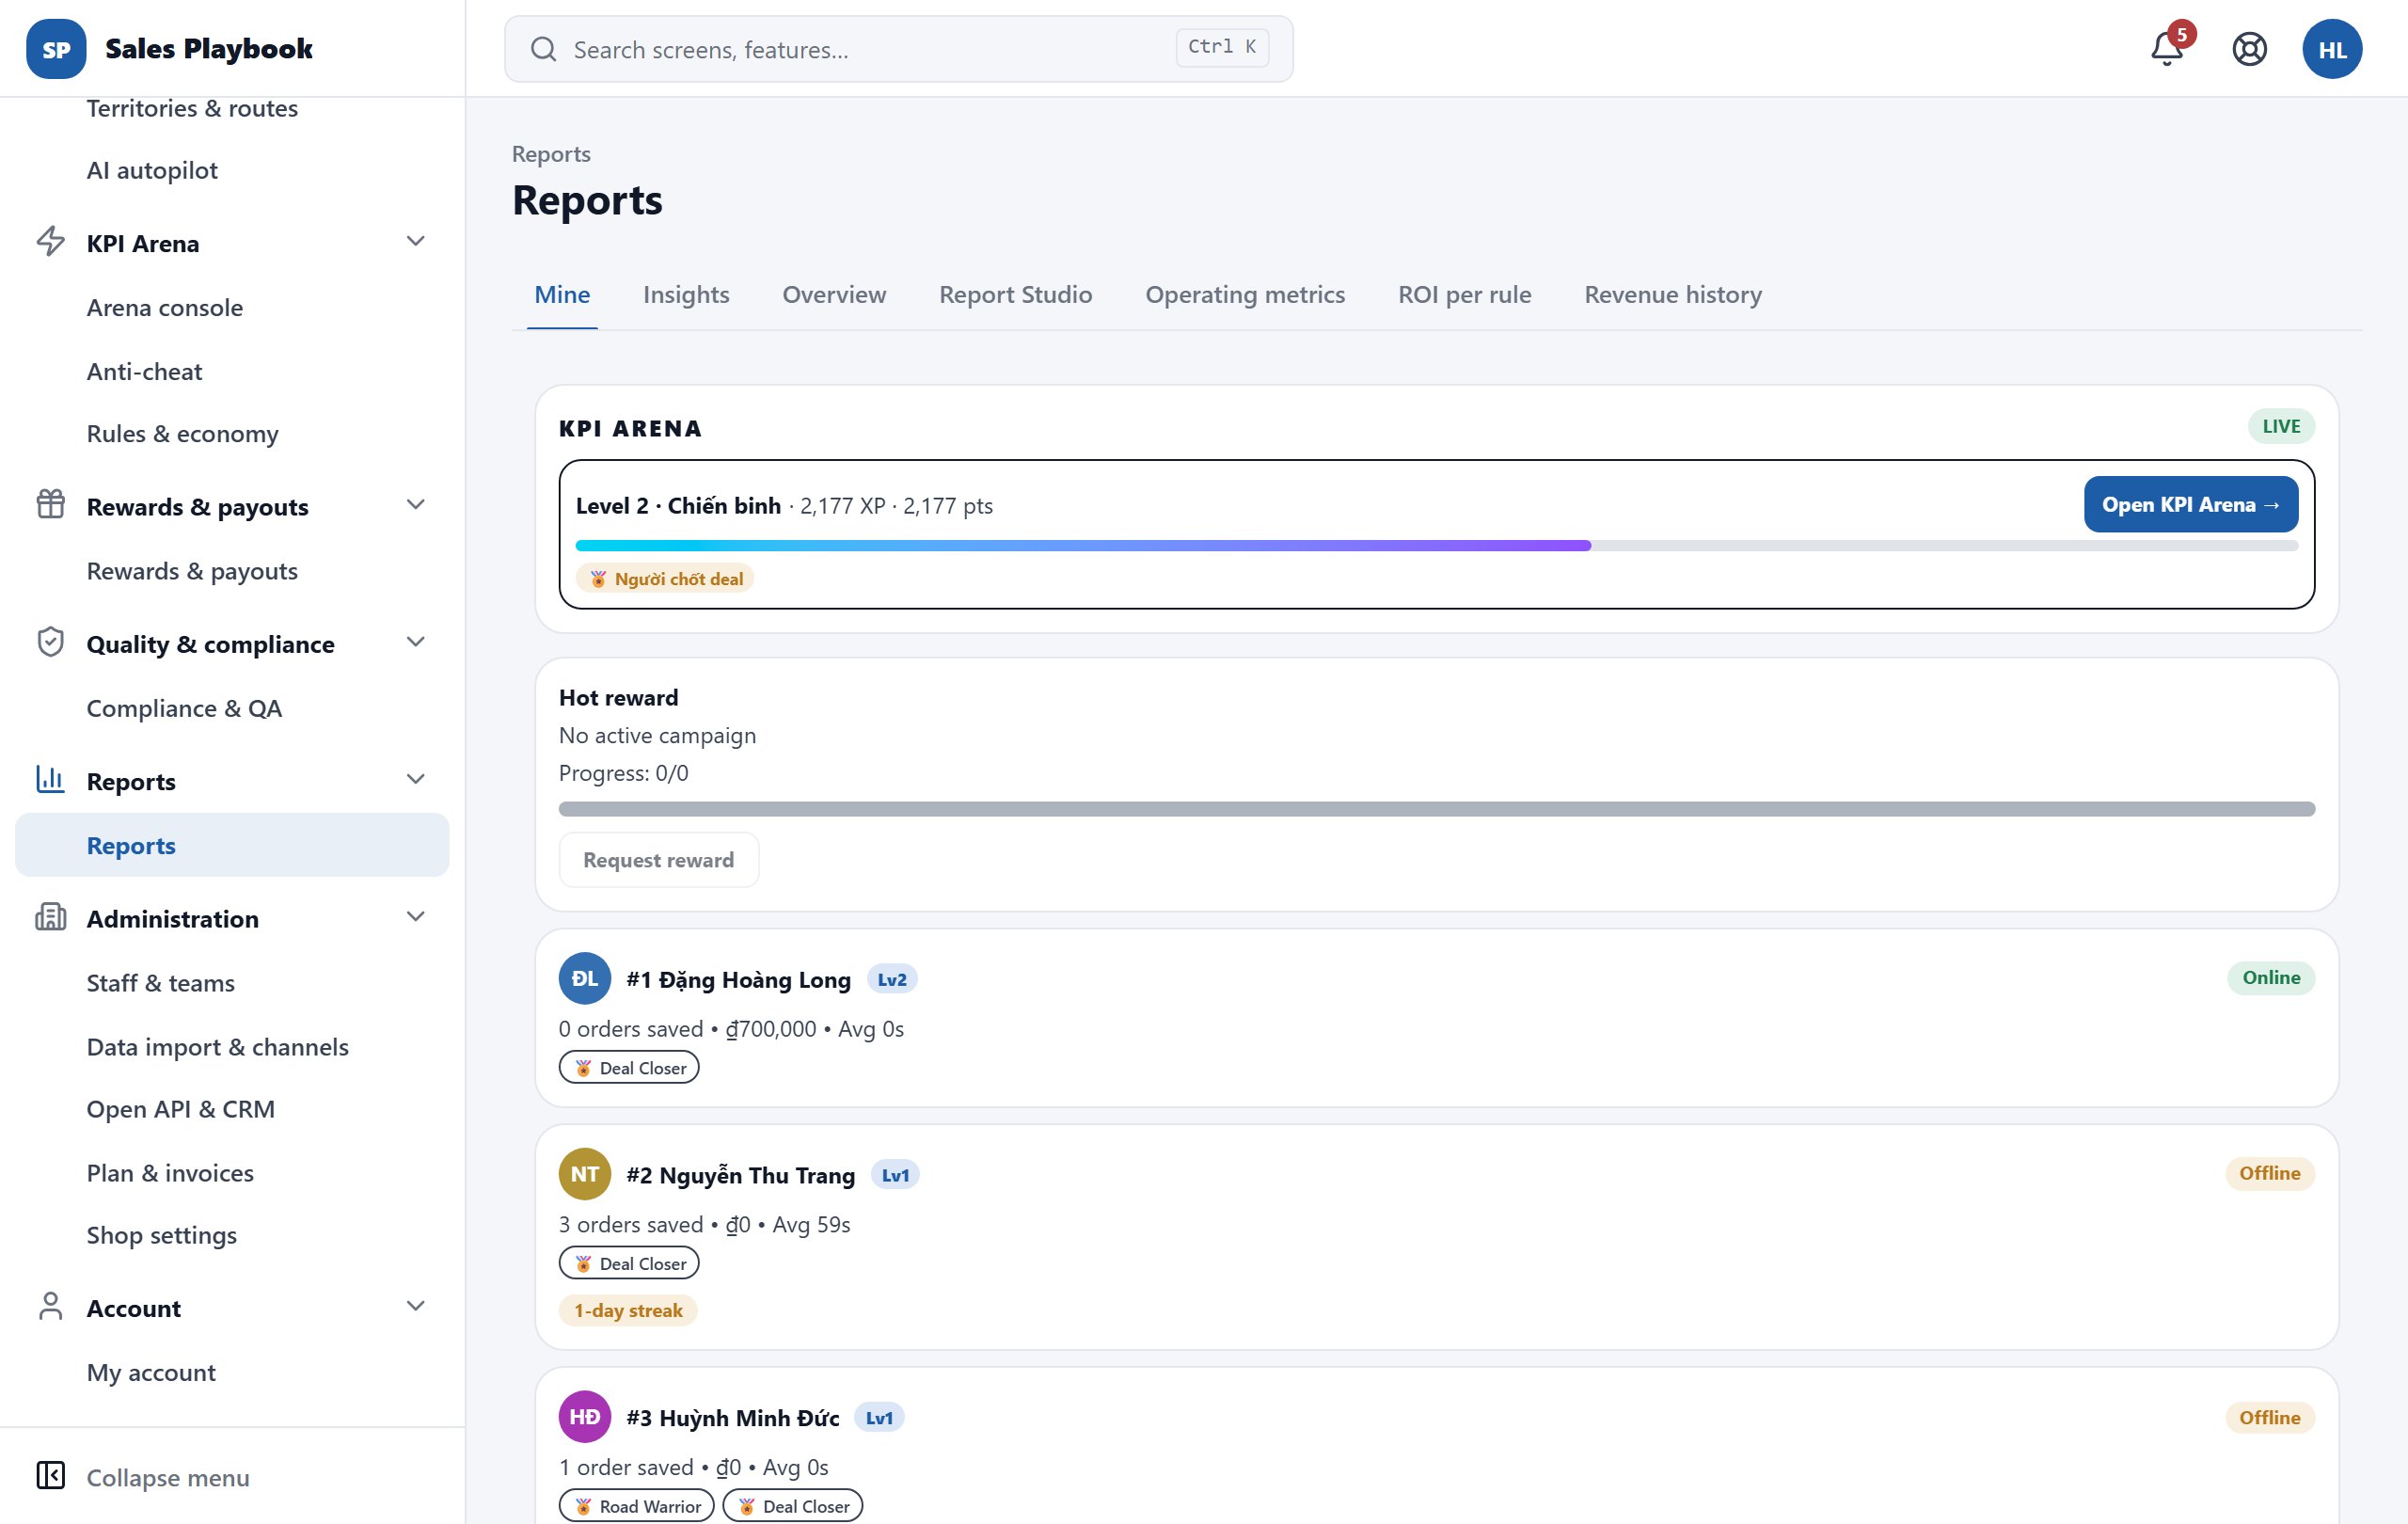
Track your targets and request a hot reward

ReportsReportsMine

Steps

  1. 1Open "Reports" in the sidebar, on the "Mine" tab.
  2. 2The "KPI ARENA" block shows your level, XP and points. Click "Open KPI Arena →" to go to the competition screens.
  3. 3The "Hot reward" block shows the running reward campaign (or "No active campaign") and your progress as current / target.
  4. 4When you reach the target, click "Request reward".
  5. 5Scroll down for the team ranking: each person shows orders saved, revenue, average response time ("Avg"), "Online"/"Offline" status, badges and their day streak.
  6. 6The "Insights" tab next to it shows your strengths and weak spots compared with the team leader.
Reports, Mine tab: the KPI Arena block, Hot reward and the team ranking
The "Hot reward" block with the "Request reward" button; the team ranking with badges and streaks below.

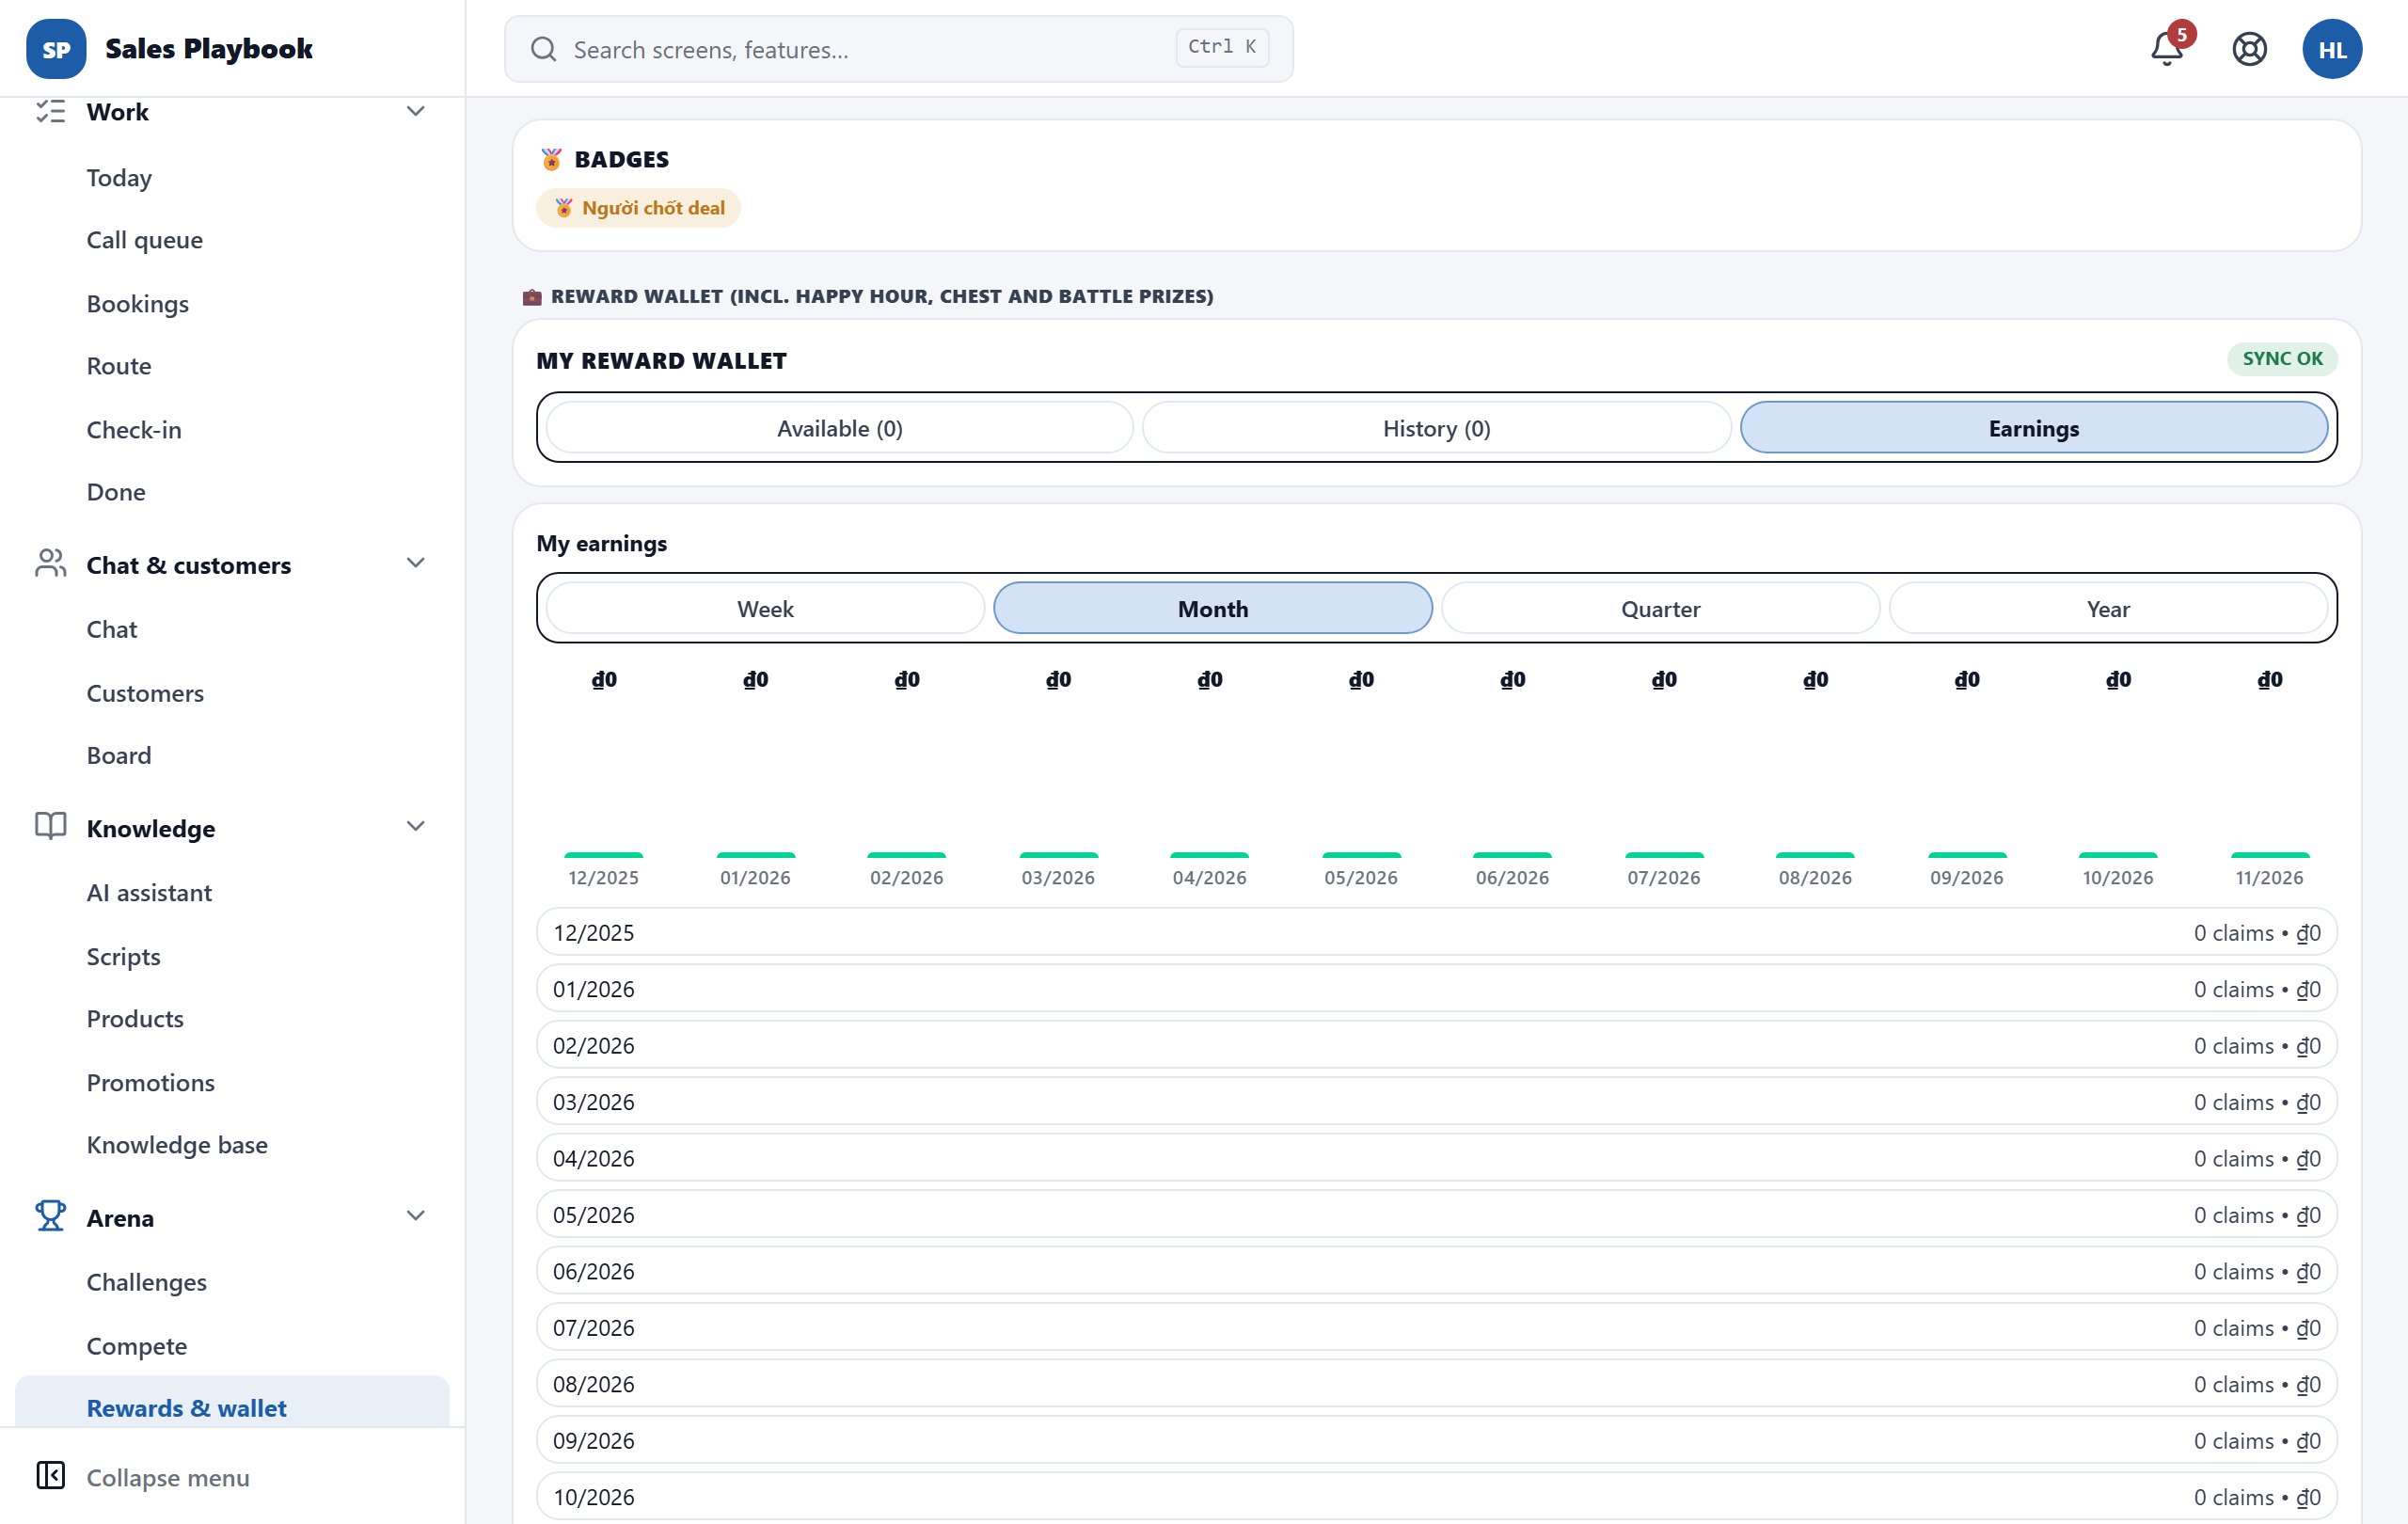
View your reward wallet, voucher codes and reward earnings

ArenaRewards & walletMy rewards

Steps

  1. 1Open "Arena" › "Rewards & wallet", tab "My rewards", and scroll to the bottom, to "REWARD WALLET (INCL. HAPPY HOUR, CHEST AND BATTLE PRIZES)".
  2. 2If a reward campaign is running, a "Reward campaign" block appears just above it — click "Claim reward" once you qualify.
  3. 3The "Available" tab lists your approved vouchers — click "COPY" to copy a code.
  4. 4The "History" tab lists rewards already handed out; click "Load more" for the next page.
  5. 5On the "Earnings" tab pick "Week", "Month", "Quarter" or "Year" to see your reward total and the period's Top 5.
My reward wallet at the bottom of the My rewards tab, with the Available, History and Earnings tabs
Reward wallet: switch between "Available", "History" and "Earnings".

10 / 8 features

Arena: challenges, competitions, rewards and levels

Every meeting, call and closed deal turns into points and XP. Complete challenges, compete on the leaderboard, in battles and seasonal leagues, spin for prizes and trade points for rewards.

Complete today's challenges and Happy Hours

ArenaChallenges

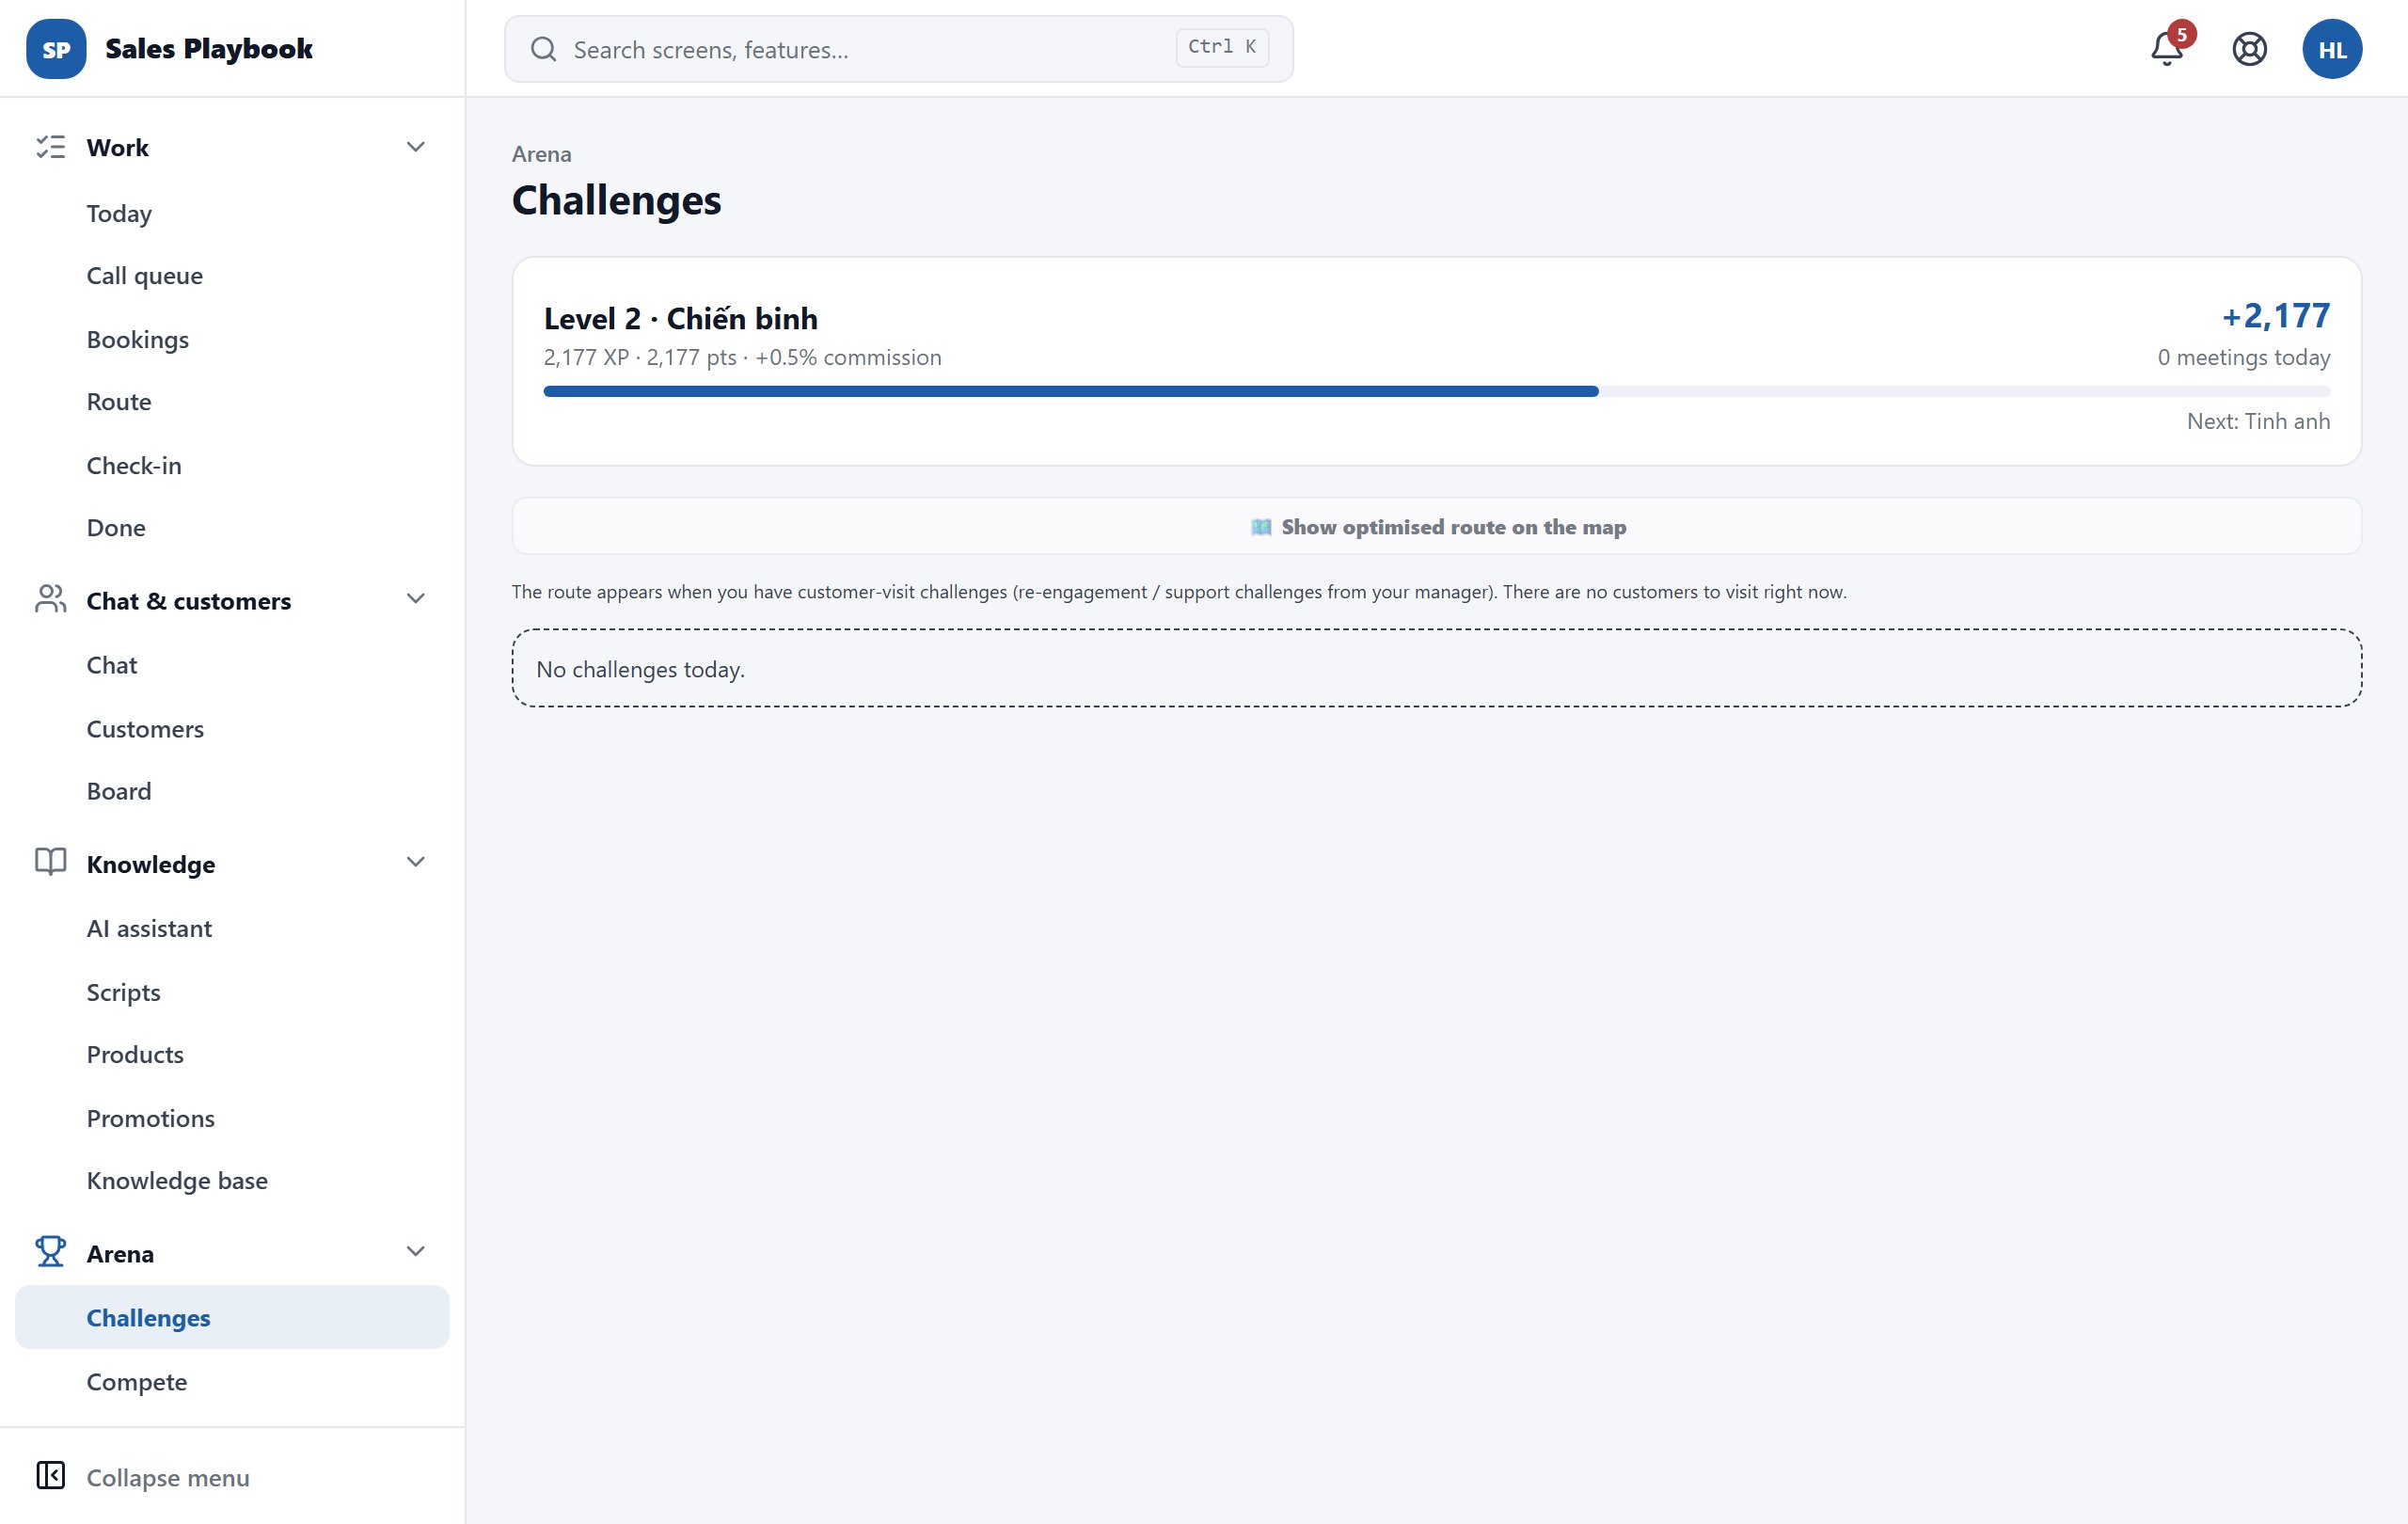
Steps

  1. 1Open "Arena" › "Challenges". The strip at the top always shows your level, XP, points and how many meetings you had today.
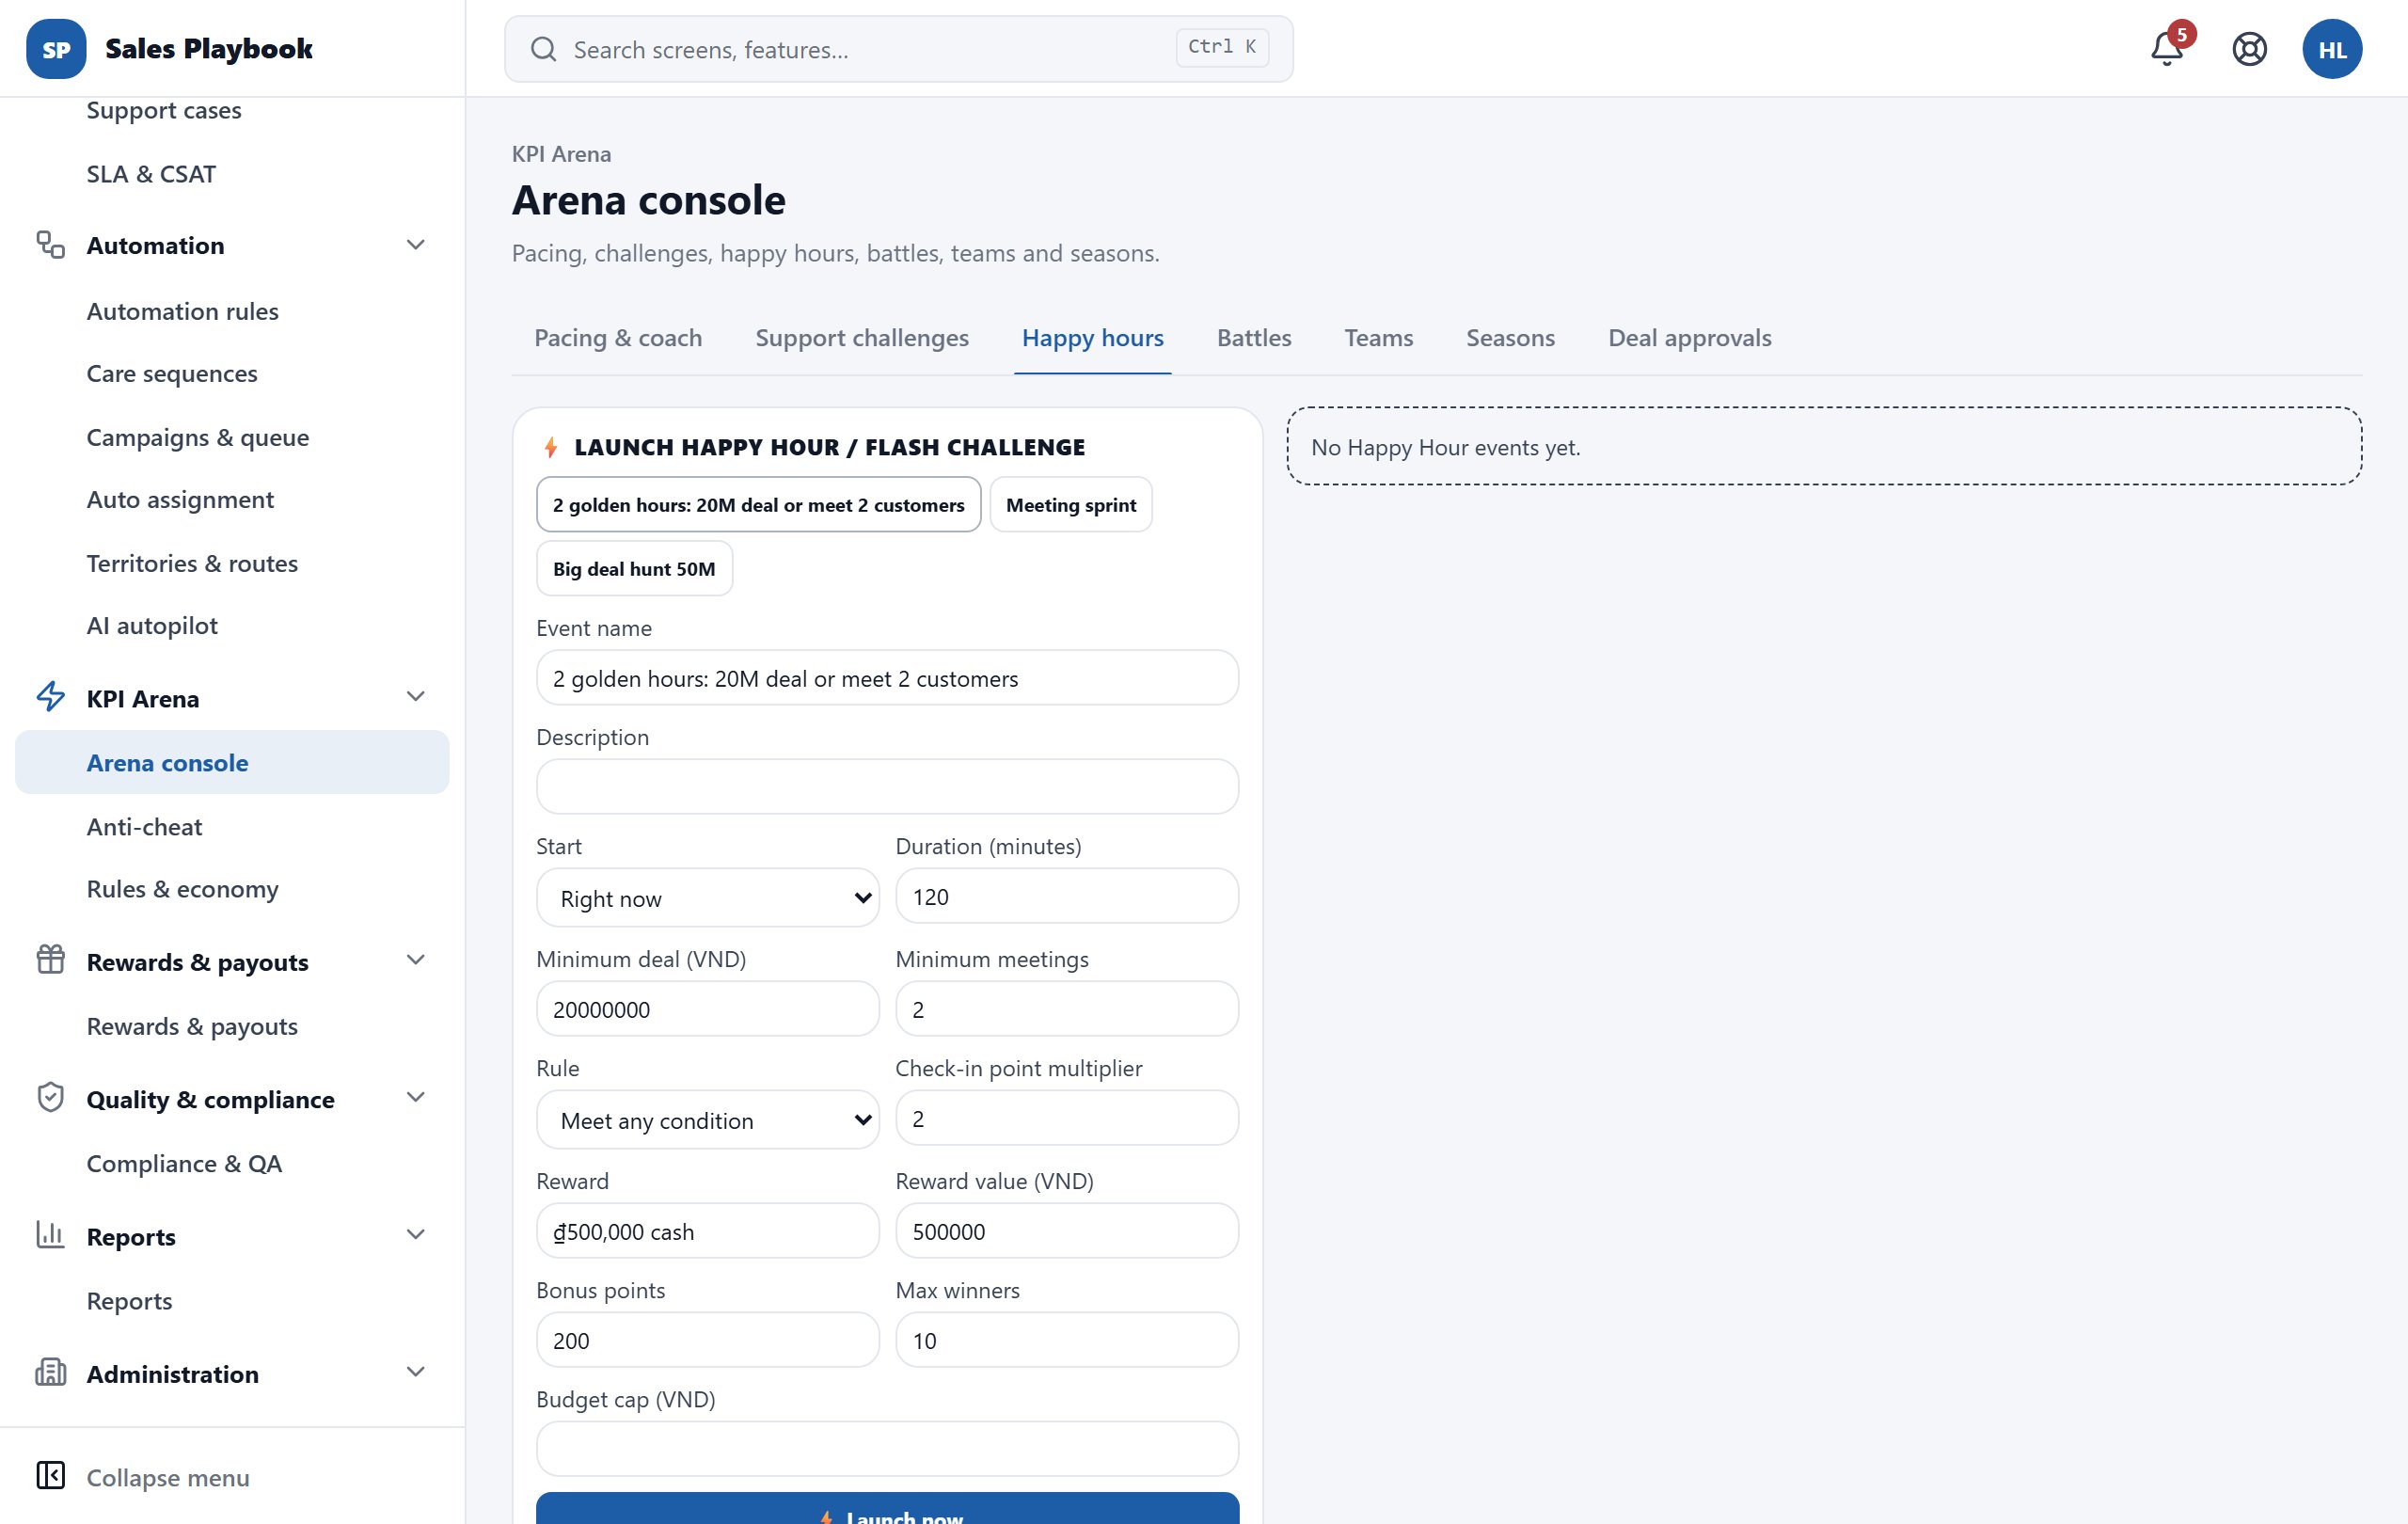
  2. 2When a Happy Hour is on, a "⚡ …" card shows a countdown (or "starts in …"), the rule (close a deal ≥ … / meet … customers, joined by "OR"/"AND"), the reward and your progress.
  3. 3Each challenge card shows its status ("In progress", "Completed", "Claimed", "Expired"), bonus points, point multiplier, due date and ride-along buddy (if any).
  4. 4In a re-engagement challenge, tap a customer to call them, click "📍 Visit" (opens Check-in with that customer already picked) or "📝 Log call".
  5. 5When logging a call, choose "Talked to them" or "No answer", write a note of at least 5 characters and click "Save".
  6. 6When a challenge is "Completed", click "🎉 Claim … pts".
  7. 7Click "🗺️ Show optimised route on the map" to order the visits to the challenge's customers.
Arena › Challenges with the level strip, the route button and the challenge list
The level strip at the top; challenges and Happy Hours appear below the "Show optimised route on the map" button.

View the leaderboard by different metrics

ArenaCompeteLeaderboard

Steps

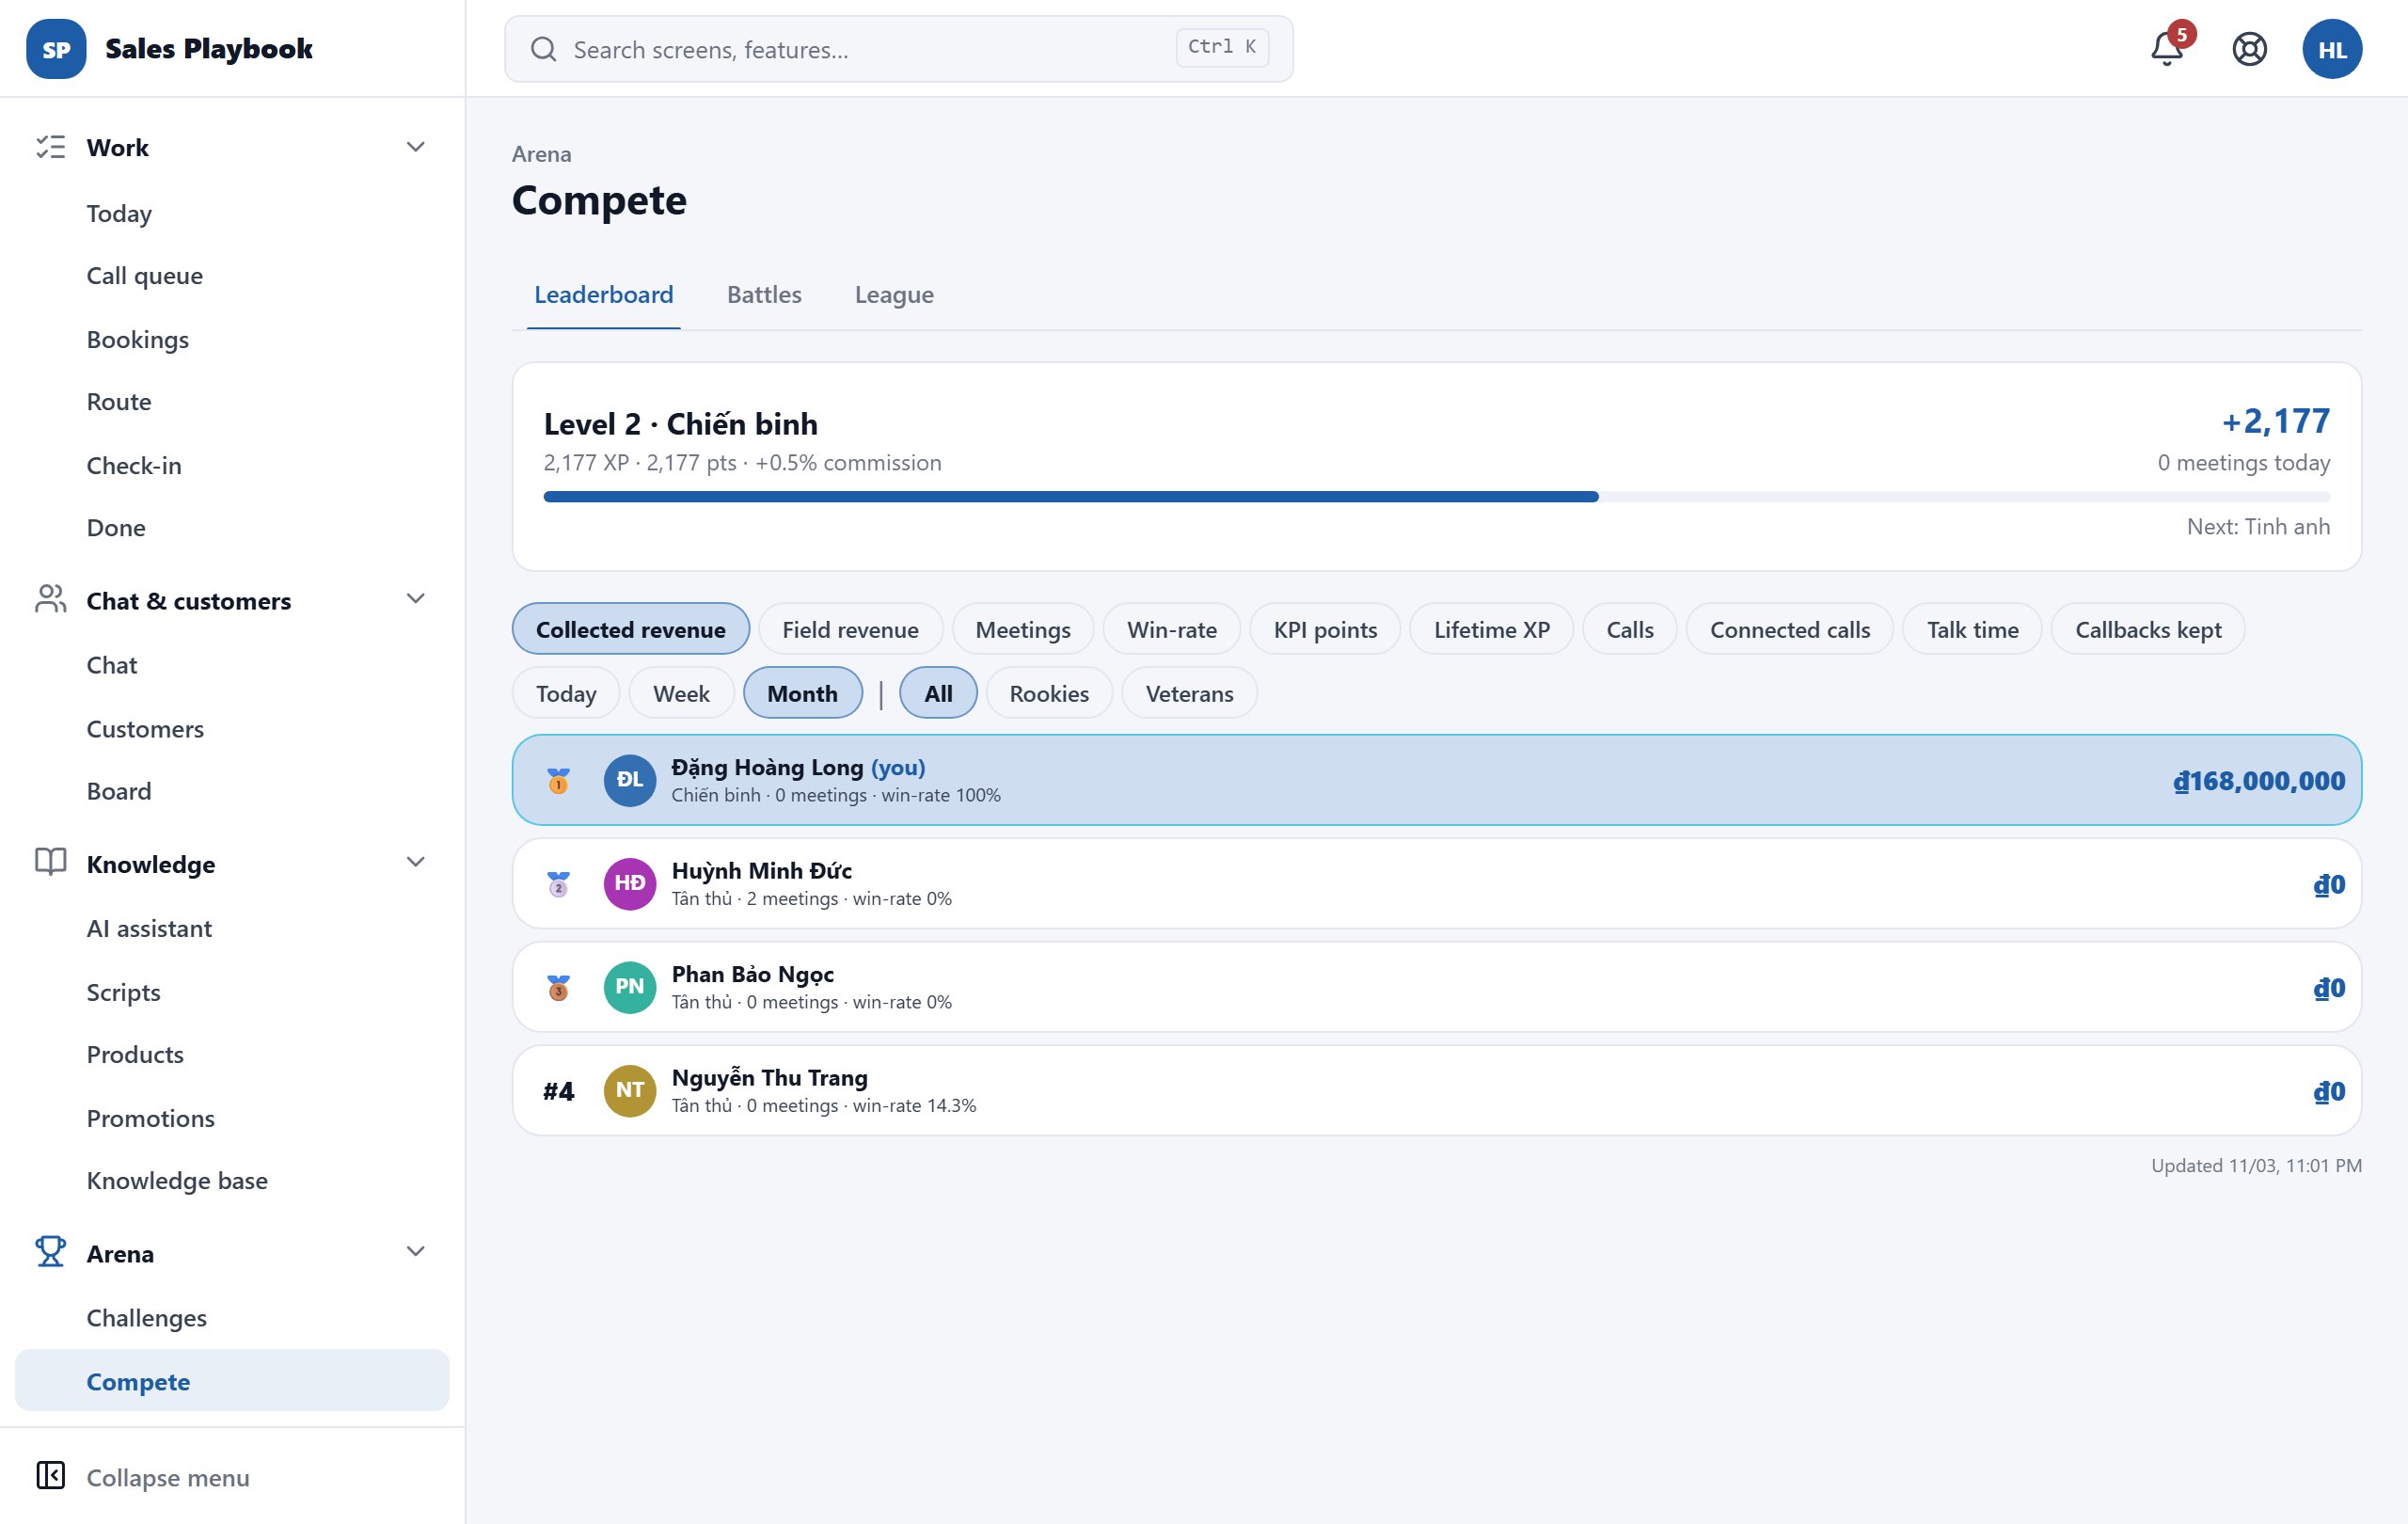
  1. 1Open "Arena" › "Compete", tab "Leaderboard".
  2. 2Pick a metric: "Collected revenue", "Field revenue", "Meetings", "Win-rate", "KPI points", "Lifetime XP", "Calls", "Connected calls", "Talk time" or "Callbacks kept".
  3. 3Pick the period: "Today", "Week" or "Month".
  4. 4Filter the group: "All", "Rookies" or "Veterans" to compare yourself with people of similar seniority.
  5. 5Your row is highlighted and marked "(you)"; each row shows level, meetings and win-rate.
Leaderboard tab with metric, period and group buttons and the ranking list
Pick the metric and period in the two rows of buttons; your row is highlighted.

Follow your 1v1 and team battles

ArenaCompeteBattles

Steps

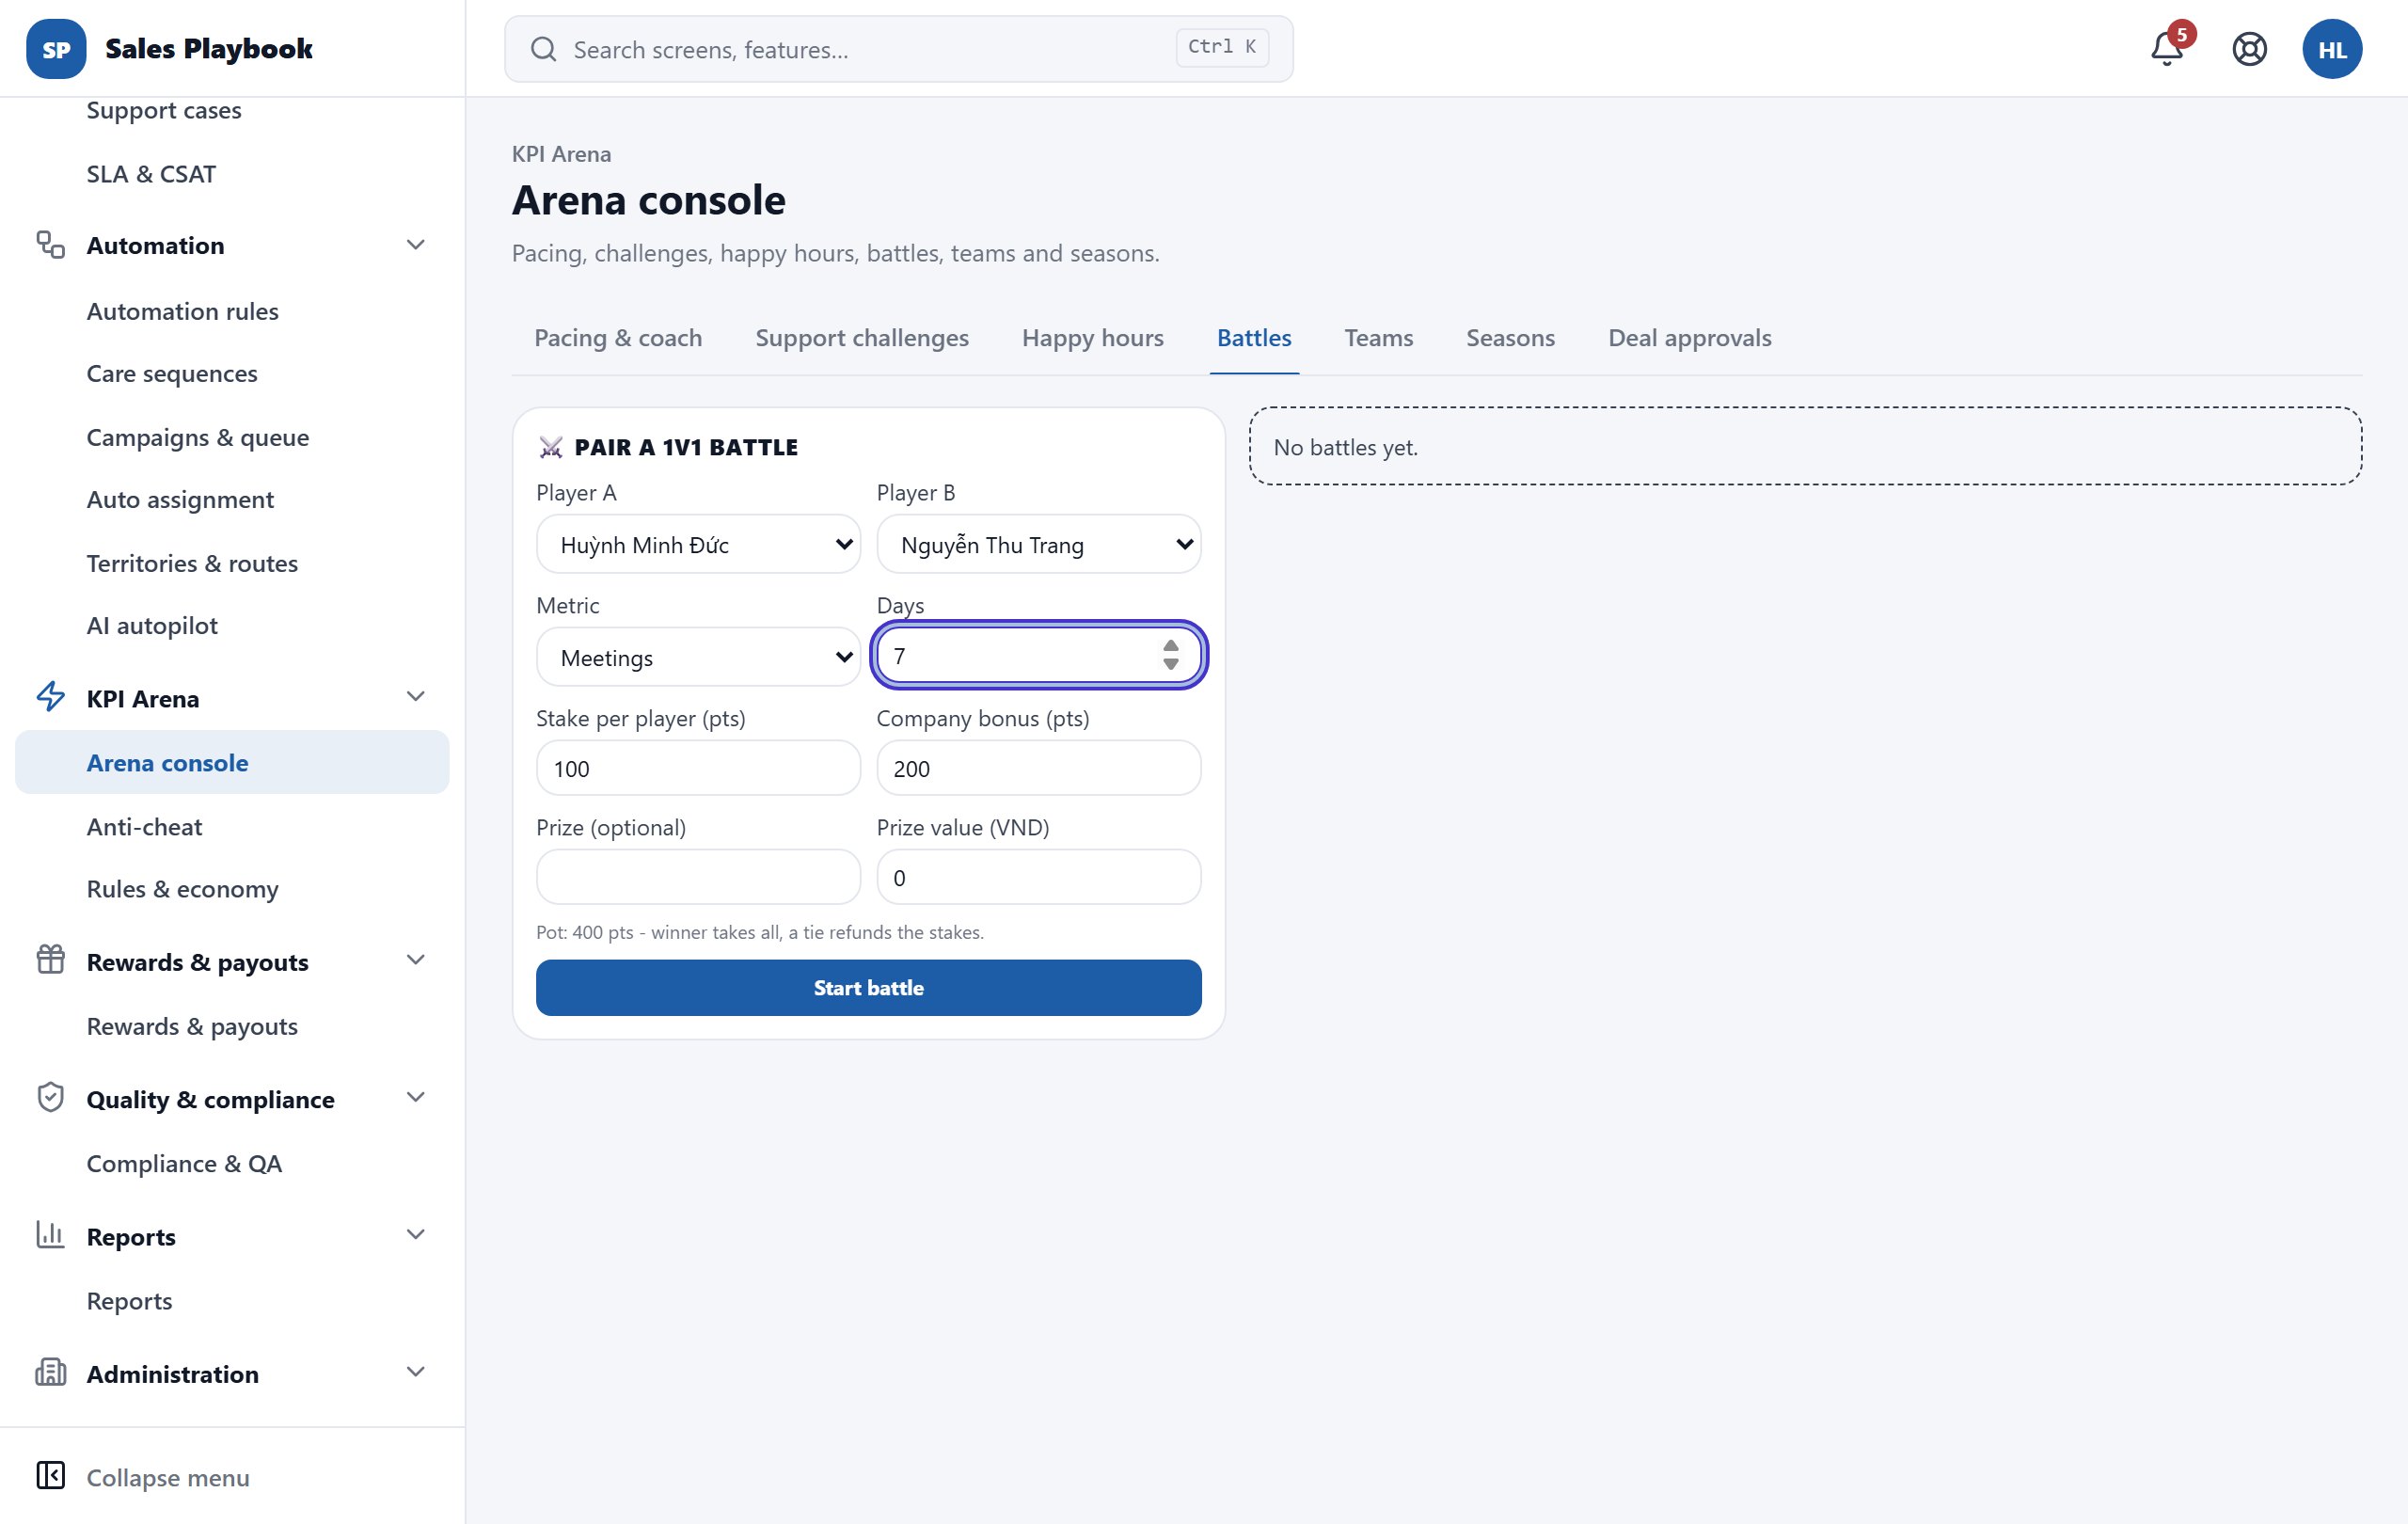
  1. 1Open "Arena" › "Compete", tab "Battles".
  2. 2Each battle shows its stage ("Upcoming", "Live", "Settling", "Finished", "Cancelled"), the metric and the pot (both players' stakes plus the company bonus).
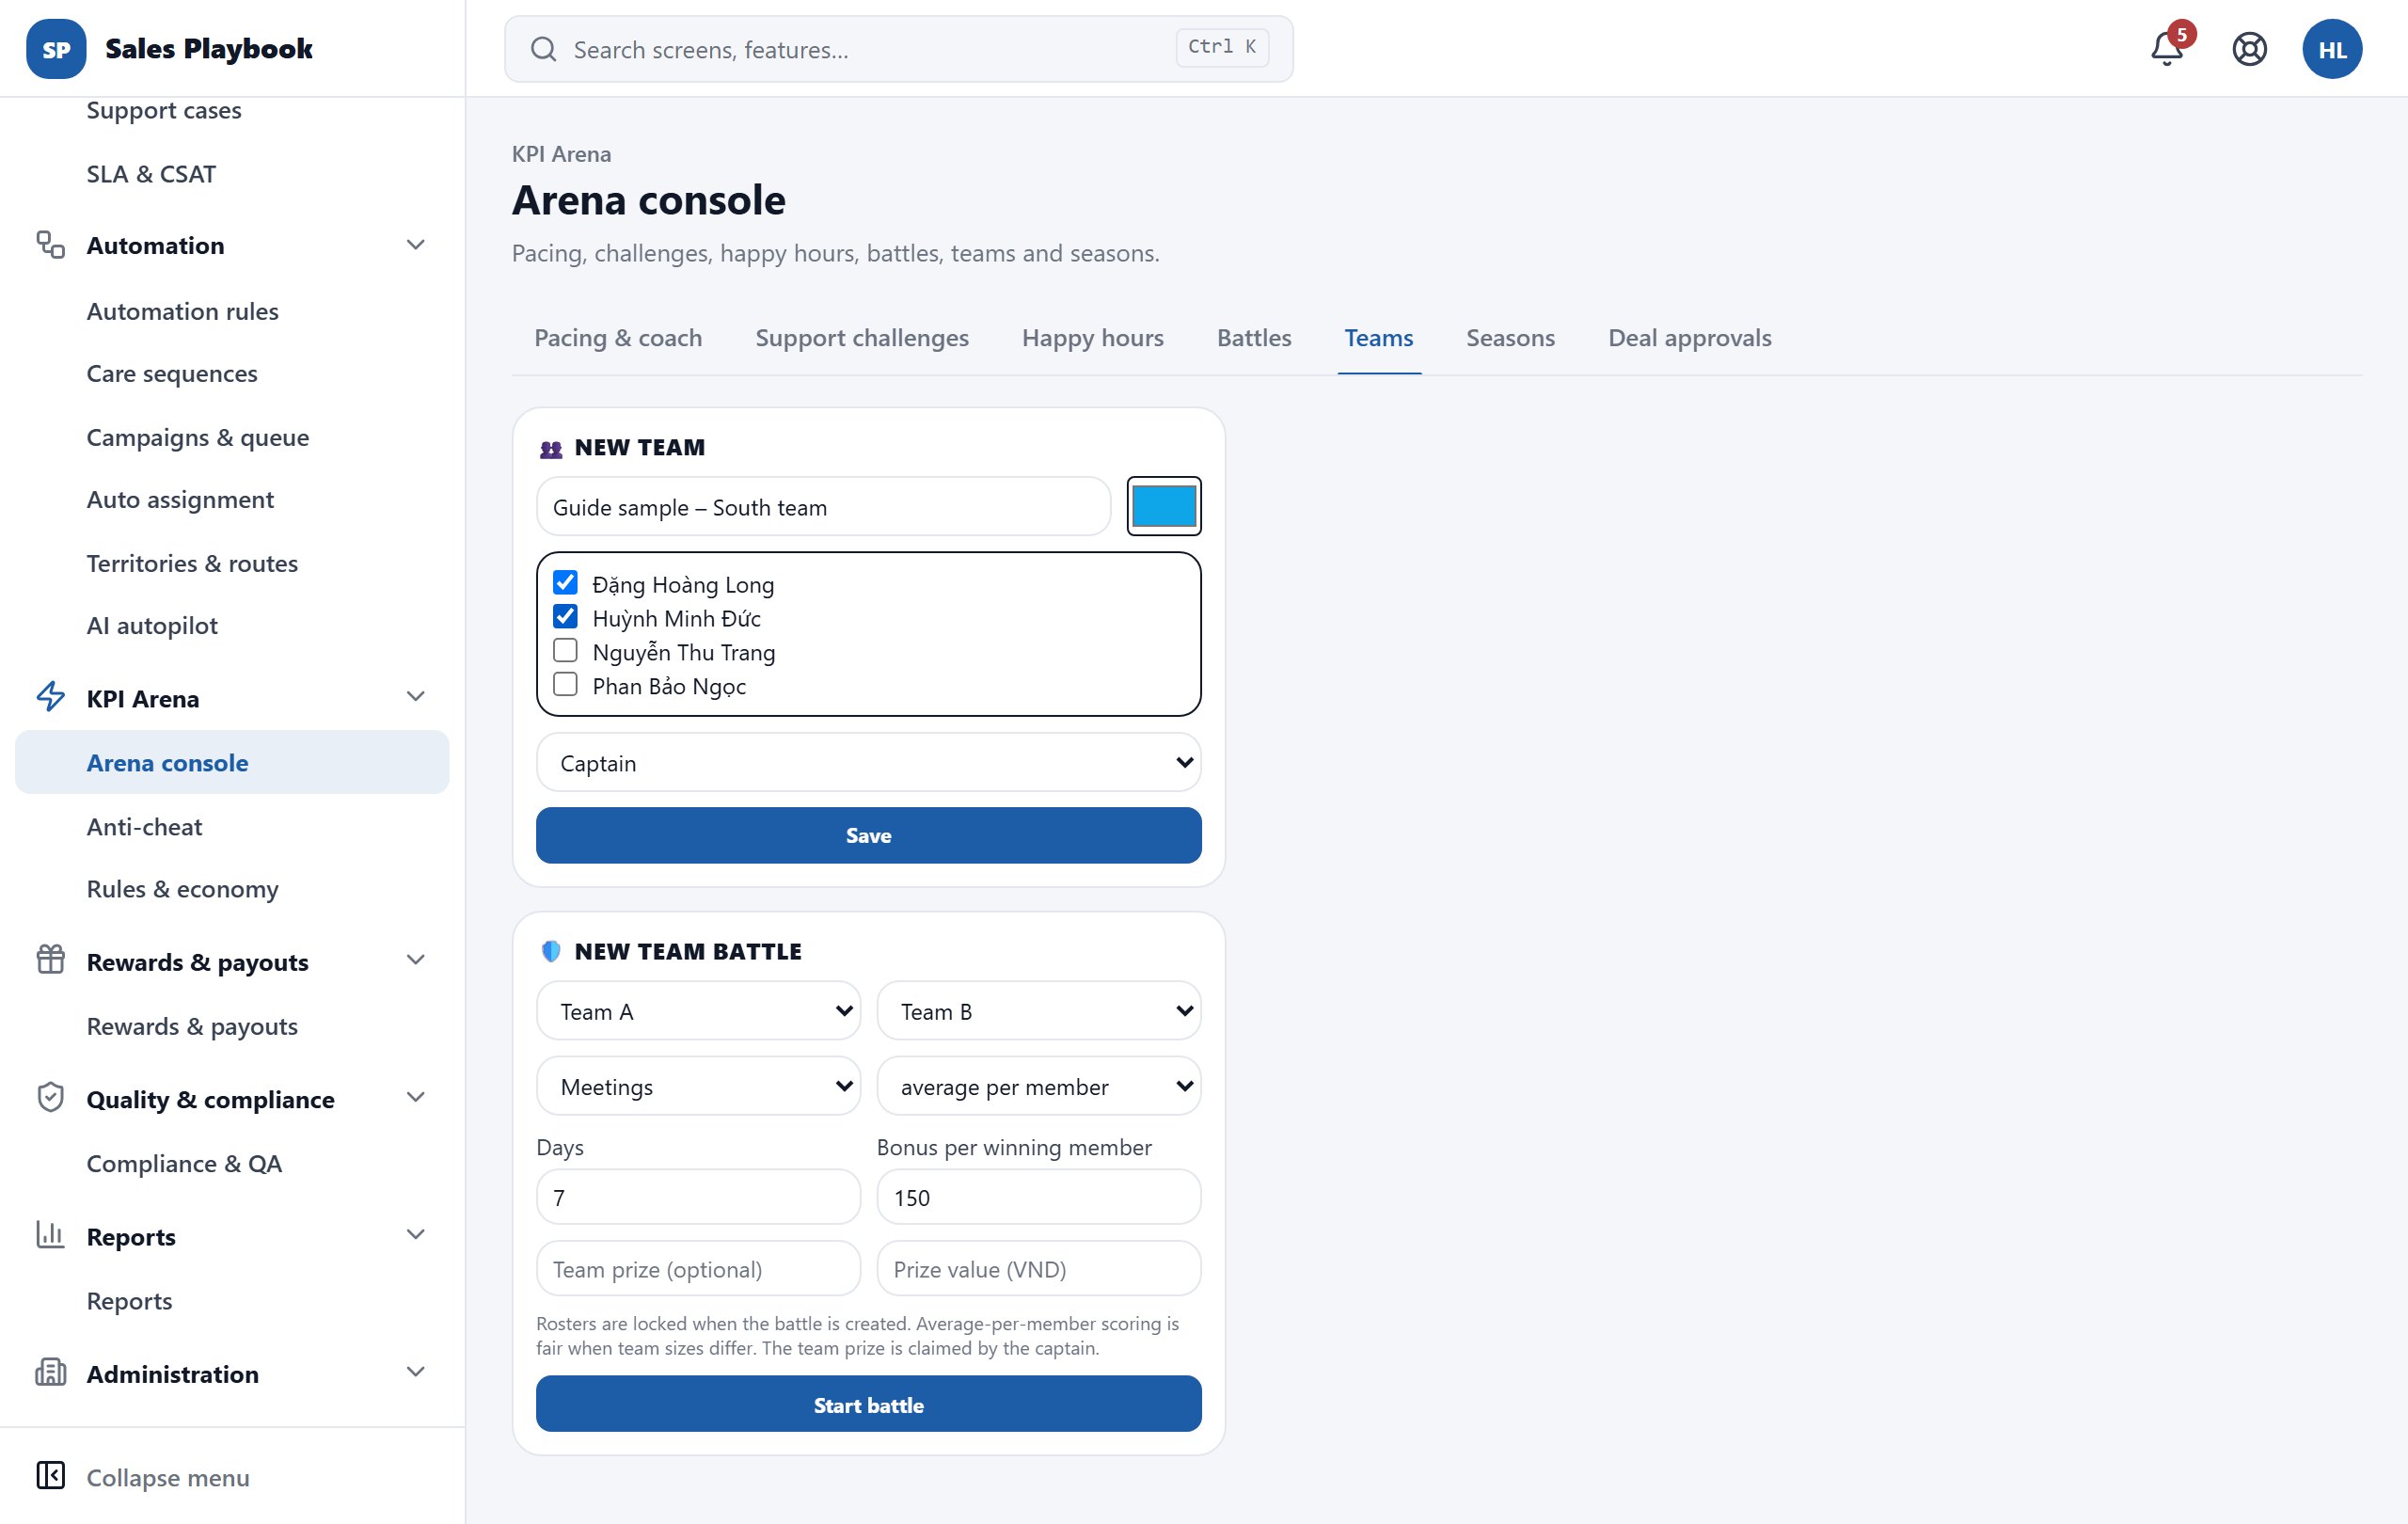
  3. 3Follow both players' results while the battle is live; a team battle shows the team names, the scoring ("average per member" or "team total") and the bonus points per member.
Battles tab on the Compete screen
Your battles appear here (screenshot: no battles yet).

Follow your division in the season

ArenaCompeteLeague

Steps

  1. 1Open "Arena" › "Compete", tab "League".
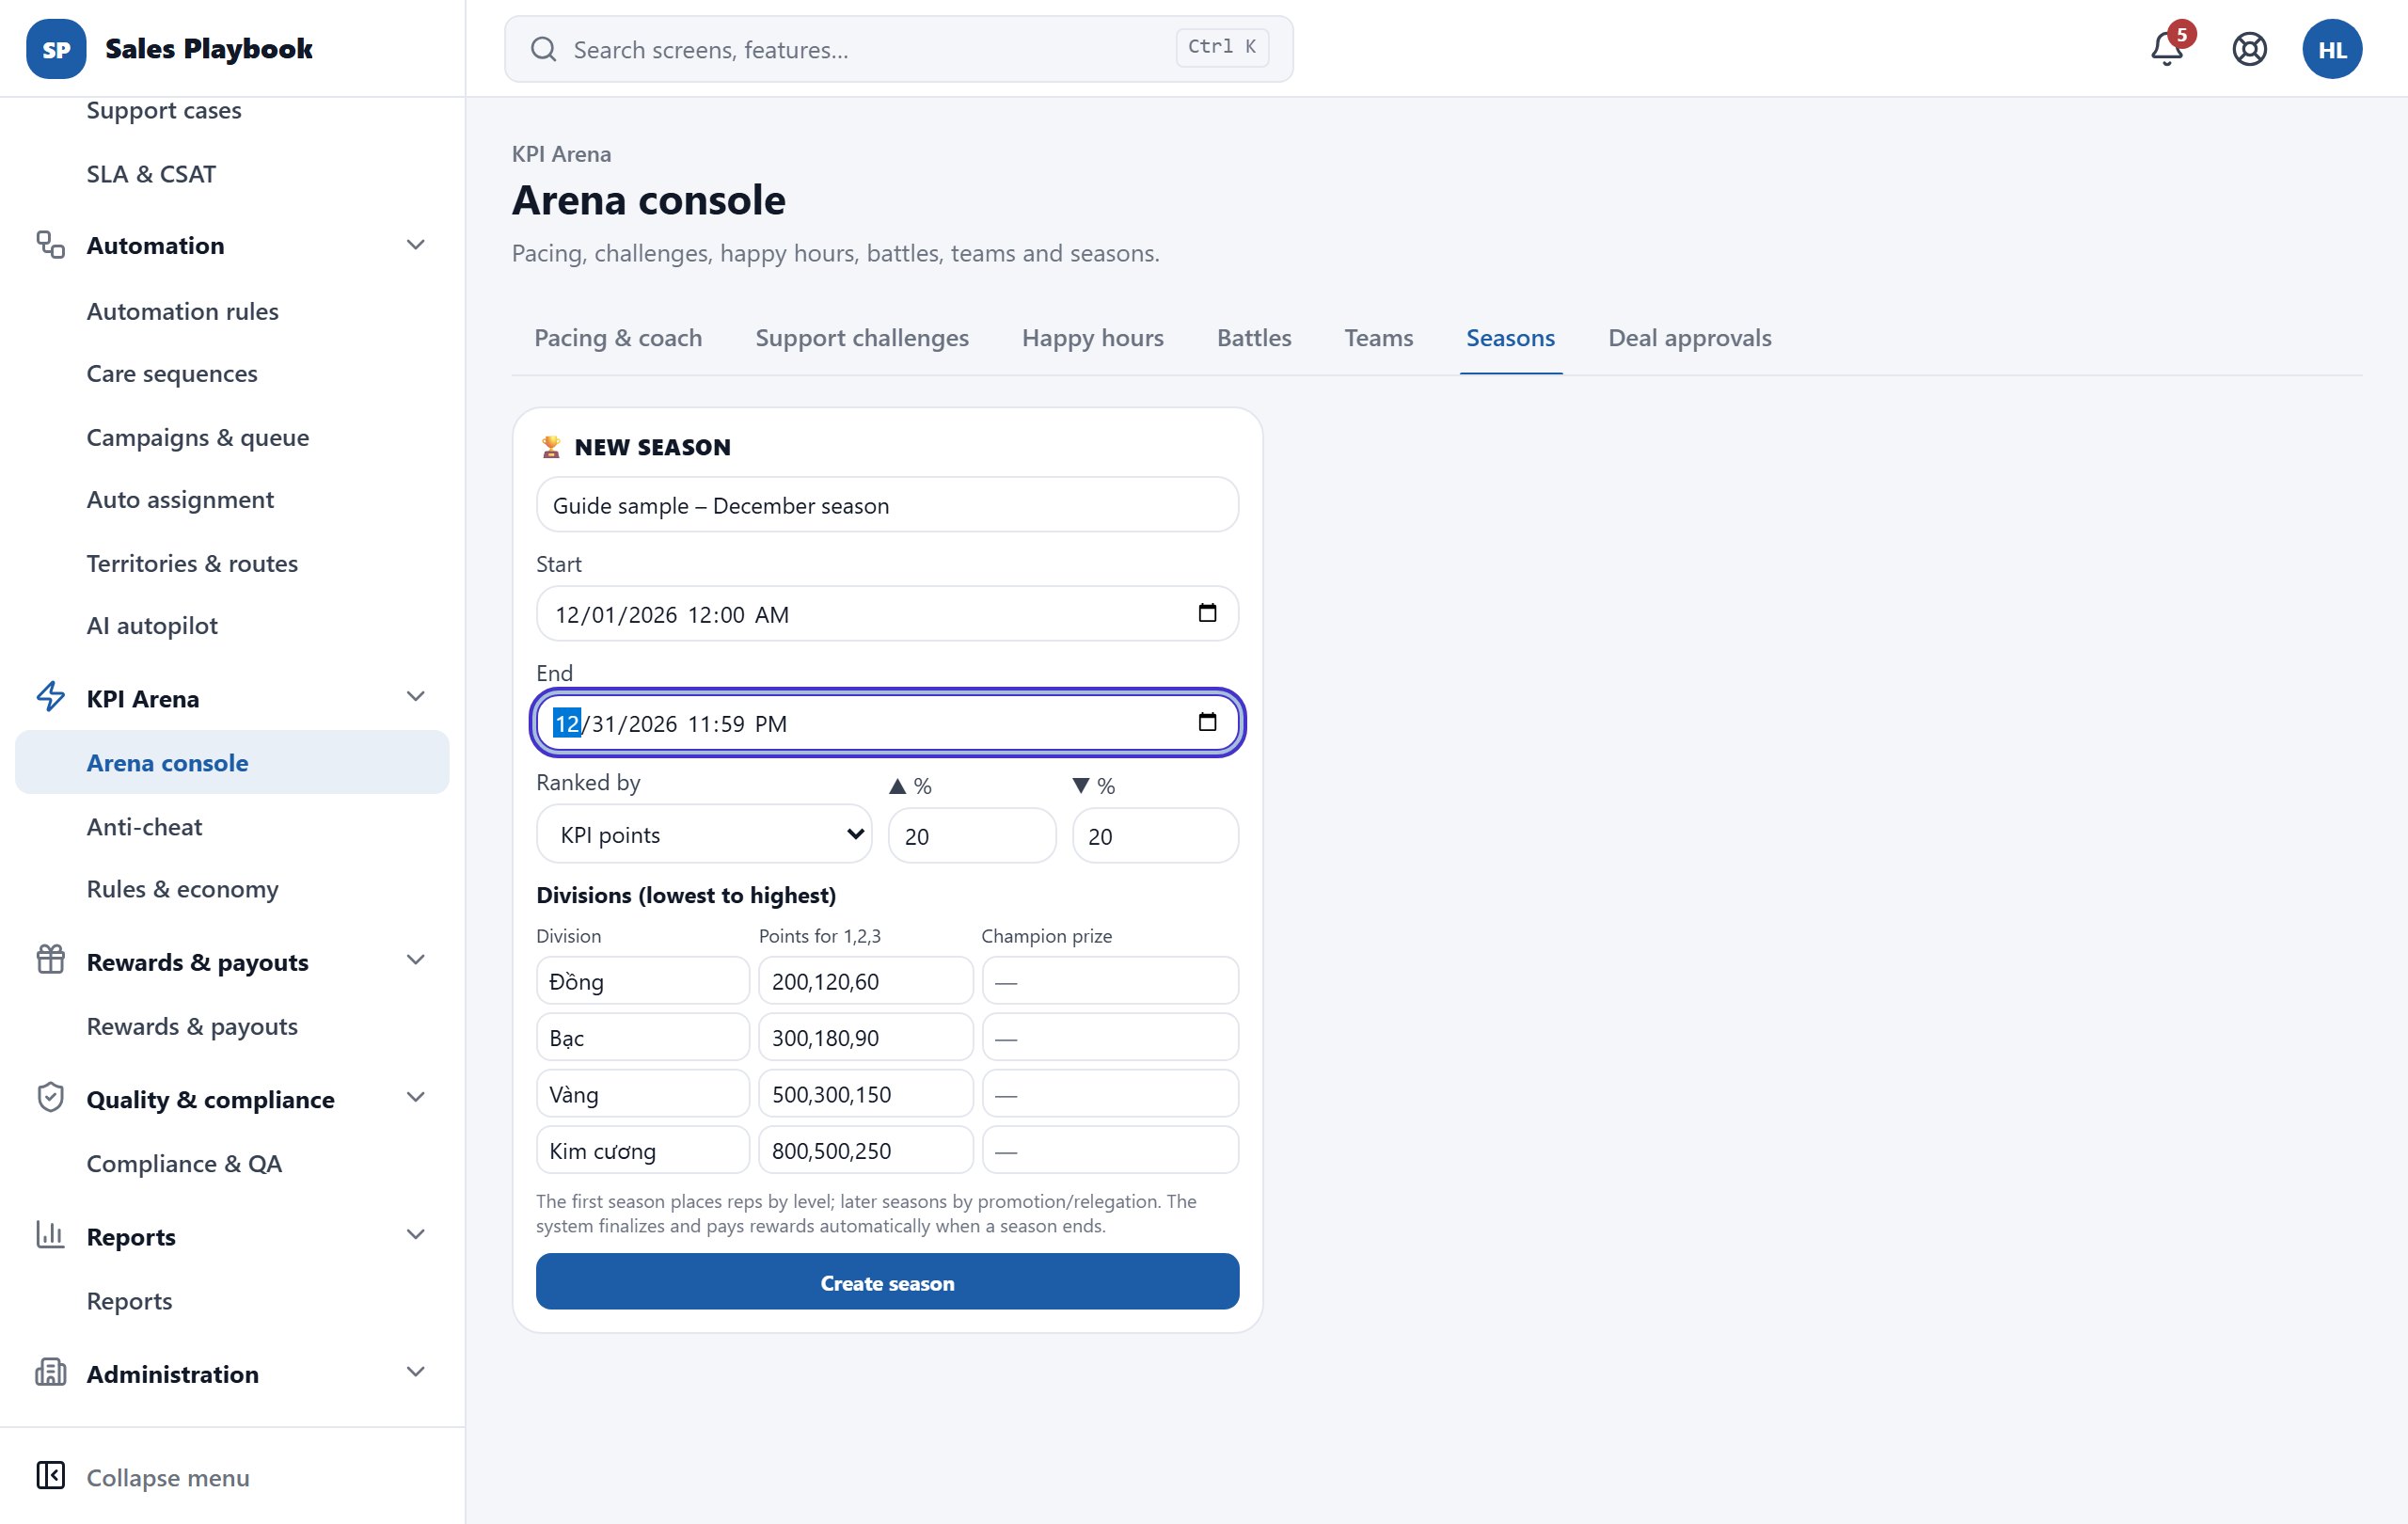
  2. 2See the season name, its stage ("Upcoming", "Live", "Finalizing", "Finished") and its rules: which metric ranks you, what top % is promoted and what bottom % is relegated.
  3. 3The "Your division" line shows which division you are in; the table below is the ranking in that division and the prize points per rank.
  4. 4The "Last season" line records your rank and whether you were promoted, relegated or stayed up.
League tab on the Compete screen
The running season and your division appear here (screenshot: no season yet).

Spin the wheel, open chests and earn badges

ArenaRewards & walletMy rewards

Steps

  1. 1Open "Arena" › "Rewards & wallet", tab "My rewards".
  2. 2In "LUCKY WHEEL", the label in the top-right corner shows your spins left. Click "Spin now" to spin.
  3. 3In "MYSTERY CHEST", the progress bar shows how many customers you met today against the milestone for a chest. Click "View odds" to see each prize's probability.
  4. 4"BADGES" shows the badges you have earned (e.g. Road Warrior, Deal Closer, Happy Hour King…).
  5. 5"Recent rewards" lists what you just won; cash, voucher and day-off prizes are marked "awaiting manager payout".
My rewards tab with the lucky wheel and the mystery chest
The lucky wheel (spins left in the corner) and the mystery chest with its progress bar.

Redeem points for rewards

ArenaRewards & walletMarket

Steps

  1. 1Open "Arena" › "Rewards & wallet", tab "Market". Your current points are shown at the top of "REWARD SHOP".
  2. 2Each reward shows its price in points, the stock left and how many redemptions you have left this month.
  3. 3Click "Redeem". The button is disabled and says why when it reads "Not enough points", "Out of stock", "Requires level …" or "Monthly limit reached".
  4. 4For a day-off reward you can pick a "Preferred day off (optional)".
  5. 5Click "Confirm".
  6. 6Follow it under "My redemptions": "Awaiting handover", "Approved, awaiting handover", "Delivered", "Rejected"…
Market tab with the reward shop and your current points
Your points at the top of the shop; every reward has a "Redeem" button (screenshot: no rewards yet).

View your career path and points history

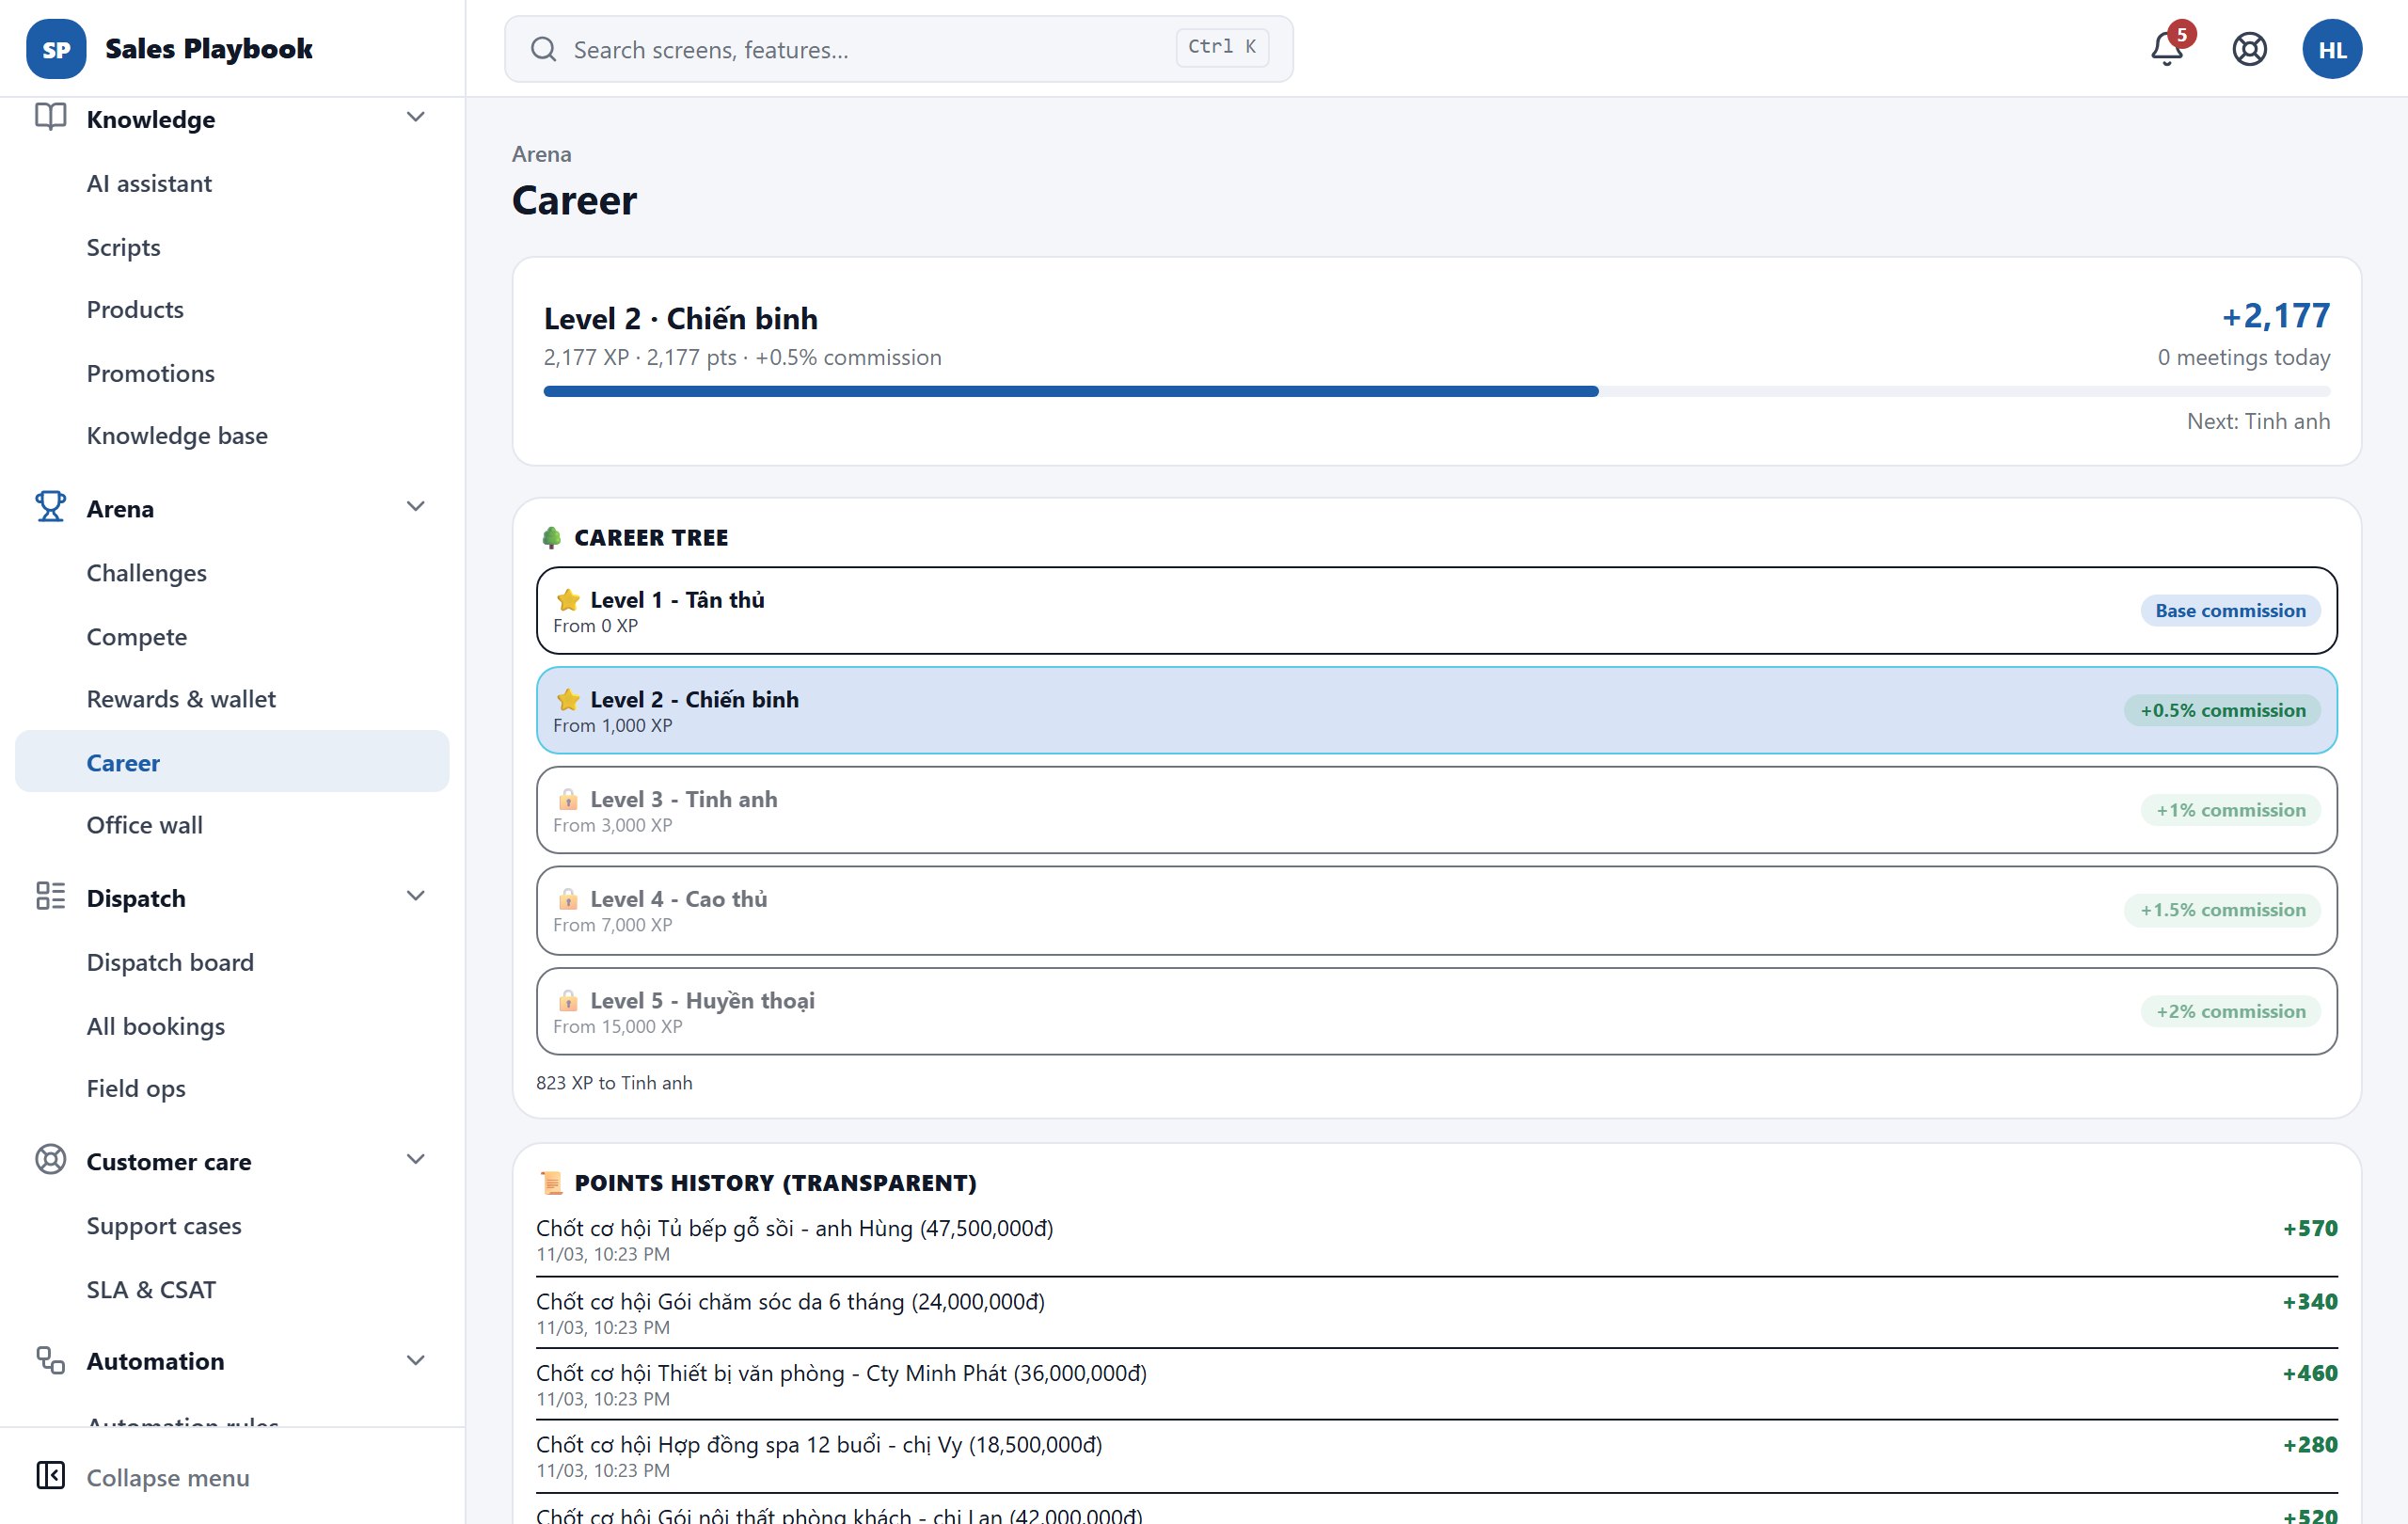
ArenaCareer

Steps

  1. 1Open "Arena" › "Career".
  2. 2"CAREER TREE" lists the levels, the minimum XP and the extra commission %; your current level is highlighted and the last line reads "… XP to …".
  3. 3"POINTS HISTORY (TRANSPARENT)" lists every point added or deducted with the reason and time; click "Load more" for older entries.
  4. 4If there is a "Flags & penalties" section, read why points were deducted. If you think it is wrong, type an explanation in "Explain to appeal..." and click "Appeal".
Career screen: the 5-level career tree and the points history
Your current level is highlighted; the extra commission % is on the right of each level.

Show the leaderboard on the office TV

ArenaOffice wall

Steps

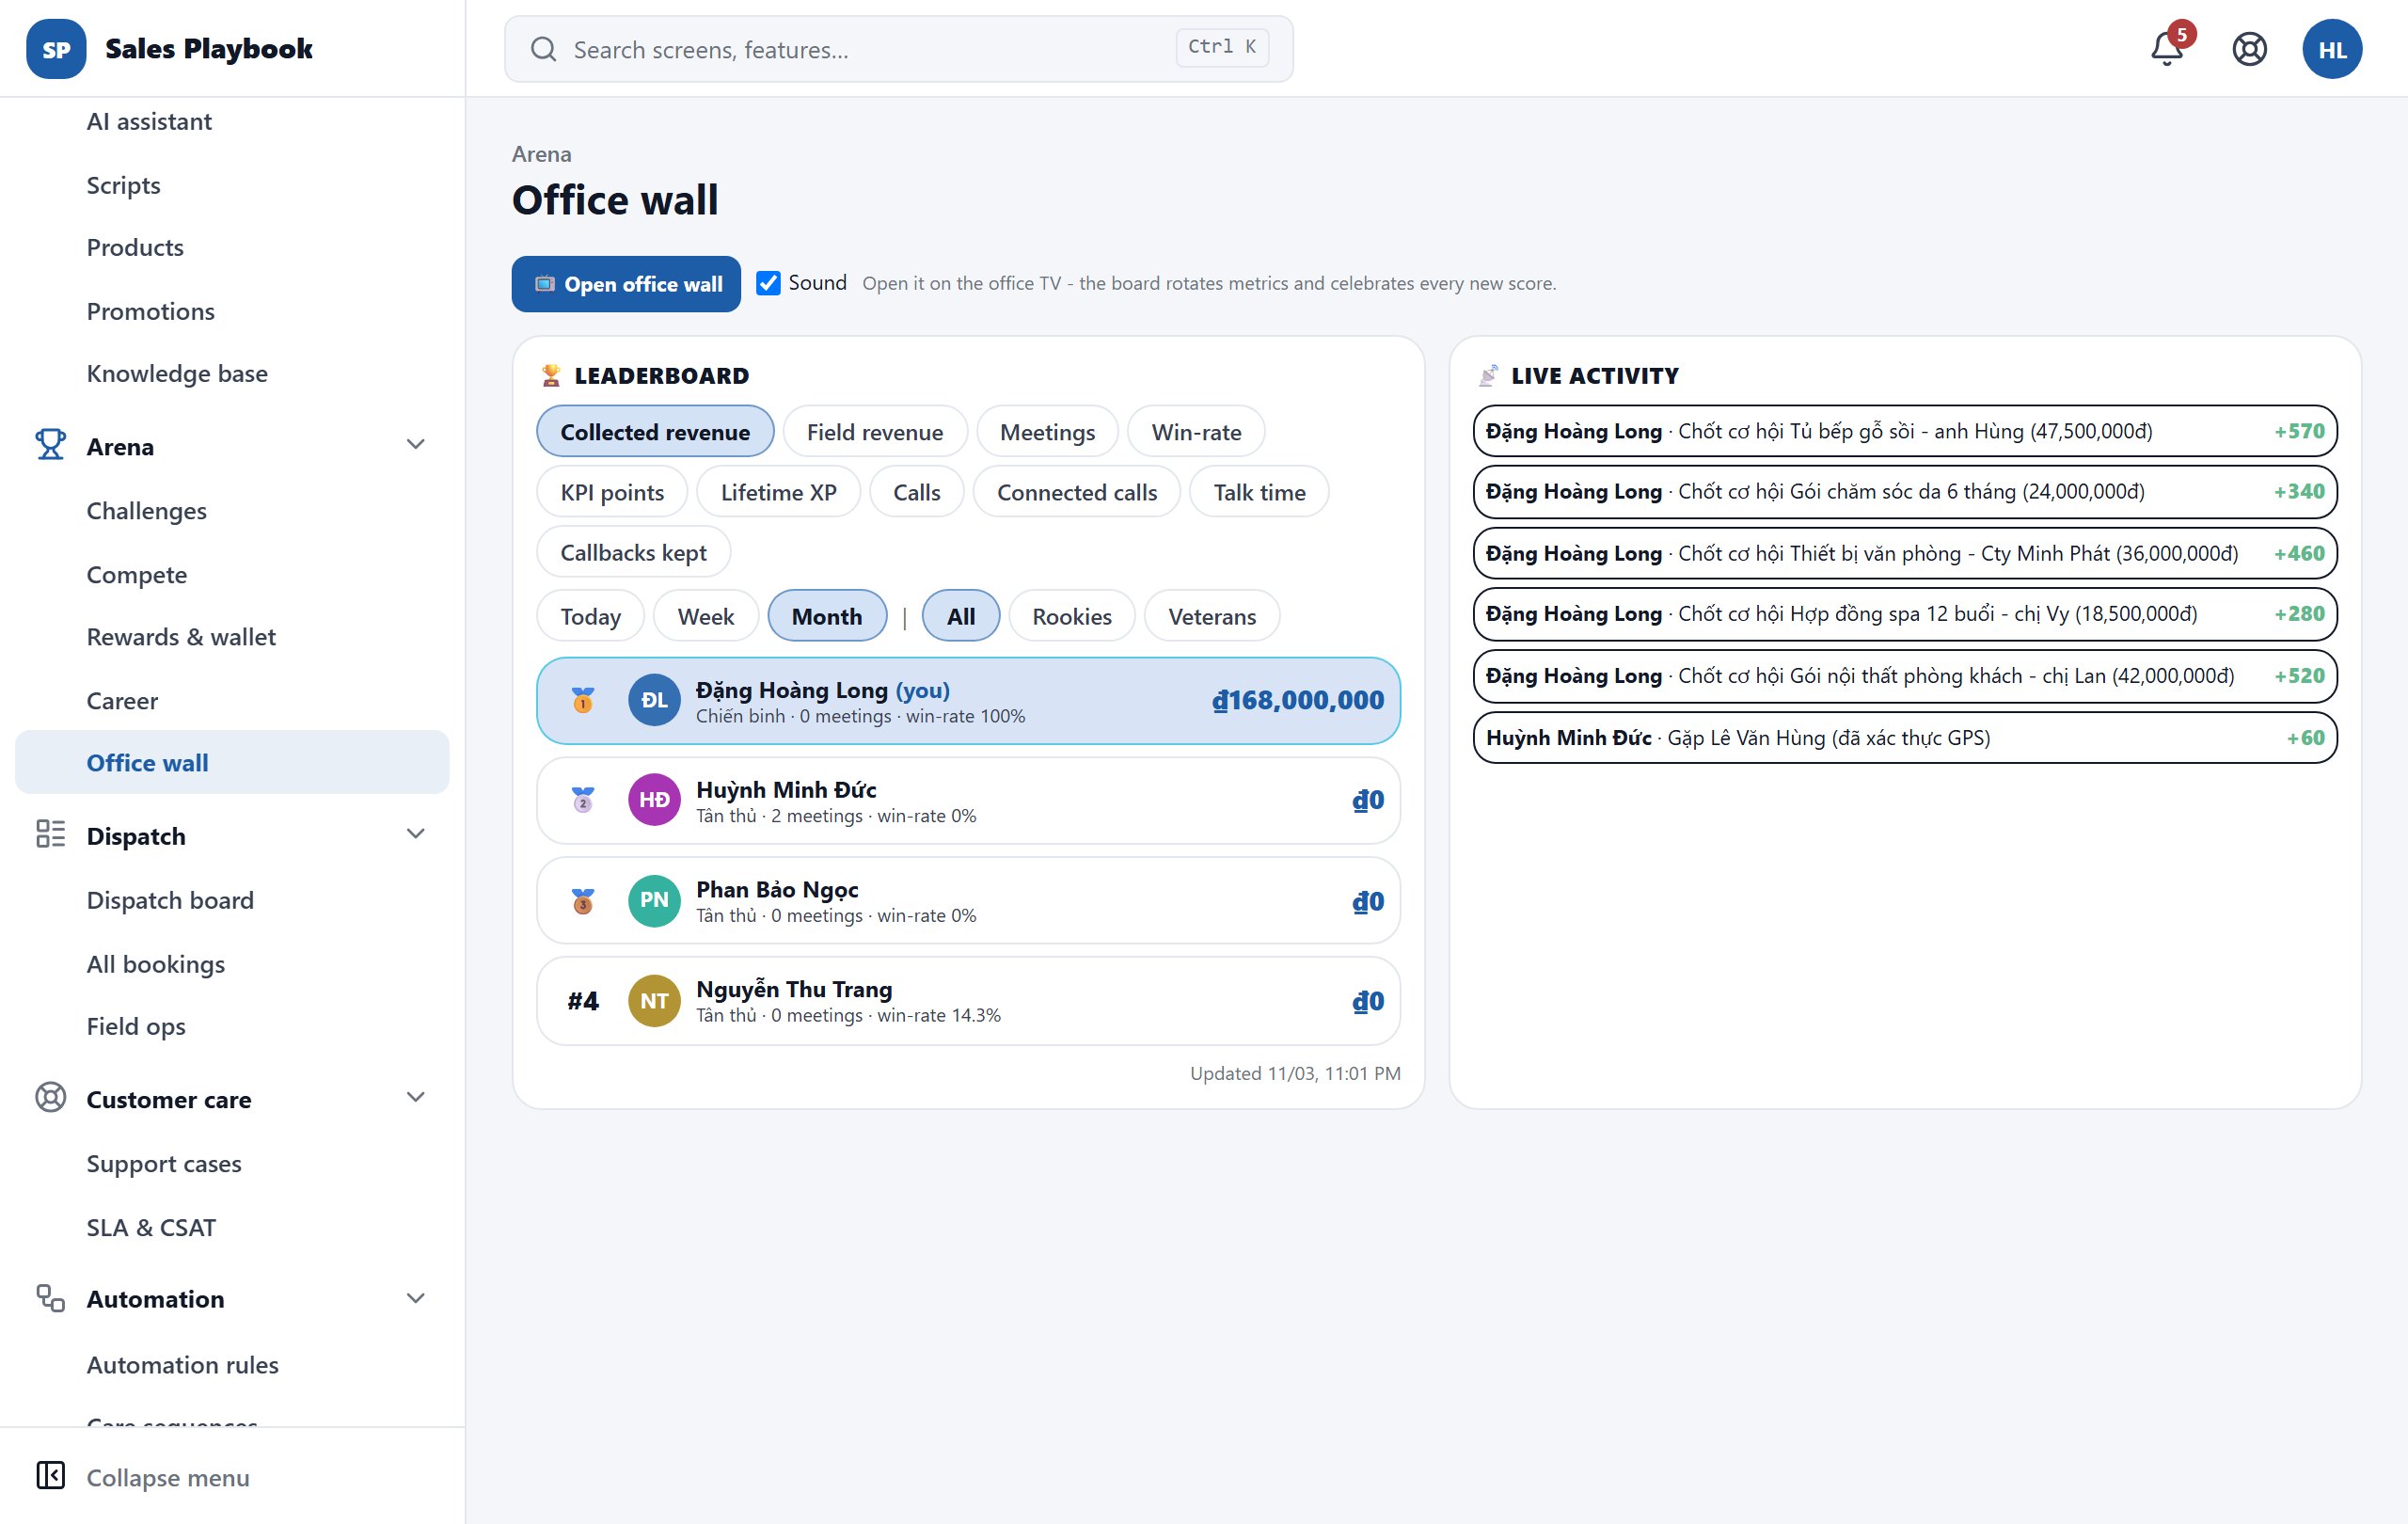
  1. 1On the computer connected to the TV, open "Arena" › "Office wall".
  2. 2Pick the metric, period and group for the "LEADERBOARD", just like on the Leaderboard tab.
  3. 3Keep "Sound" ticked if you want a chime whenever someone scores.
  4. 4Click "📺 Open office wall" to switch to full screen.
  5. 5Click "✕ Close" to exit.
Office wall with the leaderboard and the live activity column
The "Open office wall" button and the "Sound" box at the top; live activity with the points just scored on the right.

11 / 5 features

Your profile, notifications and support

Update your details, change your password, turn on notifications so you never miss a task or a customer message, and contact technical support when something goes wrong.

Update your profile and avatar

AccountMy accountProfile & shop

Steps

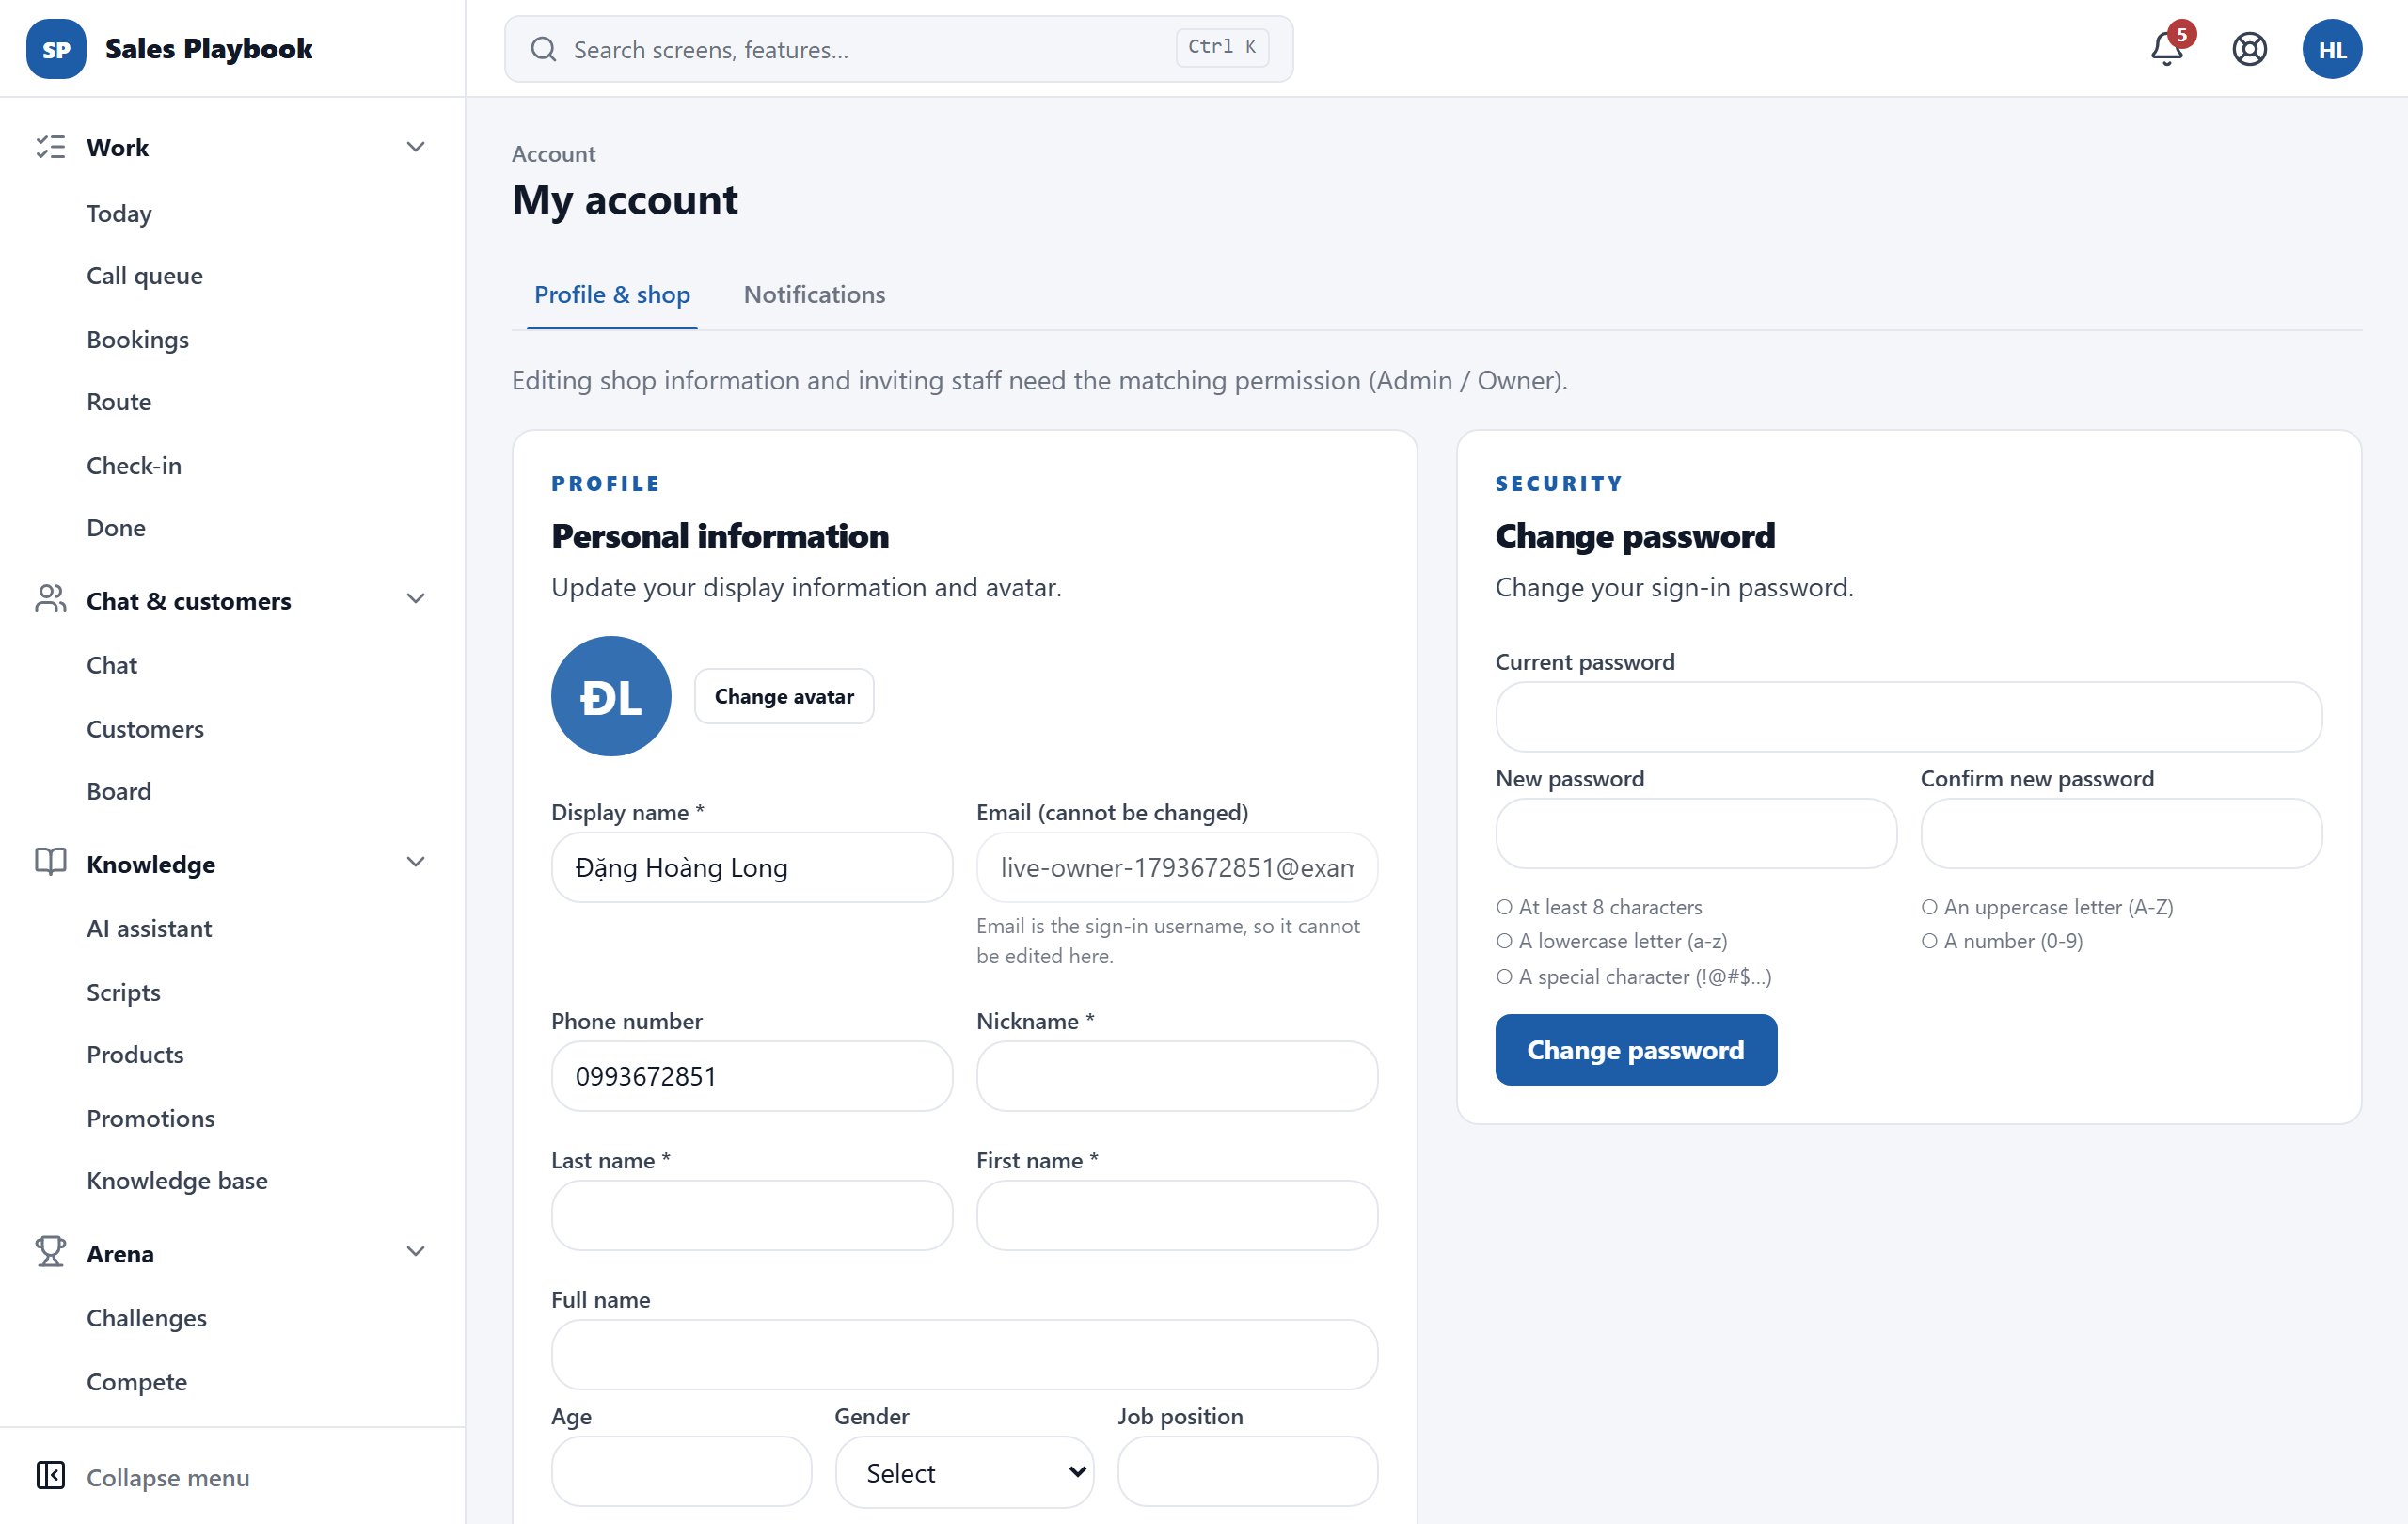
  1. 1Open "My account" in the Account group of the left menu (or avatar → "My account"), tab "Profile & shop".
  2. 2In "Personal information", click "Change avatar", choose "Choose an image from this device", drag the "Zoom" slider to frame it and click "Save avatar".
  3. 3Fill in the fields. Fields marked * are required: "Display name", "Nickname", "Last name", "First name", "Address".
  4. 4Click "Save personal information".
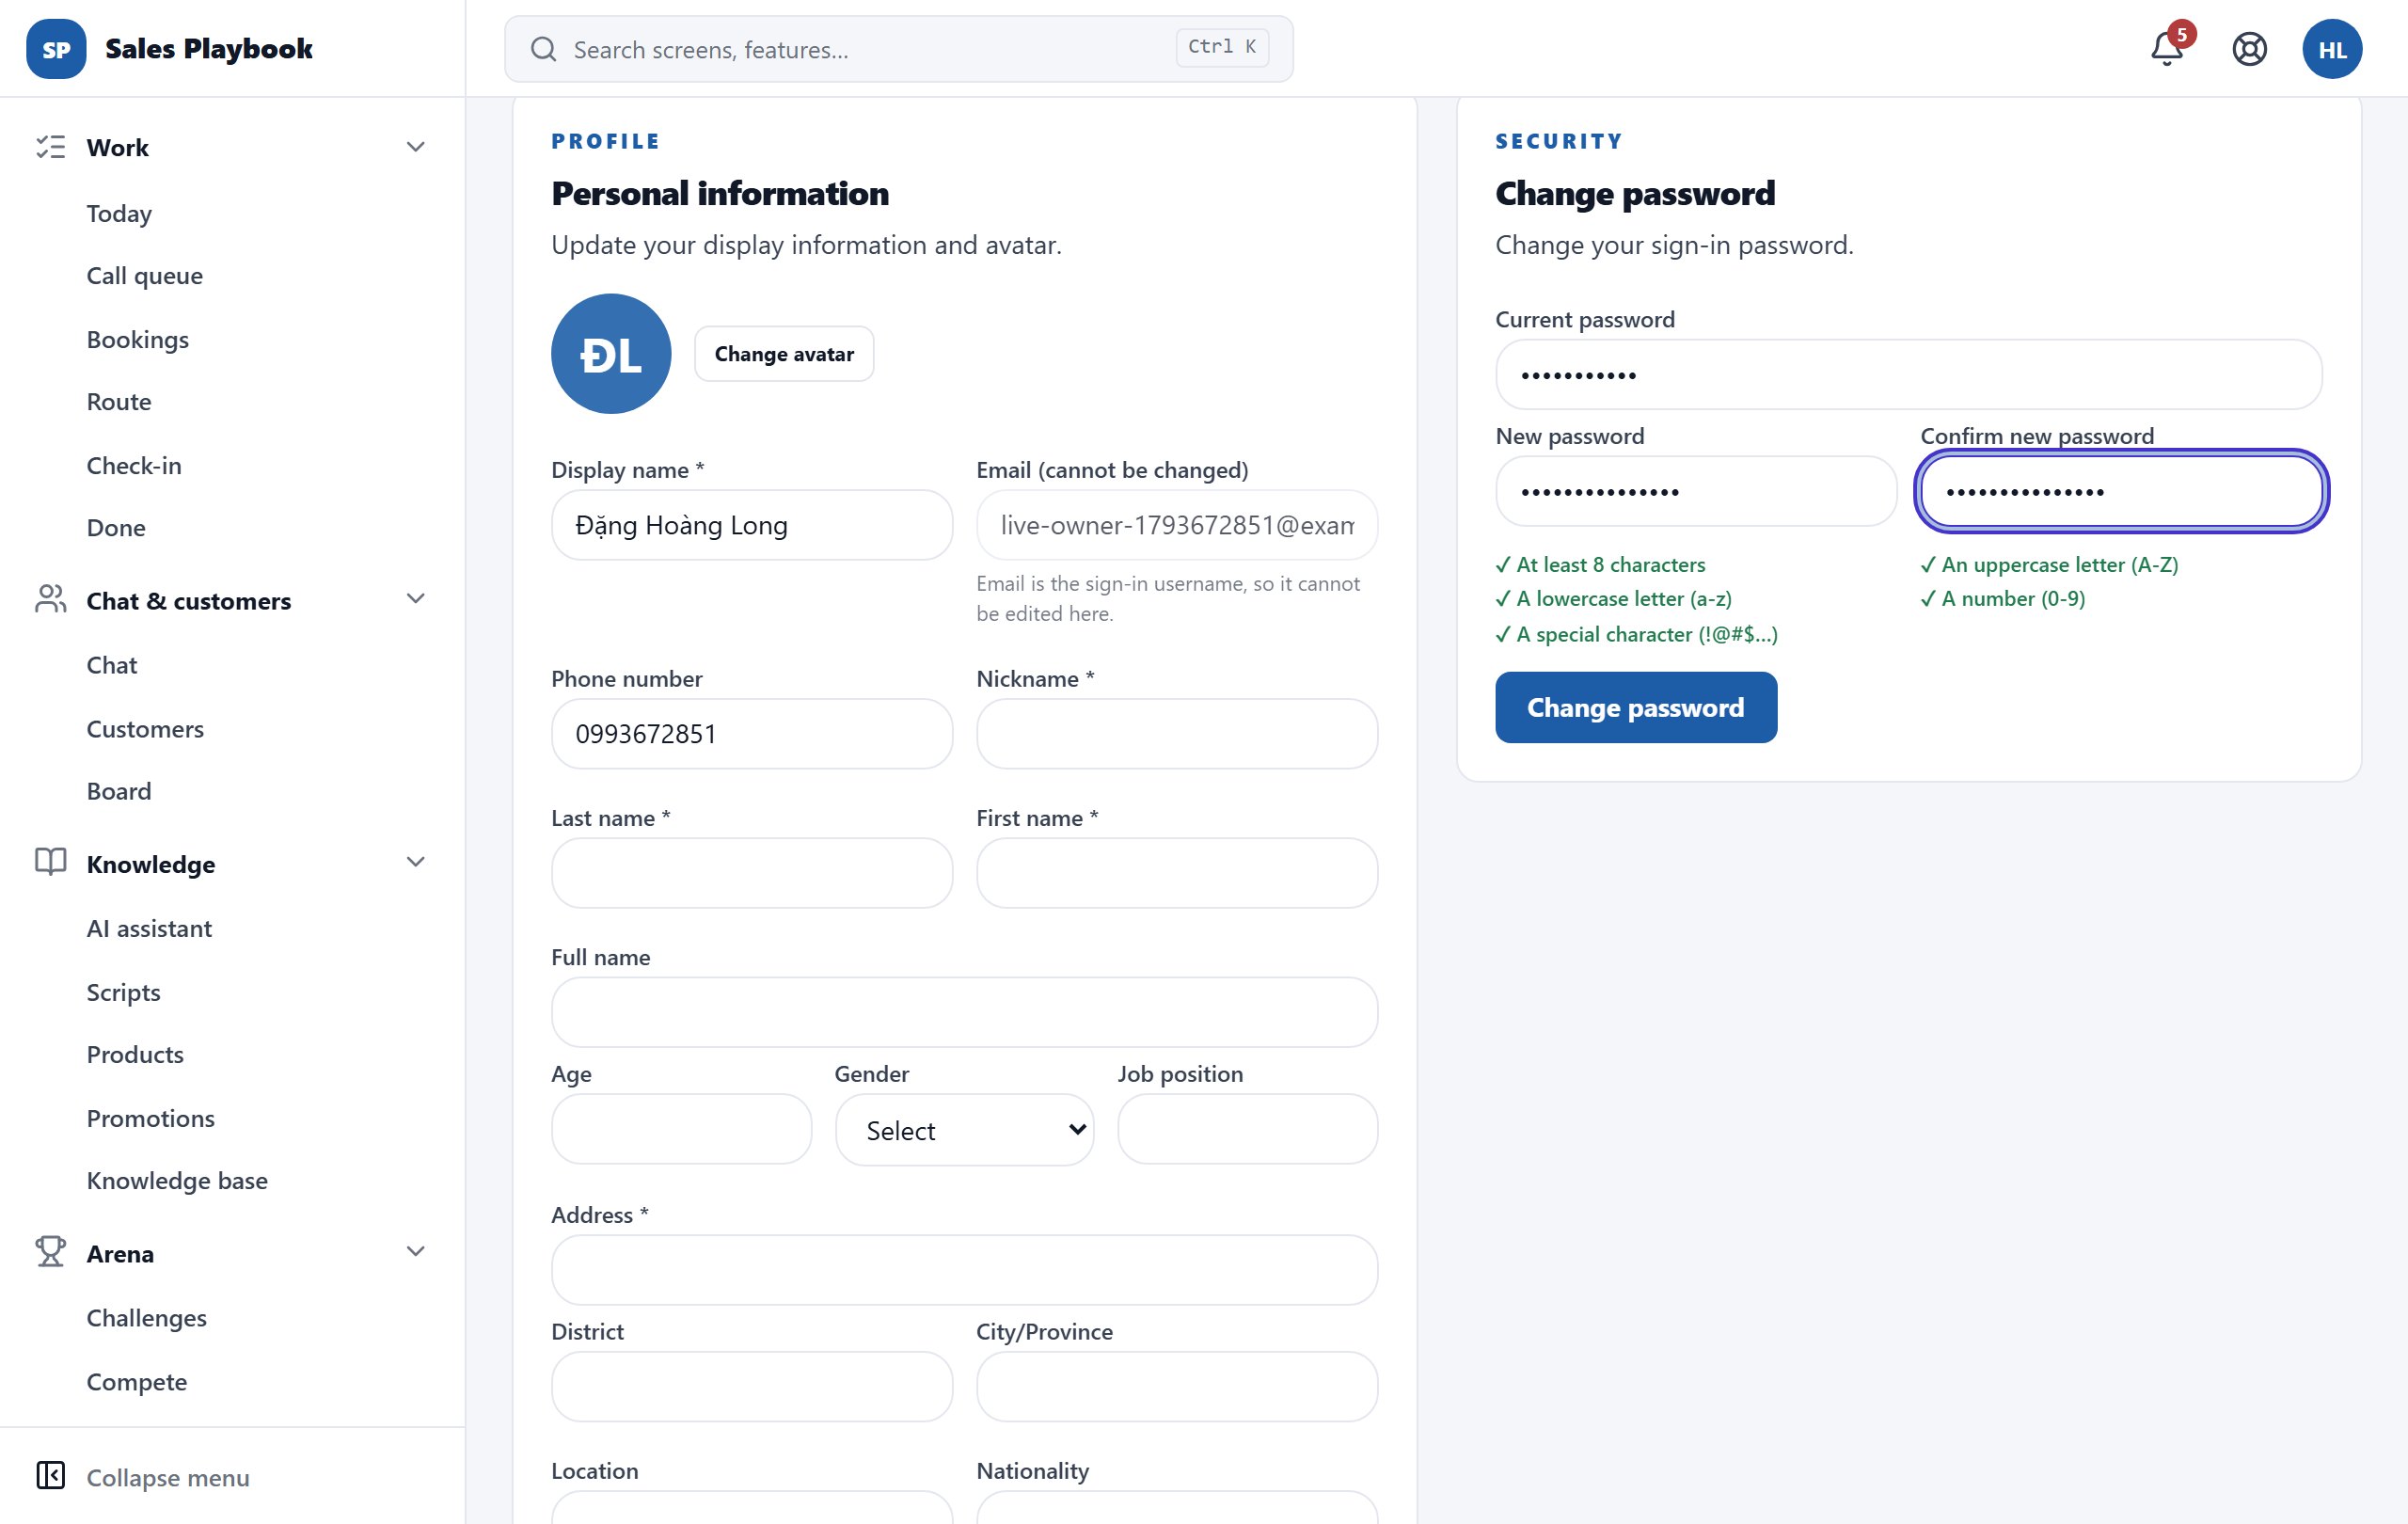
My account screen, Profile & shop tab, Personal information block with the Change avatar button and the Change password block on the right
"Personal information" on the left, "Change password" on the right.

Change your password

AccountMy accountProfile & shop

Steps

  1. 1Open "My account", tab "Profile & shop", and find the "Change password" block (SECURITY).
  2. 2Enter your "Current password".
  3. 3Enter "New password" and "Confirm new password". The new password needs at least 8 characters with an uppercase letter, a lowercase letter, a number and a special character - each rule turns into a green ✓ when met.
  4. 4Click "Change password".
Change password block filled in with current password, new password and confirmation, every password rule ticked green
Five green ✓ marks mean the new password meets the rules.

Turn on notifications and reminder emails

AccountMy accountNotifications

Steps

  1. 1Open "My account" and choose the "Notifications" tab.
  2. 2In "Notifications on this device", switch the toggle on (it reads "Notifications off"), then click Allow when the browser asks. Once on, the label changes to "Notifications on".
  3. 3In "Reminder and digest emails", tick "Task-due-soon reminder emails" and/or "Weekly KPI digest emails".
  4. 4Click "Save email preferences".
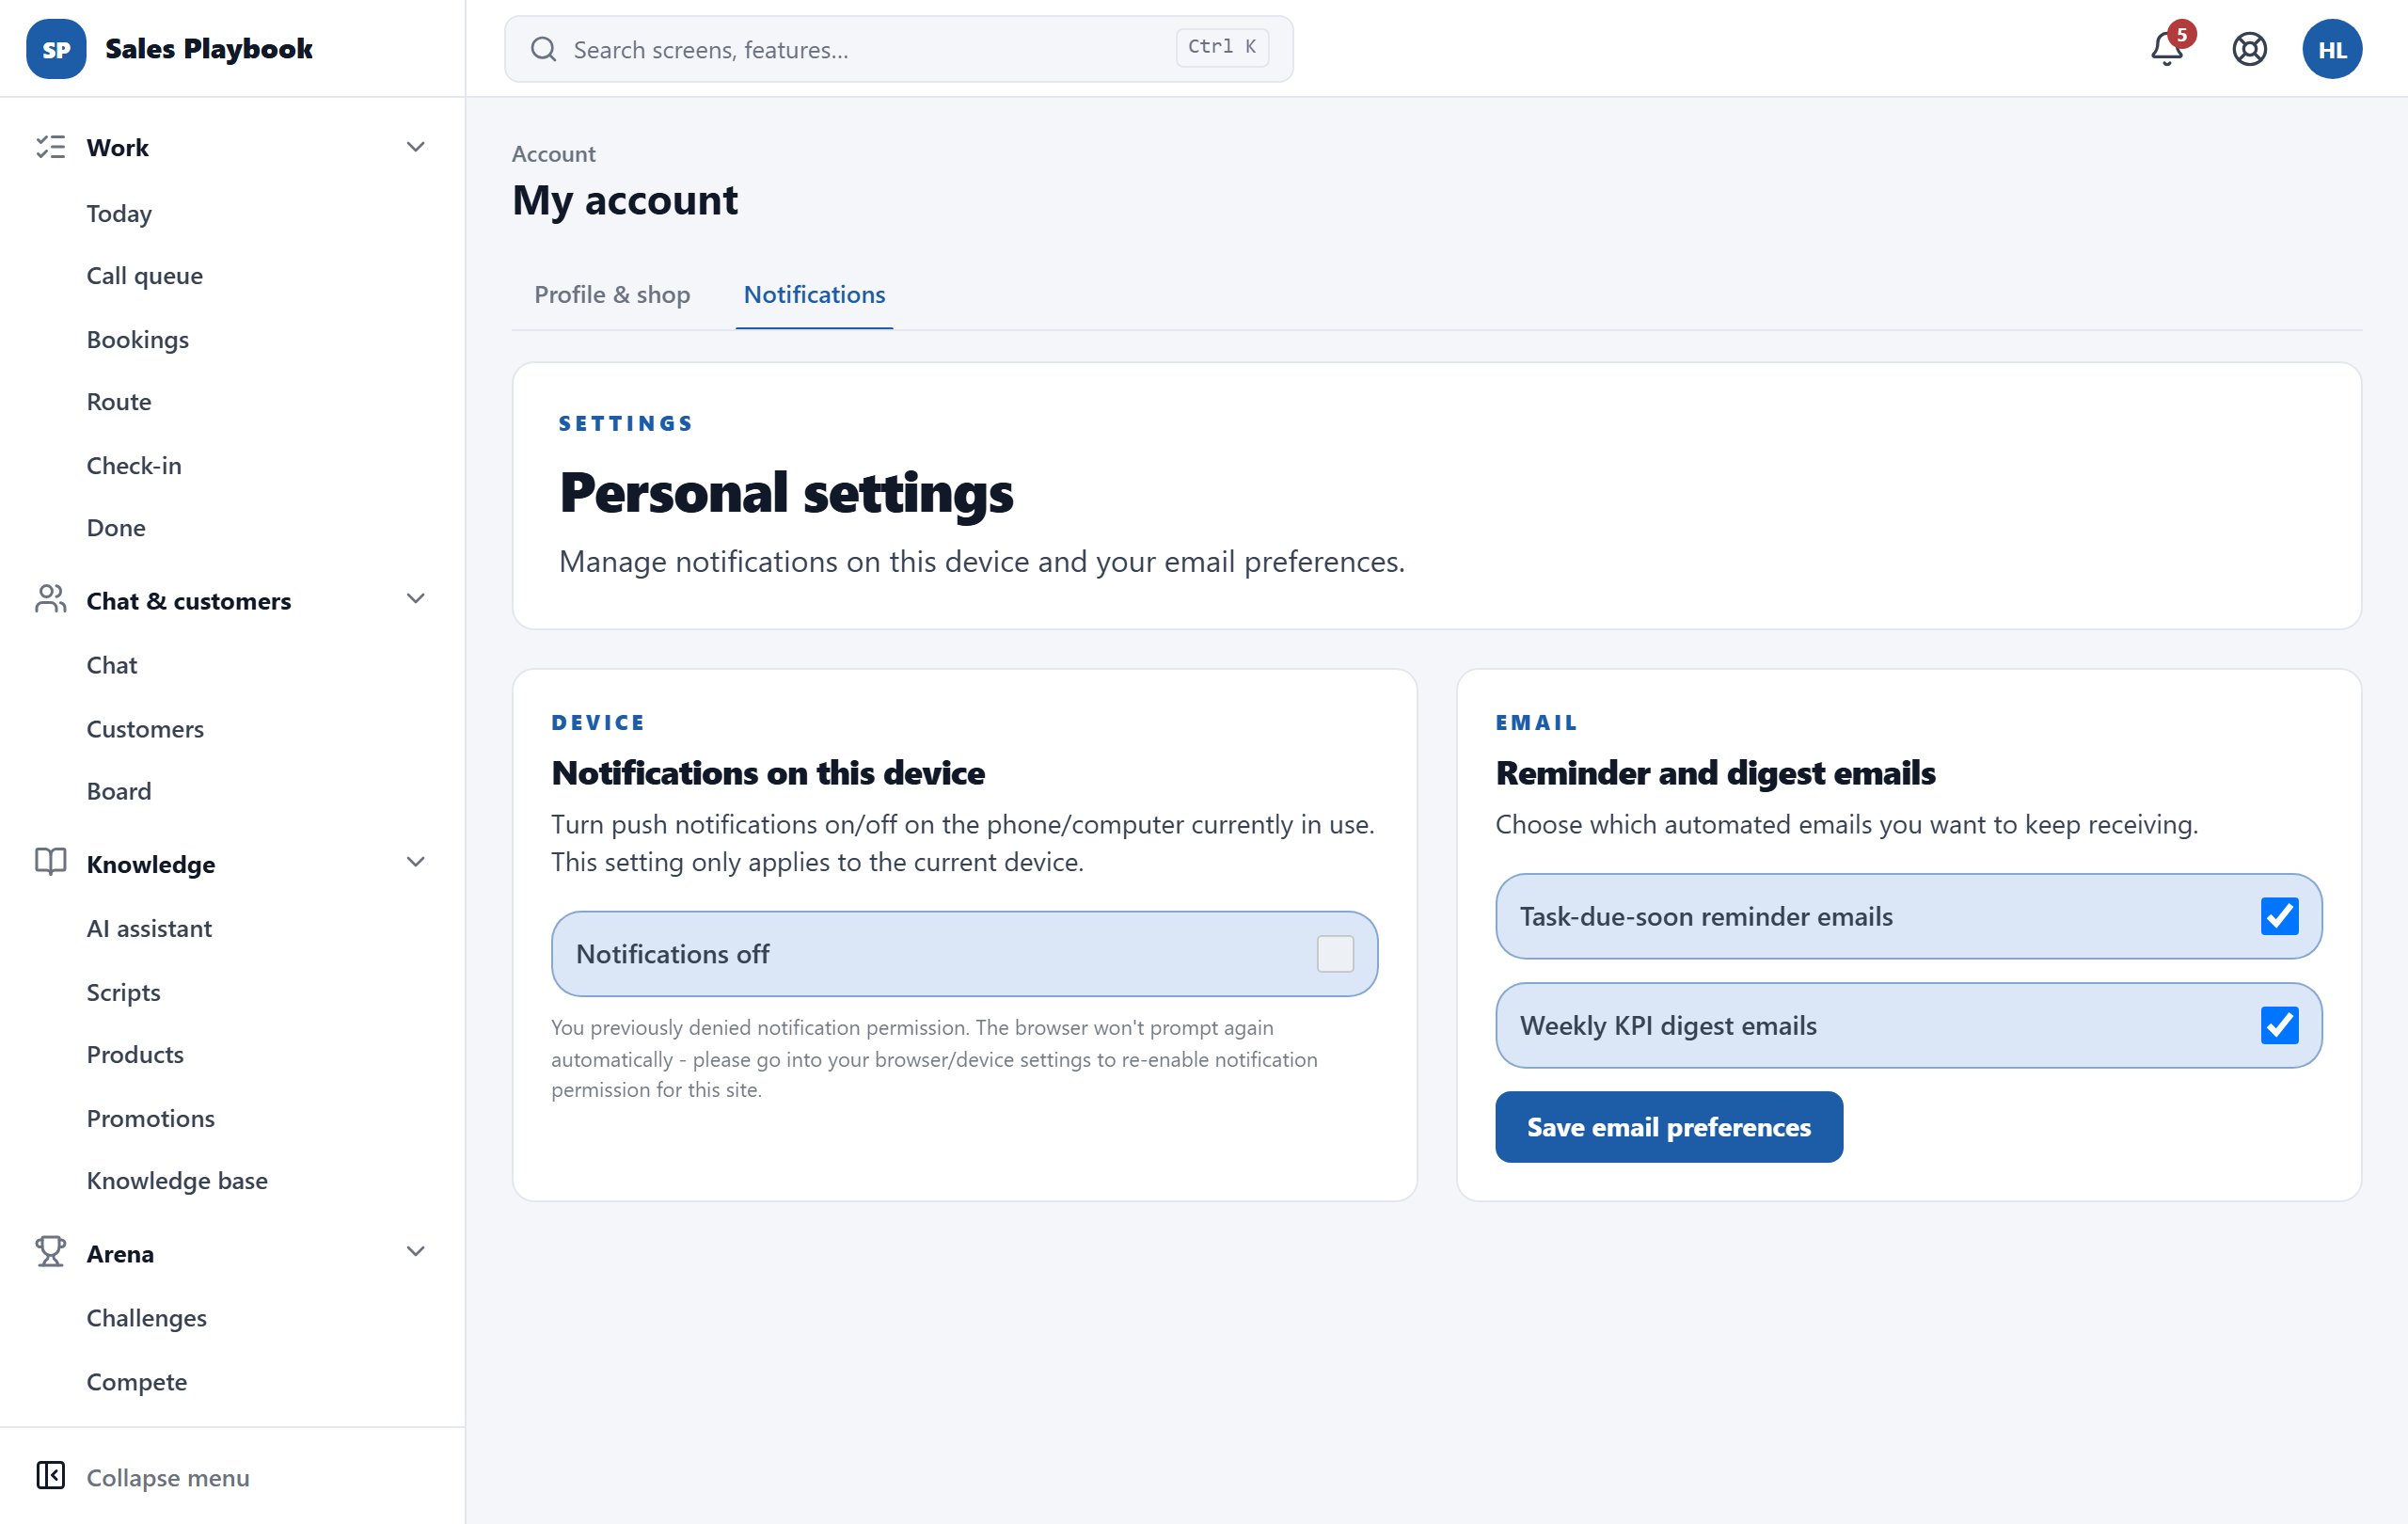
Notifications tab: Notifications on this device block with the Notifications off toggle, Reminder and digest emails block with two checkboxes and the Save email preferences button
The small text under the toggle reminds you to re-enable permission if you denied it before.

Check the in-app notification inbox

Top barBell icon

Steps

  1. 1Click the bell icon in the top bar. The red number on the bell is your unread count (above 9 it shows "9+").
  2. 2Unread notifications have a highlighted border. Click a notification to mark it read; if it is linked to a screen (e.g. a customer message), the app opens that screen directly.
  3. 3Click "Mark all as read" to clear the red number.
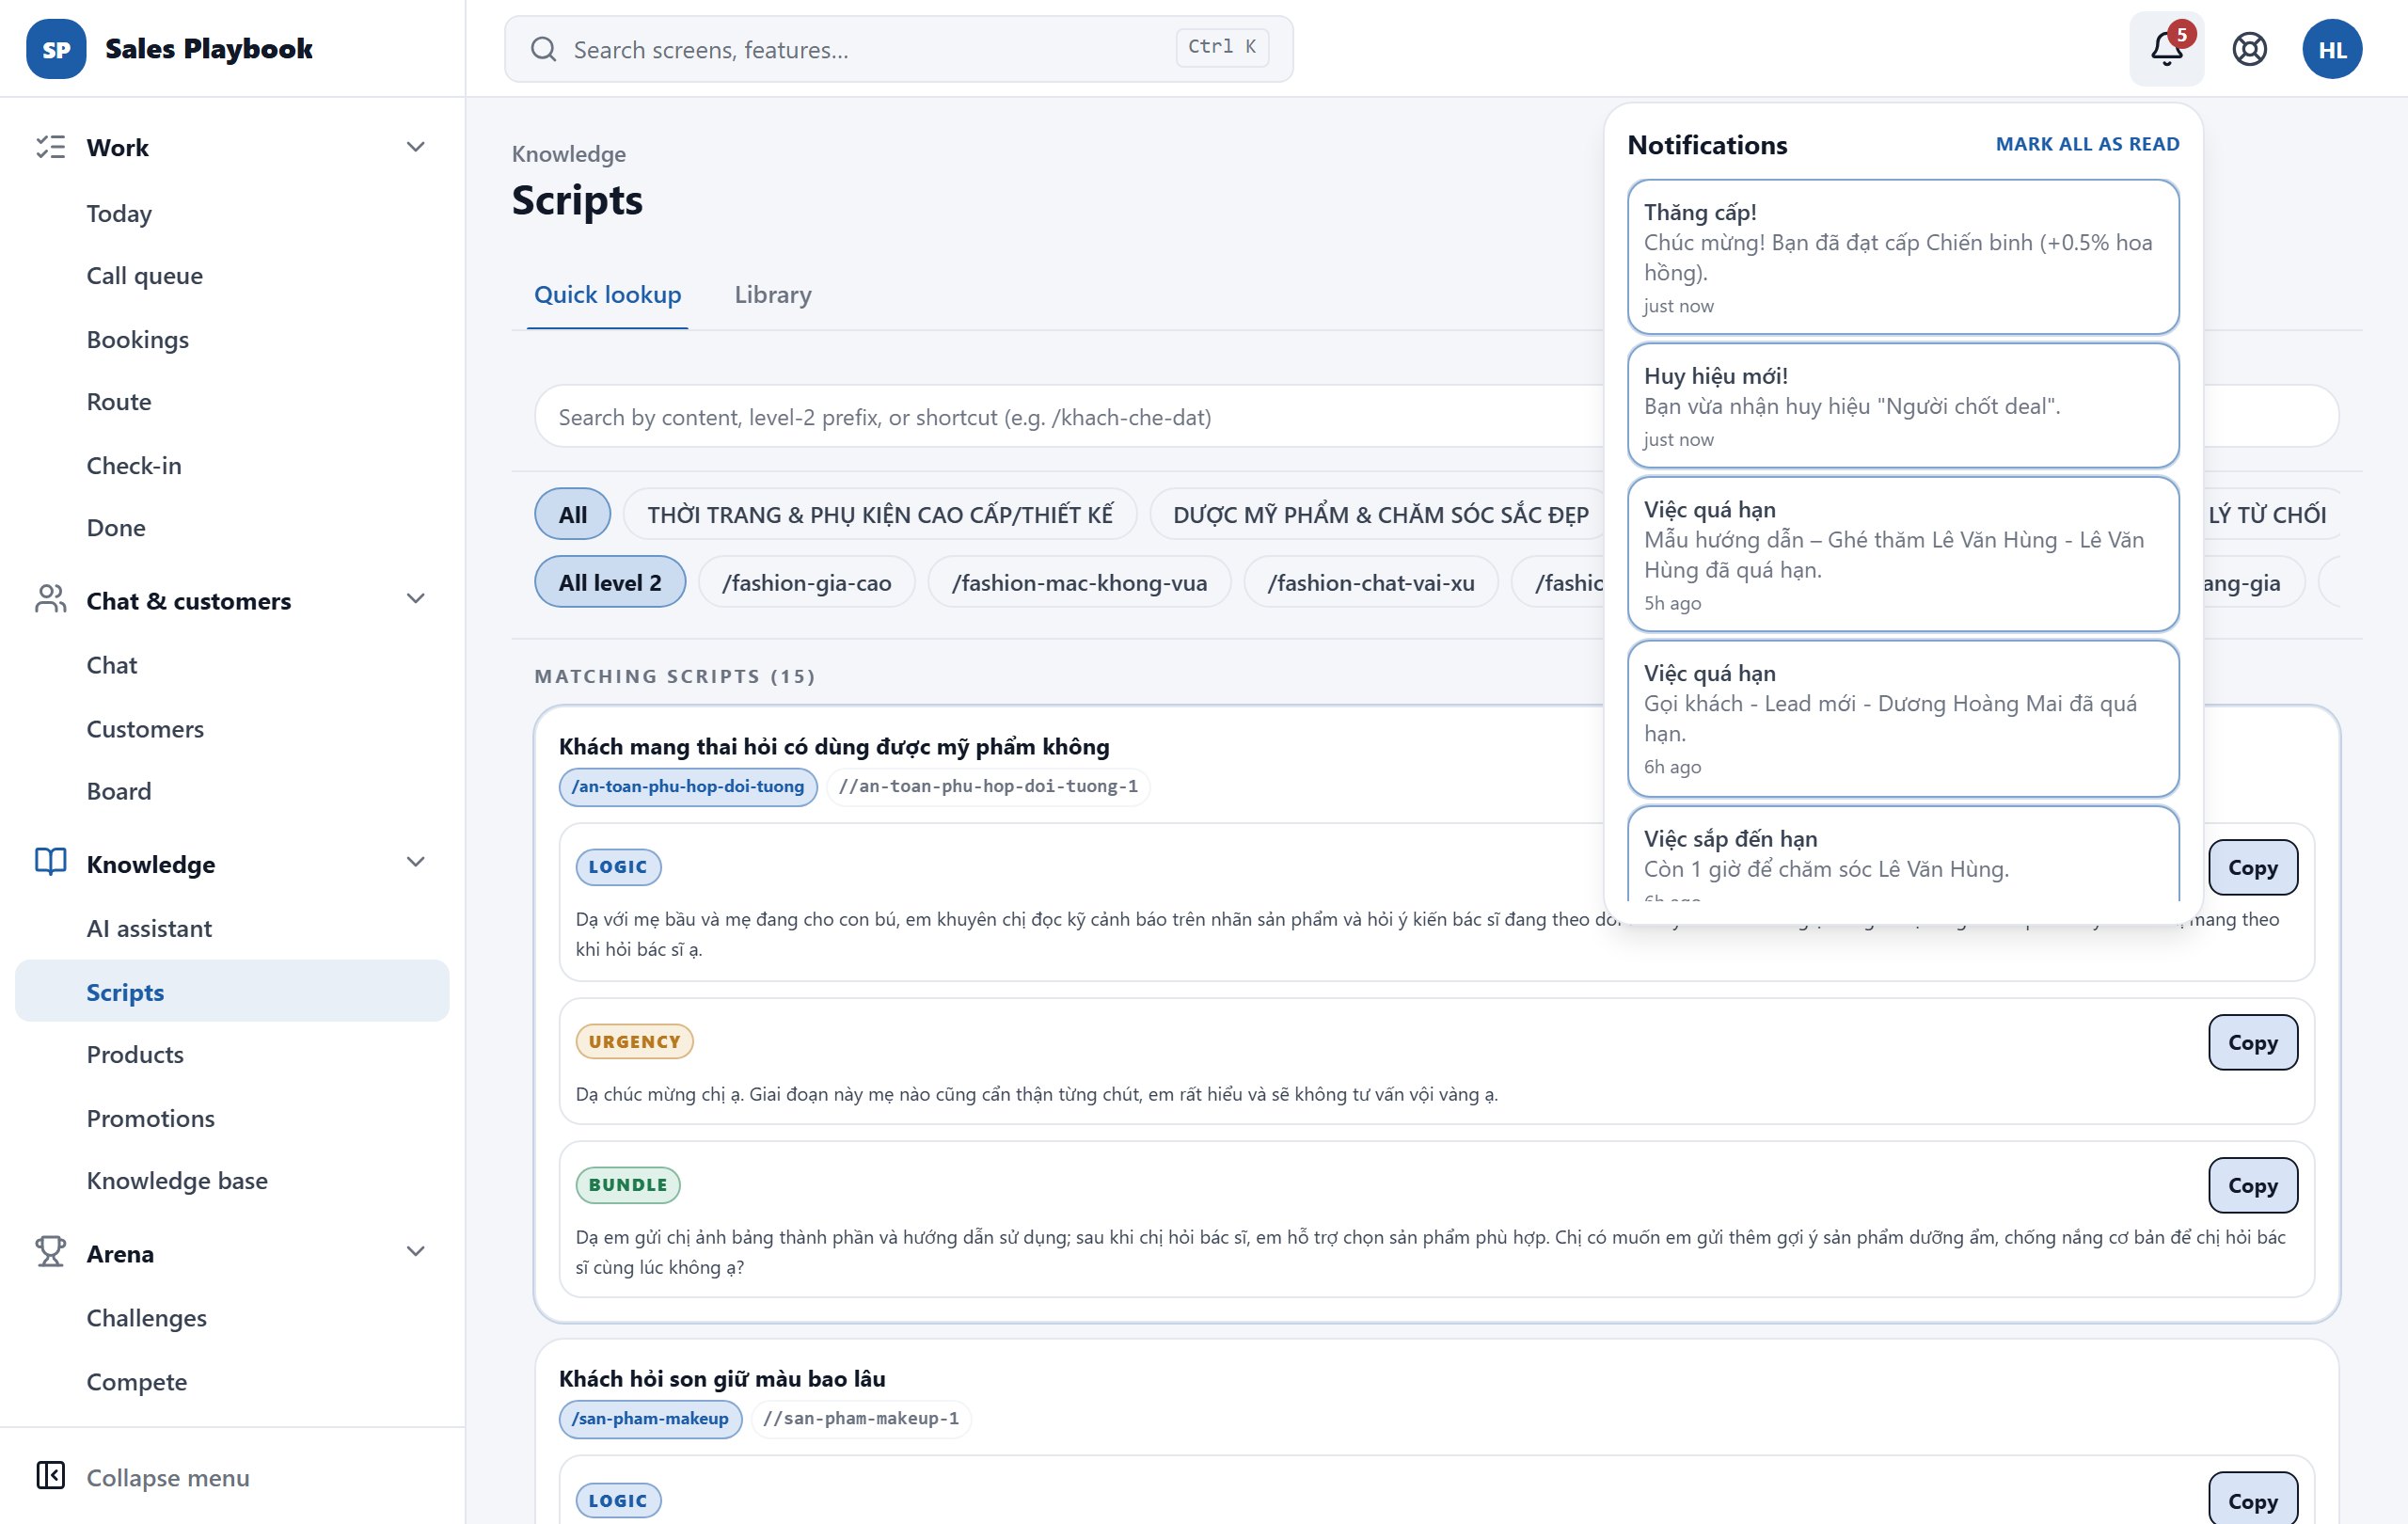
Notifications panel opened from the bell, listing overdue and due-soon tasks and Zalo messages, with Mark all as read
Each notification shows its age ("17 min ago"); "Mark all as read" is in the top-right corner.

Send a technical support request

Top barLife buoy icon (Support)

Steps

  1. 1Click the life buoy icon in the top bar (next to the bell). The "Support" panel opens on the "Submit Request" tab.
  2. 2Enter a short "Subject".
  3. 3Choose a "Category" (Technical, Billing, Feature Request, Other) and a "Priority" (Low, Medium, High).
  4. 4In "Description", describe the problem and the steps to reproduce it. The "Submitting as: …" line shows the name and email that will receive the reply.
  5. 5Click "Submit Support Request". When it succeeds, the panel shows "Request Submitted!" with the "Ticket Number" - click the copy icon to keep it.
  6. 6Open the "My Tickets" tab to see your requests and their status (New, Open, In progress, Awaiting reply, Resolved…); click a ticket's status to see replies and answer.
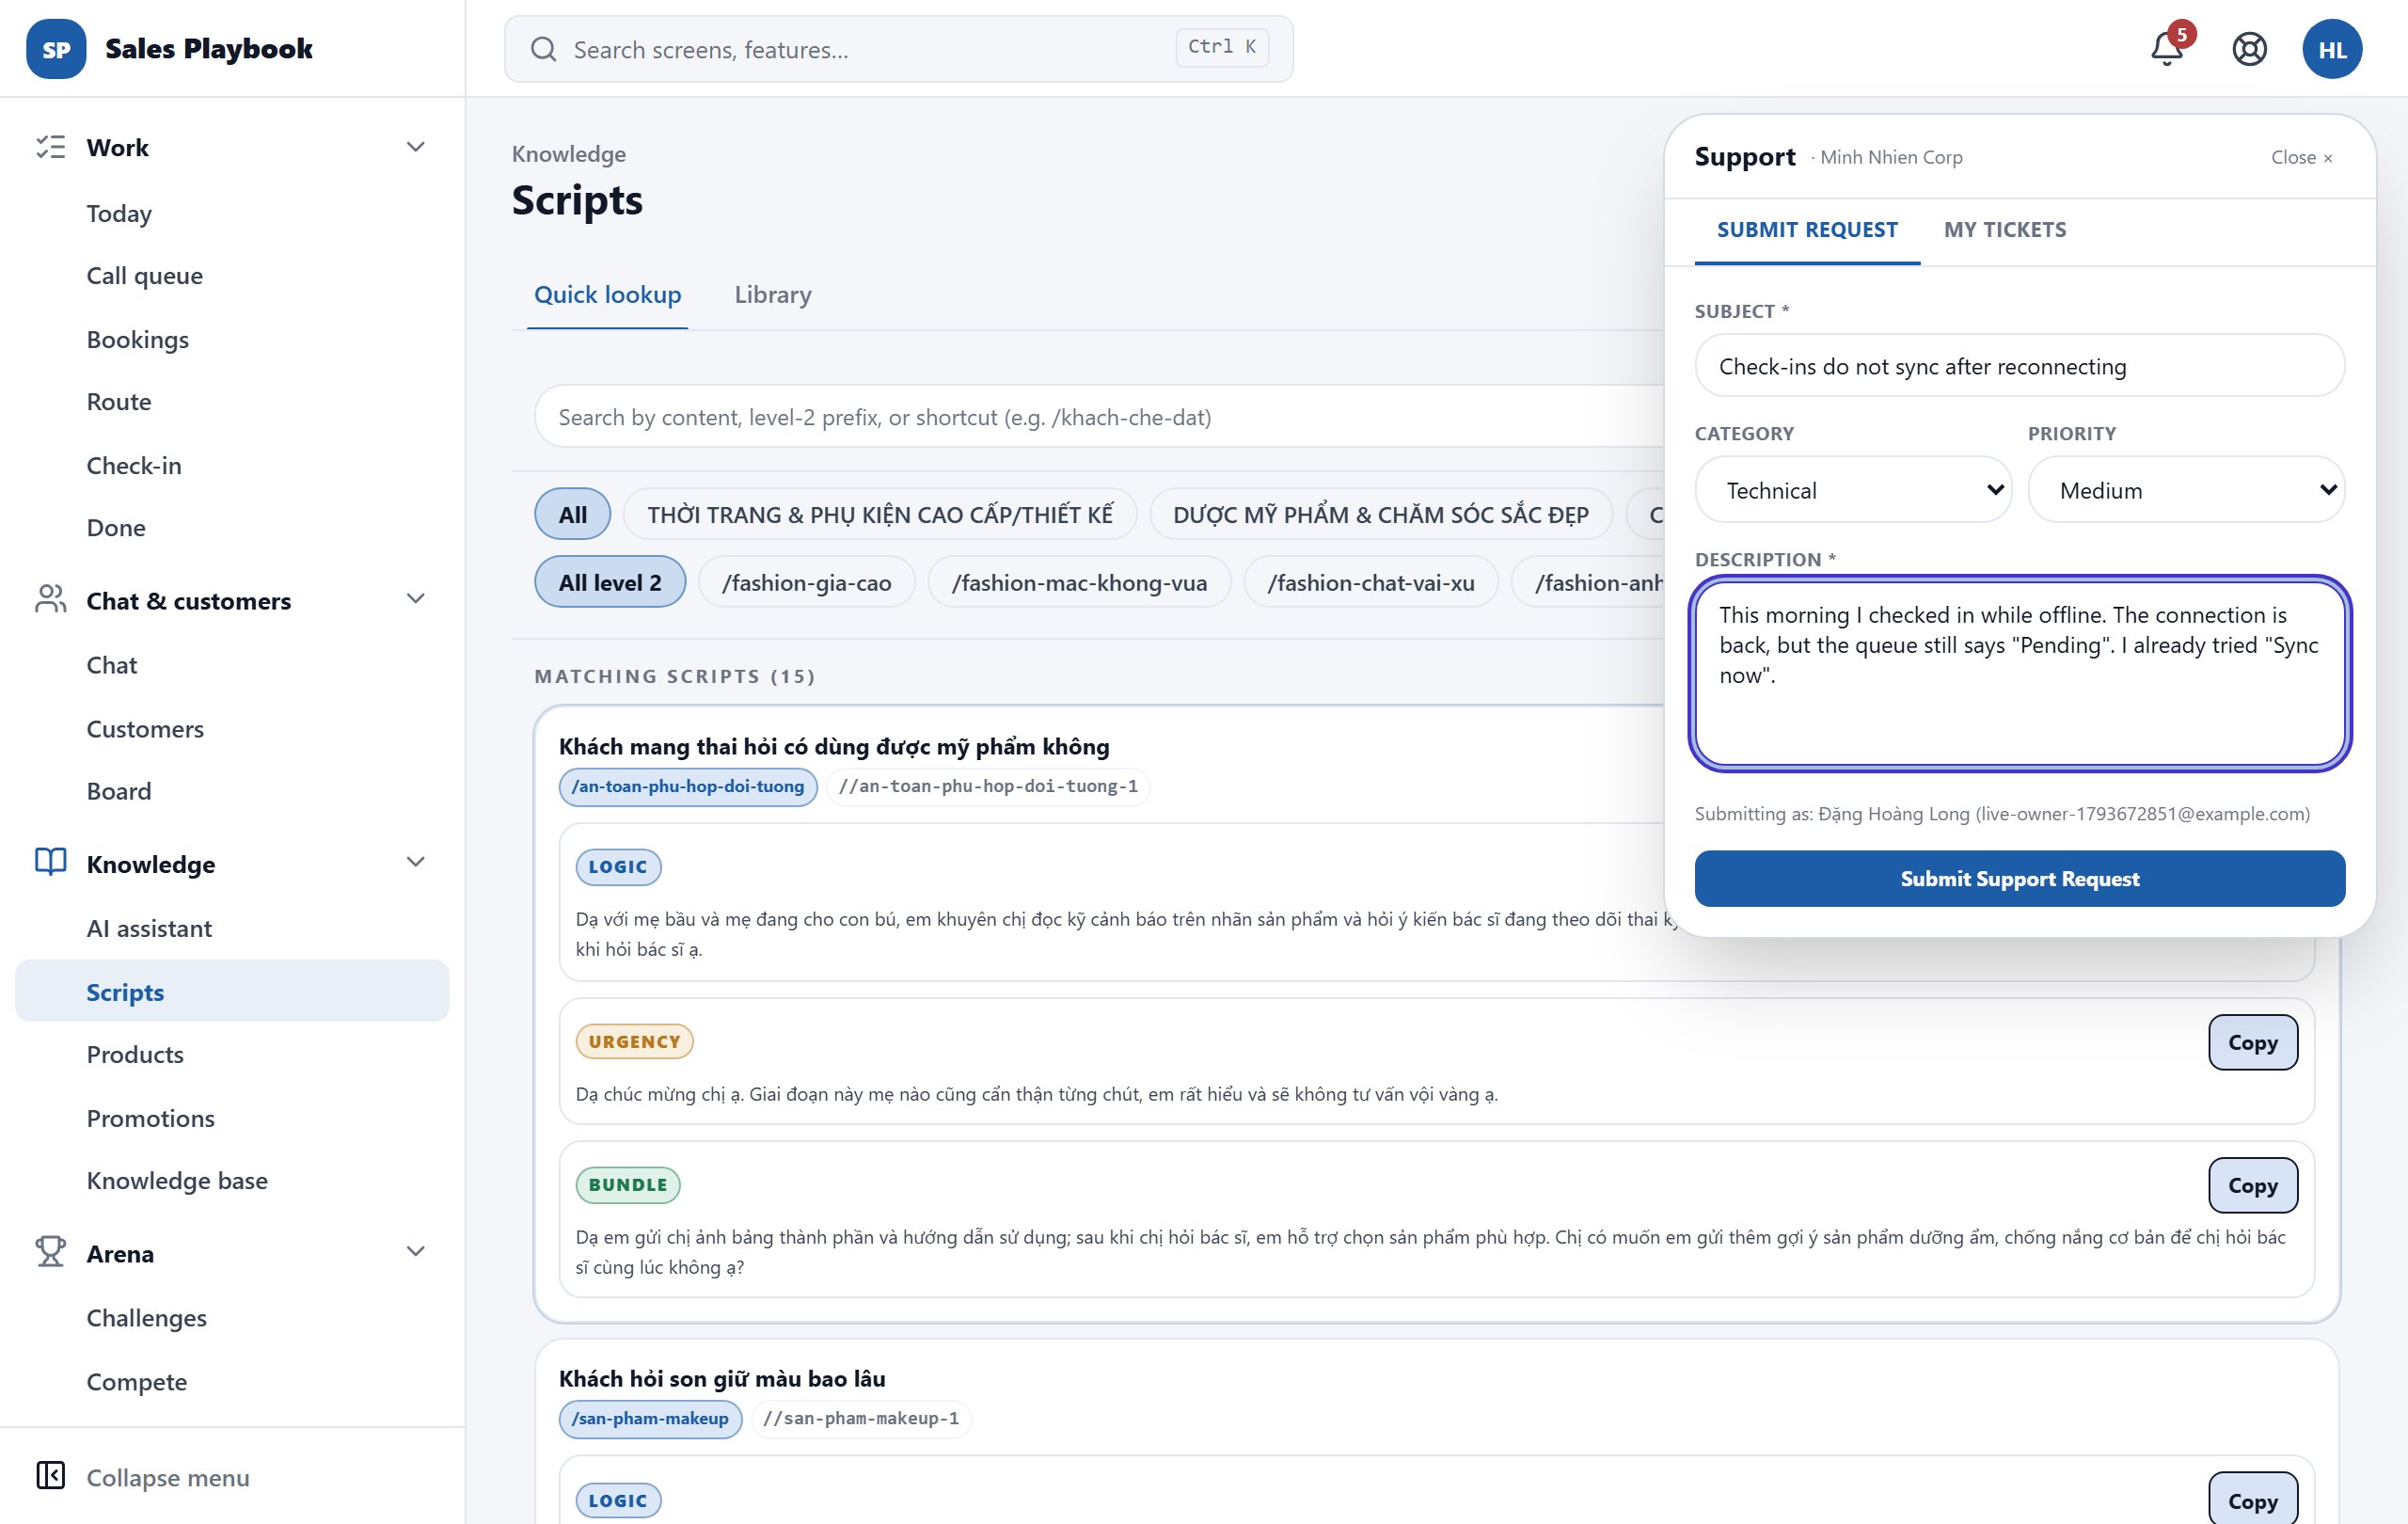
Support panel opened from the top bar, Submit Request tab filled in with a subject, Technical category, Medium priority and a description
Fill in the subject and description, then click "Submit Support Request"; follow up in "My Tickets".

12 / 2 features

Read-only screens and working offline

Staff can open some management screens in read-only mode, and keep working when the network is patchy - data syncs automatically once you are back online.

View management screens in read-only mode

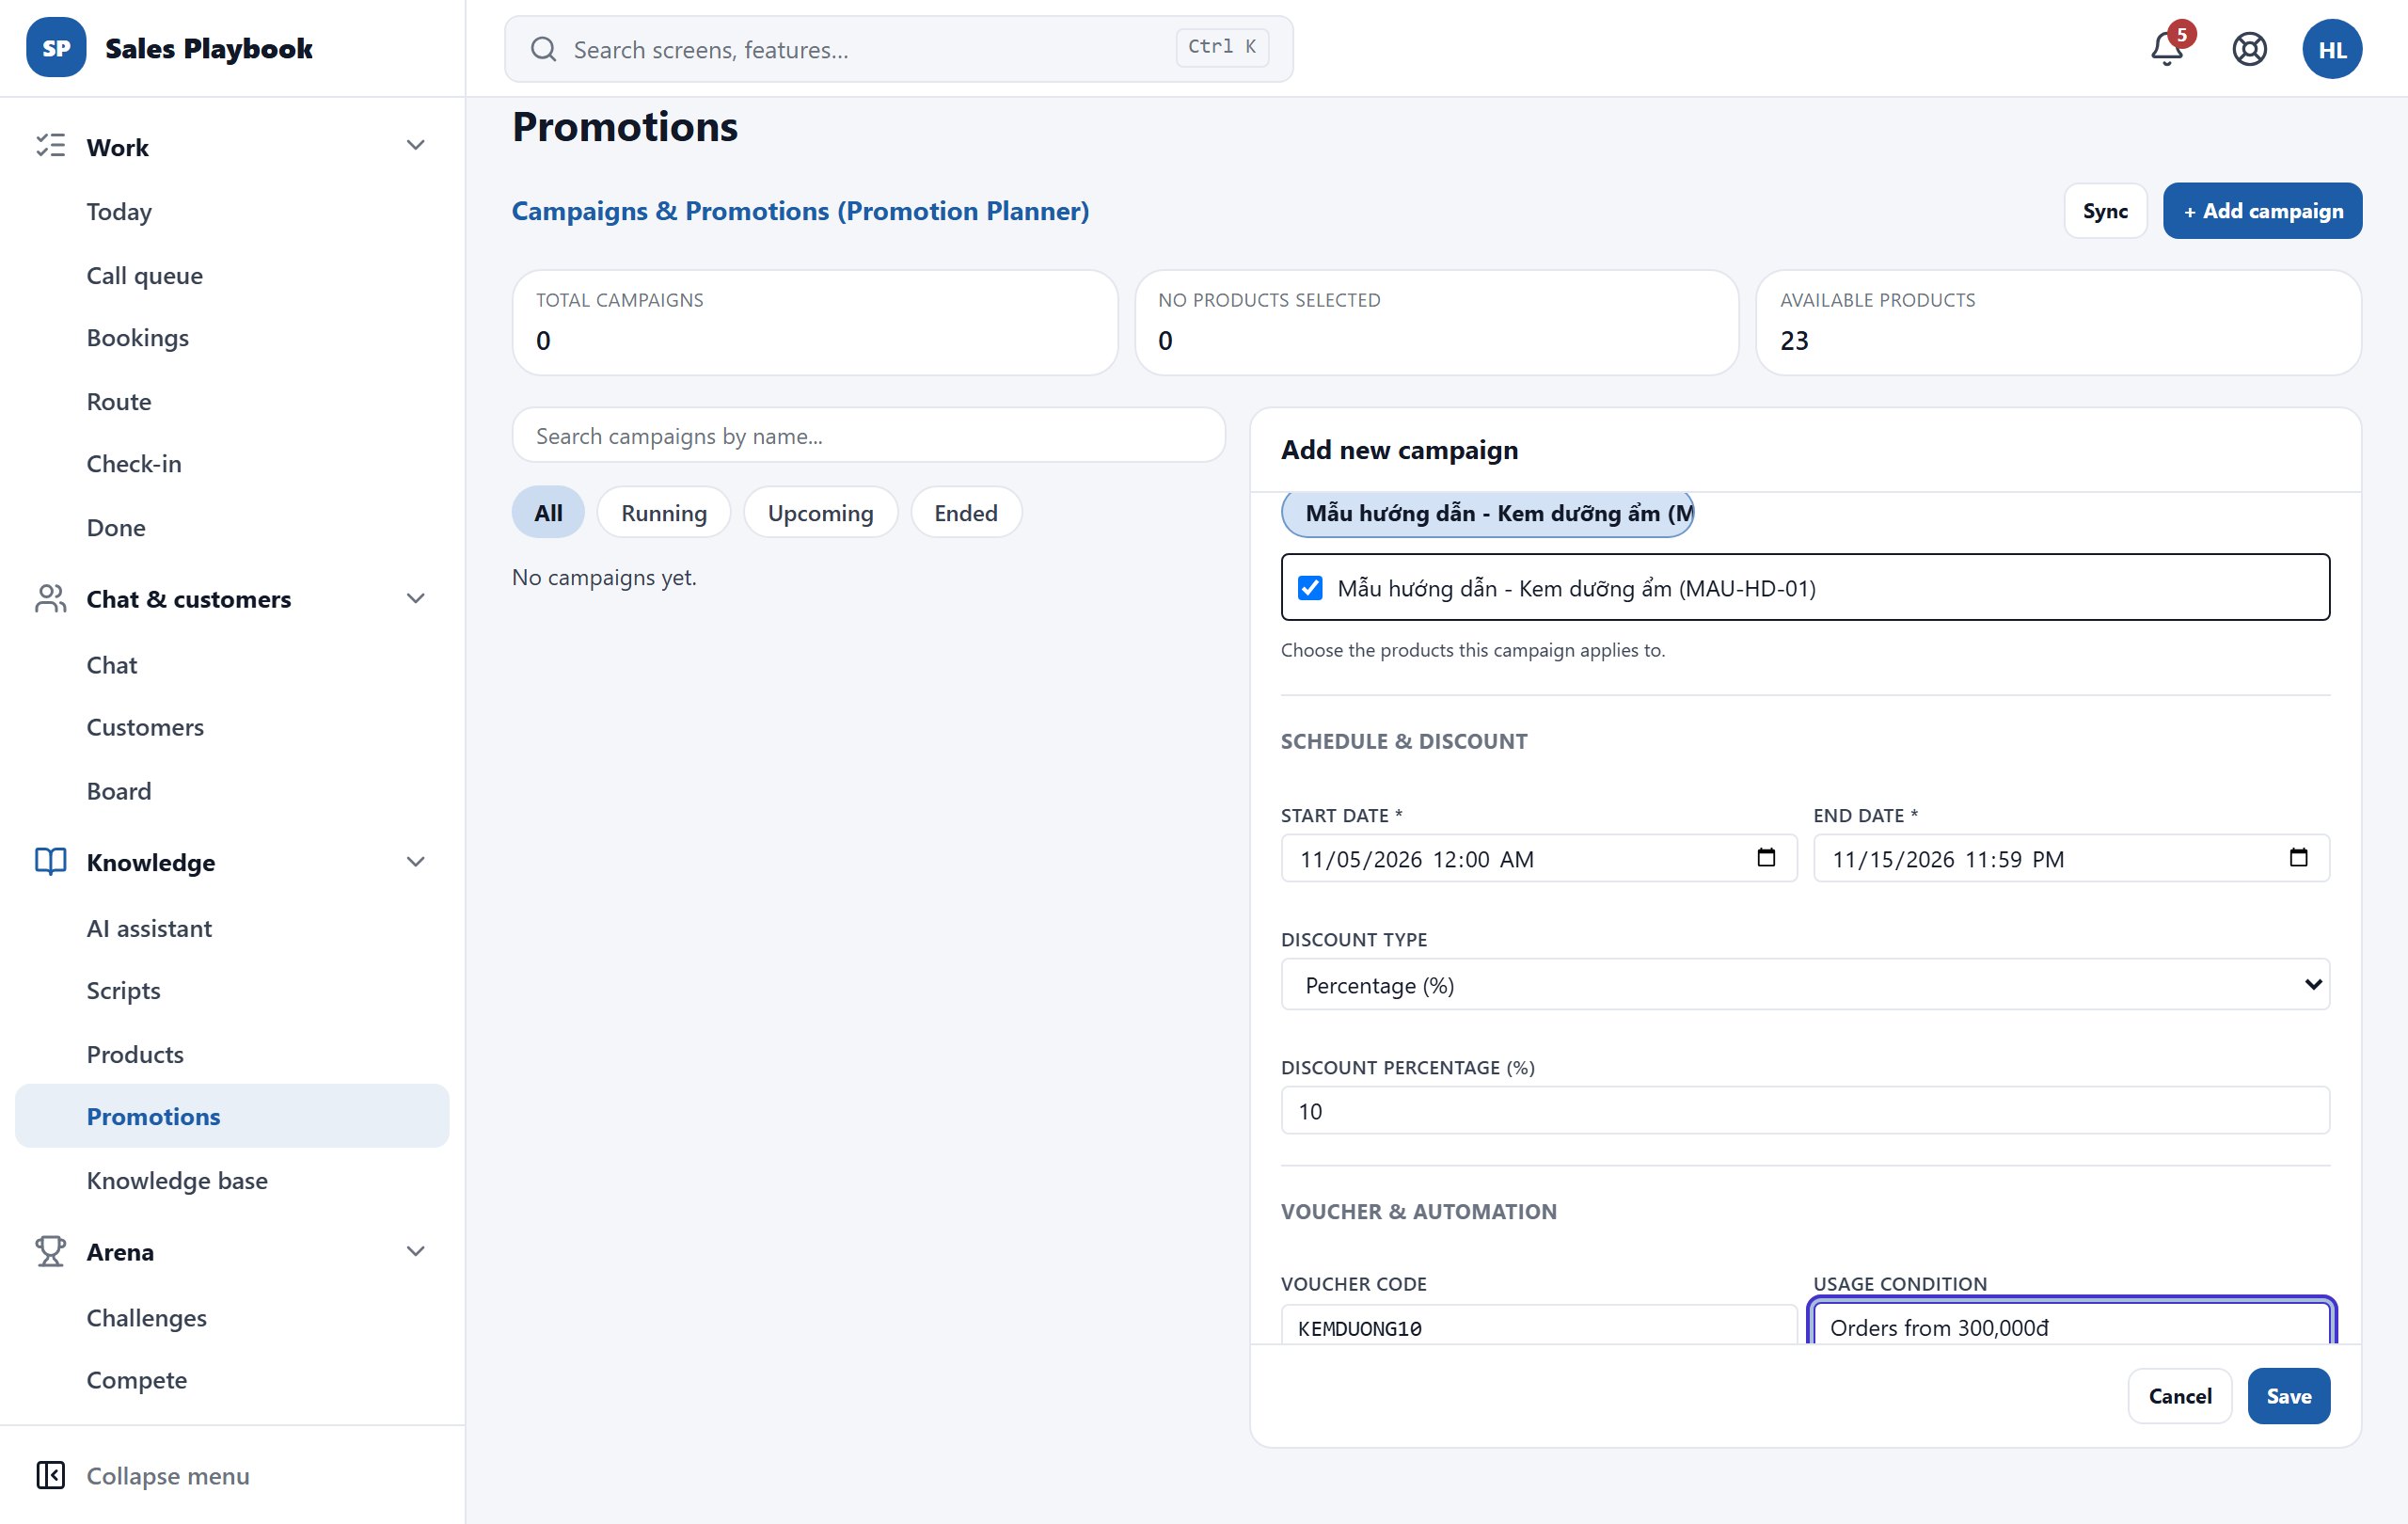
KnowledgePromotions

Steps

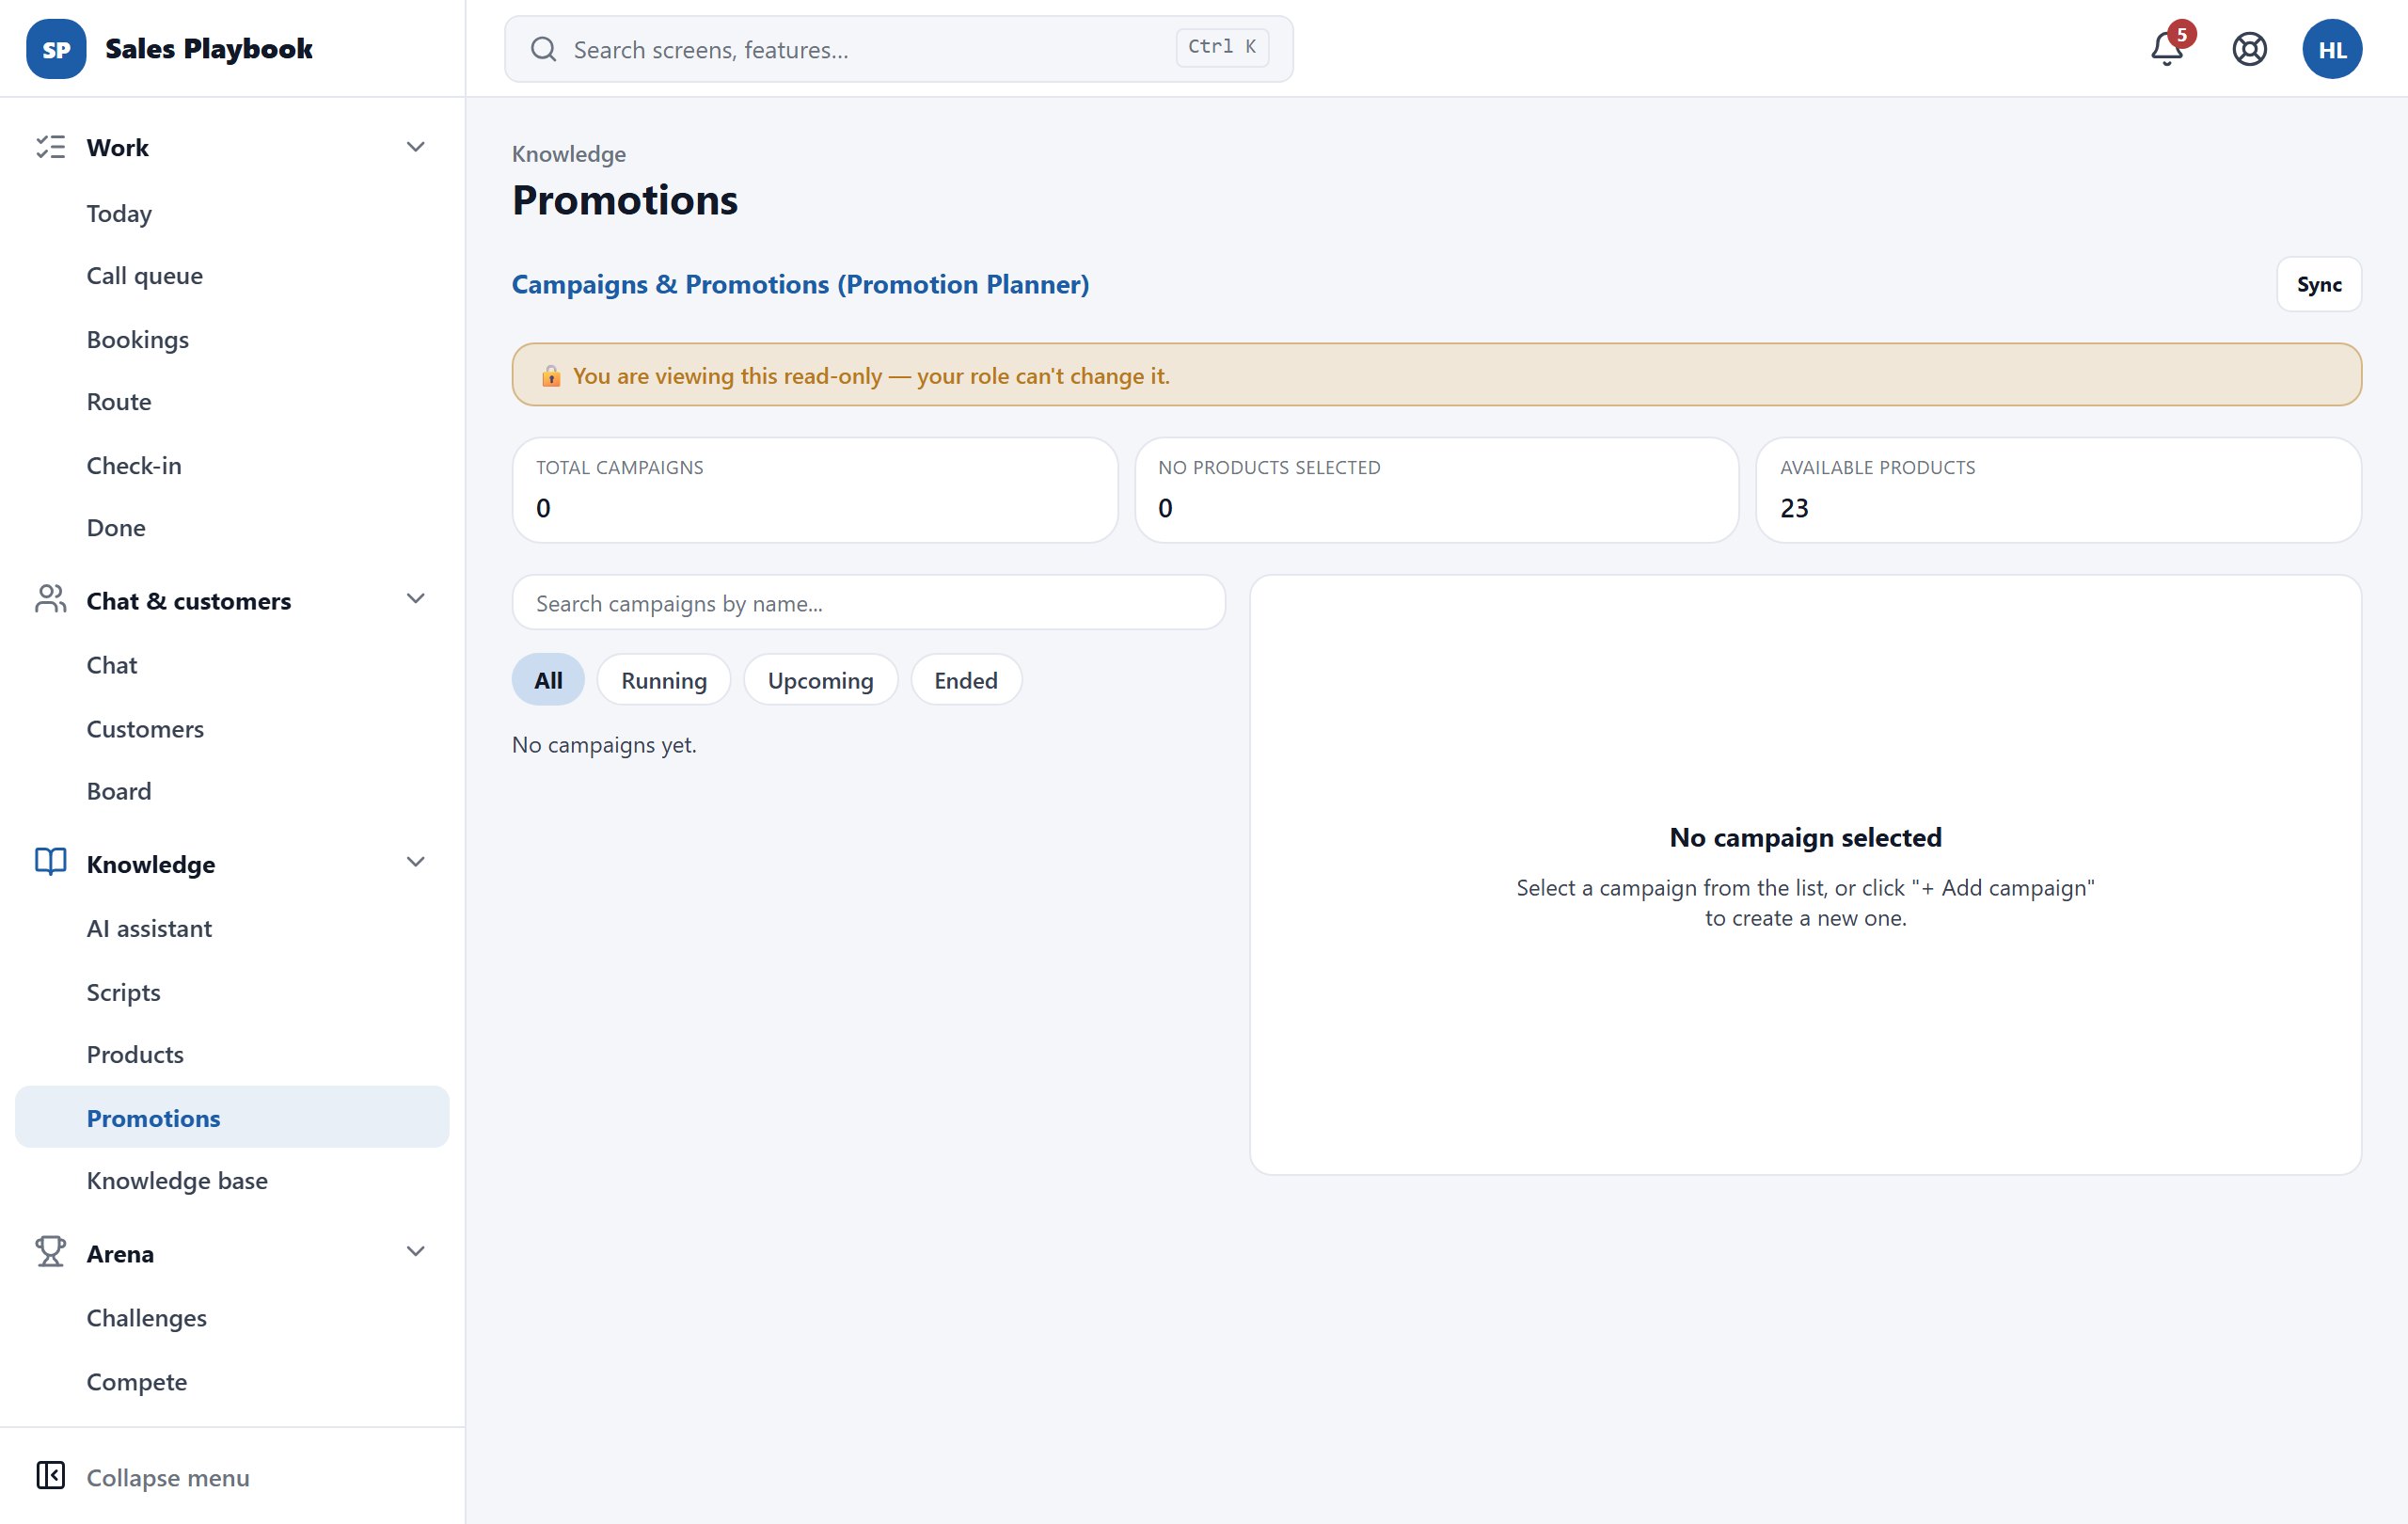
  1. 1Open the screen from the left menu as usual - e.g. "Promotions" in the Knowledge group, the "Library" tab of "Scripts", or "Reports".
  2. 2If your role may only view it, a yellow bar appears at the top: "🔒 You are viewing this read-only — your role can't change it."
  3. 3You can still search, filter and open details; add, edit and delete buttons are hidden or disabled.
  4. 4To suggest a change, tell your manager or use the staff suggestion features (e.g. suggesting a script).
Promotions screen signed in with a staff role, yellow read-only bar at the top of the page
The yellow 🔒 bar tells you this screen is read-only for your role.

Work offline

WorkToday

Steps

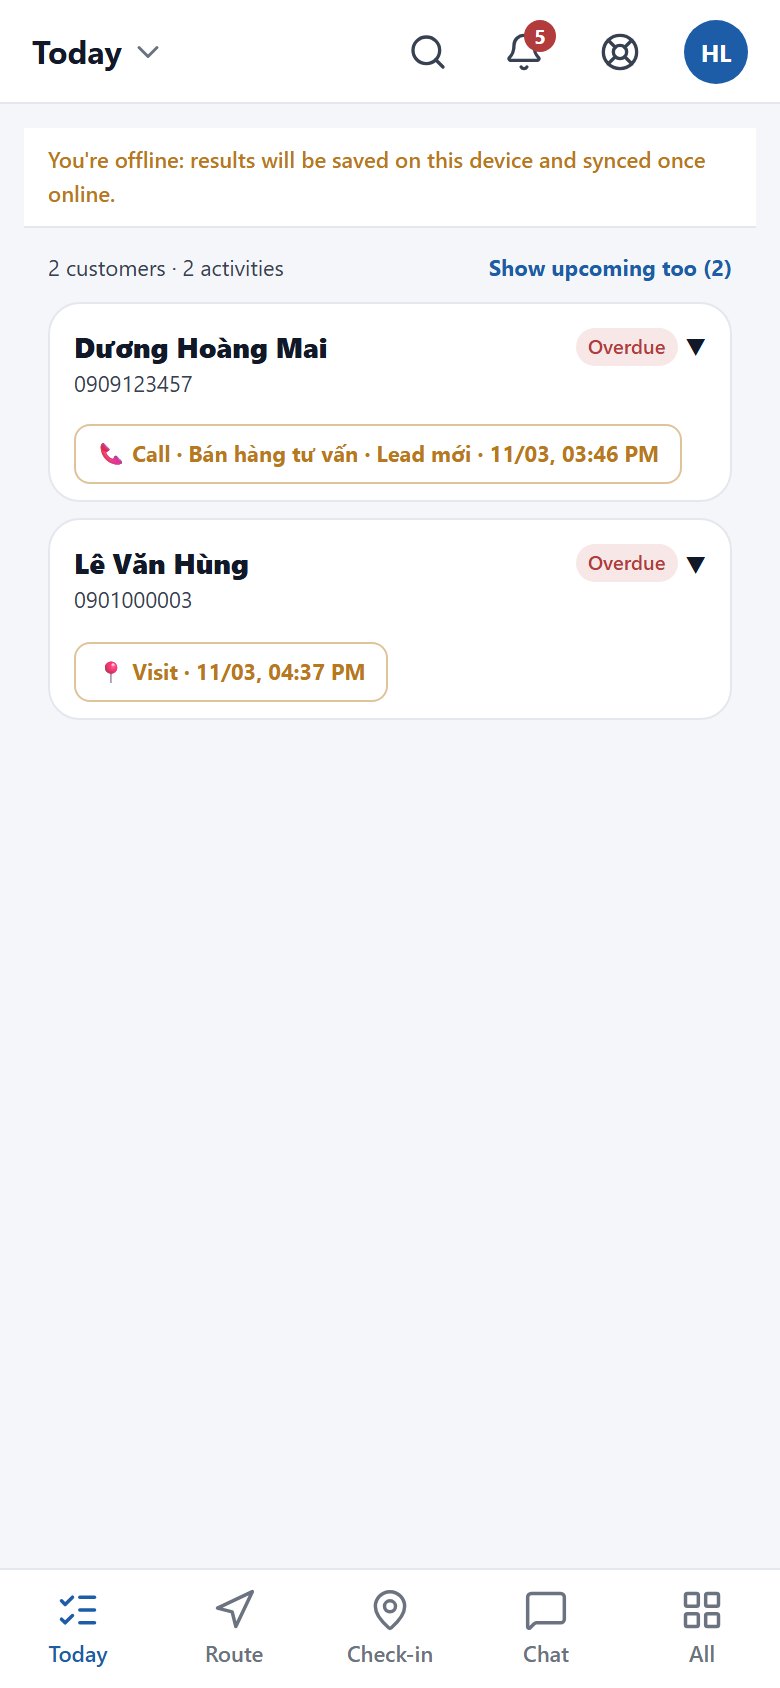
  1. 1When you lose the connection, Work › Today shows "You're offline: results will be saved on this device and synced once online." - keep recording task results as usual.
  2. 2On the Check-in screen, the "Offline · N waiting to sync" line shows how many check-ins have not been sent; the "Sync queue (N)" box lists each check-in as "Pending", "Sending" or "Synced".
  3. 3Arena actions such as claiming a challenge reward, opening a gift or levelling up are queued, with the message "You're offline - the action is queued and will sync automatically when you reconnect."
  4. 4When the connection returns, data is sent automatically: Today shows "Syncing customer-care data to the server..." or "N updates pending sync."; for check-ins you can also tap "Sync now".
  5. 5Screens using older data say "Showing the last data saved for offline use." or "Offline data from …".
Today screen on a phone while offline, yellow bar "You're offline: results will be saved on this device and synced once online." above the task list
The "You're offline…" bar at the top of Today; tasks are still listed and results can still be recorded.

13 / 13 features

Reports: overview, Report Studio and operating metrics

All the numbers for owners and managers live under "Reports": a setup checklist, an overview of every board, Report Studio (revenue, staff monitoring, script performance, AI forecasts), operating metrics, ROI for each automation rule and multi-year revenue history.

Finish setting up your shop with the 6-step checklist

ReportsReportsOverview

Steps

  1. 1Open "Reports" in the sidebar and choose the "Overview" tab (owners and admins land on this tab).
  2. 2Read the "x/6 steps done" line to see your progress. Finished steps show a green ✓.
  3. 3Click an unfinished step to jump straight to the right screen: "Add a category (or apply an industry template)" and "Add your first product" open Products, "Invite your first employee" opens Staff, "Connect a Zalo OA or Facebook Page" opens the channel connections, "Set the AI tone" opens the AI tone tab of Scripts, "Try the AI assistant in the workspace" opens the AI assistant.
  4. 4When you are done, come back to "Reports" › "Overview": the step gets its ✓ once the system records it.
  5. 5If you no longer want to see the box, click "DISMISS" in the top-right corner.
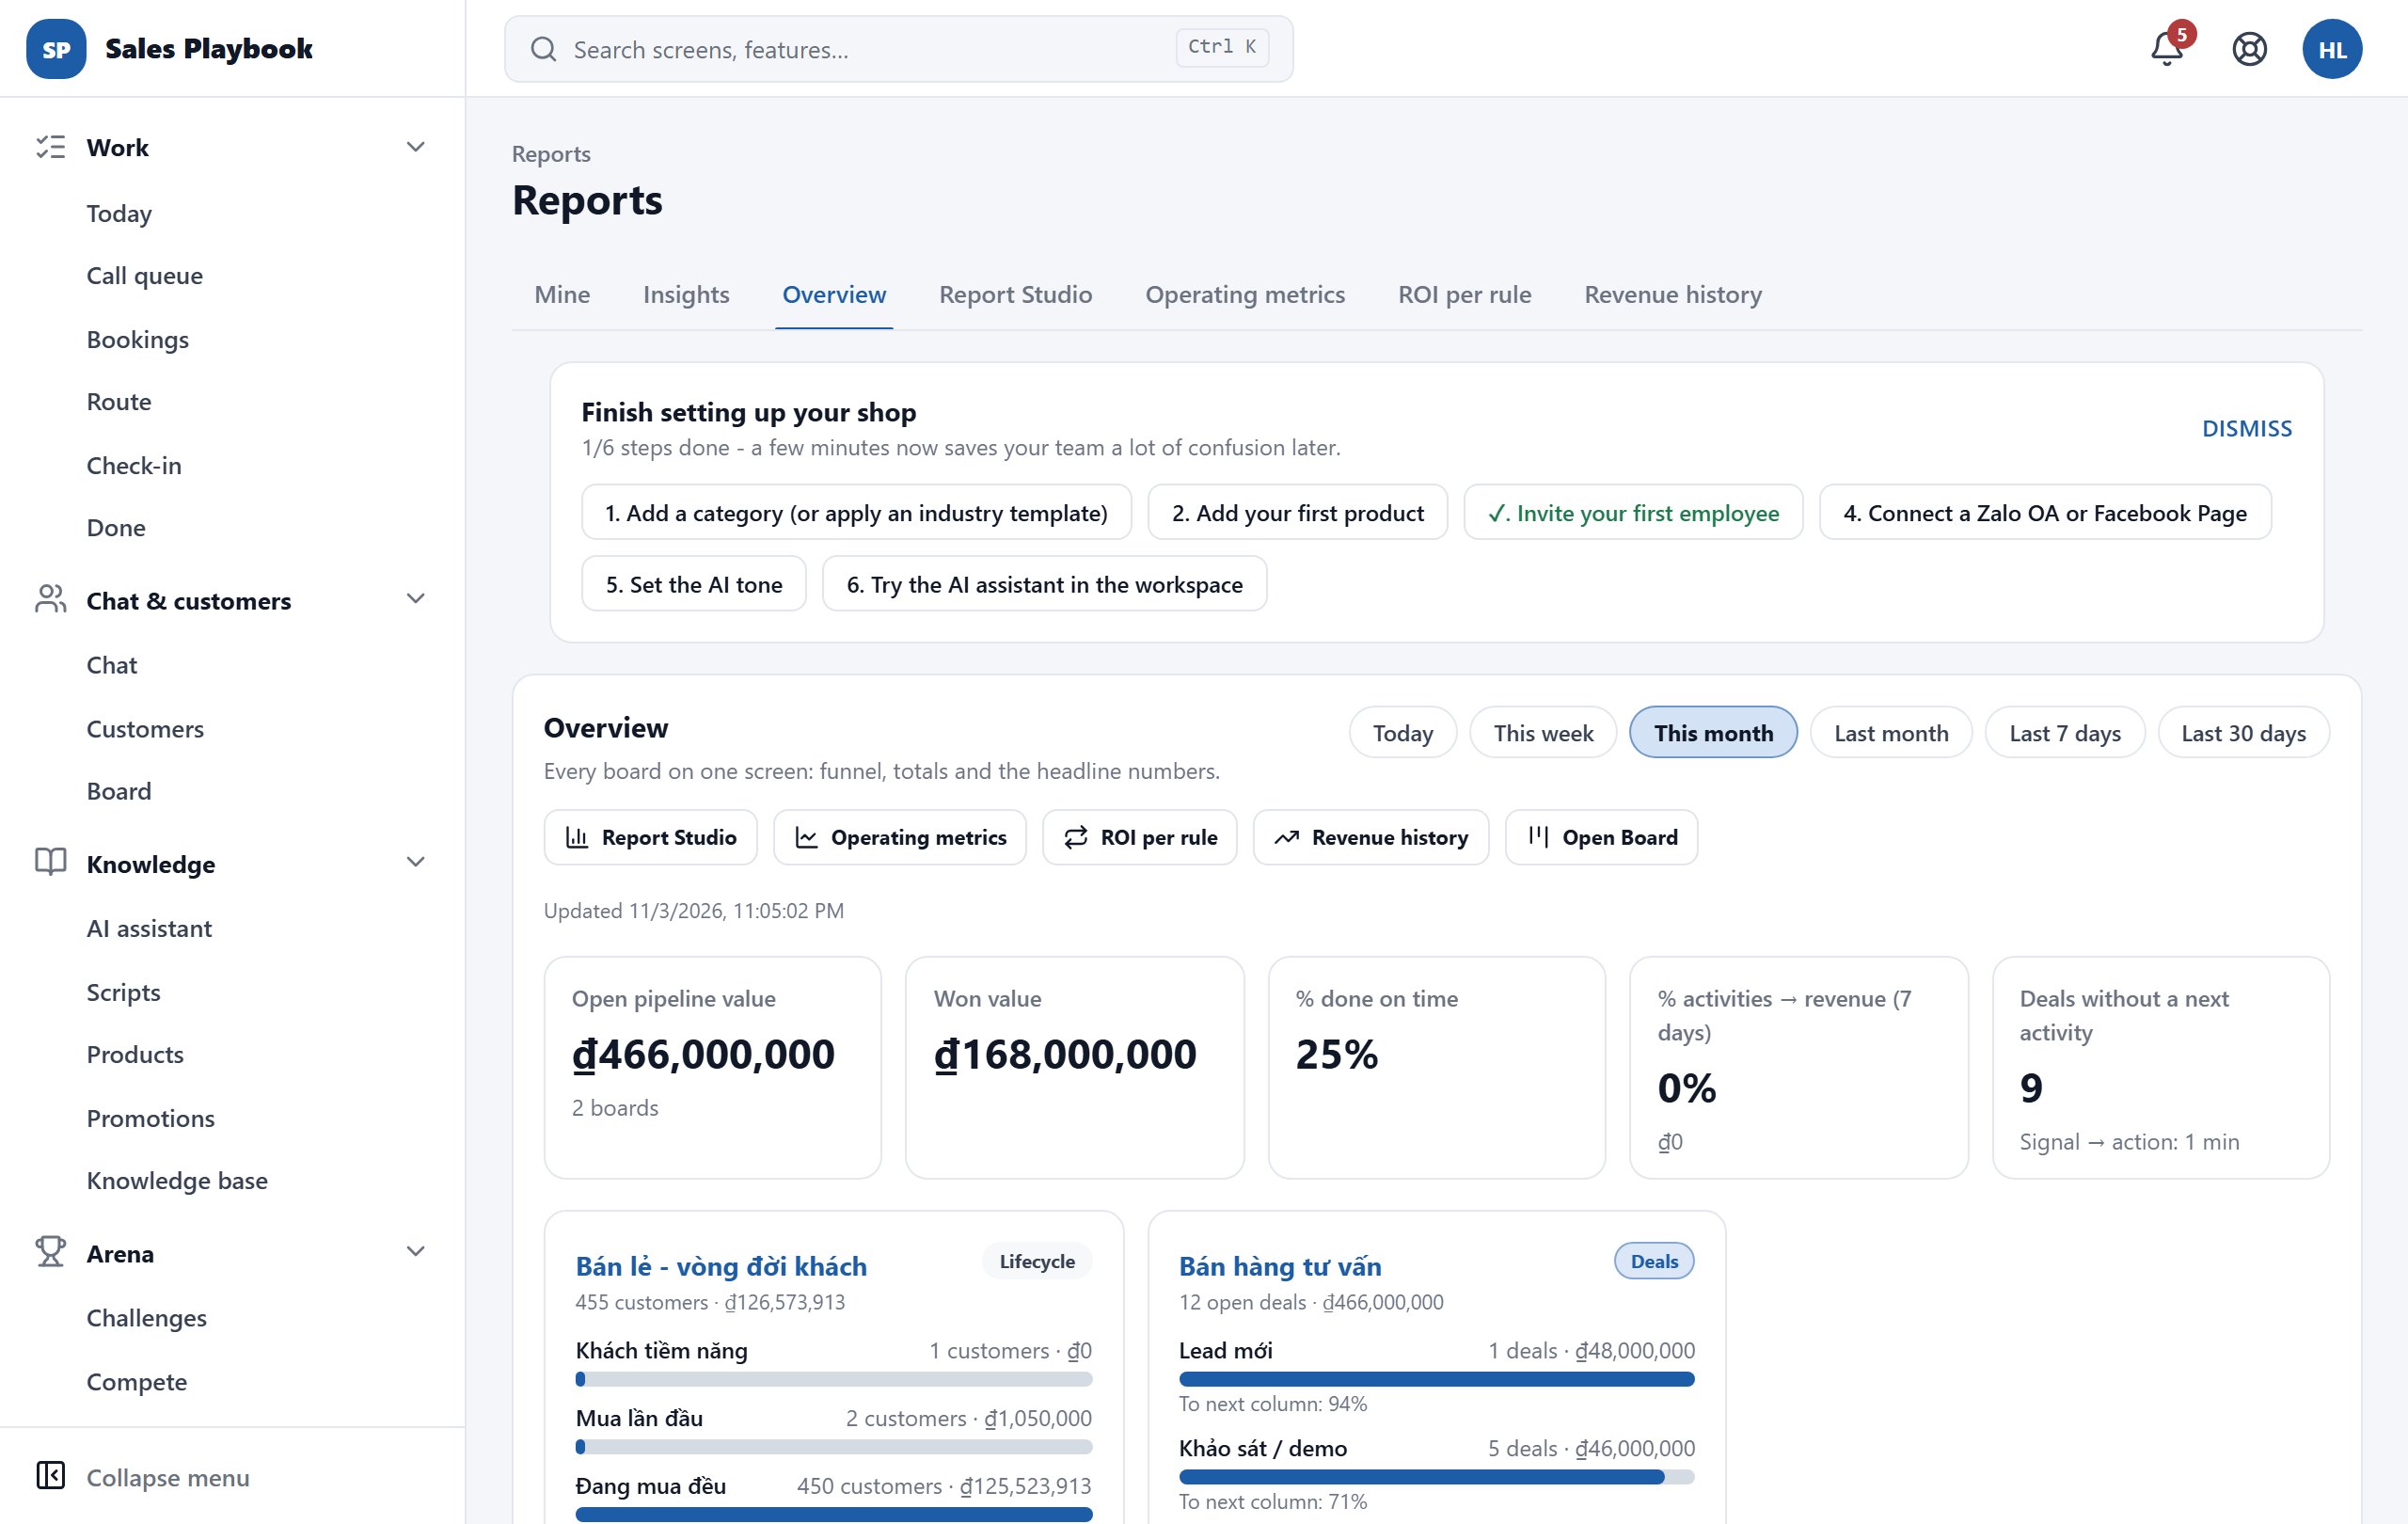
Reports Overview tab with the Finish setting up your shop box at the top and its 6 step buttons
"Finish setting up your shop": finished steps have a green ✓; click the others to open the right screen.

See every board and the headline numbers at a glance

ReportsReportsOverview

Steps

  1. 1Open "Reports" › "Overview".
  2. 2Pick a period: "Today", "This week", "This month", "Last month", "Last 7 days" or "Last 30 days".
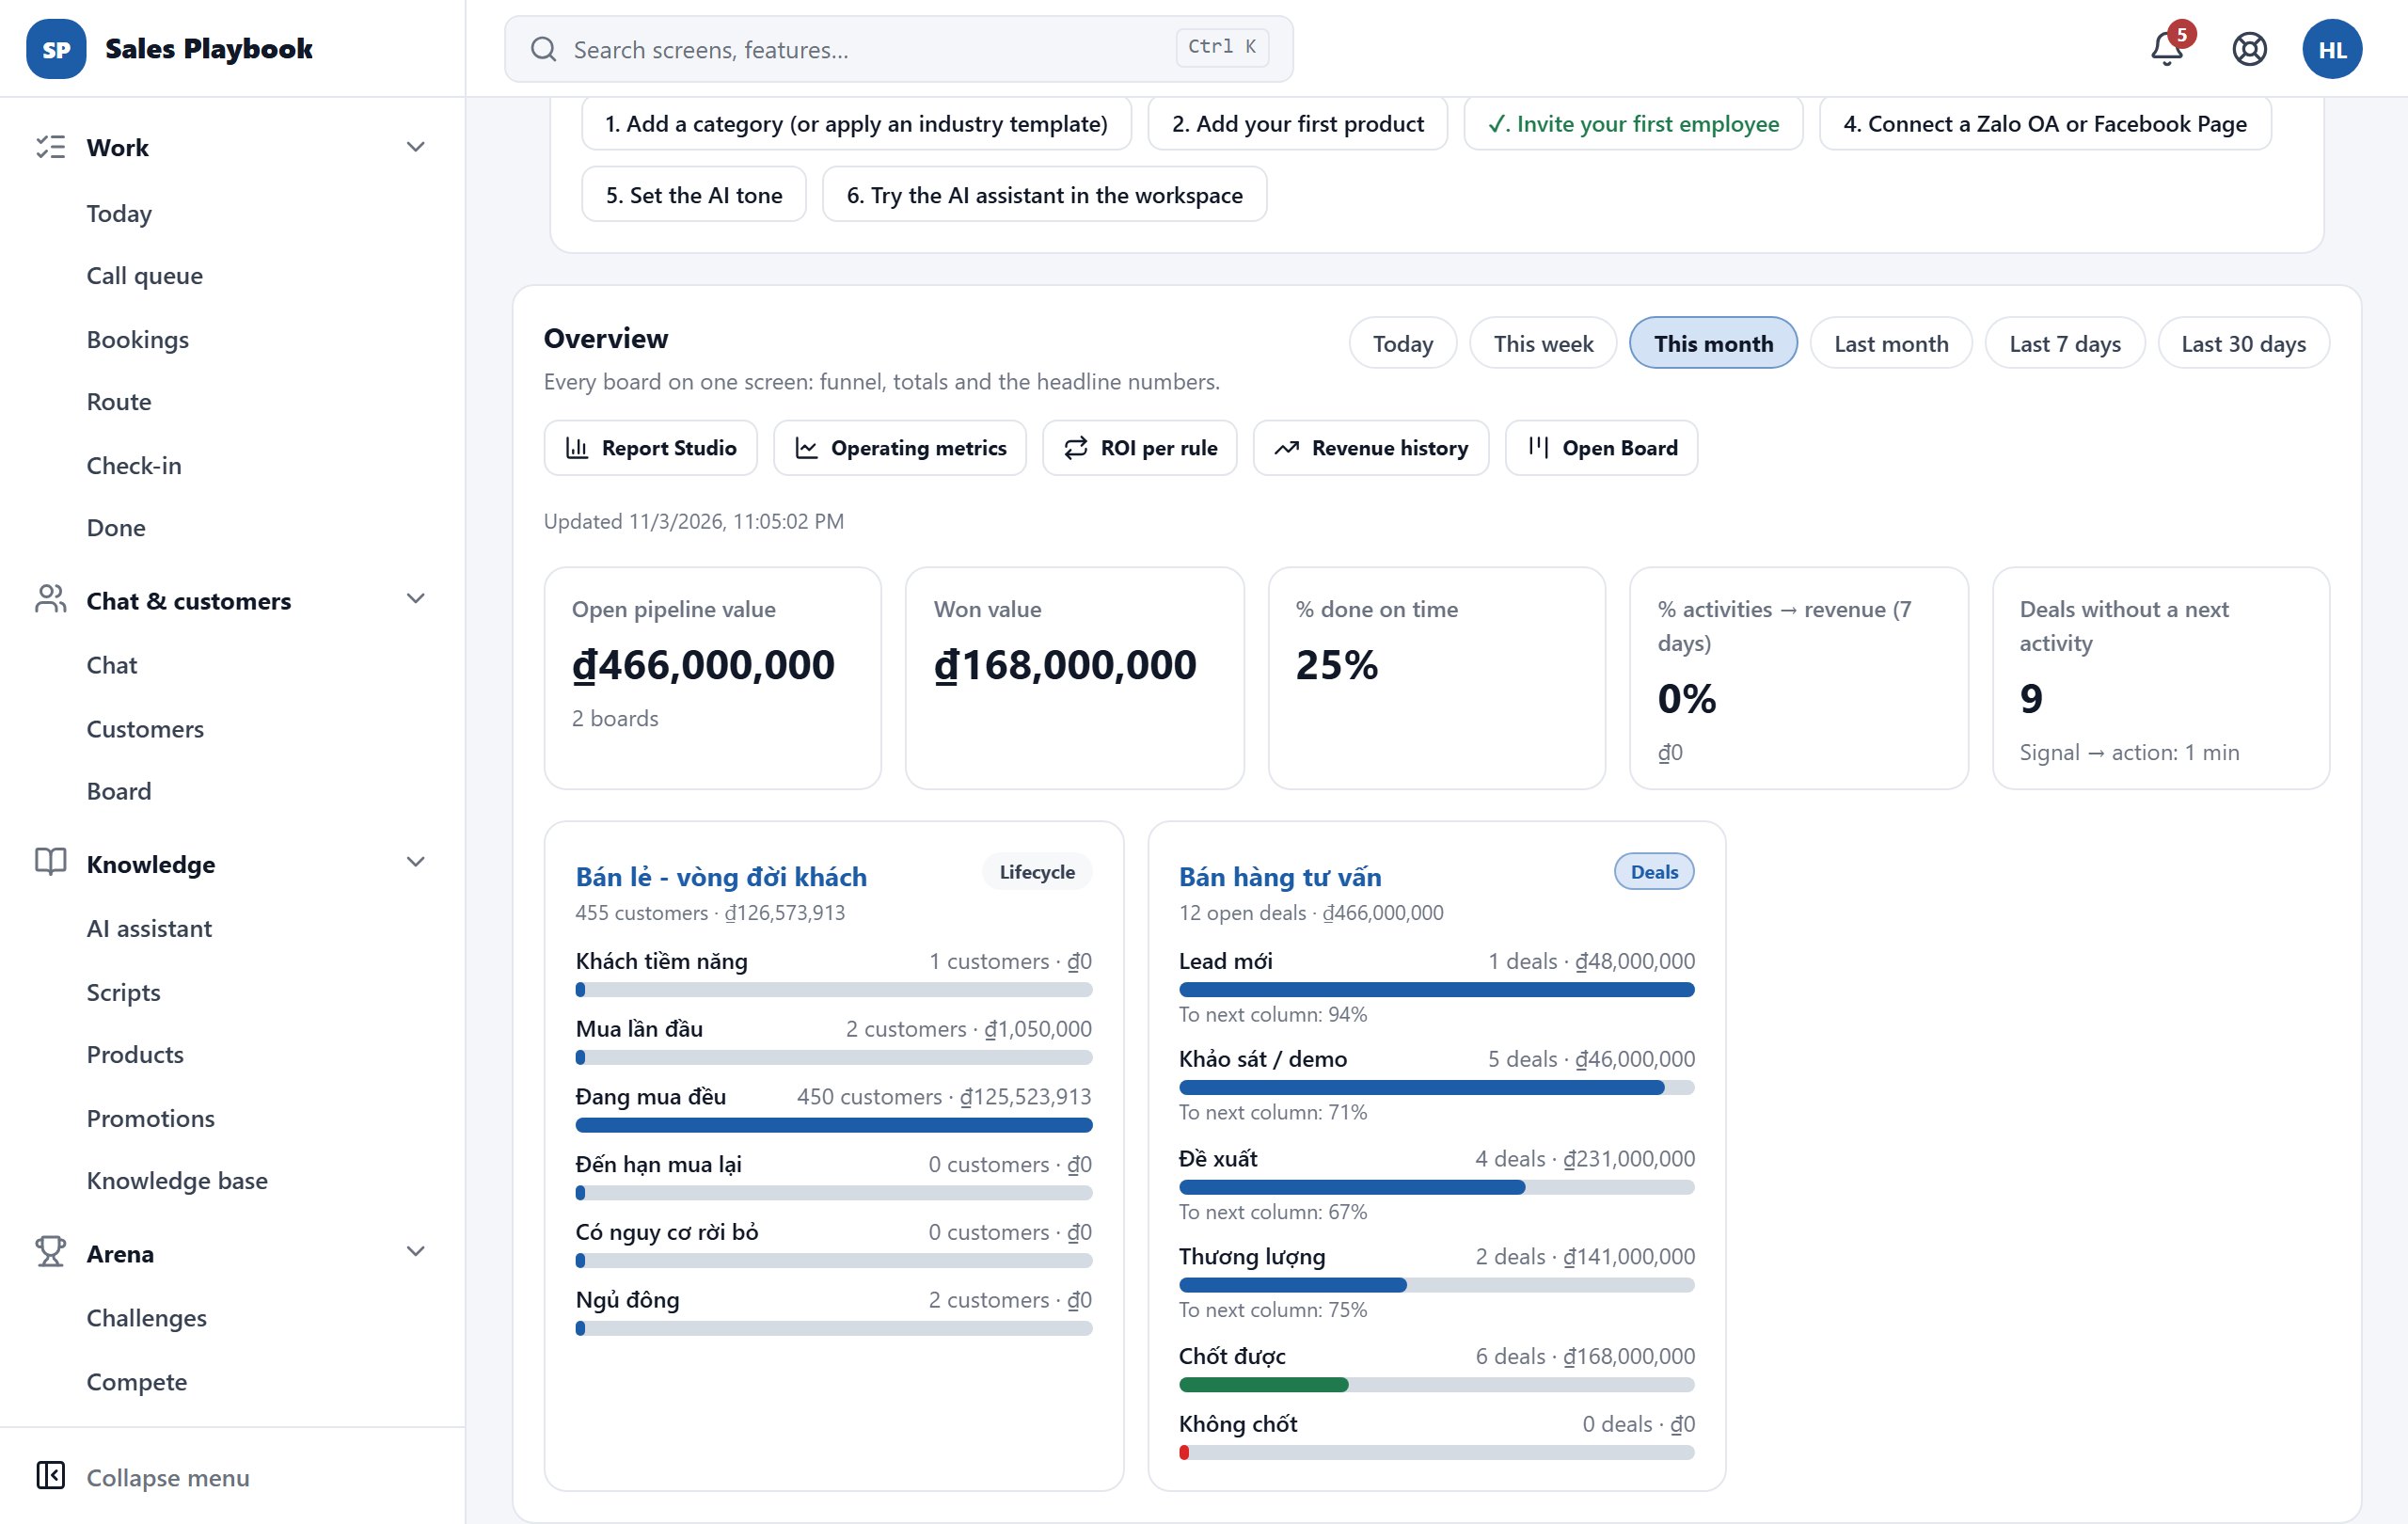
  3. 3Read the 5 tiles: "Open pipeline value", "Won value", "% done on time", "% activities → revenue (7 days)" and "Deals without a next activity" (with the "Signal → action" time).
  4. 4Scroll down to the board cards: a lifecycle board counts customers and revenue per stage; a deals board counts deals, the value of each column and the "To next column" rate.
  5. 5To dig deeper, use the shortcut buttons "Report Studio", "Operating metrics", "ROI per rule", "Revenue history" or "Open Board".
Overview tab: period picker, 5 headline tiles and the funnel cards of the Bán lẻ - vòng đời khách and Bán hàng tư vấn boards
The 5 headline tiles on top, then each board's funnel with its "To next column" rate.

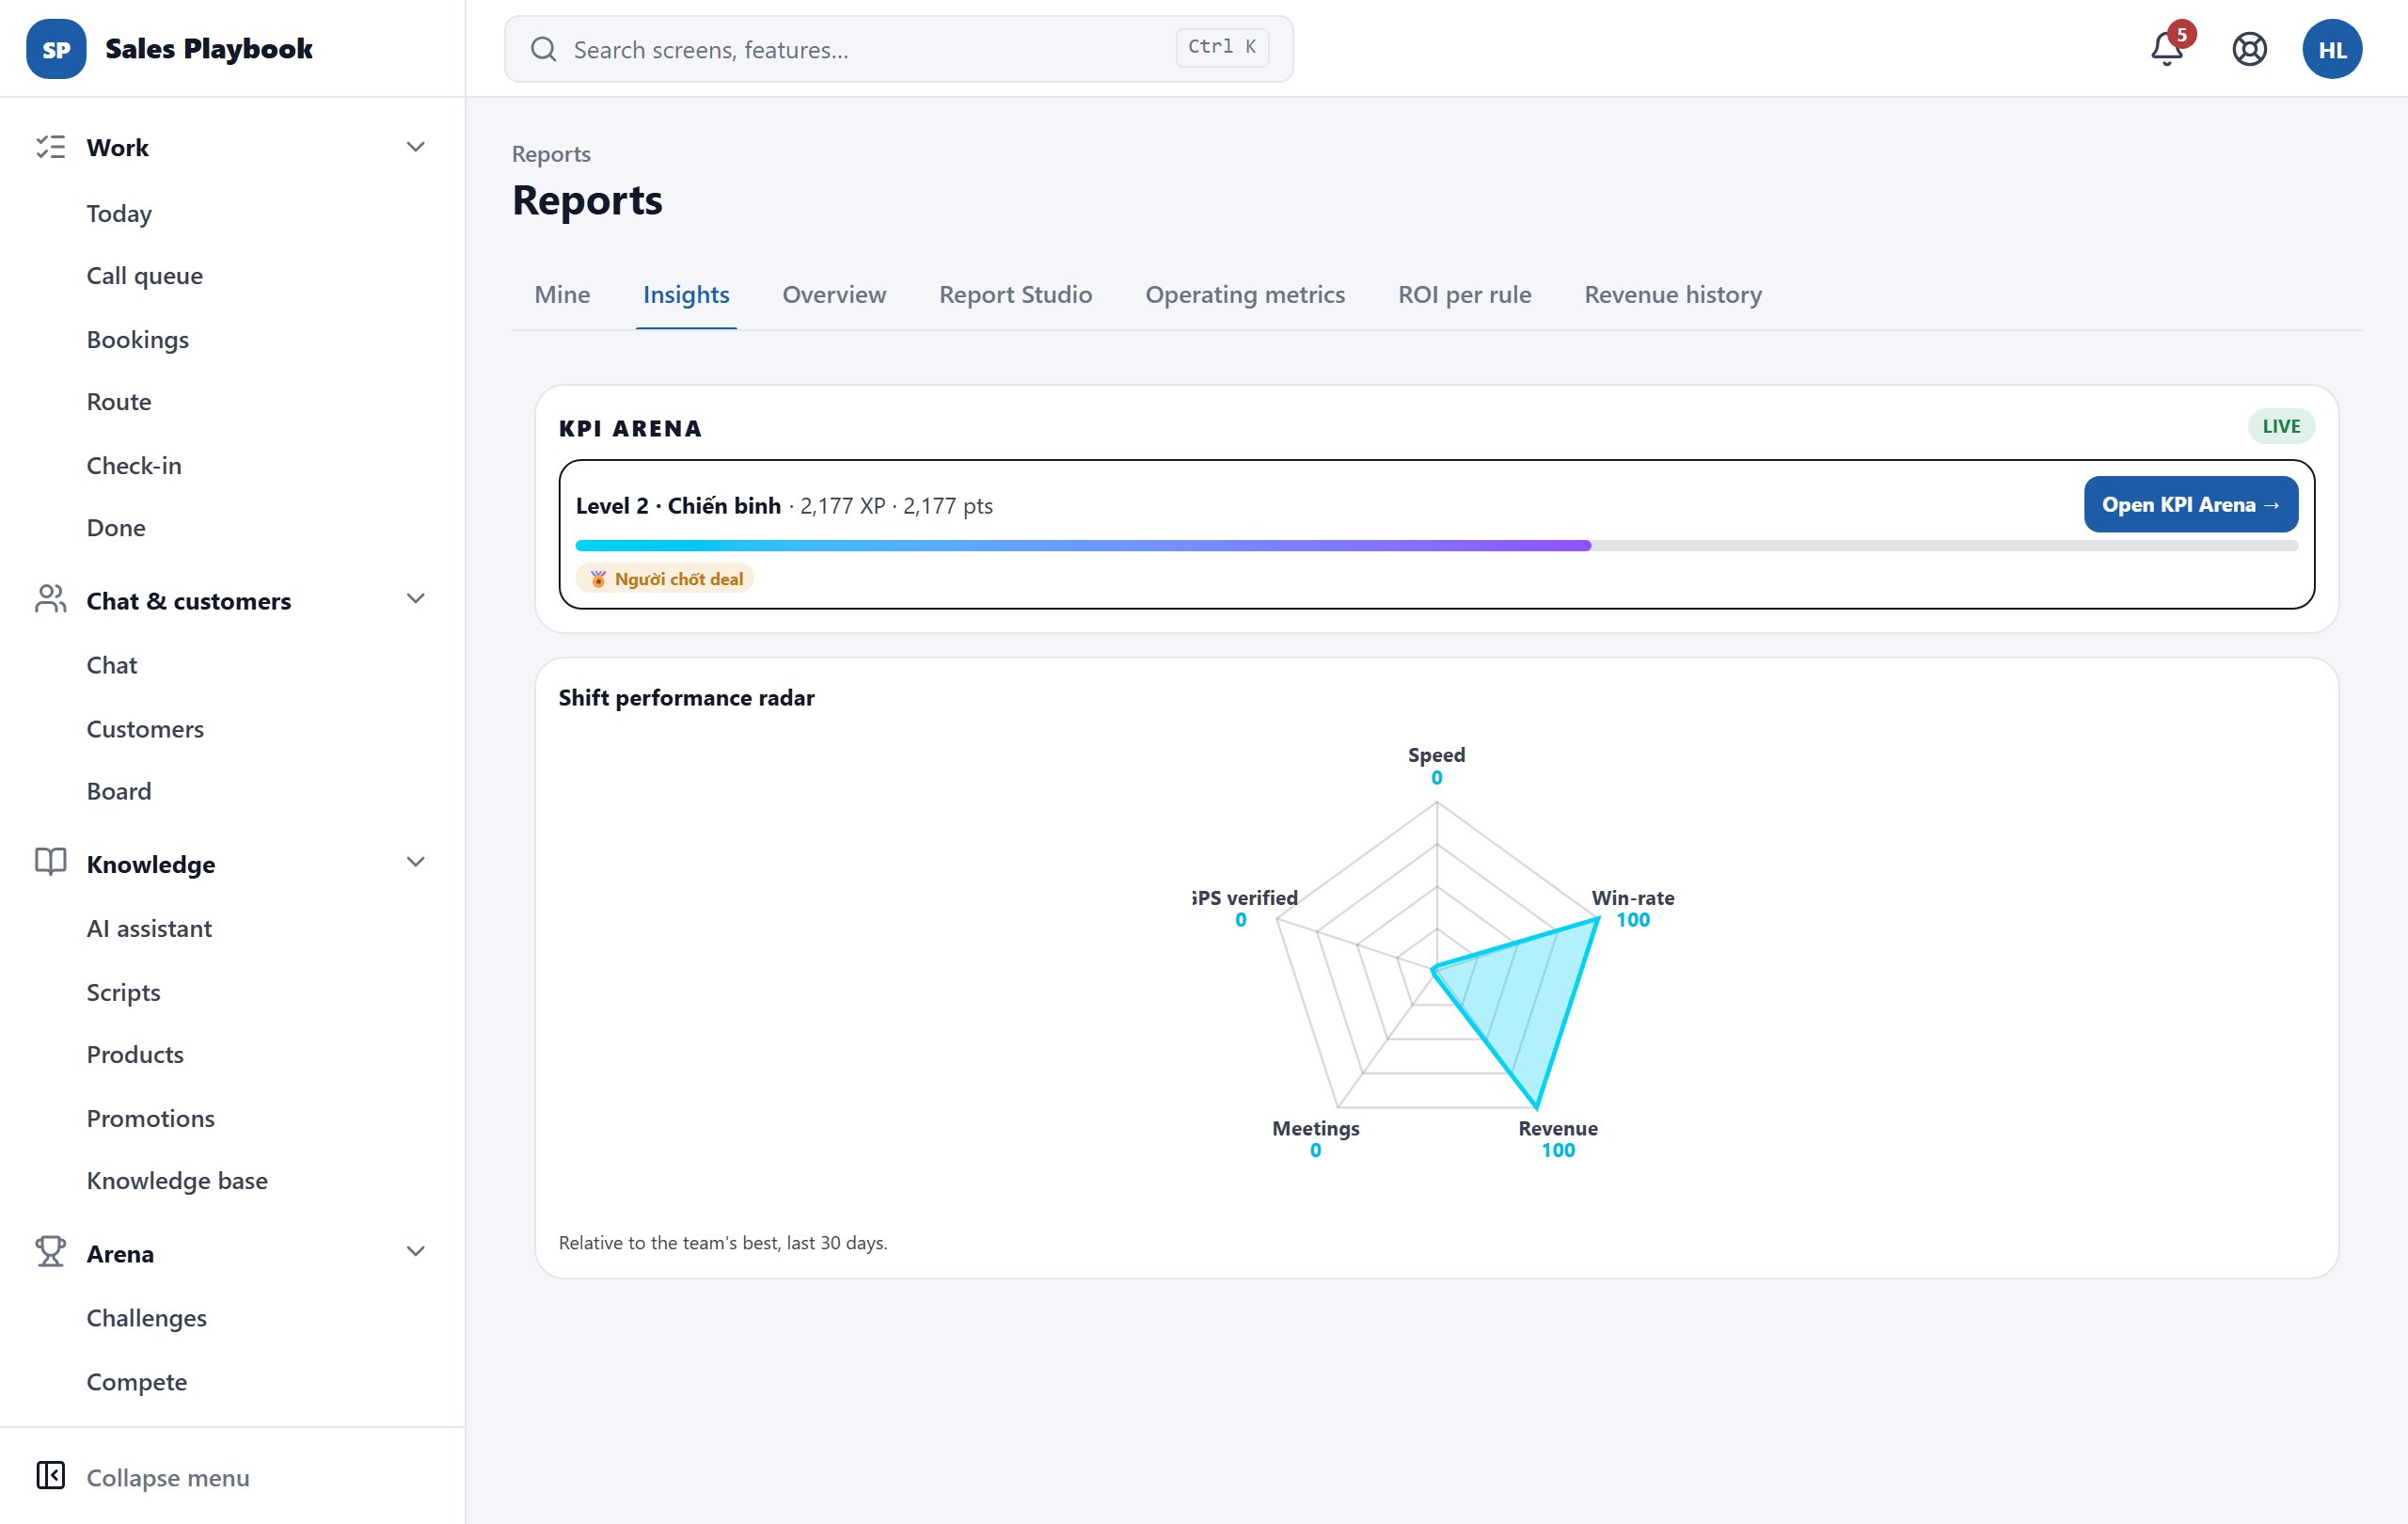
Check your performance radar and improvement tip

ReportsReportsInsights

Steps

  1. 1Open "Reports" › "Insights".
  2. 2The "KPI ARENA" box shows your level, XP and points; click "Open KPI Arena →" for the details.
  3. 3Look at the "Shift performance radar": each axis is one measure ("Speed", "Win-rate", "Revenue"…), relative to the team's best over the last 30 days.
  4. 4Read the small line under the chart. It normally says "Relative to the team's best, last 30 days."; when there is no comparison data yet, it shows a general tip instead (e.g. "Suggestion: prioritize upsell scripts when speed is high but revenue is not yet stable.").
  5. 5Personal coaching tips, when there are any, appear right below the radar box.
Insights tab with the KPI Arena box and the Shift performance radar chart
The shift performance radar and its explanation line at the bottom of the box.

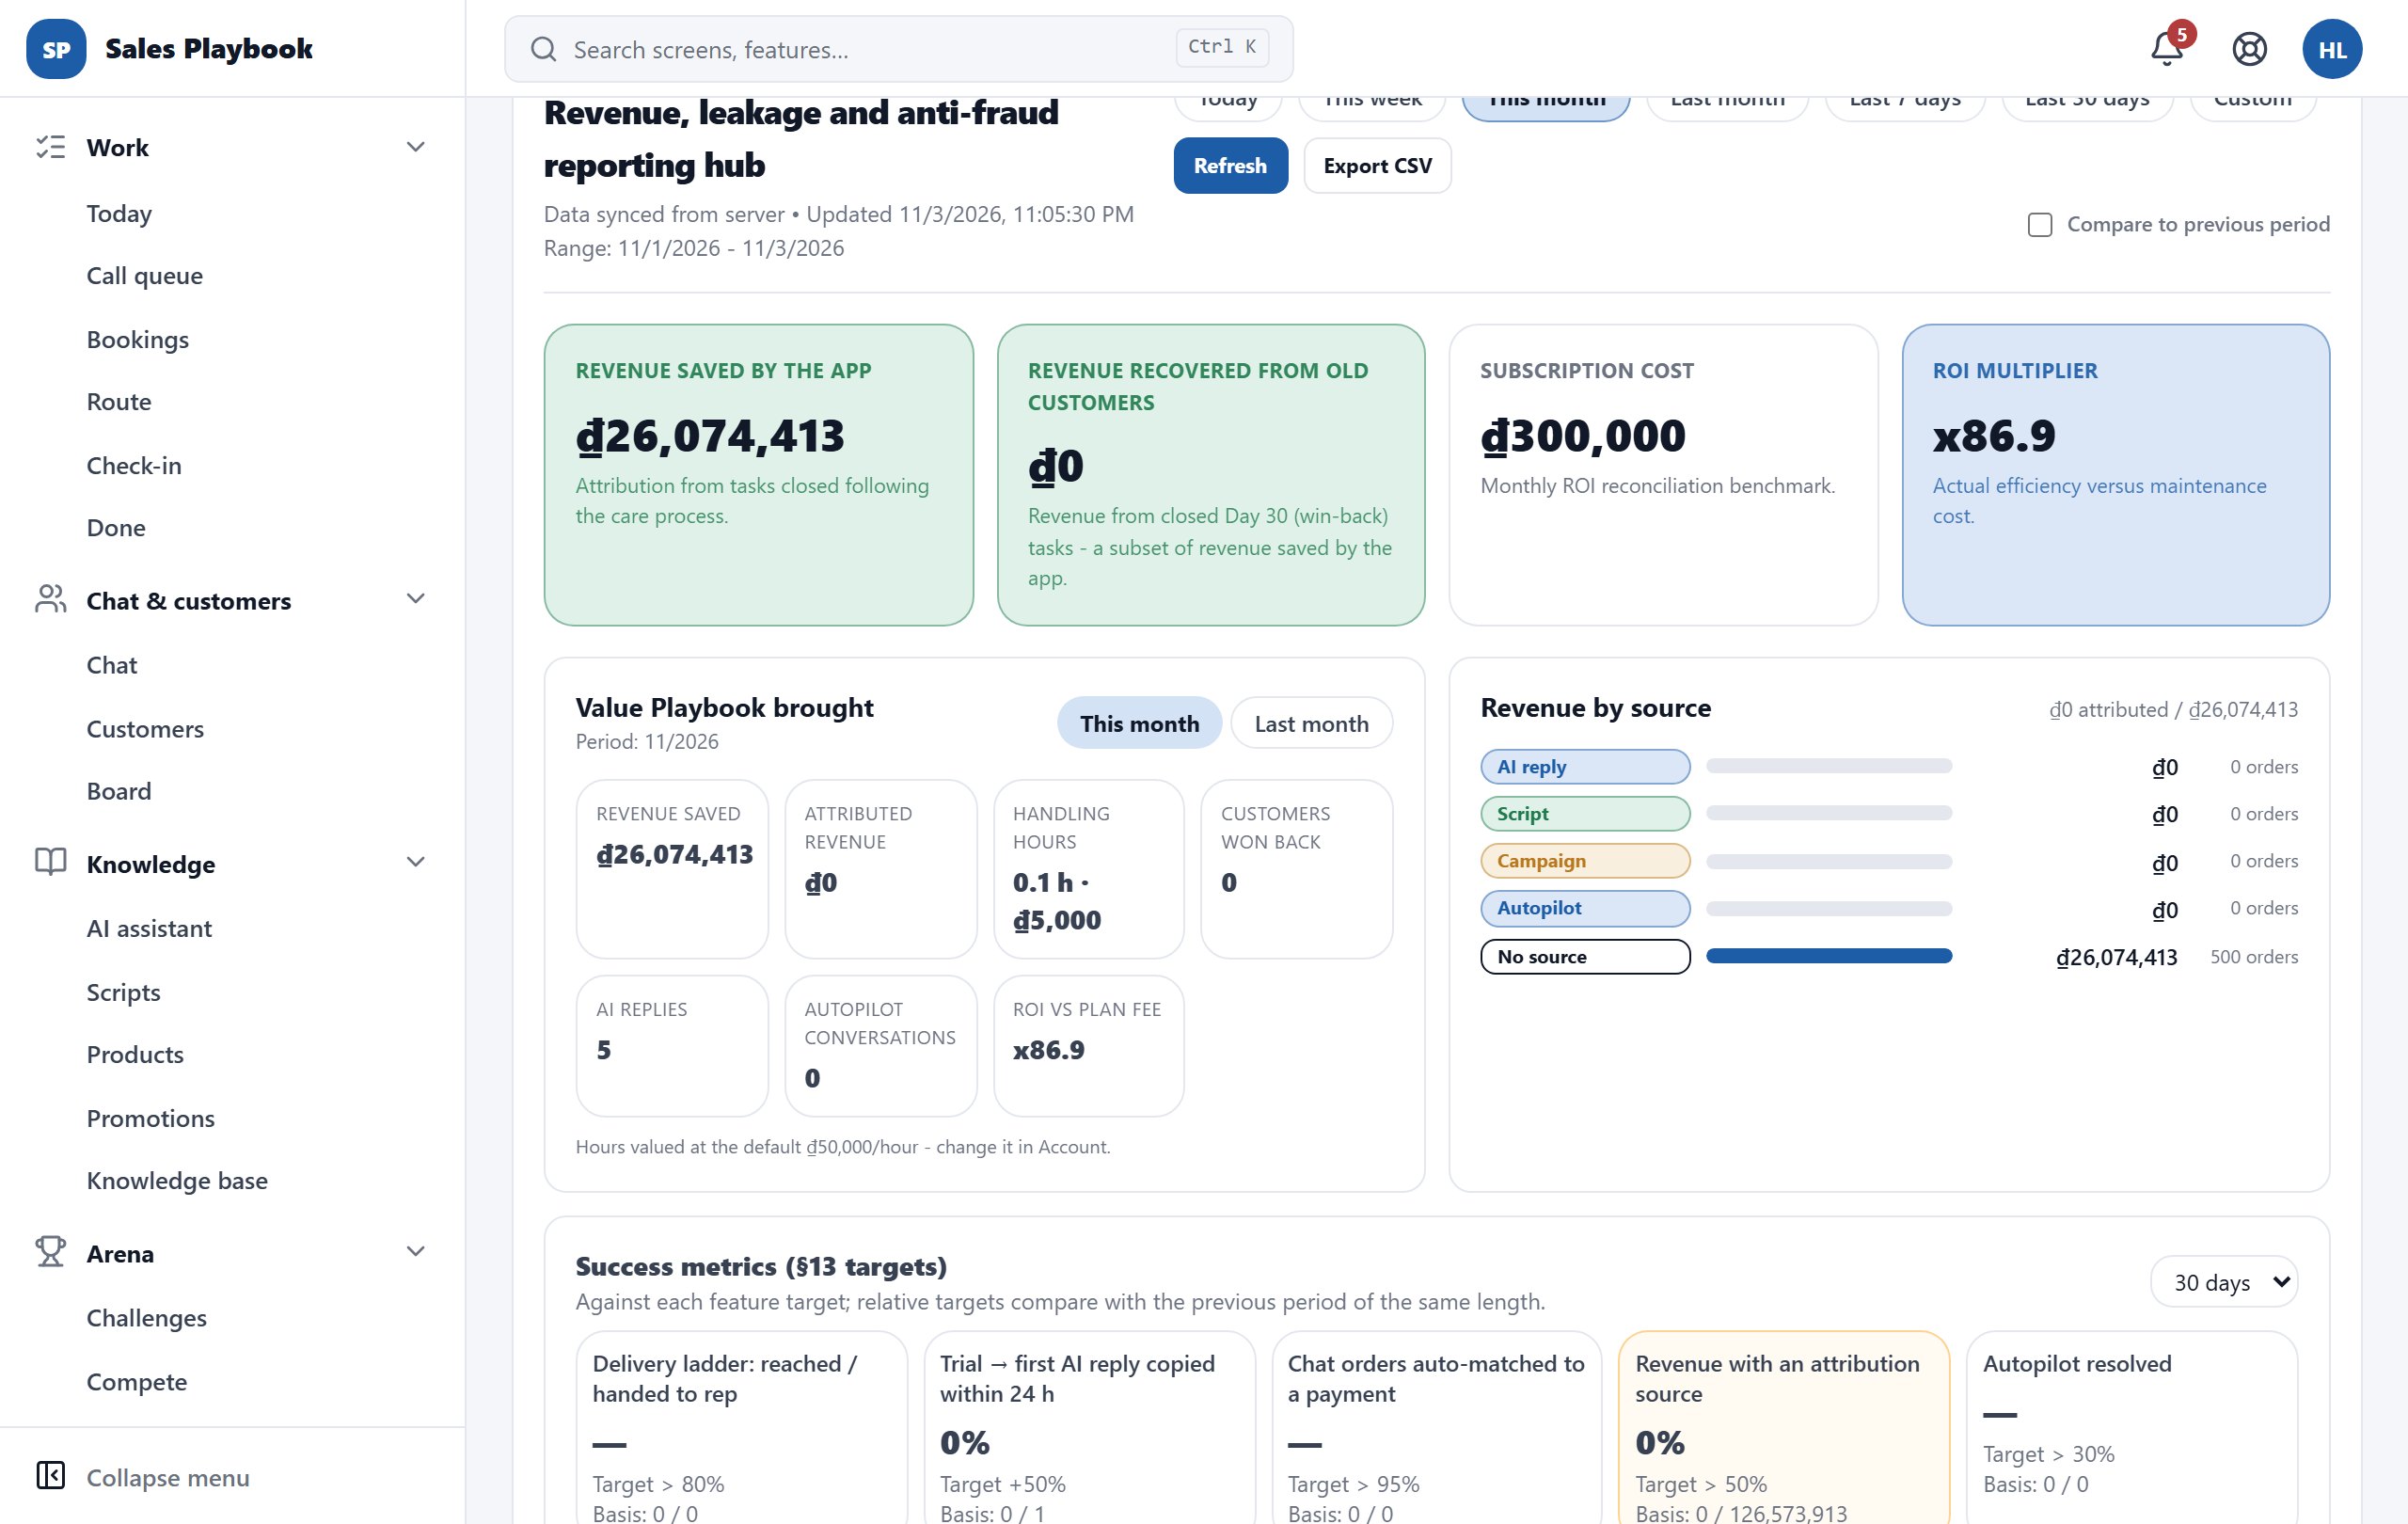
Read Report Studio: revenue saved, ROI and revenue by source

ReportsReportsReport Studio

Steps

  1. 1Open "Reports" › "Report Studio" (managers land on this tab).
  2. 2Pick a period ("Today" … "Last 30 days"), or click "Custom" to choose your own dates and click "Apply". Tick "Compare to previous period" to see the change against the previous period of the same length.
  3. 3Read the 4 top cards: "Revenue saved by the app", "Revenue recovered from old customers", "Subscription cost" and "ROI multiplier".
  4. 4The "Value Playbook brought" box ("This month" / "Last month") converts revenue saved, handling hours, customers won back and AI replies into an ROI against the plan fee. "Revenue by source" splits revenue into AI reply, Script, Campaign, Autopilot and No source.
  5. 5"Success metrics" (pick 30 / 60 / 90 days) compares each metric with its target and shows the basis of the calculation.
  6. 6Further down, choose a report group: "Boards & workflow" (funnel and signal → action time), "Group A - Revenue & leakage" (the "Financial alerts" box: tasks handled, complaints resolved, cost ratio), "Group B - Staff monitoring", "Group C - Scripts & products" or "AI Forecast & Strategy".
  7. 7Click "Refresh" to fetch the latest numbers and "Export CSV" to download the report.
Report Studio with the Refresh and Export CSV buttons, the 4 revenue-saved and ROI cards, the Value Playbook brought box and Revenue by source
The 4 ROI cards on top; "Export CSV" and "Compare to previous period" sit at the right of the header.

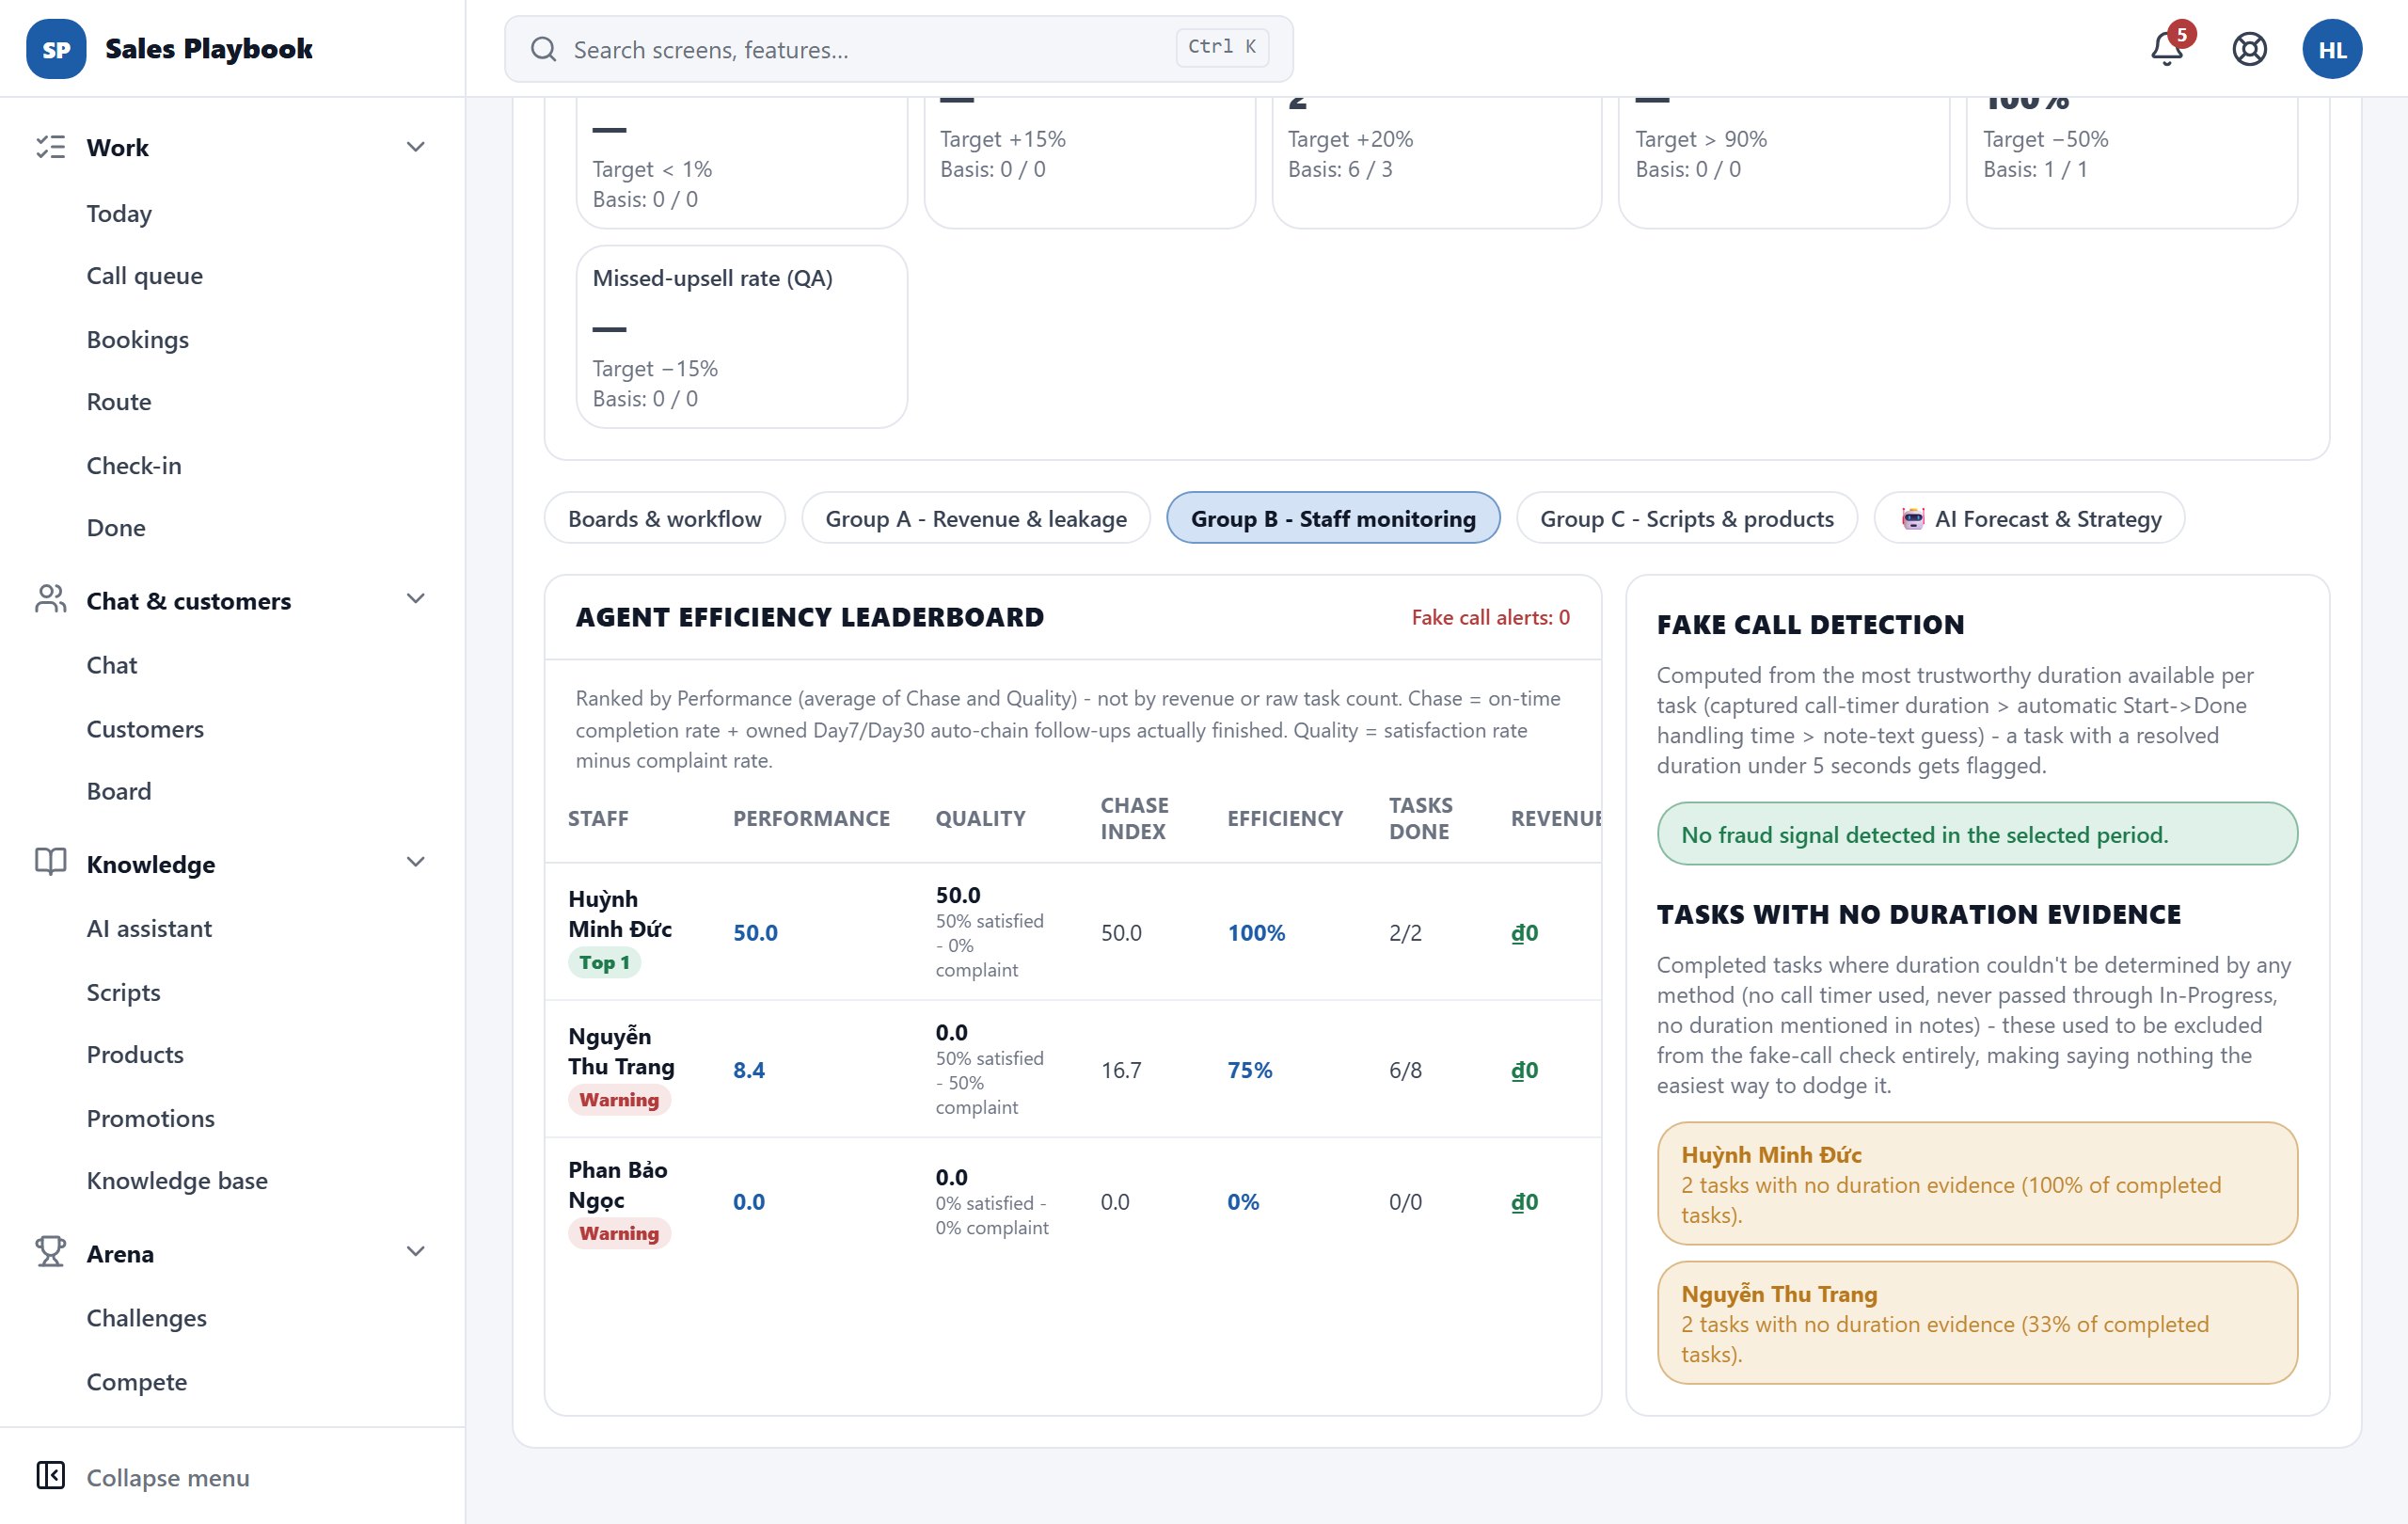
Monitor staff performance and spot fake calls

ReportsReportsReport StudioGroup B - Staff monitoring

Steps

  1. 1Open "Reports" › "Report Studio" and pick a period.
  2. 2Scroll down and click the "Group B - Staff monitoring" button.
  3. 3Read the "Agent efficiency leaderboard": "Performance" is the average of "Chase index" (on-time completion plus Day7/Day30 follow-ups) and "Quality" (satisfaction rate minus complaint rate). The leader gets a "Top 1" badge, weak performers a "Warning" badge.
  4. 4Check "Fake call detection": tasks with a duration under 5 seconds are flagged. If there are none you see "No fraud signal detected in the selected period."
  5. 5Check "Tasks with no duration evidence": staff with completed tasks whose duration could not be determined (no call timer, never set to In-Progress, no duration in the notes).
Group B - Staff monitoring: agent efficiency leaderboard, Fake call detection and Tasks with no duration evidence
"Top 1" / "Warning" badges in the leaderboard; fake-call alerts and tasks without evidence on the right.

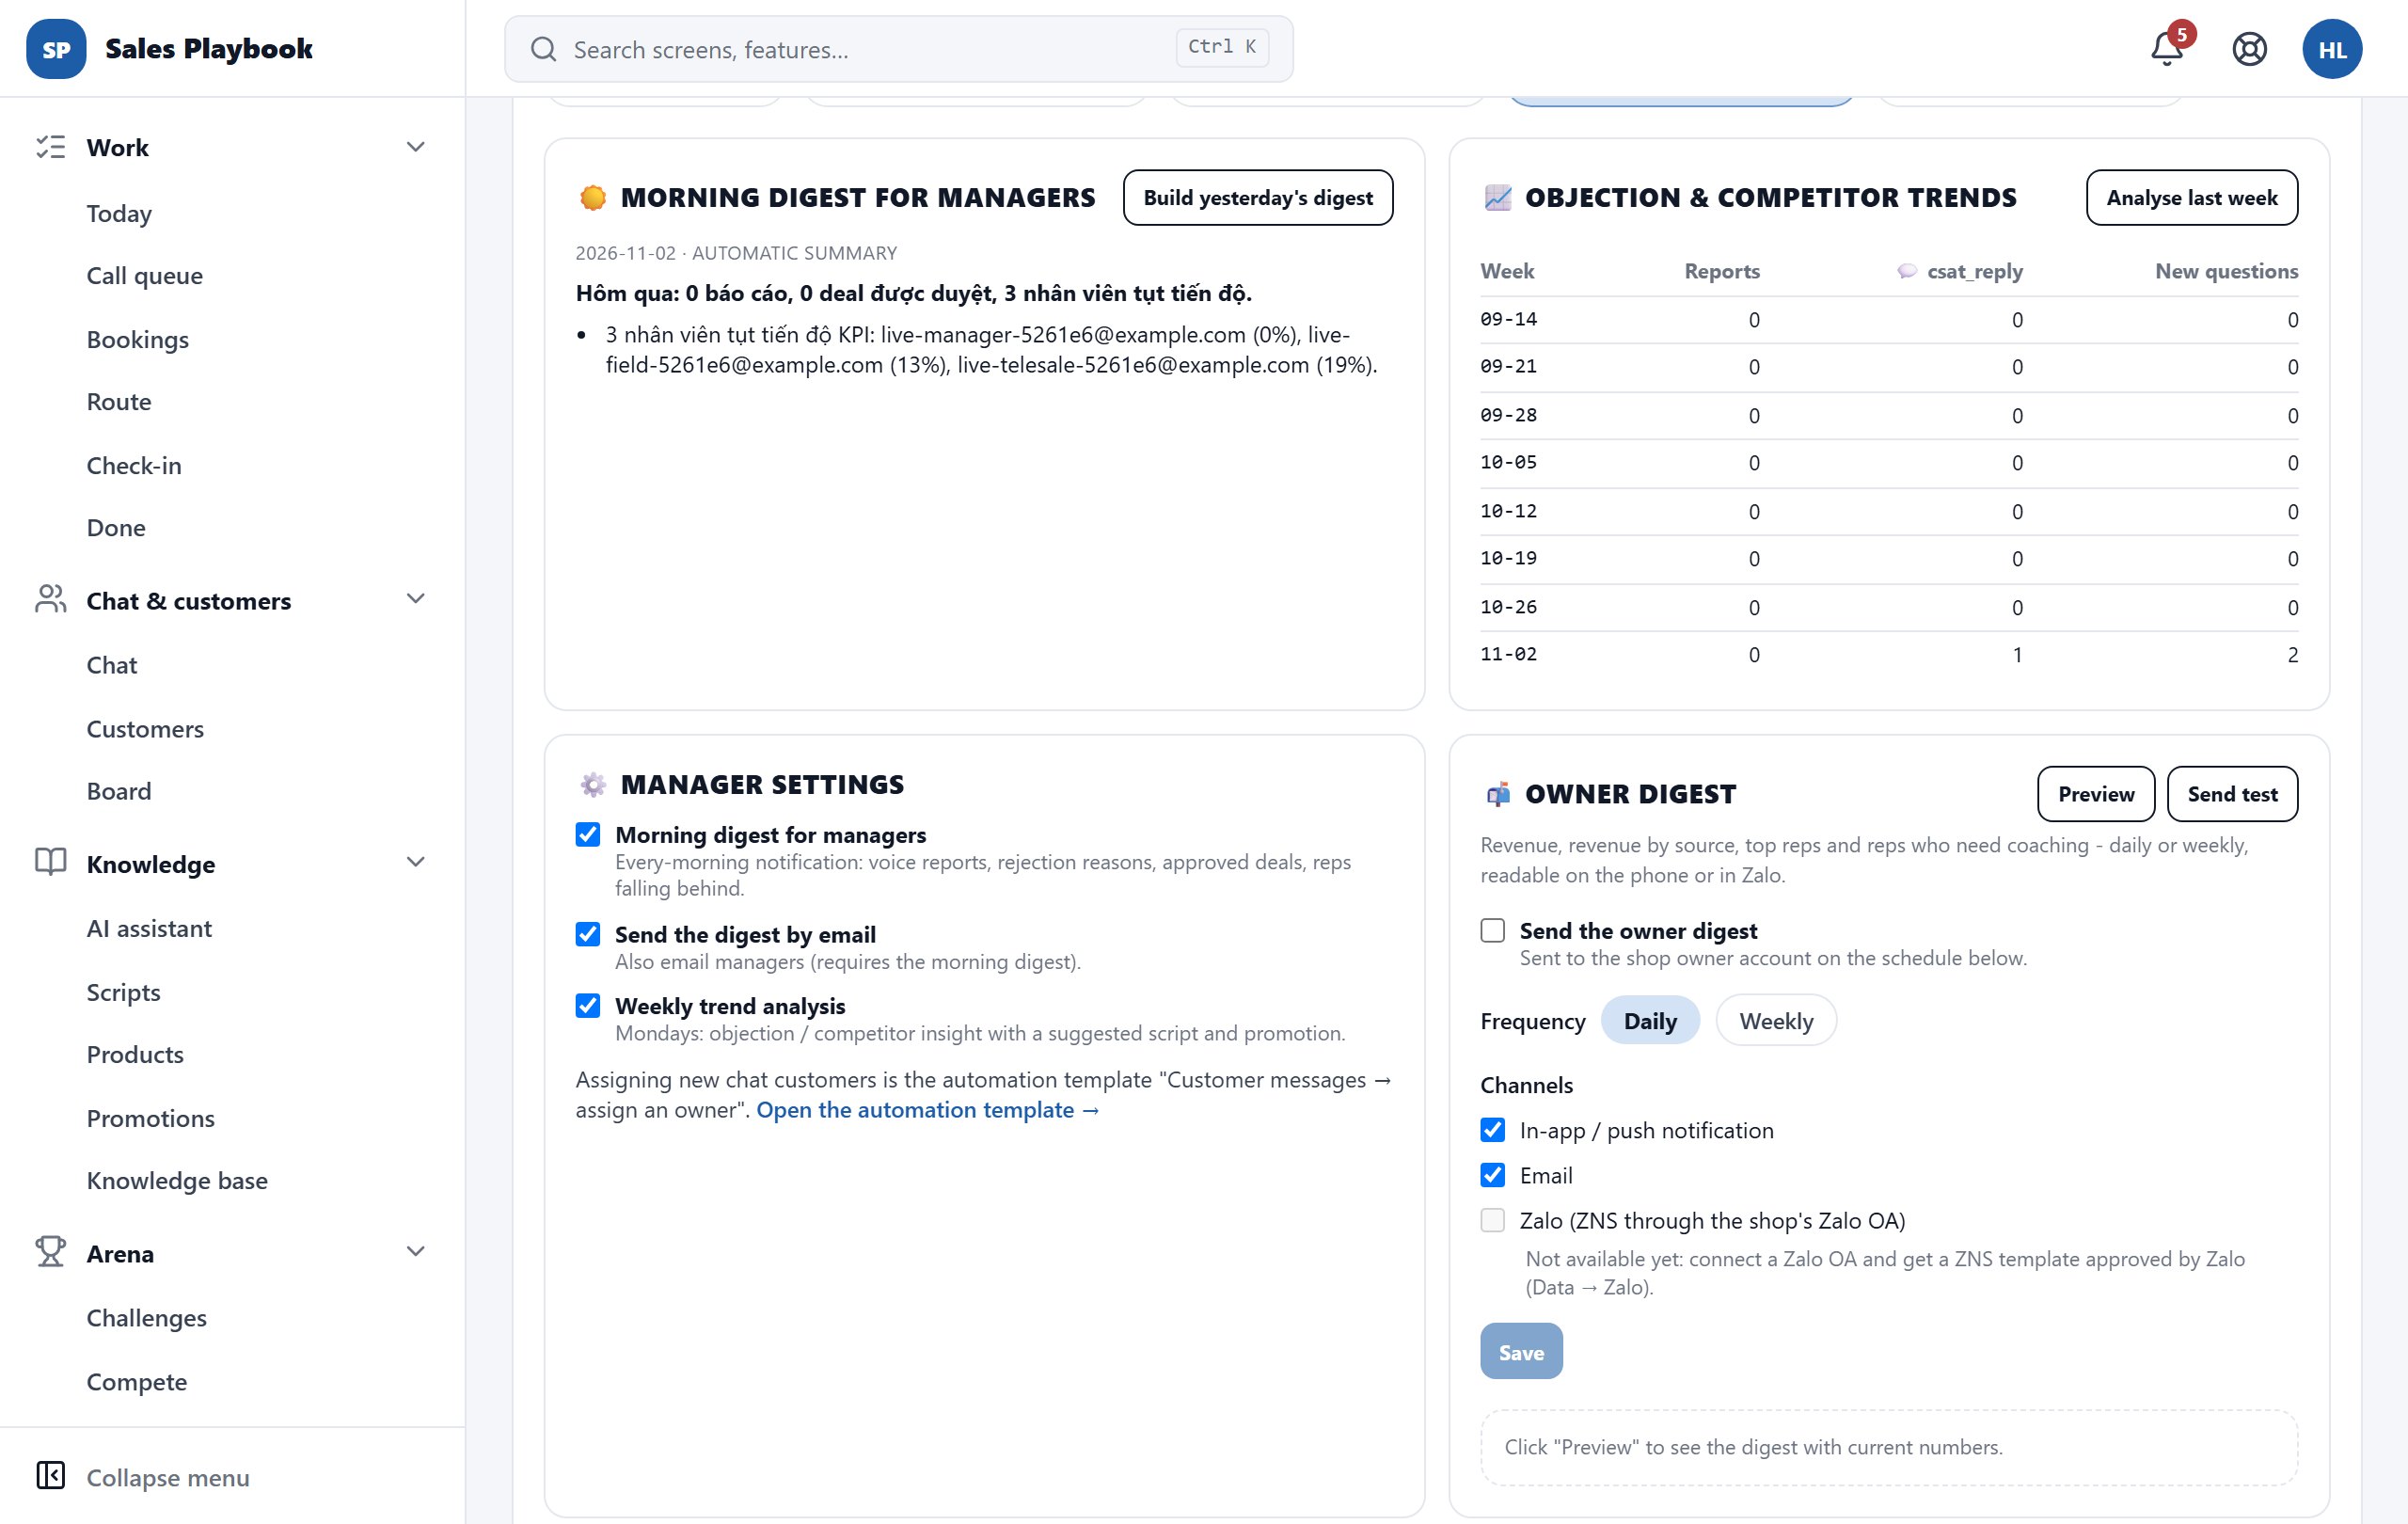
Turn on the manager morning digest and the owner digest

ReportsReportsReport StudioGroup C - Scripts & products

Steps

  1. 1Open "Reports" › "Report Studio", scroll down and click "Group C - Scripts & products".
  2. 2The "Morning digest for managers" box shows the latest summary; click "Build yesterday's digest" to rebuild it now.
  3. 3The "Objection & competitor trends" box counts by week; click "Analyse last week" to have the AI analyse it again.
  4. 4In "Manager settings", tick "Morning digest for managers", "Send the digest by email" and "Weekly trend analysis" as needed.
  5. 5In "Owner digest": tick "Send the owner digest", choose a "Frequency" ("Daily" / "Weekly") and "Channels" ("In-app / push notification", "Email", "Zalo (ZNS through the shop's Zalo OA)"), then click "Save".
  6. 6Click "Preview" to see the digest with the current numbers, or "Send test" to receive a sample.
Group C: Morning digest for managers, Objection & competitor trends, Manager settings and Owner digest
"Owner digest" (right): pick a frequency and channels, then click "Save"; "Preview" / "Send test" are at the top.

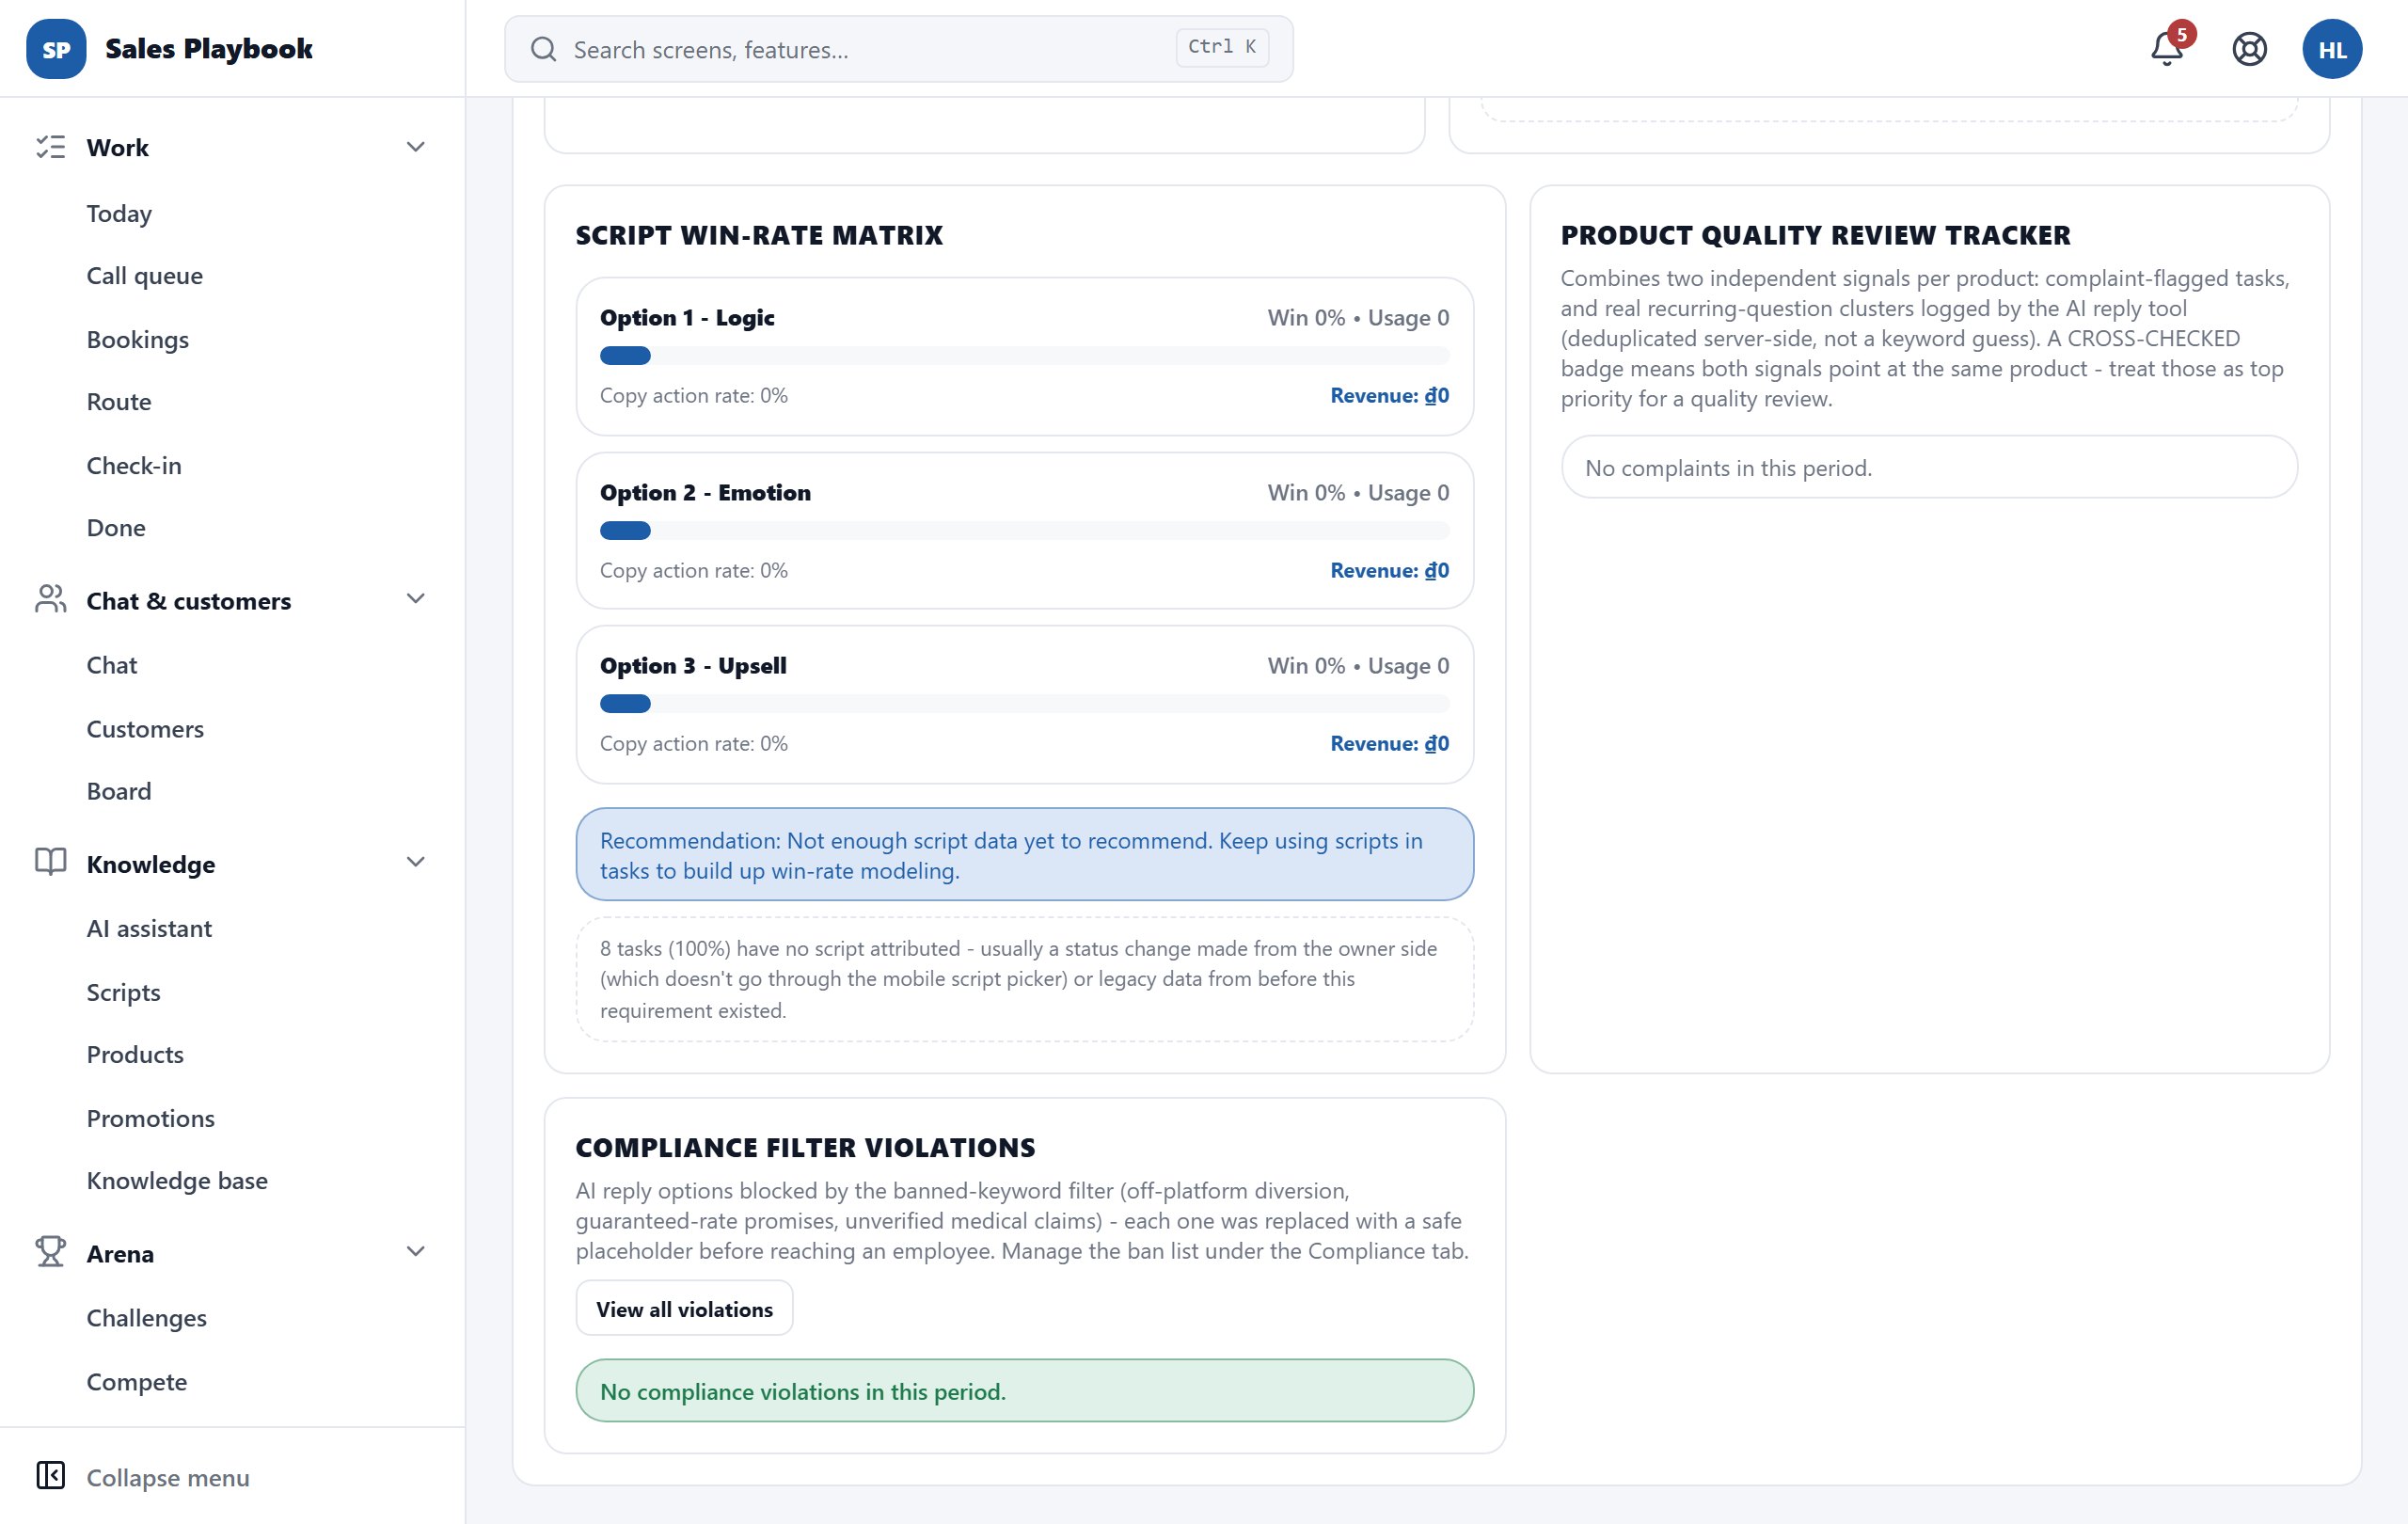
Measure script win rates and review product quality

ReportsReportsReport StudioGroup C - Scripts & products

Steps

  1. 1Open "Reports" › "Report Studio", click "Group C - Scripts & products" and scroll down.
  2. 2"Script win-rate matrix": each option shows its win rate, usage, copy action rate and revenue. Read the "Recommendation" line to see which one to replicate.
  3. 3The small note below tells you how many tasks have no script attributed (usually tasks whose status a manager changed instead of a rep handling them through the script picker).
  4. 4"Product quality review tracker" combines 2 signals per product: complaint-flagged tasks and recurring-question clusters. A "CROSS-CHECKED" badge means both point at the same product: review those first.
  5. 5"Compliance filter violations" lists AI reply options that were blocked; click "View all violations" to filter by category or by staff name.
Group C: Script win-rate matrix, Product quality review tracker and Compliance filter violations
The Option 1 / 2 / 3 matrix with its "Recommendation"; the "View all violations" button is in the box below.

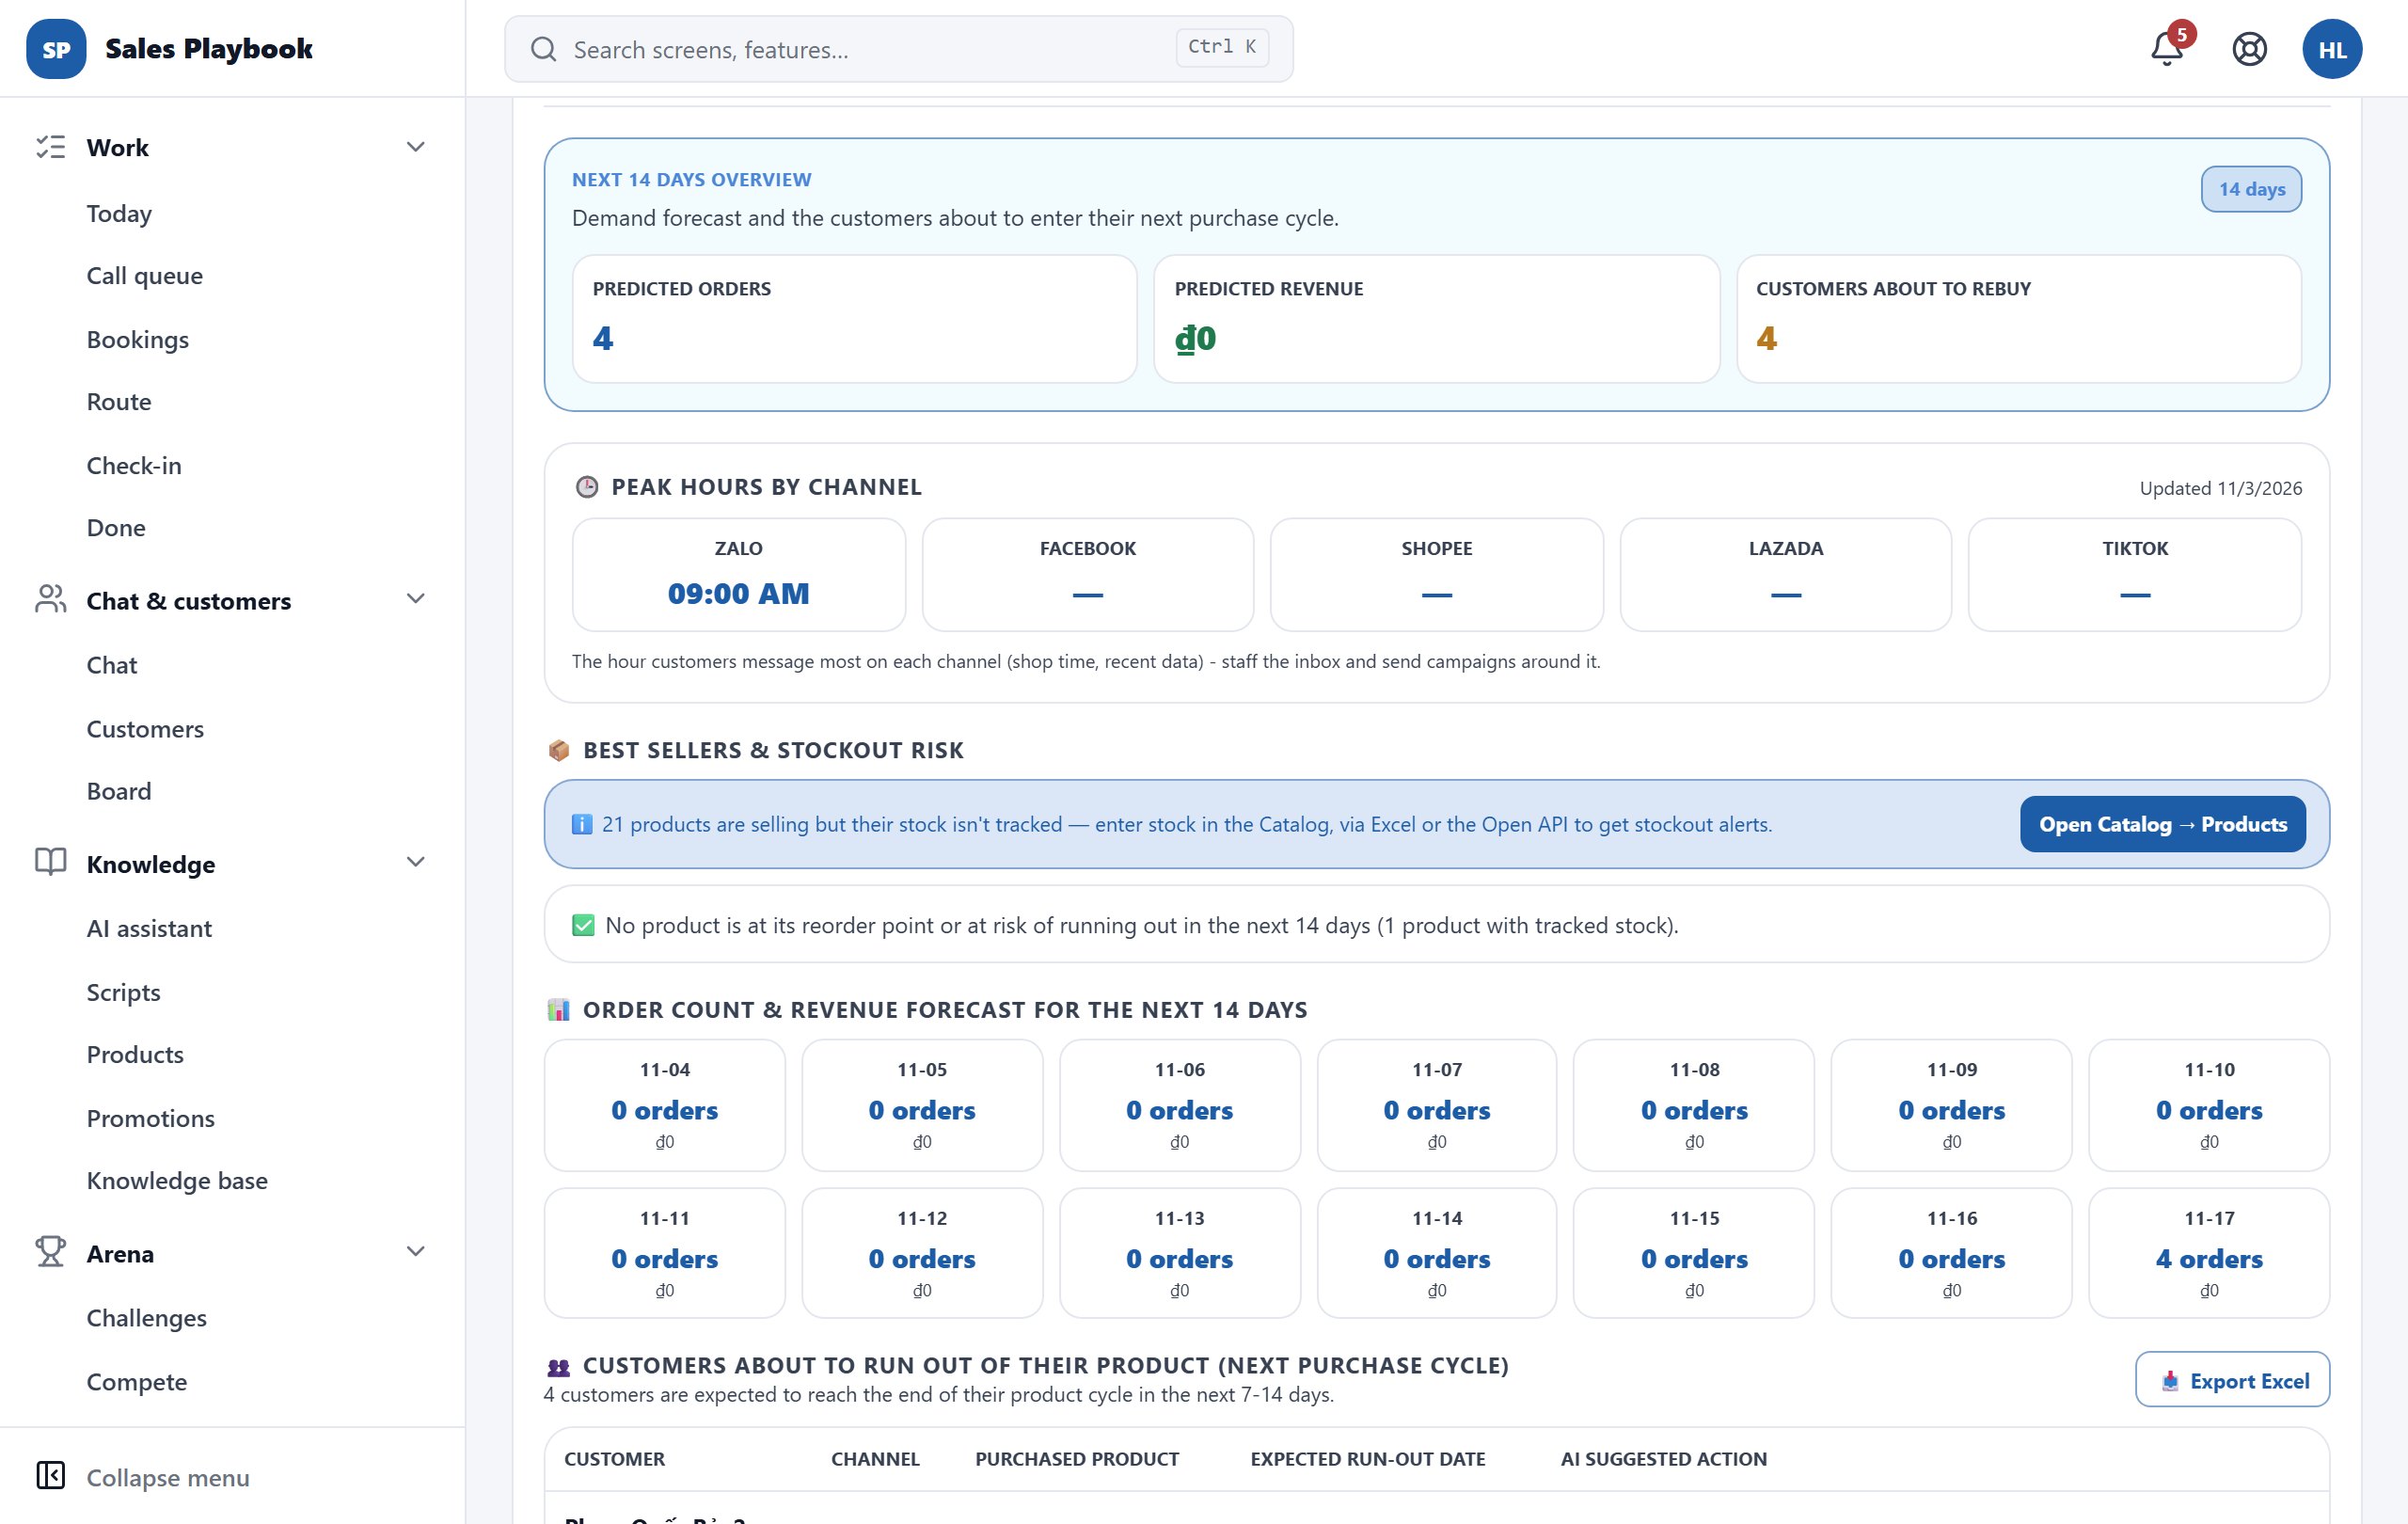
See the 14-day demand forecast and customers about to rebuy

ReportsReportsReport StudioAI Forecast & Strategy

Steps

  1. 1Open "Reports" › "Report Studio", scroll down and click "AI Forecast & Strategy".
  2. 2Choose the "Purchase Heatmap & Demand Forecast (14 Days)" tab. For fresh numbers click "Run AI Analysis Now".
  3. 3Read "Next 14 days overview" (predicted orders, predicted revenue, customers about to rebuy) and "Peak hours by channel" to plan staffing and time your campaigns.
  4. 4The stockout box reminds you of products whose stock is not tracked; click "Open Catalog → Products" to enter stock.
  5. 5Scroll down to "Customers about to run out of their product": each customer has a channel, the product bought, the expected run-out date and the AI's suggested action. Click "Export Excel" to download the list for your calling team.
Purchase Heatmap tab: next 14 days overview, peak hours by channel, stockout risk, daily order forecast and customers about to run out of their product
The daily order forecast; the list of customers about to run out has an "Export Excel" button.

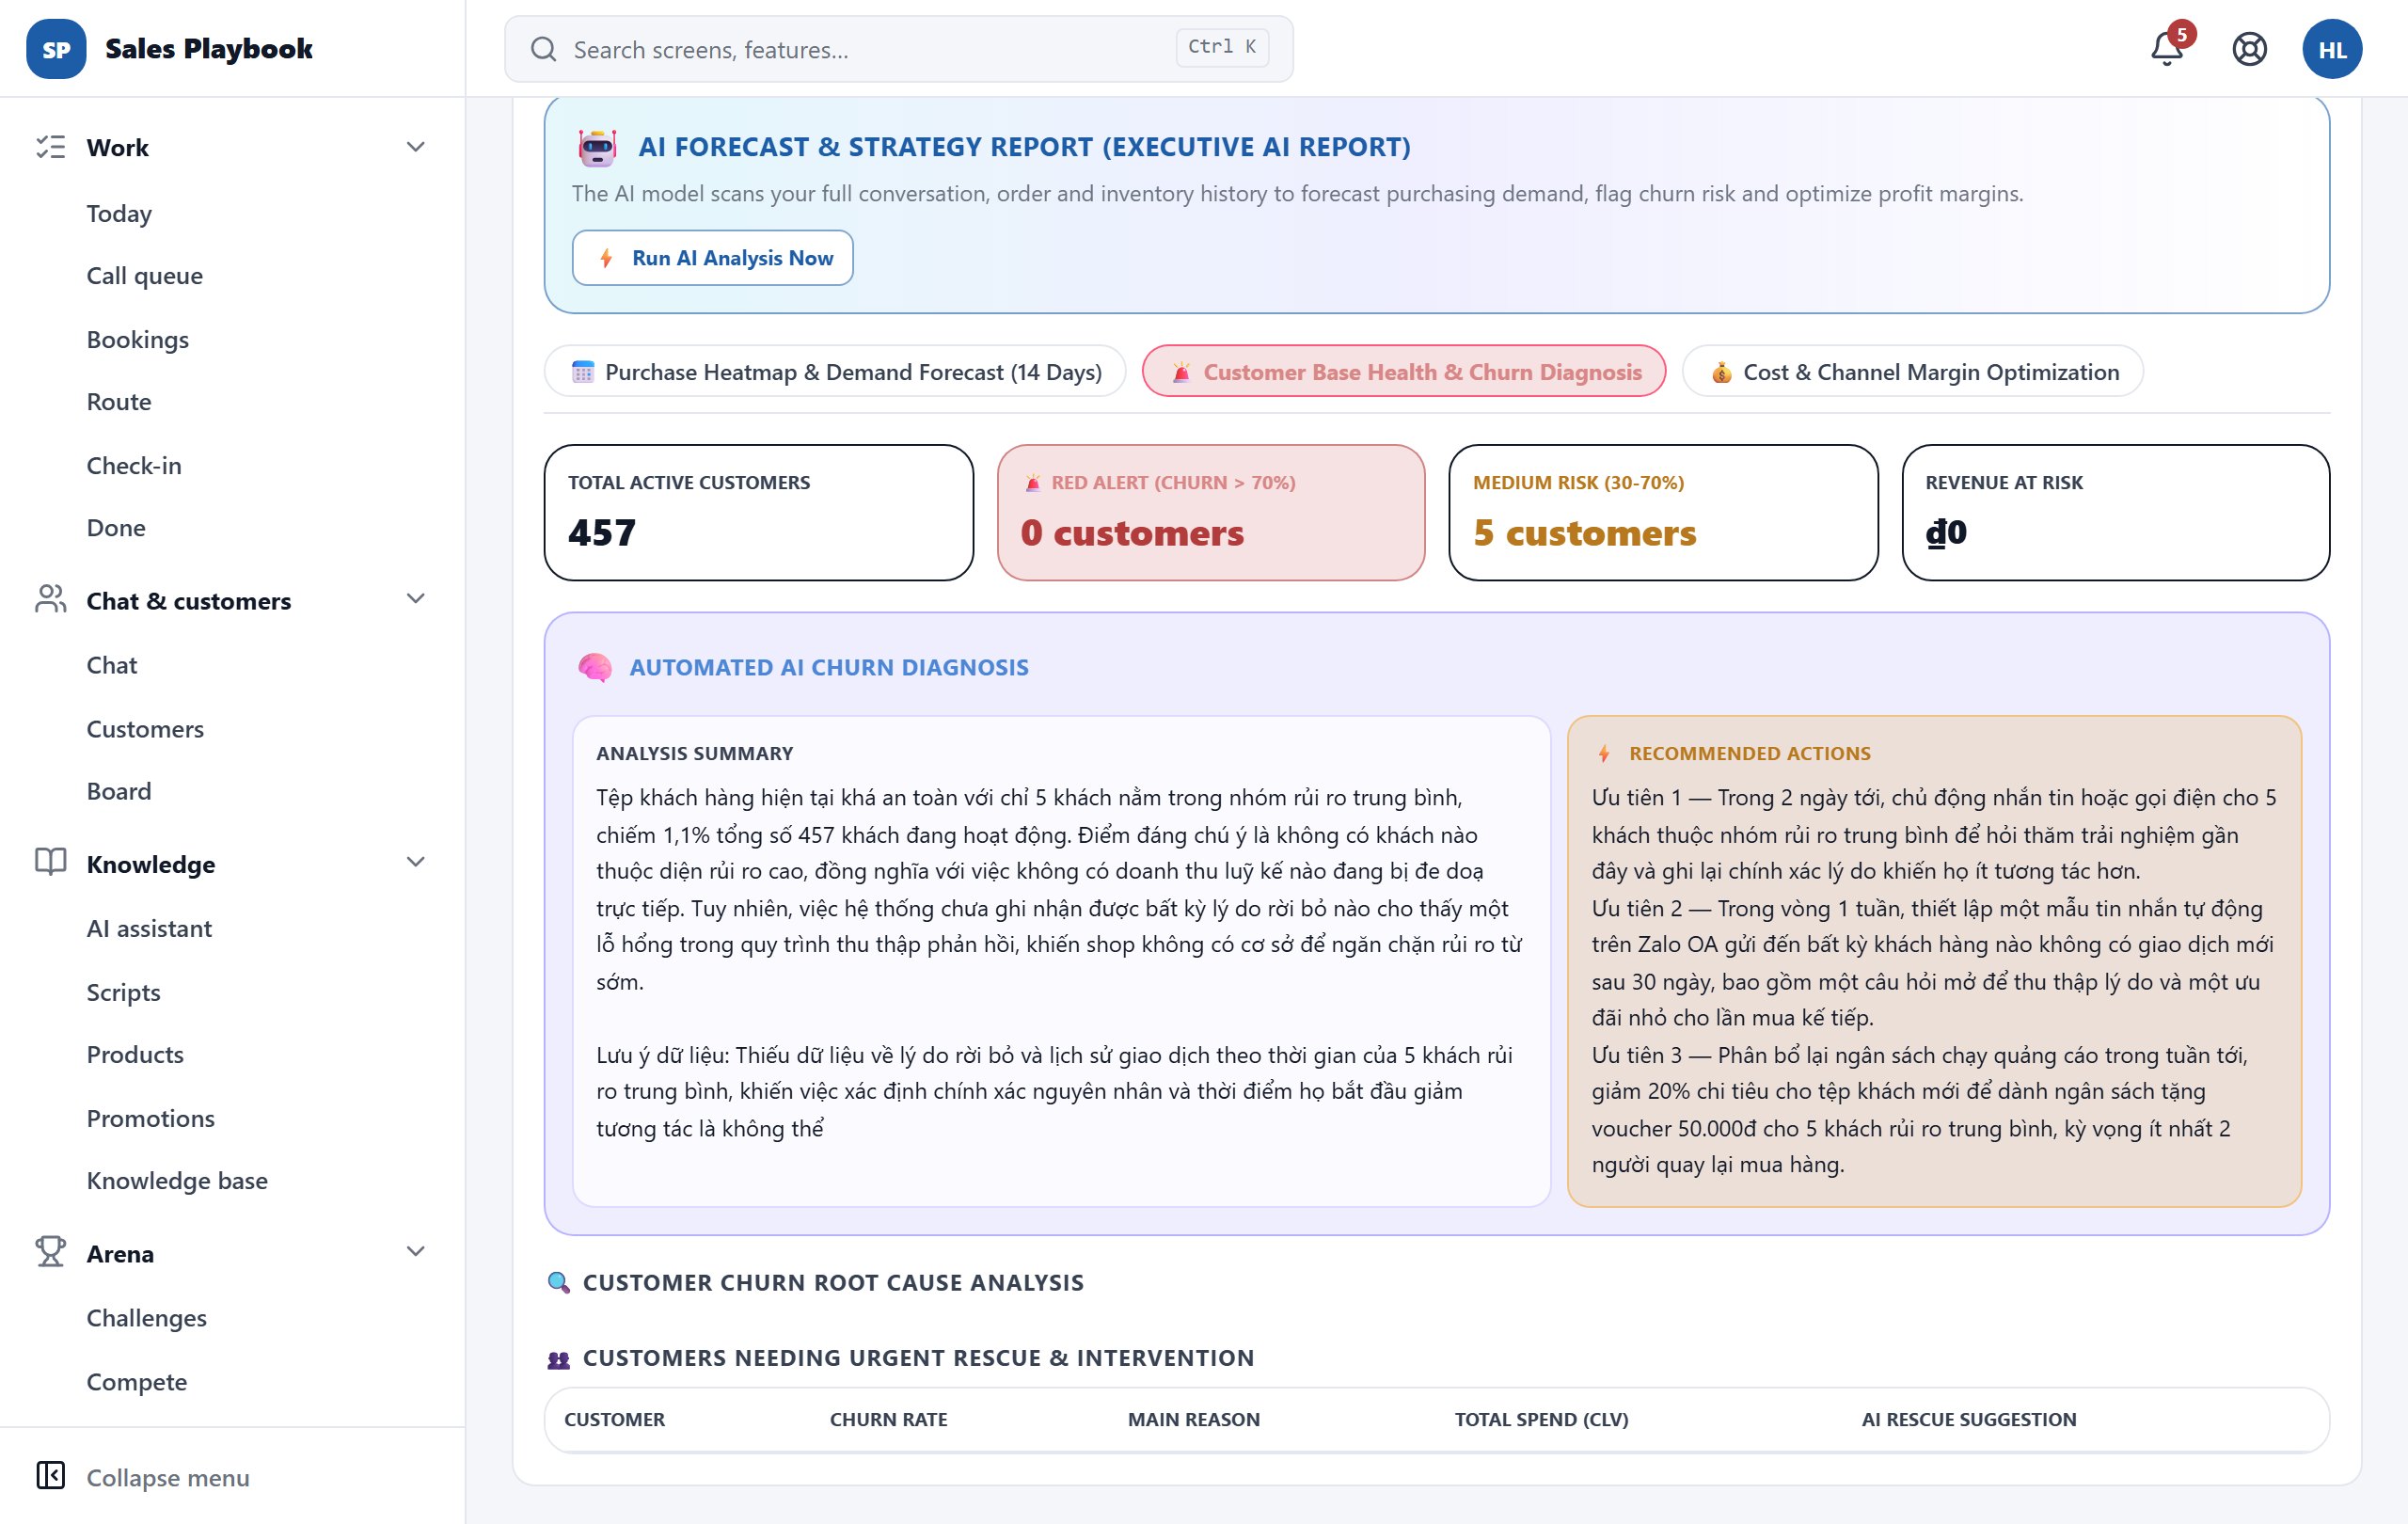
Diagnose customers at risk of churning

ReportsReportsReport StudioAI Forecast & Strategy

Steps

  1. 1In "AI Forecast & Strategy", choose the "Customer Base Health & Churn Diagnosis" tab.
  2. 2Read the 4 cards: "Total active customers", "Red alert (churn > 70%)", "Medium risk (30-70%)" and "Revenue at risk".
  3. 3Read "Automated AI churn diagnosis": the "Analysis summary" column and the "Recommended actions" column (priorities 1, 2, 3).
  4. 4Scroll down to "Customer churn root cause analysis" and "Customers needing urgent rescue & intervention" (churn rate, main reason, total spend, AI rescue suggestion) to hand out care tasks.
Customer Base Health & Churn Diagnosis tab with 4 risk cards, the analysis summary and the AI recommended actions
The 4 risk cards on top; the purple box is the AI's diagnosis and recommended actions.

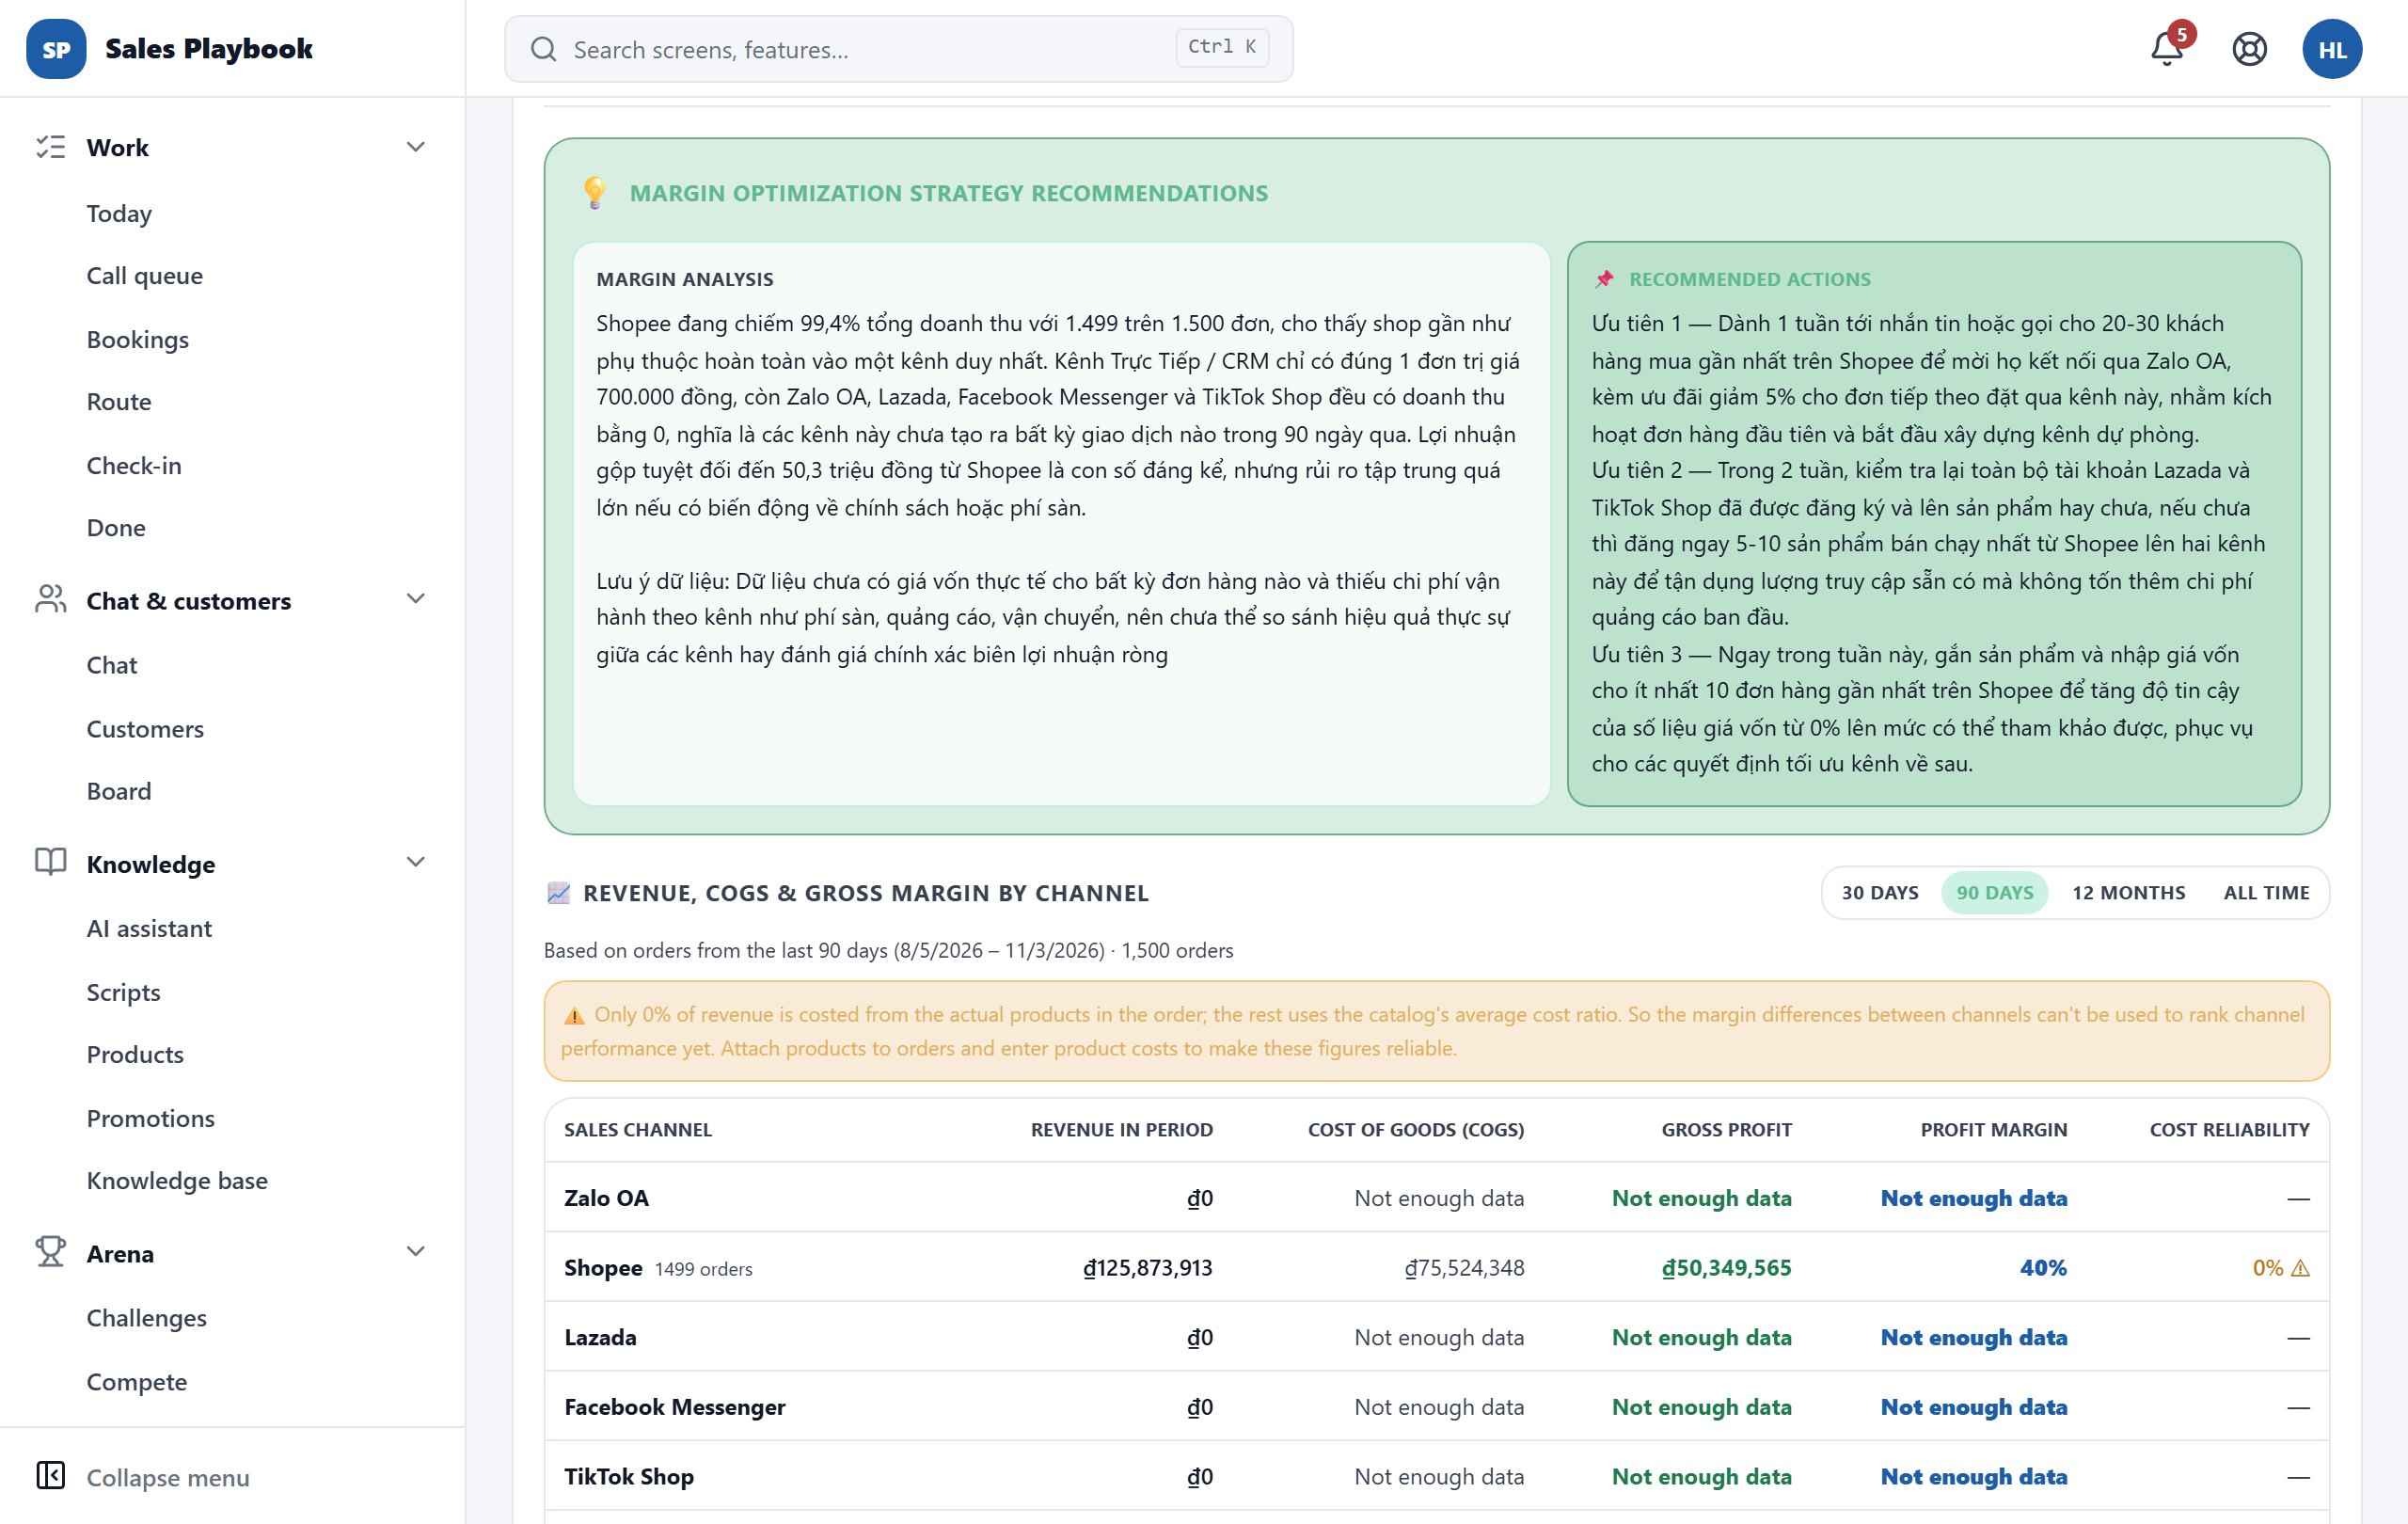
Compare profit margins across sales channels

ReportsReportsReport StudioAI Forecast & Strategy

Steps

  1. 1In "AI Forecast & Strategy", choose the "Cost & Channel Margin Optimization" tab (wait a few seconds for the numbers to load).
  2. 2Read "Margin optimization strategy recommendations": the "Margin analysis" part and the "Recommended actions" (priorities 1, 2, 3).
  3. 3In the "Revenue, COGS & gross margin by channel" table, choose "30 days", "90 days", "12 months" or "All time".
  4. 4Check the "Cost reliability" column: a low number with ⚠ means most of the cost is estimated from the catalog's average cost ratio, so don't rank channels on it yet.
Cost & Channel Margin Optimization tab with the AI recommendations and the table comparing revenue, COGS and gross profit per channel
AI recommendations on top; the per-channel table has a 30 days / 90 days / 12 months / All time picker.

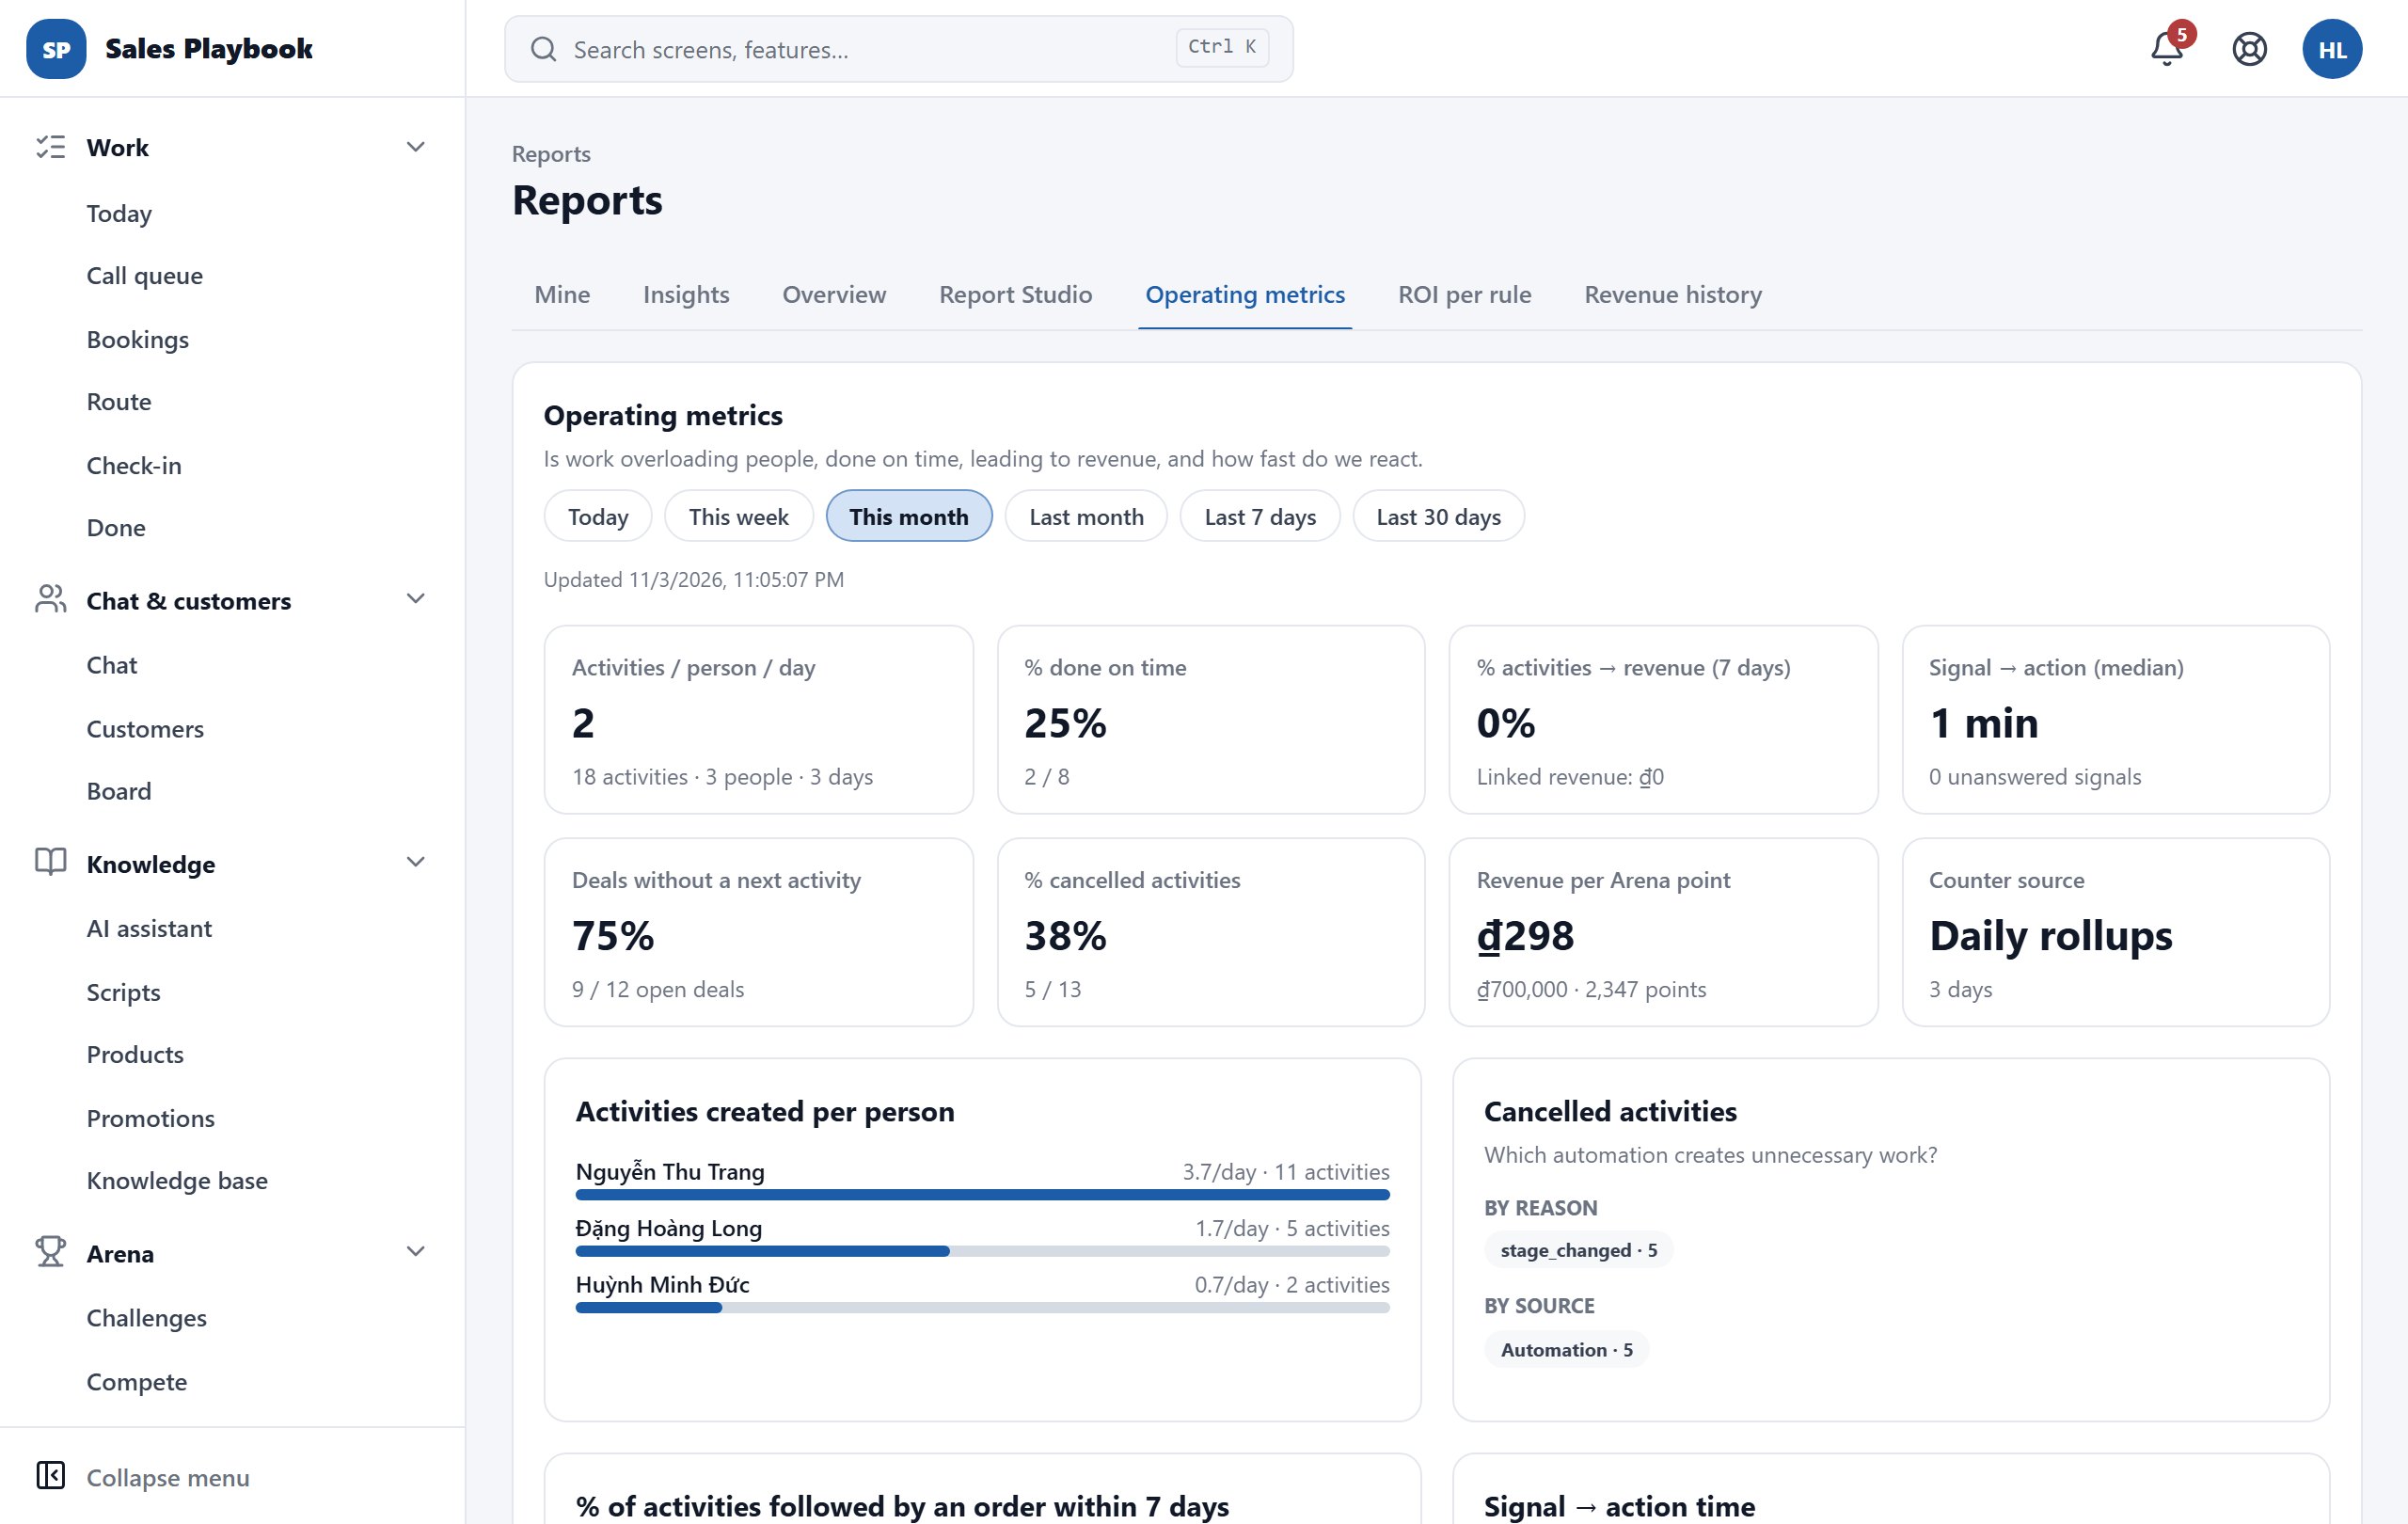
Track your team's operating metrics

ReportsReportsOperating metrics

Steps

  1. 1Open "Reports" › "Operating metrics" and pick a period.
  2. 2Read the 8 tiles: "Activities / person / day", "% done on time", "% activities → revenue (7 days)", "Signal → action (median)", "Deals without a next activity", "% cancelled activities", "Revenue per Arena point" and "Counter source".
  3. 3"Activities created per person" shows who gets the most work; "Cancelled activities" breaks cancellations down by reason and by source so you can find the automation that creates unnecessary work.
  4. 4Scroll down: "Signal → action time" lists each signal type (customer message, deal stuck in a stage, support case…) with the number answered, the median and the number unanswered.
  5. 5"Time per column" and "Funnel per board column" show where deals sit too long and the conversion to the next column.
Operating metrics tab with 8 tiles, the Activities created per person box and Cancelled activities
The 8 tiles on top; "Cancelled activities" shows which automation creates unnecessary work.

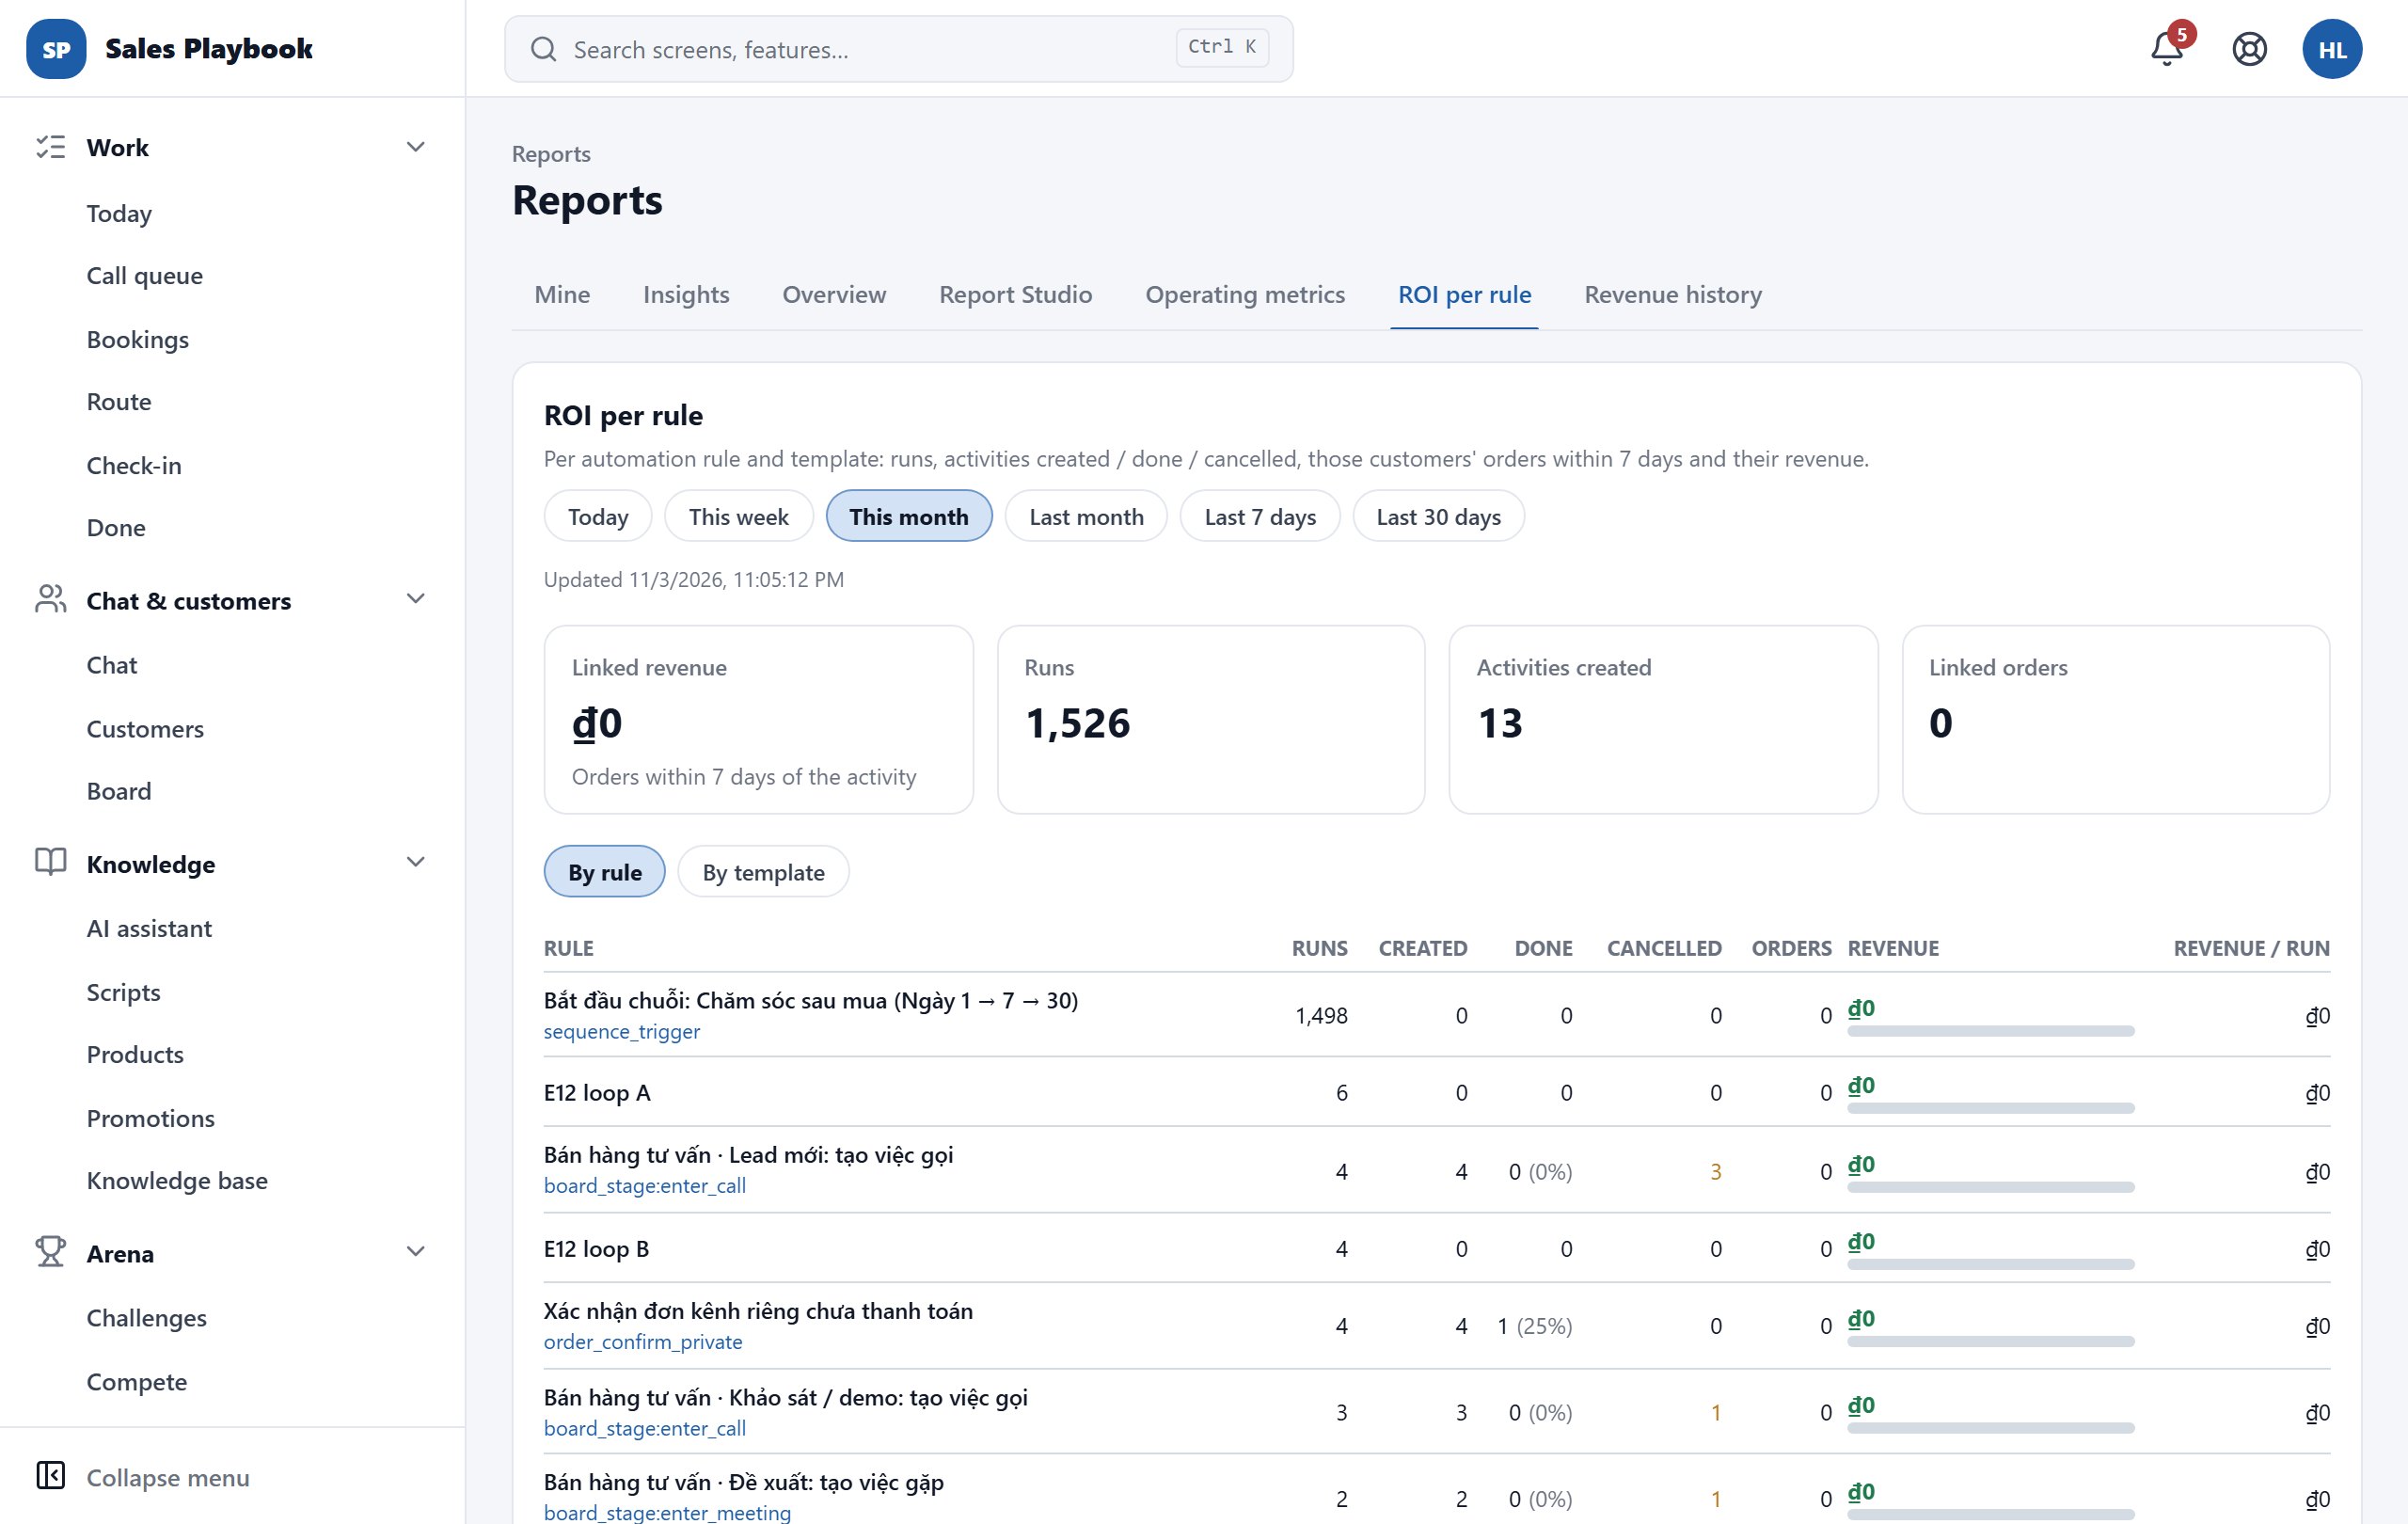
Measure the ROI of each automation rule

ReportsReportsROI per rule

Steps

  1. 1Open "Reports" › "ROI per rule" and pick a period.
  2. 2Look at the 4 totals: "Linked revenue", "Runs", "Activities created" and "Linked orders".
  3. 3Choose "By rule" to see each rule, or "By template" to group them by source template.
  4. 4Read the table: "Runs", "Created", "Done", "Cancelled", "Orders", "Revenue" and "Revenue / run". A rule that runs a lot but brings no orders is a candidate to adjust or turn off in "Automation rules".
ROI per rule tab with 4 totals and a table of runs, activities created, orders and revenue per rule
The ROI table: compare "Runs" with "Orders" and "Revenue" to see which rules are worth keeping.

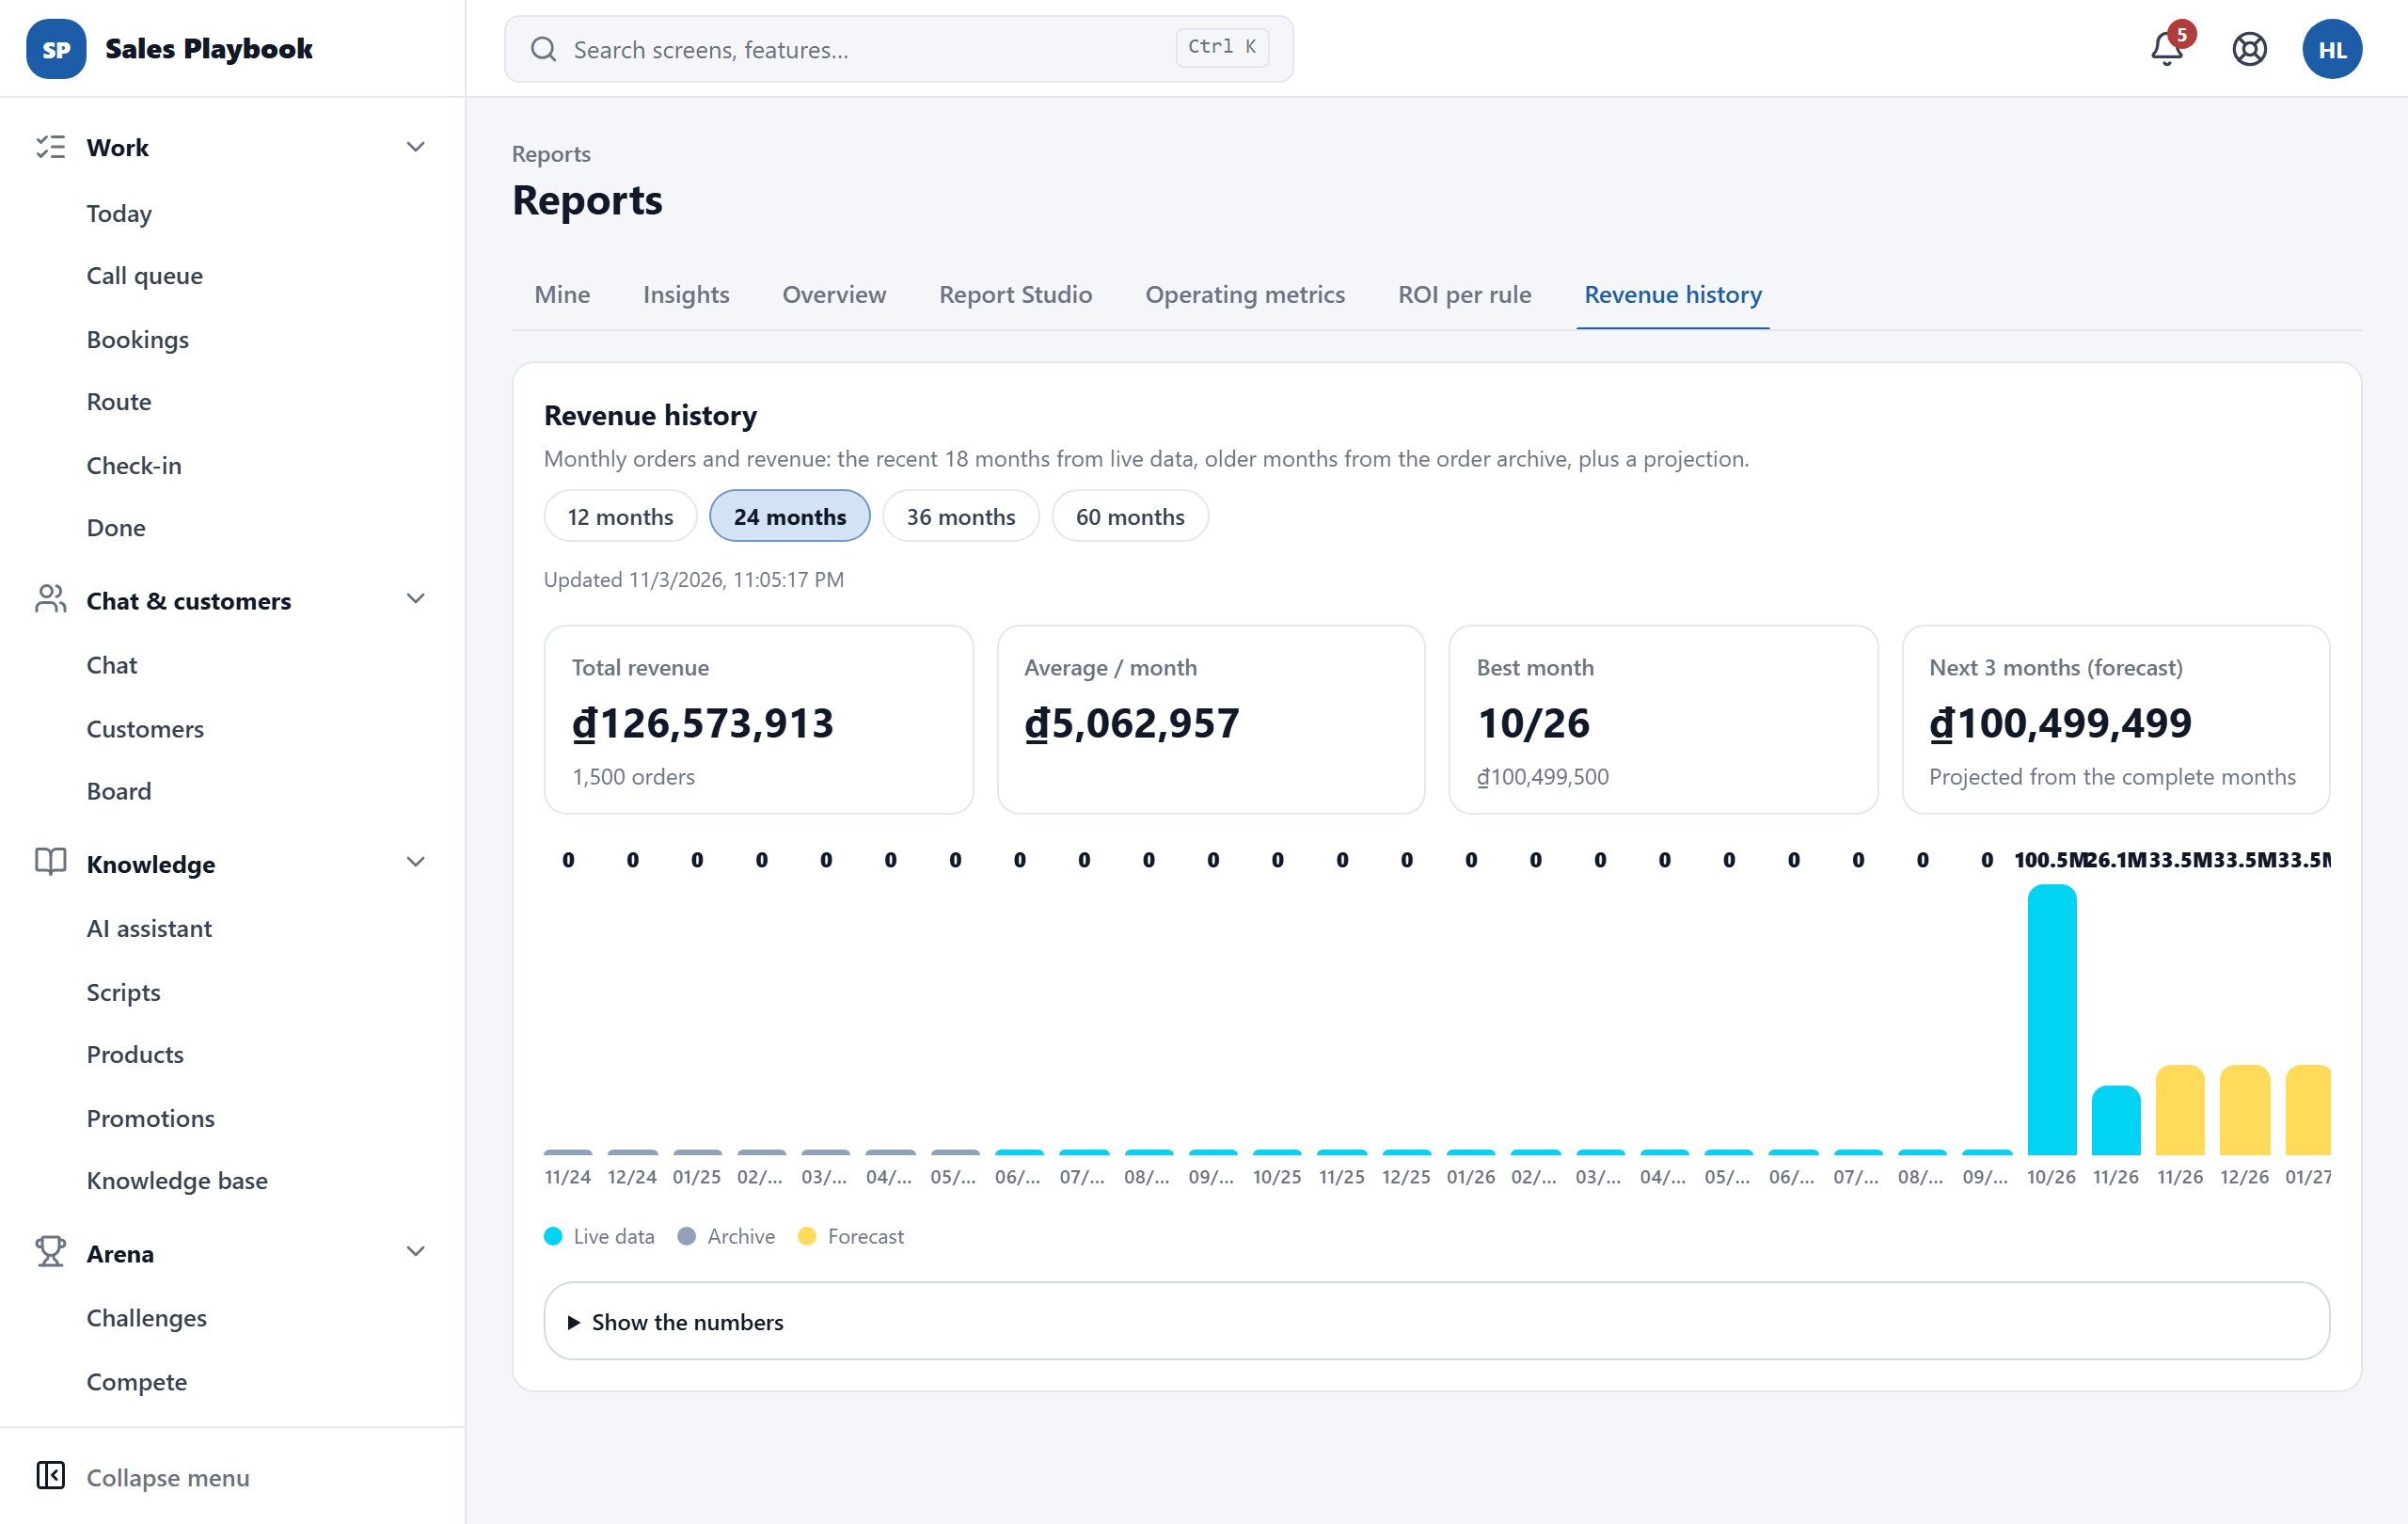
View multi-year revenue history and a 3-month forecast

ReportsReportsRevenue history

Steps

  1. 1Open "Reports" › "Revenue history".
  2. 2Pick a length: "12 months", "24 months", "36 months" or "60 months".
  3. 3Read the 4 tiles: "Total revenue" (with the order count), "Average / month", "Best month" and "Next 3 months (forecast)".
  4. 4In the bar chart, colours separate "Live data", "Archive" and "Forecast".
  5. 5Click "Show the numbers" for the detailed figures of each month.
Revenue history tab with 4 tiles and a monthly bar chart including forecast bars
Monthly revenue chart; the last bars are the forecast for the next 3 months.

14 / 4 features

Staff, seats & AI limits

Invite people, look at each person in detail, set AI limits, lock an account temporarily when needed and offboard people who leave to free their seat.

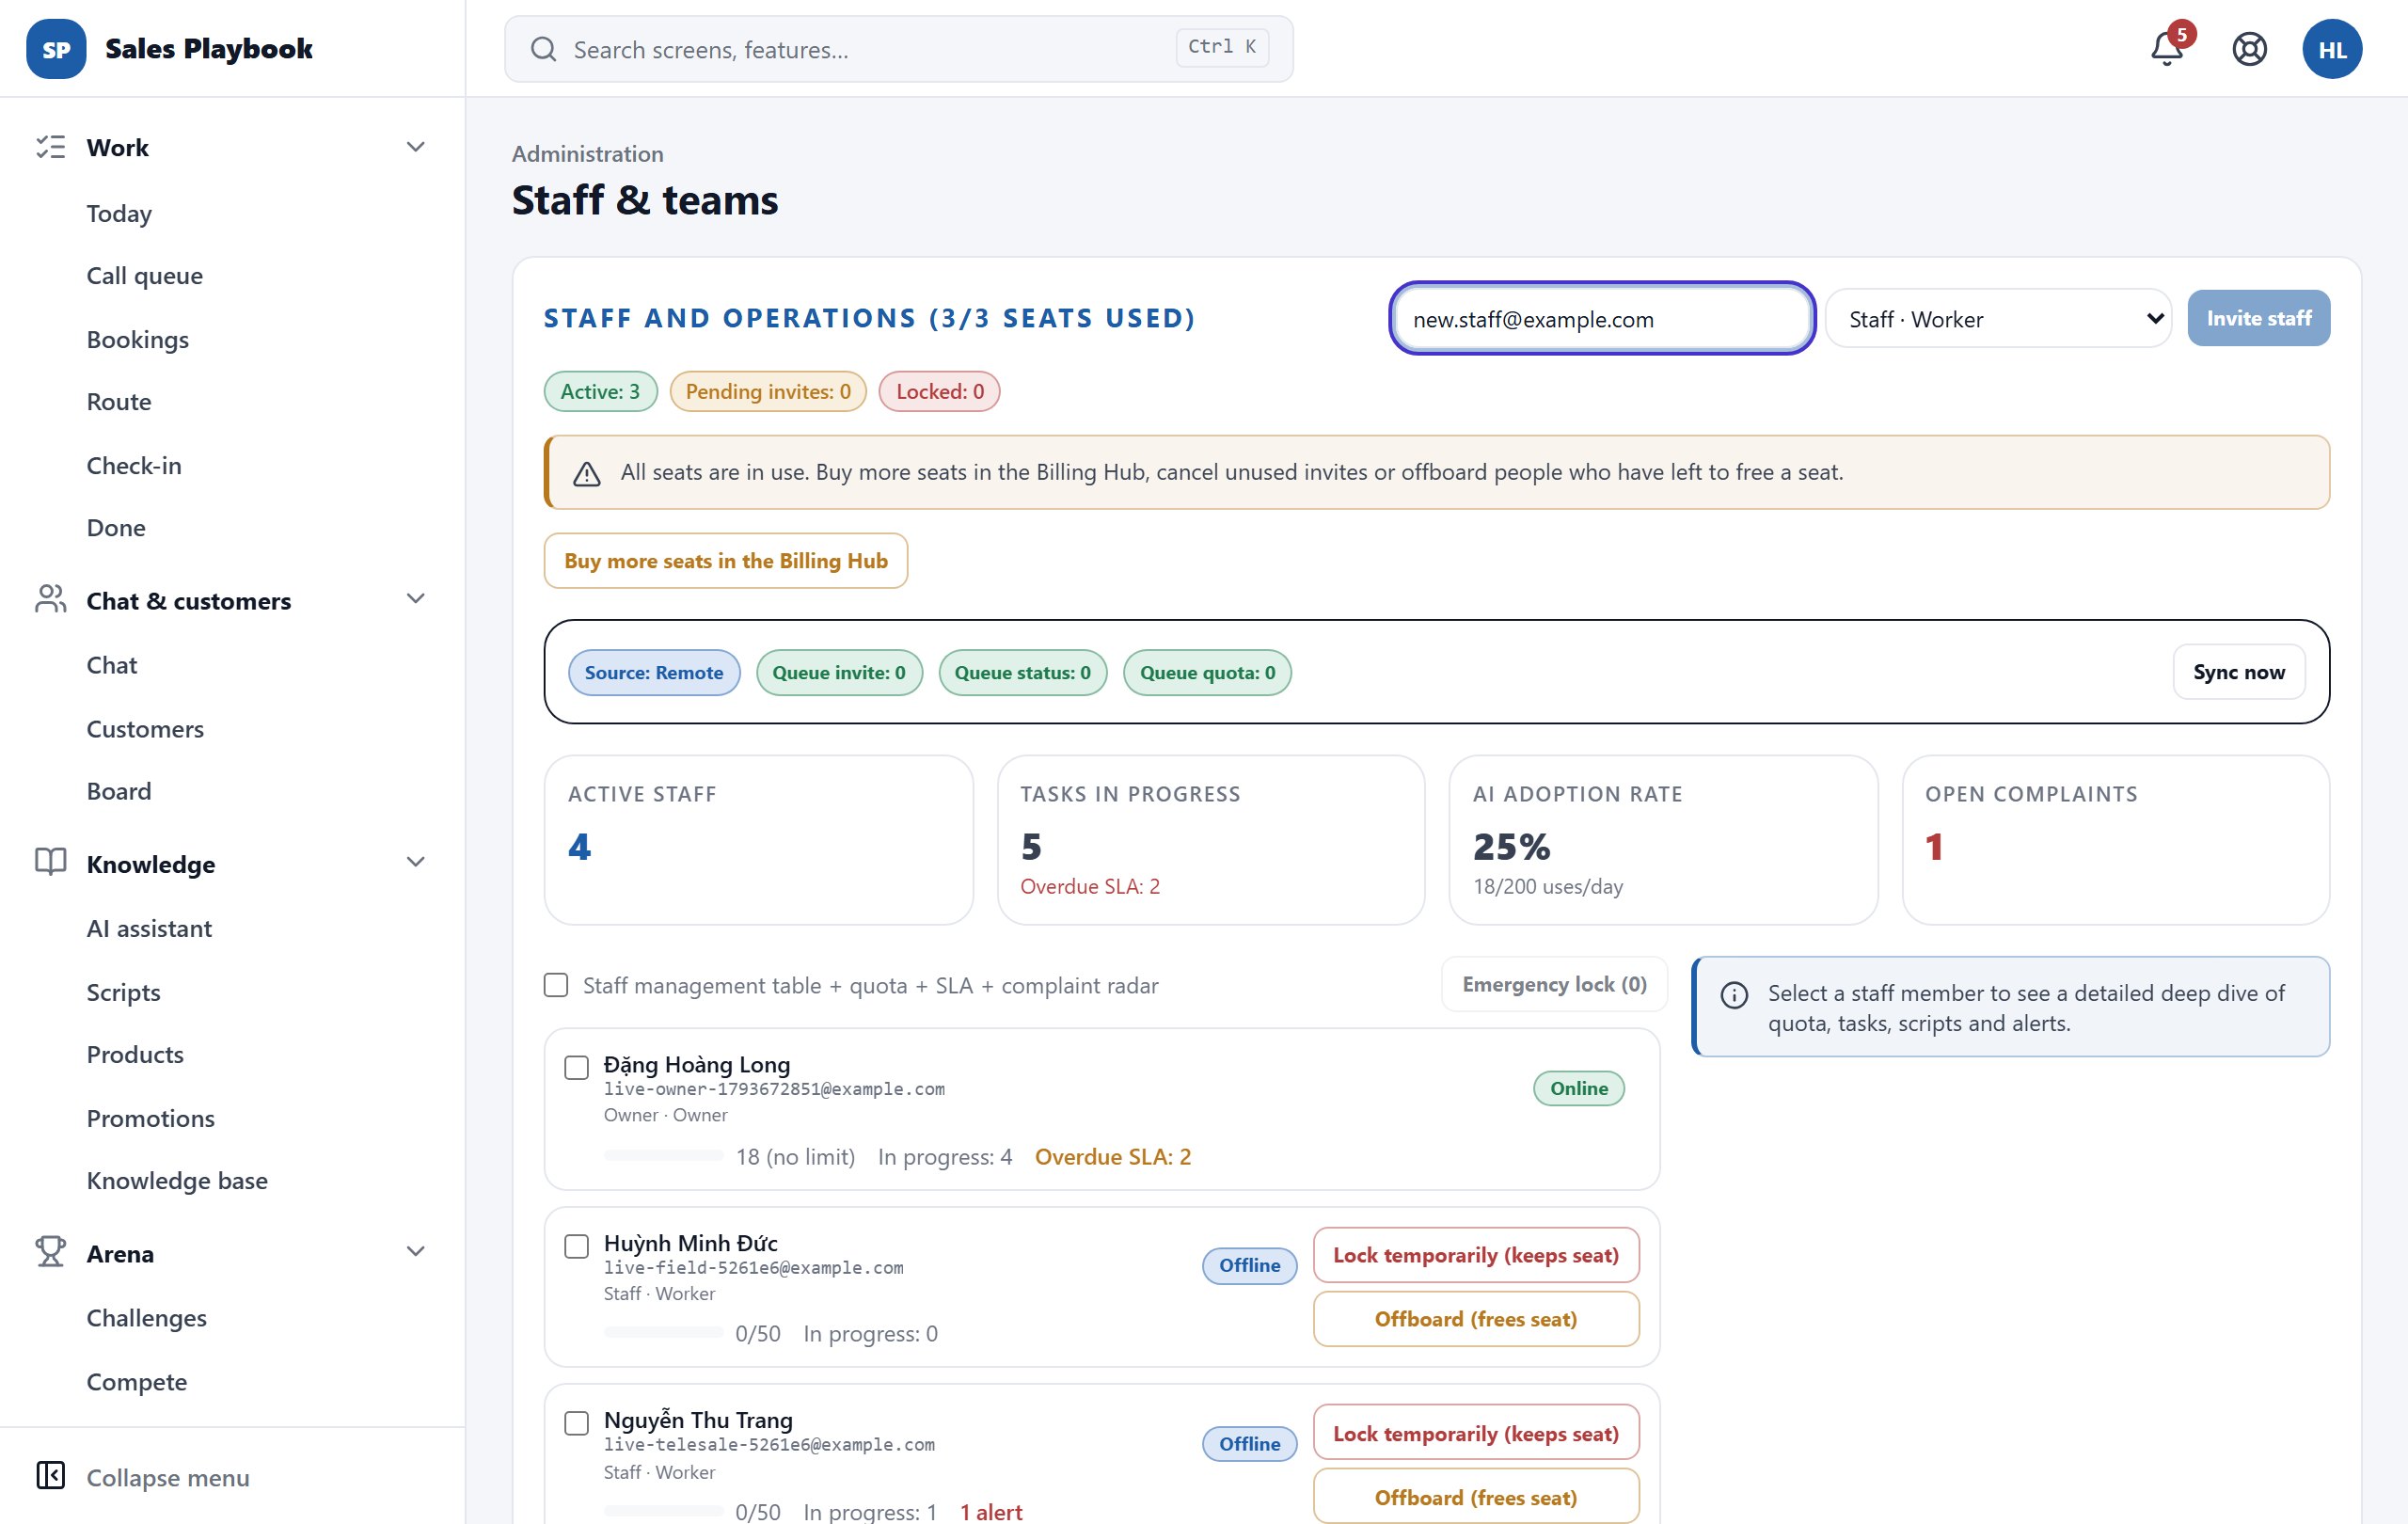
Invite staff and keep track of seats

AdministrationStaff & teams

Steps

  1. 1Open "Administration" › "Staff & teams". The card title shows your seats, as "Staff and Operations (used/limit seats used)"; right below are the "Active", "Pending invites" and "Locked" badges.
  2. 2Type the email address in the "New staff email" box.
  3. 3Pick a role in the box next to it (e.g. "Staff · Worker", "Manager · Manager") — see Roles & permissions to choose the right one.
  4. 4Click "Invite staff". The person receives an activation email and sets their own password.
  5. 5If someone has not activated yet, use "Resend invite" on their row; to cancel the invite completely, click "Delete invite".
Staff & teams page: the New staff email box filled with new.staff@example.com, the role picker and the Invite staff button; below it the all-seats-in-use warning
This sample account uses all 3/3 seats, so "Invite staff" is disabled and "Buy more seats in the Billing Hub" appears.

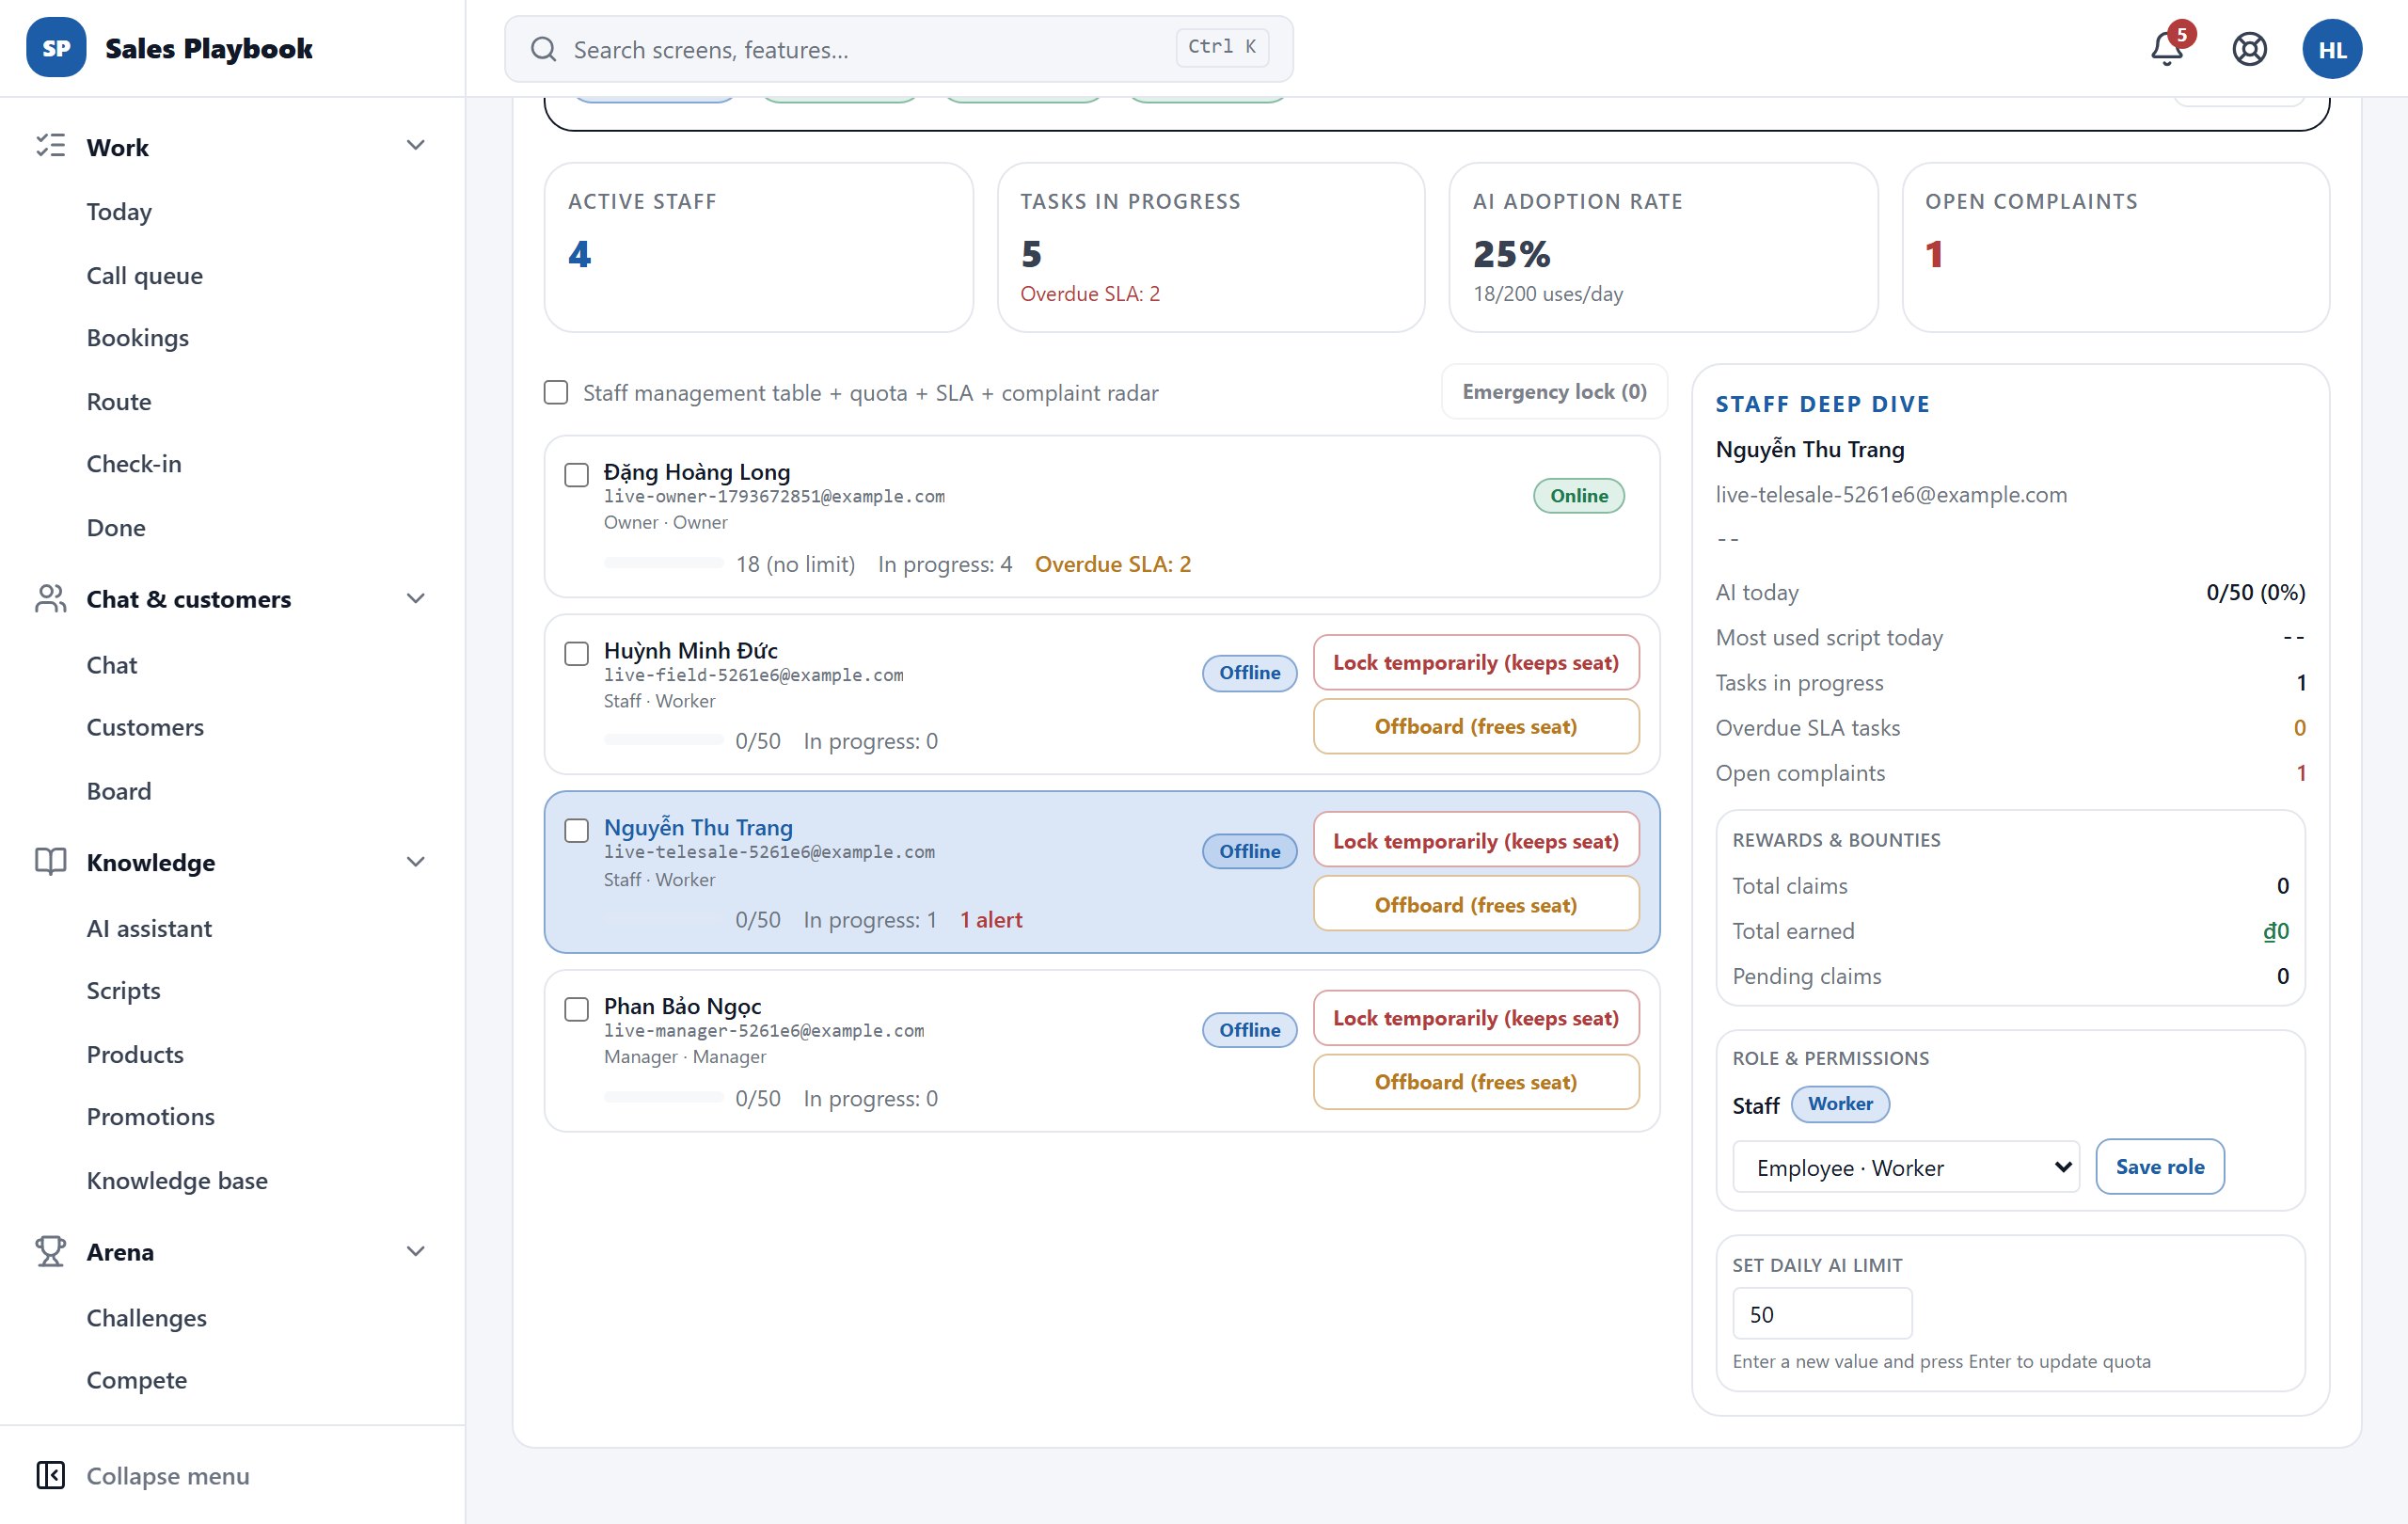
Look at one employee in detail (deep dive)

AdministrationStaff & teamsStaff deep dive

Steps

  1. 1Above the list, four team-wide cards: "Active staff", "Tasks in progress" (with "Overdue SLA"), "AI adoption rate" and "Open complaints".
  2. 2Click a person's name in the list. The "Staff deep dive" panel opens on the right.
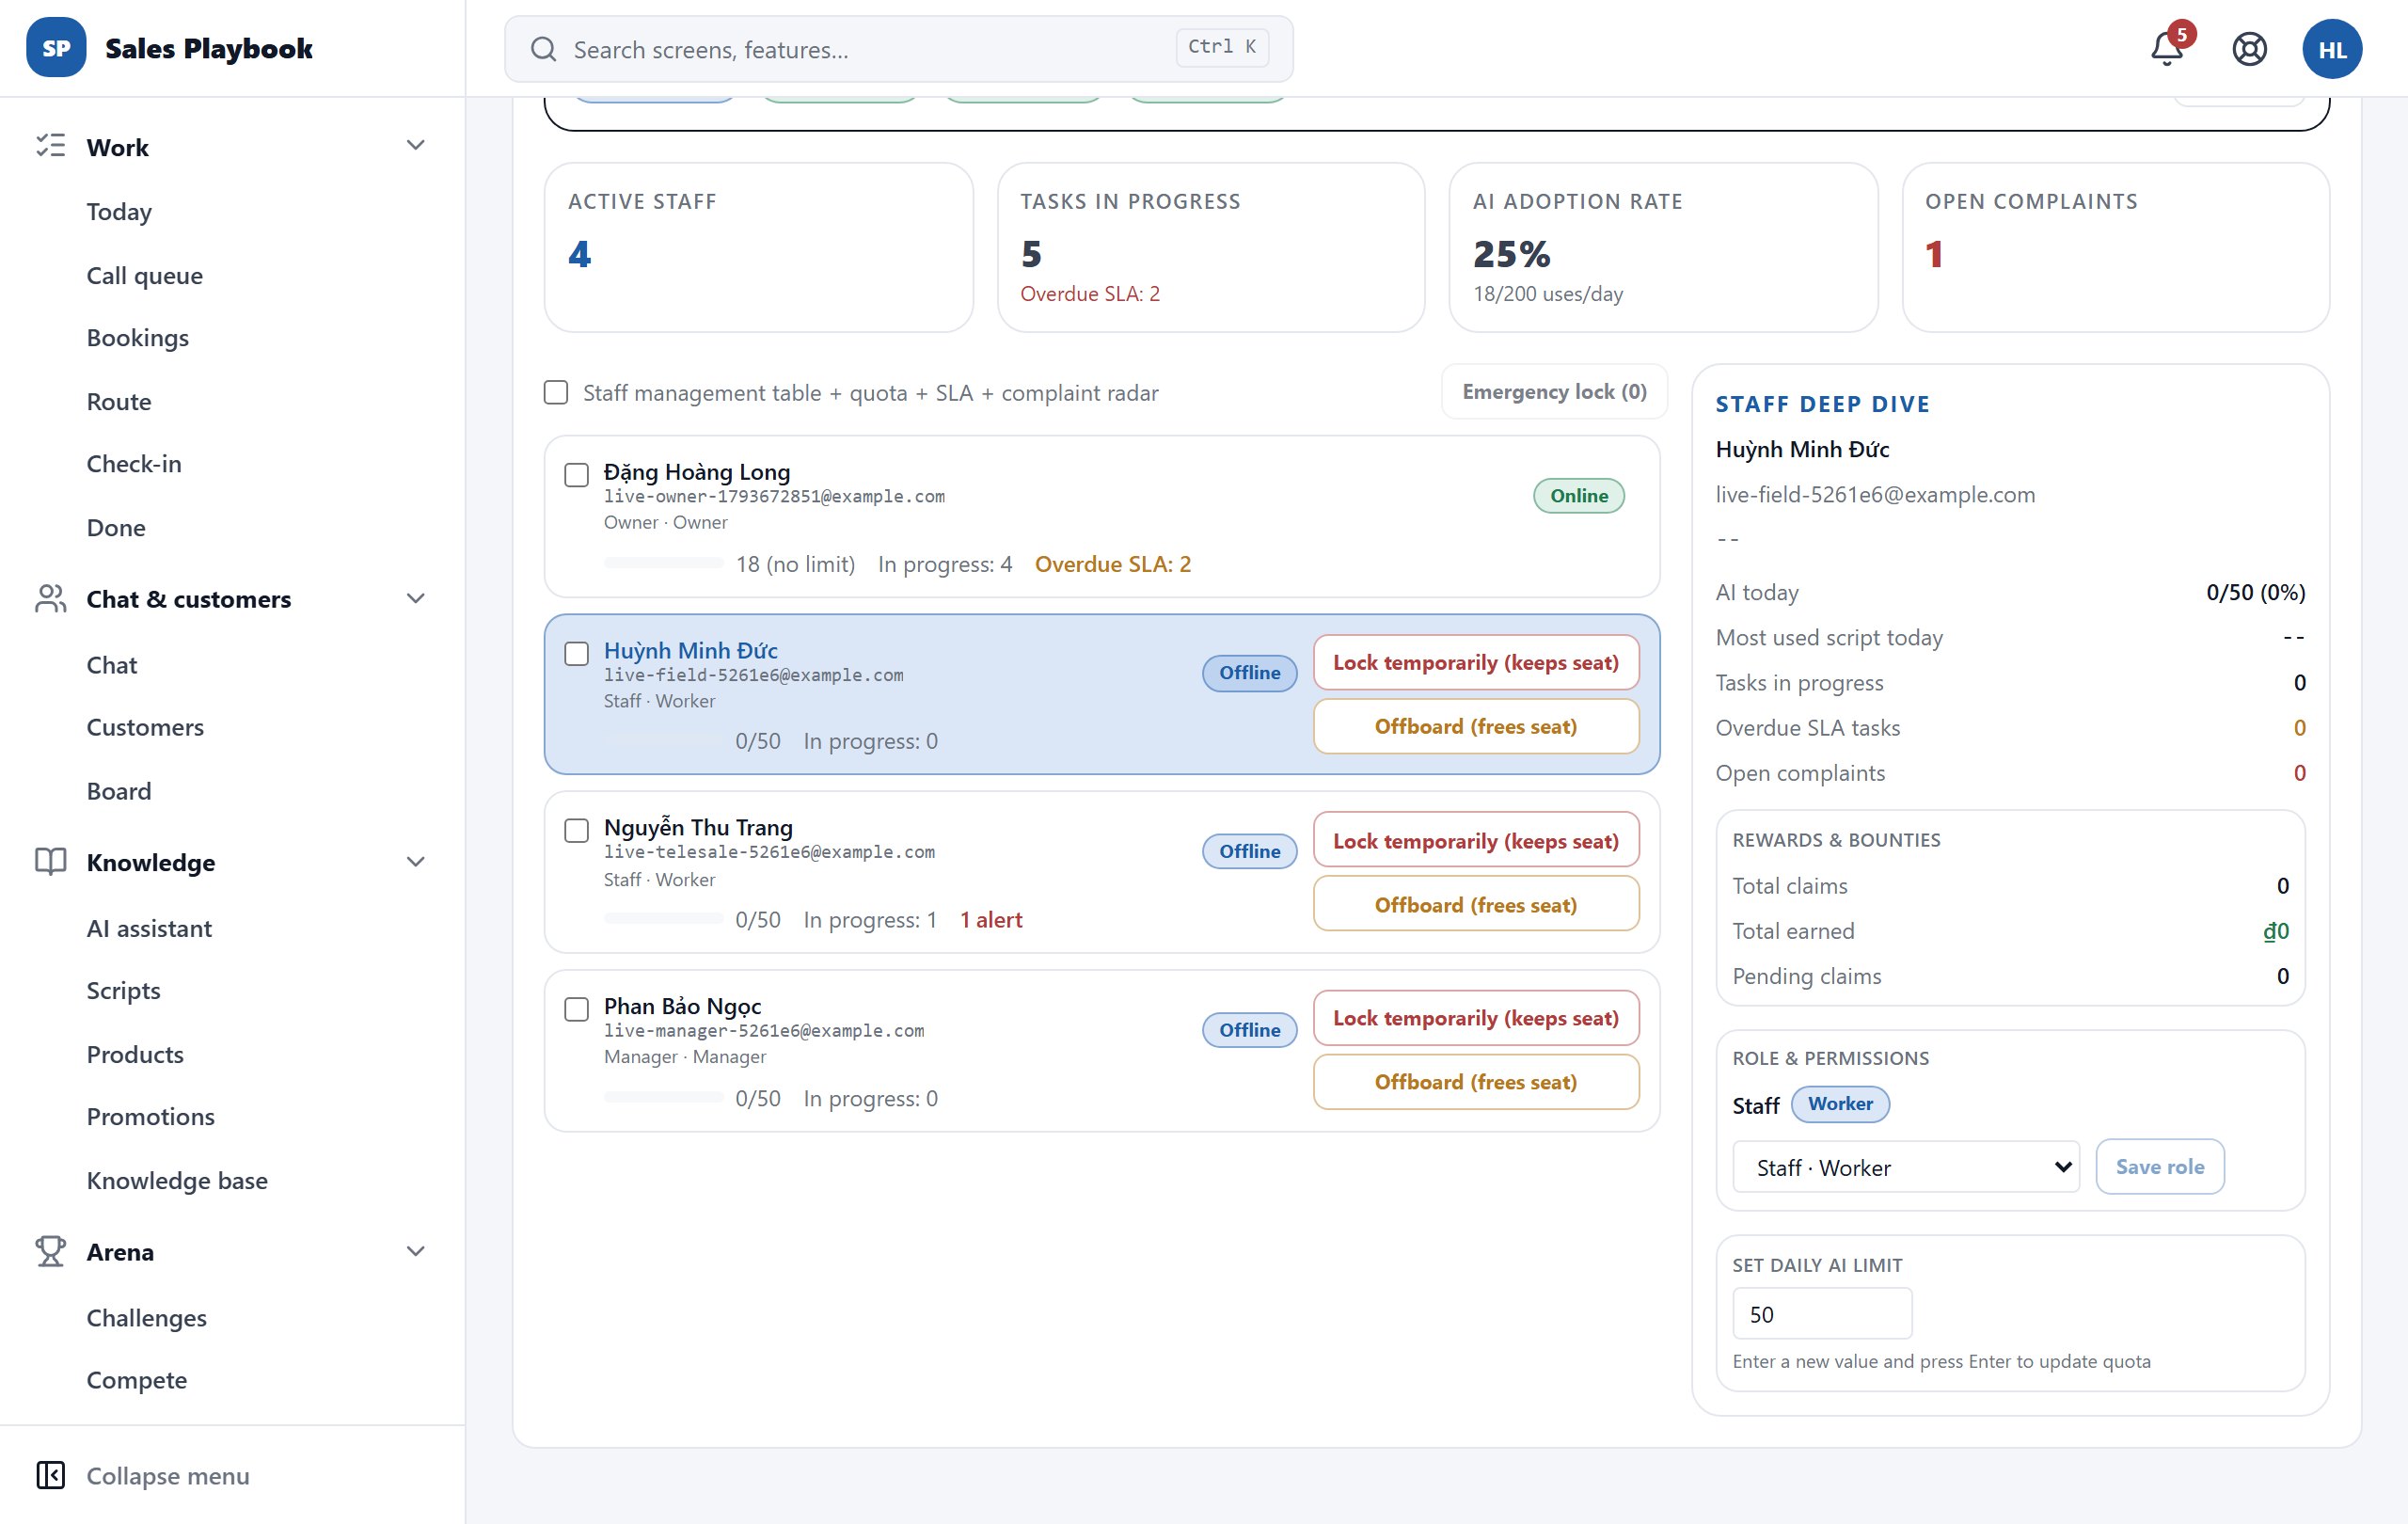
  3. 3Read "AI today", "Most used script today", "Tasks in progress", "Overdue SLA tasks", "Open complaints" and the "Rewards & bounties" block.
  4. 4The "Role & permissions" block shows the current role and lets you change it; "Set daily AI limit" changes the AI limit.
Staff list with one person selected; the Staff deep dive panel on the right shows AI today, tasks in progress, Rewards & bounties, Role & permissions and Set daily AI limit
Click a person to open "Staff deep dive" on the right.

Set AI limits and lock accounts in an emergency

AdministrationStaff & teams

Steps

  1. 1Change the AI limit: select the person, type a new number in "Set daily AI limit" in the "Staff deep dive" panel and press Enter. The bar under each name shows requests used / limit (e.g. 0/50).
  2. 2Lock one person: click "Lock temporarily (keeps seat)" on their row.
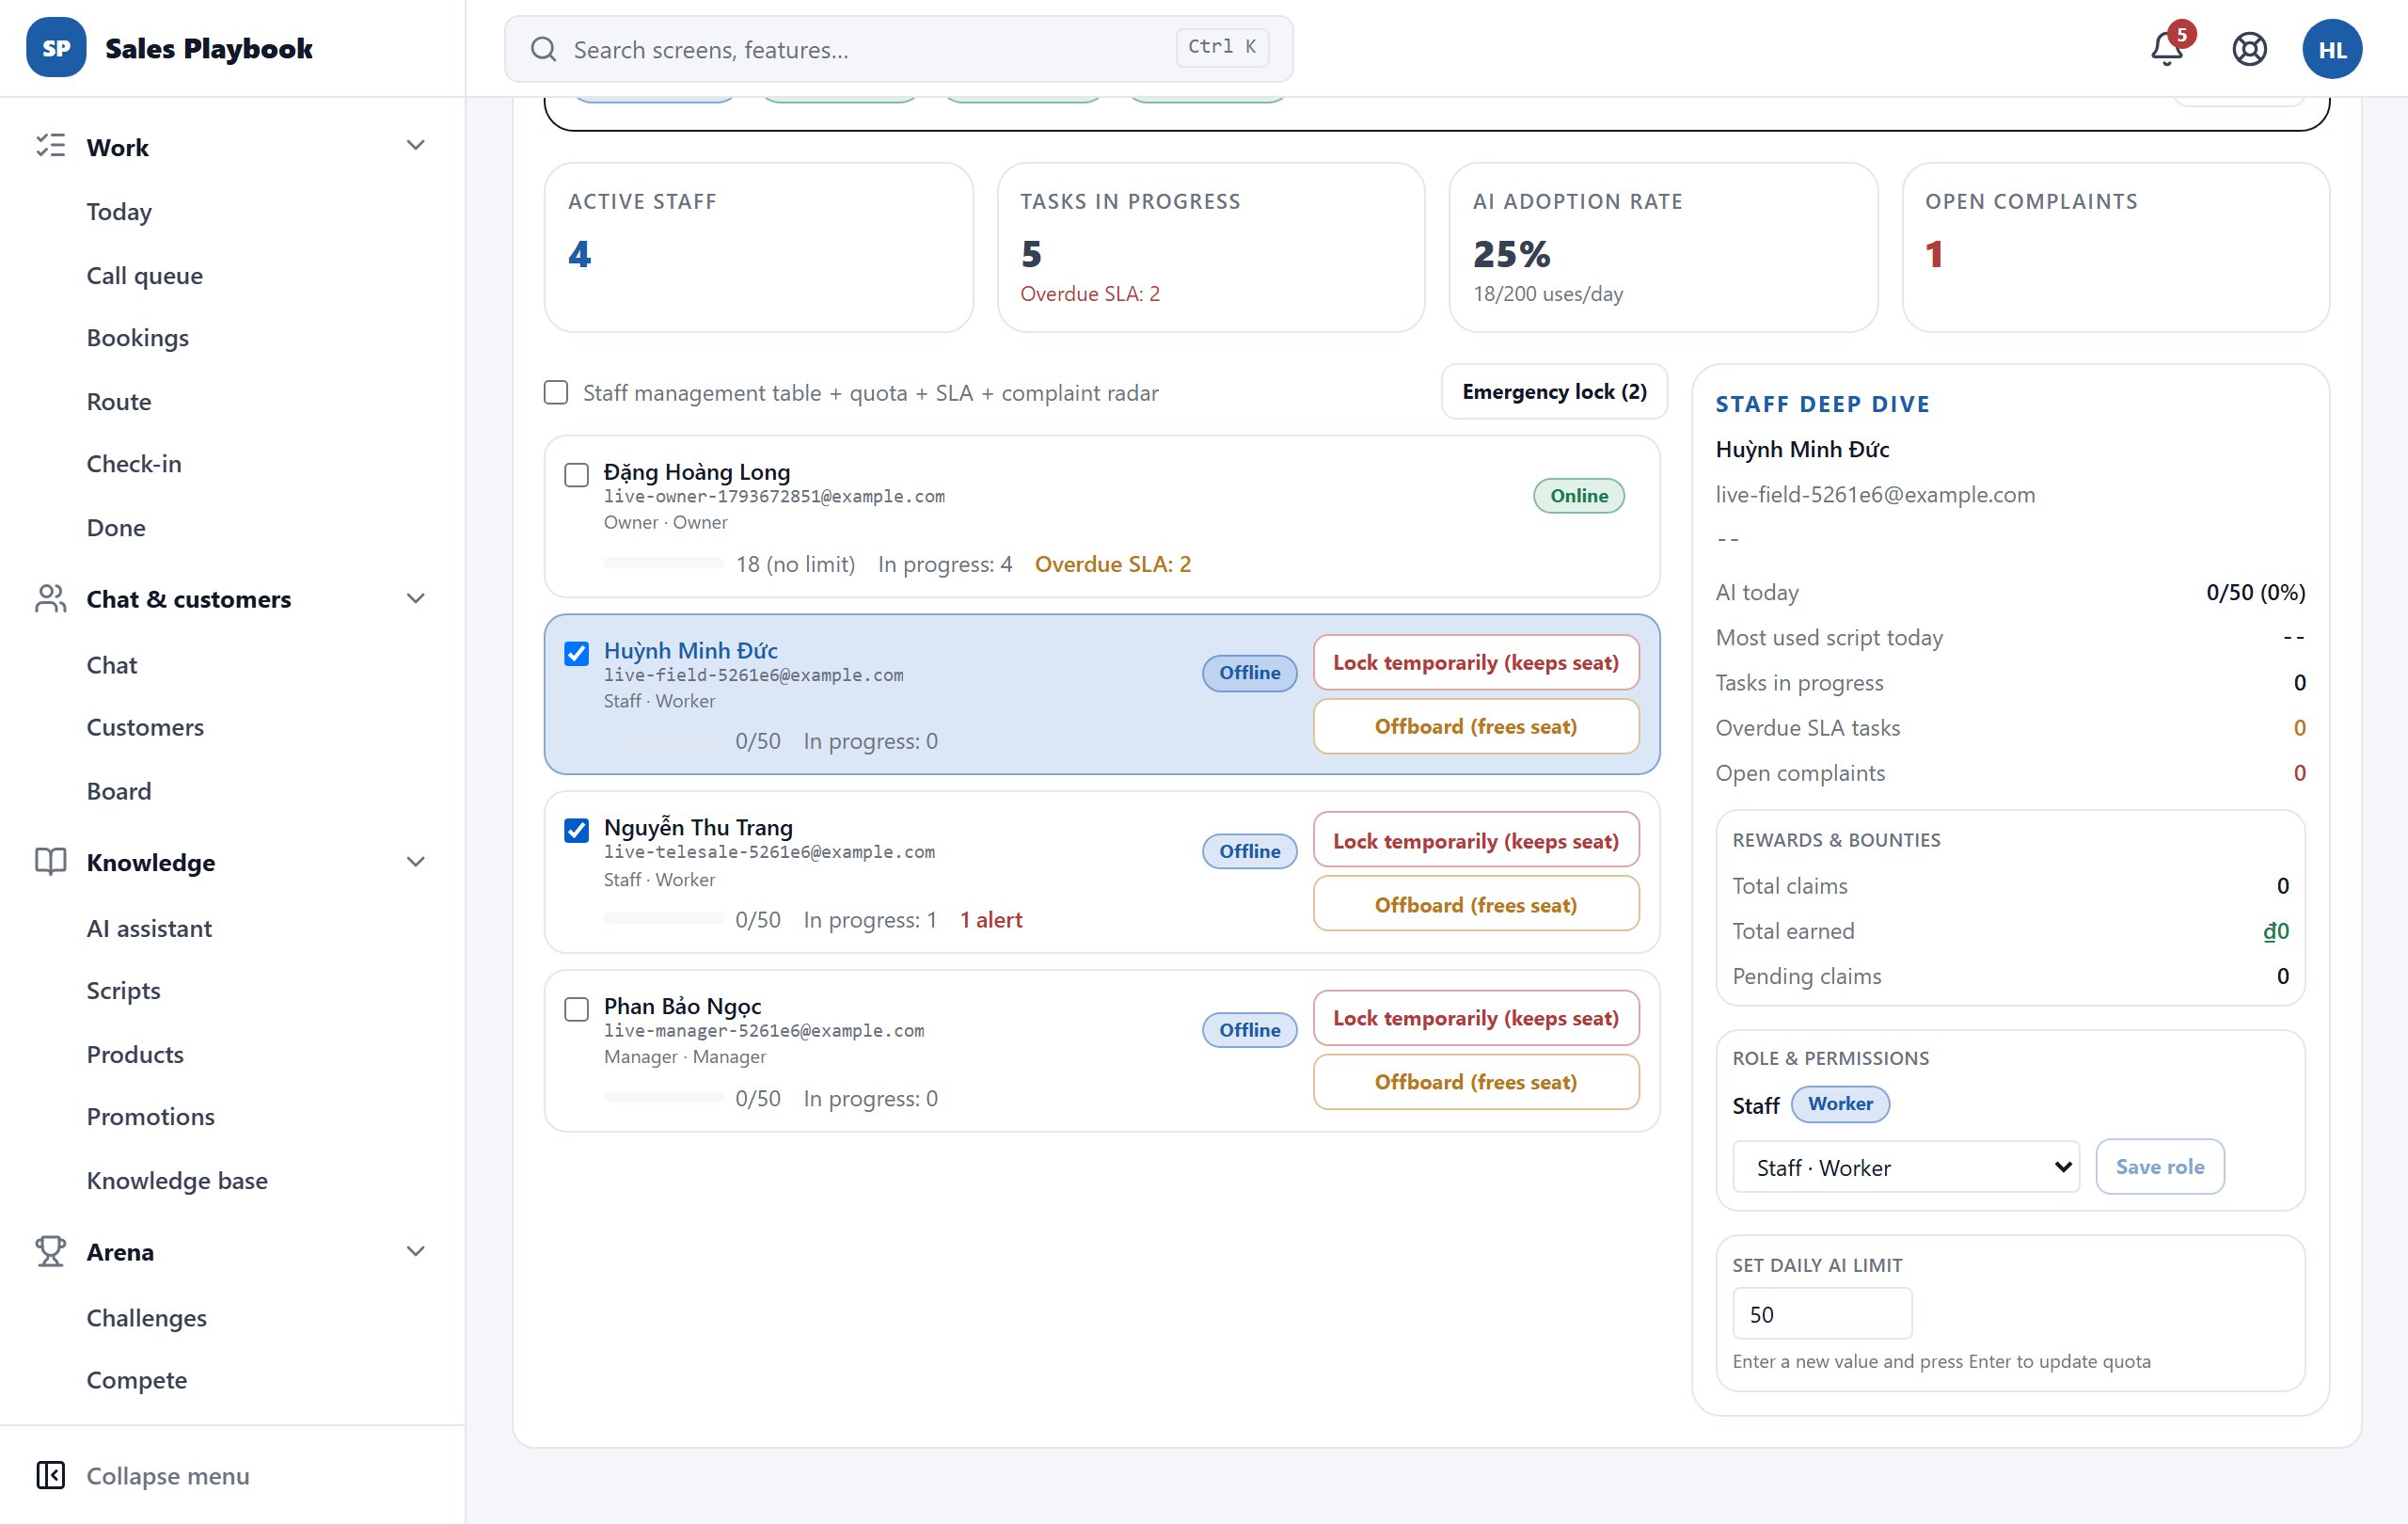
  3. 3Lock several people at once: tick the box in front of each name (or the box next to "Staff management table + quota + SLA + complaint radar" at the top of the list to select everyone), then click "Emergency lock (number selected)".
  4. 4To let someone back in, click "Unlock" on their row.
Two employees ticked and the Emergency lock (2) button active; each row has a Lock temporarily (keeps seat) button; the right panel has the Set daily AI limit box
With 2 people ticked the button reads "Emergency lock (2)". The AI limit is changed in the bottom-right box.

Offboard an employee (free their seat)

AdministrationStaff & teamsOffboard (frees seat)

Steps

  1. 1On the employee's row, click "Offboard (frees seat)". The "Offboard: …" dialog has 4 steps.
  2. 2Step 1 explains what the system will do. Click "Continue".
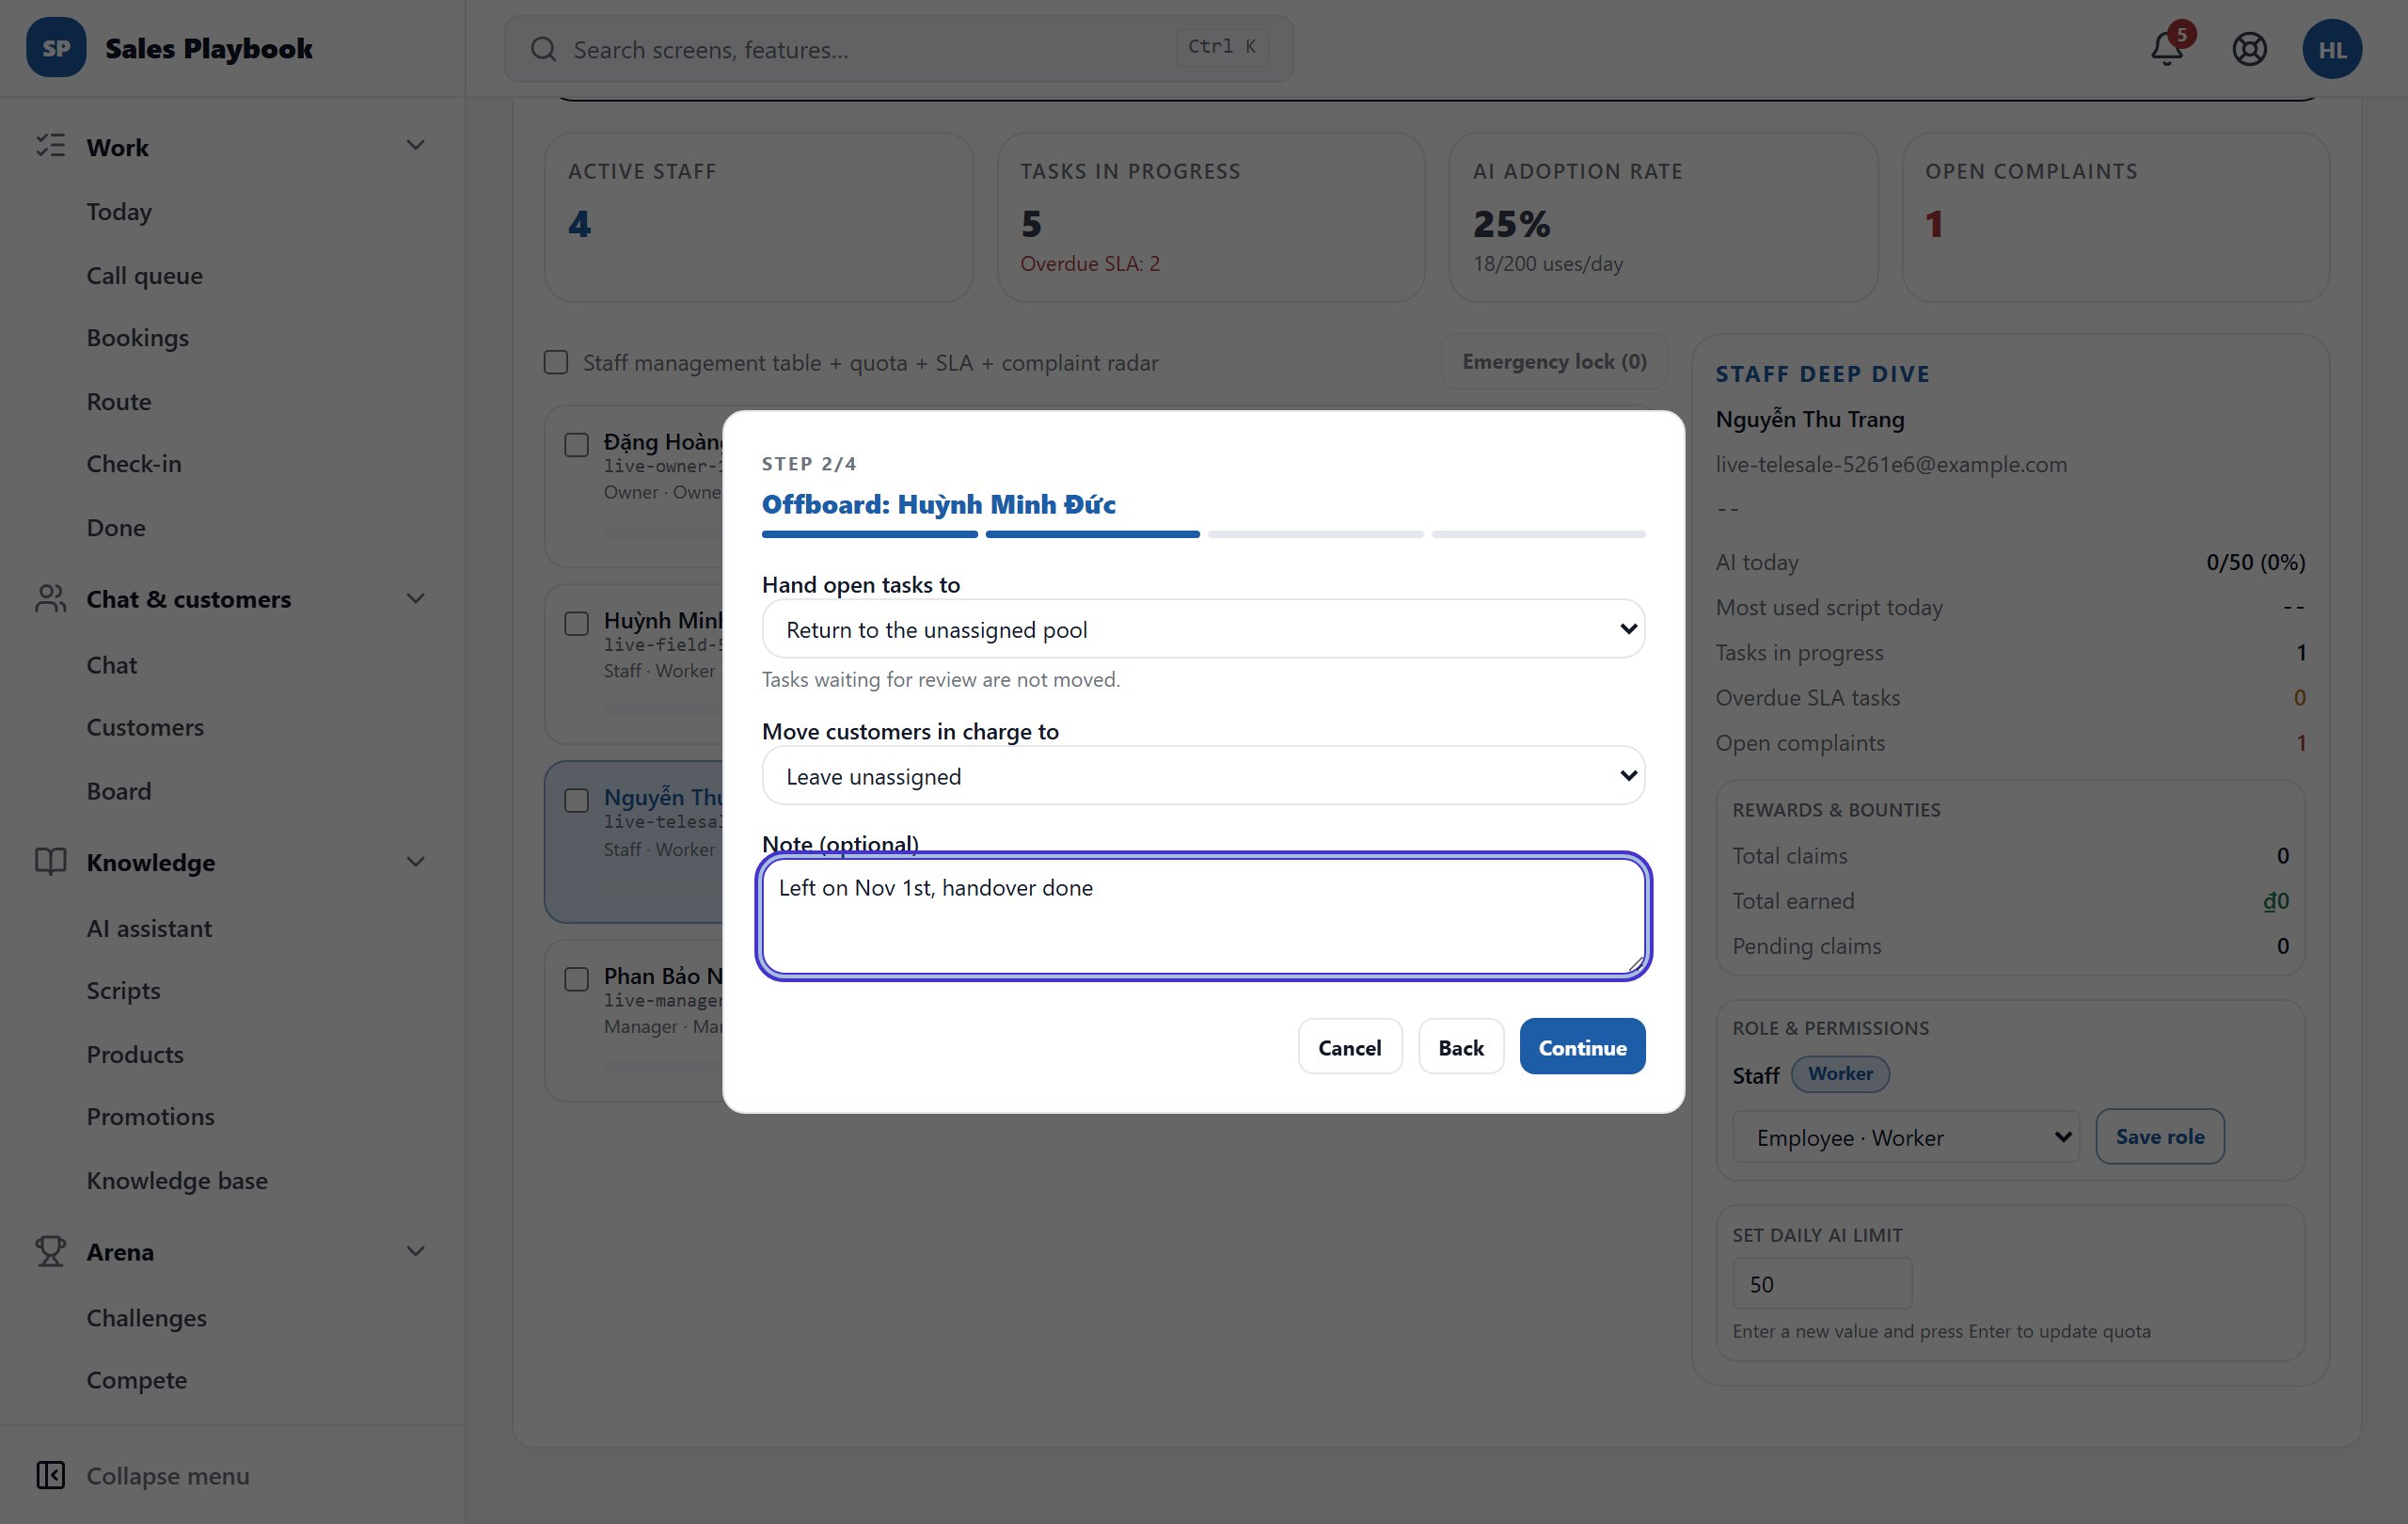
  3. 3Step 2: pick who gets the work in "Hand open tasks to" (or "Return to the unassigned pool") and in "Move customers in charge to" (or "Leave unassigned"). Add a "Note (optional)" if needed, then click "Continue".
  4. 4Check the summary and click "Confirm offboarding".
  5. 5The result screen tells you how many tasks and customers were handed over, which challenges/battles were cancelled, the seats now used, and what you still need to handle yourself.
Offboard dialog at step 2/4 with Hand open tasks to, Move customers in charge to and a filled-in Note
Step 2/4: choose who takes over the work and customers, note the reason, then click "Continue".

15 / 4 features

Roles & permissions

Who can see and change what: four tiers — Worker, Manager, Admin (CIO) and Owner — plus how to change a role and grant extra permissions to an individual manager.

The four permission tiers and what each can do

AdministrationStaff & teamsRole for the invite

Steps

  1. 1The role picker shows "Role · Tier": "Administrator · Admin (CIO)", "Manager · Manager", and three Worker-tier roles: "Staff", "Employee" and "Contractor".
  2. 2Worker tier: their own work (Work, Chat with assigned customers, Check-in), the AI assistant, viewing and drafting/pinning scripts, the KPI Arena, the general reports and viewing shop settings.
  3. 3Manager tier: day-to-day operations — catalog, products, stock, promotions, automation, customers and every conversation, assigning tasks, Excel import, approving scripts, AI forecasts, reviewing compliance violations, running the Arena and rewards. View (but not change) Staff, Plan & invoices, Sales channels and Open API.
  4. 4Admin (CIO) tier: adds invite/lock/change role/offboard, changing plan and payments, connecting/disconnecting sales channels, API keys and webhooks, editing shop settings, category templates, deleting and merging customers, deleting tasks, editing compliance rules, administering the script library, configuring the Arena and paying cash rewards.
  5. 5Owner: every permission, plus granting extra permissions to Managers and closing the account. The account that created the shop is the owner; this role cannot be given to anyone else.
Role list for an invite: Administrator · Admin (CIO), Manager · Manager, Staff · Worker, Employee · Worker, Contractor · Worker
Each role shows its permission tier after the "·".

Read-only mode: you can look but not change

AdministrationData import & channels

Steps

  1. 1A menu item only appears if you can at least view it. Items you cannot view are missing from the menu and from search.
  2. 2Open a screen you can only view, for example "Administration" › "Data import & channels" as a Manager.
  3. 3The top of the page shows "🔒 You are viewing this read-only — your role can't change it."
  4. 4Edit buttons (e.g. "Add Shopee shop", "Disconnect", "Import customers") are greyed out; hovering over one shows "Your role doesn't have this permission".
Data import & channels page viewed as a Manager: the read-only banner at the top, and the Add Shopee shop, Connect Lazada and Disconnect buttons greyed out
Manager role: the "🔒 … read-only" banner at the top and greyed-out edit buttons.

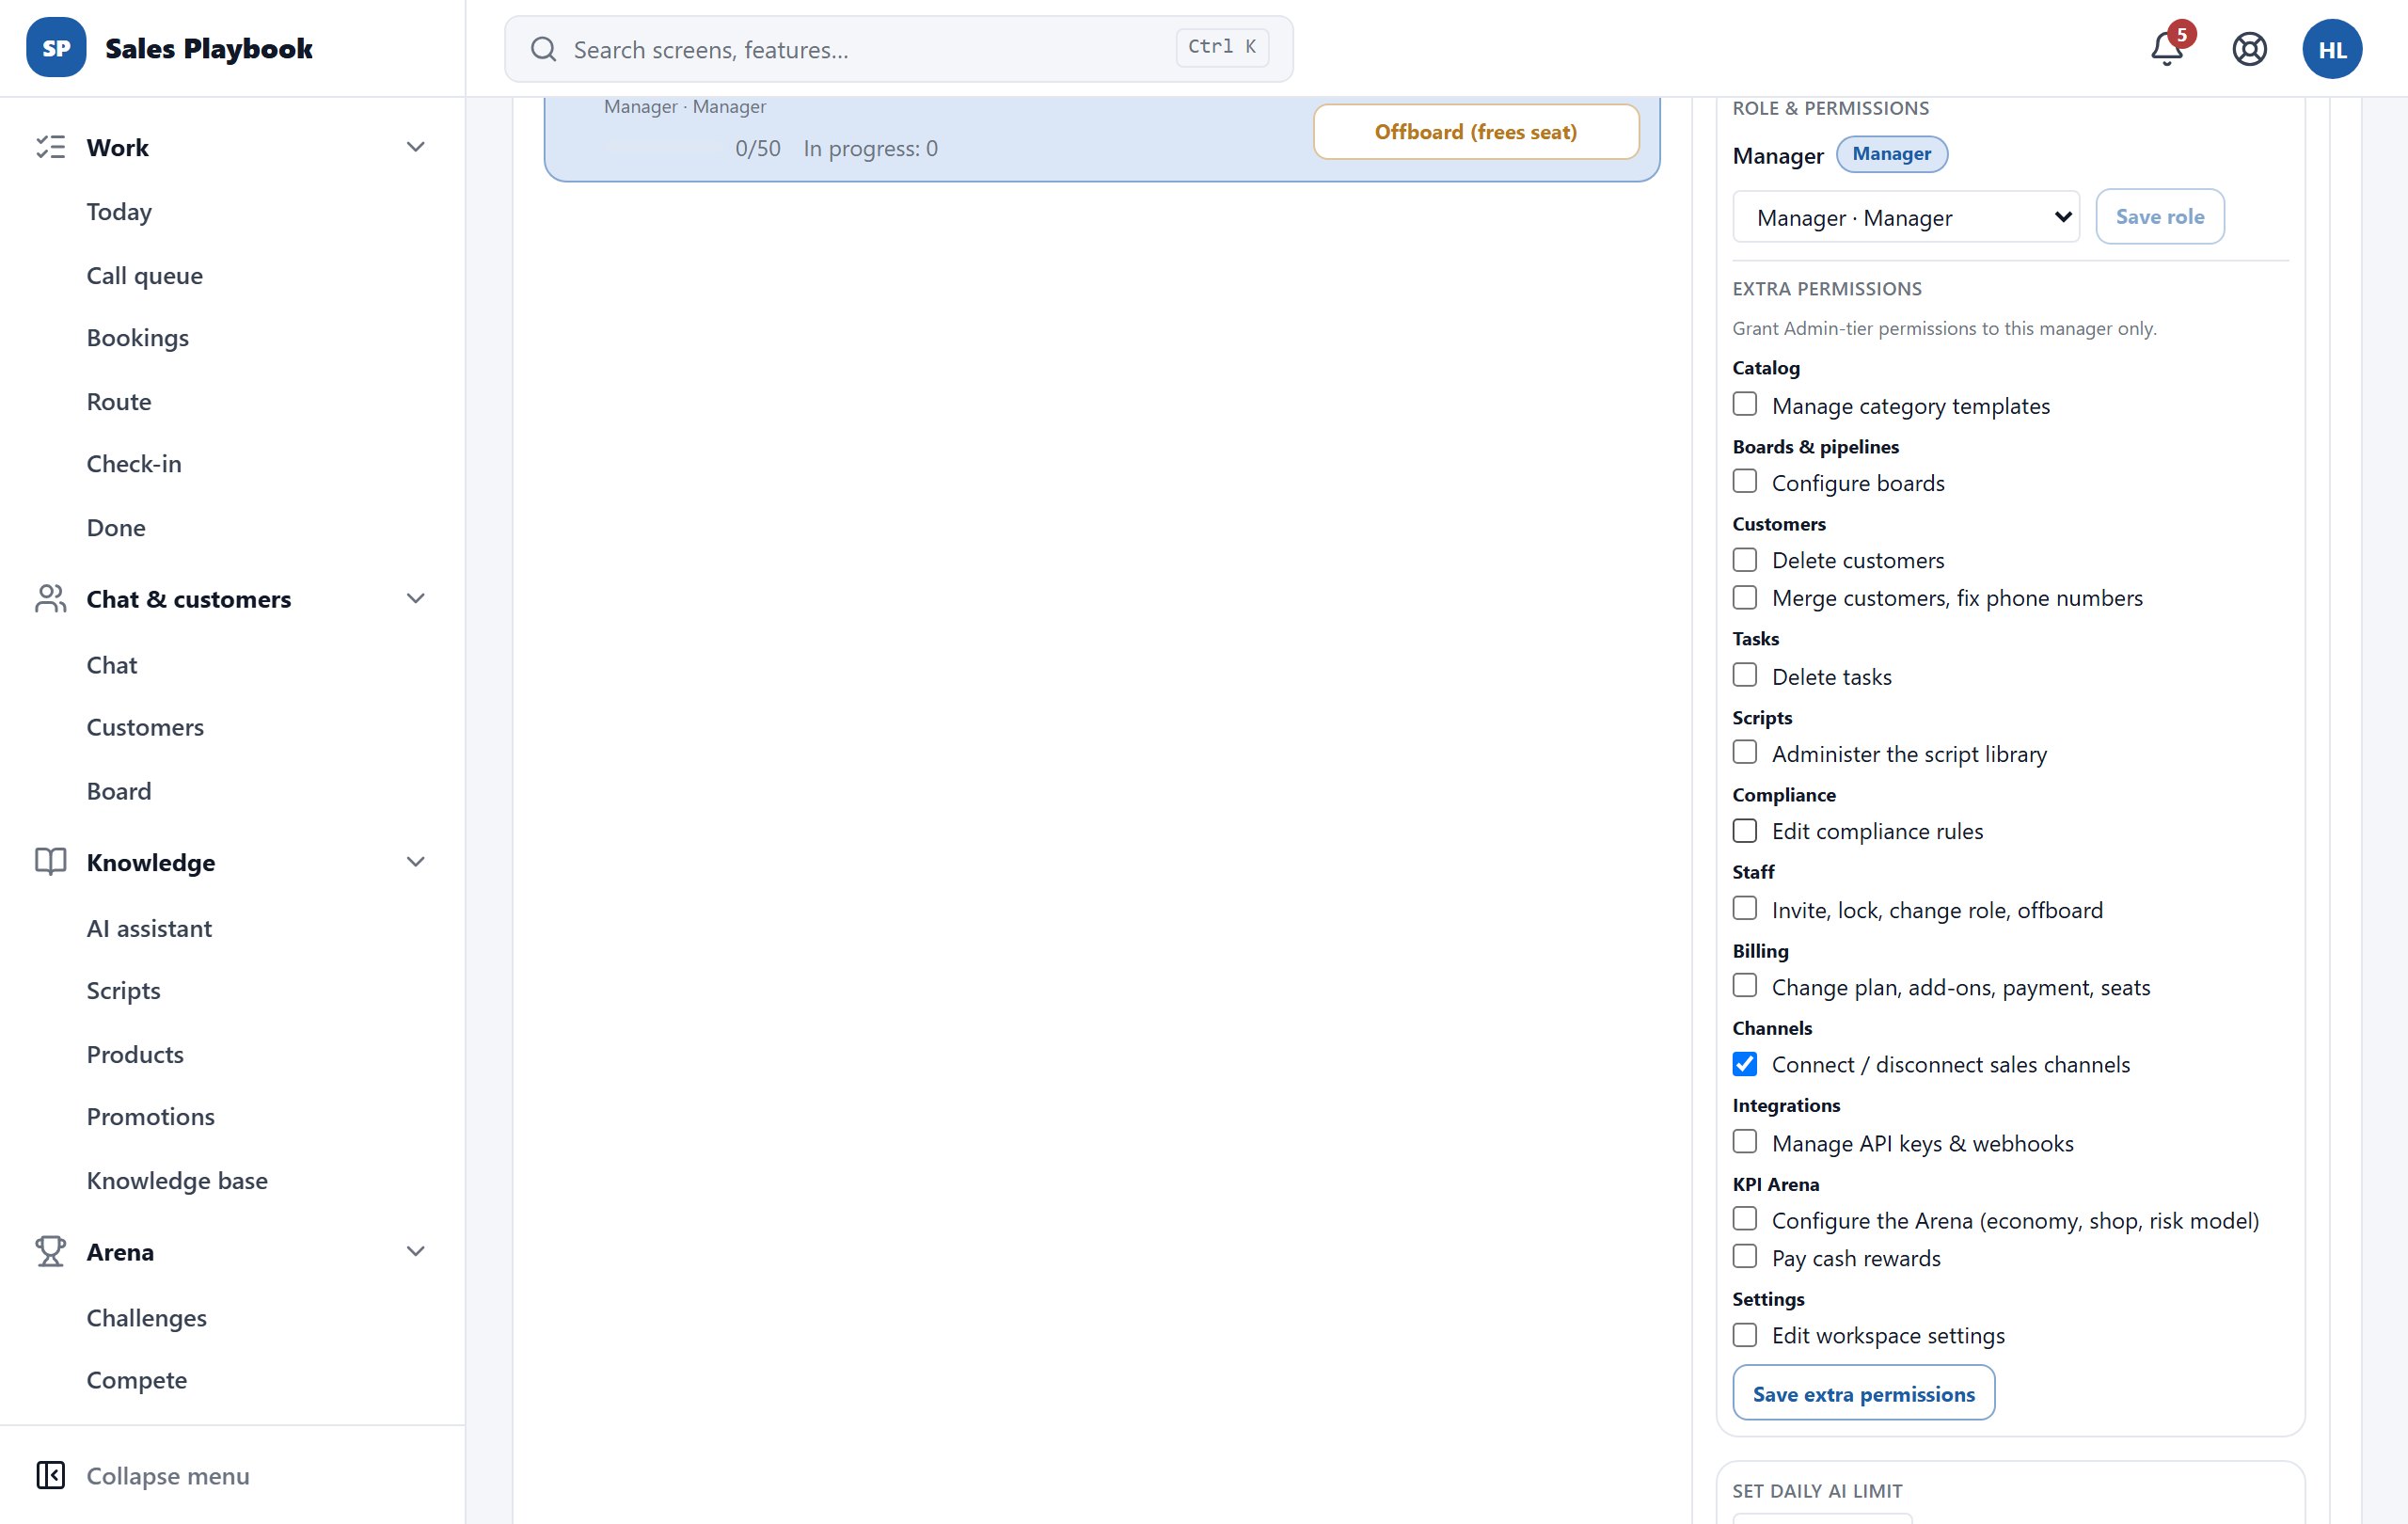
Grant extra permissions to a Manager

AdministrationStaff & teamsRole & permissionsExtra permissions

Steps

  1. 1Sign in as the owner, open "Administration" › "Staff & teams" and click a person with the Manager role.
  2. 2In the "Staff deep dive" panel, scroll to "Role & permissions" › "Extra permissions" — a list of Admin-tier permissions grouped by area (Customers, Billing, Channels, Integrations, KPI Arena, Settings…).
  3. 3Tick what you want to grant, for example "Connect / disconnect sales channels", "Change plan, add-ons, payment, seats", "Manage API keys & webhooks", "Delete customers" or "Pay cash rewards".
  4. 4Click "Save extra permissions".
Extra permissions block with permissions grouped by area, Connect / disconnect sales channels ticked, and the Save extra permissions button at the bottom
"Connect / disconnect sales channels" is ticked — click "Save extra permissions" to apply it.

Change a role, and who can act on whom

AdministrationStaff & teamsRole & permissions

Steps

  1. 1Click the employee. In the "Role & permissions" block of the "Staff deep dive" panel, pick the new role in the picker.
  2. 2Click "Save role" (it only becomes active once you have picked a different role).
  3. 3The owner can assign any role; Administrators can only assign Manager and the Worker-tier roles.
  4. 4Actions on an Administrator — changing their role, locking, offboarding — can only be done by the owner.
Staff deep dive panel, Role & permissions block with the new role Employee · Worker selected and the Save role button active
Pick the new role, then click "Save role".

16 / 4 features

Data import & sales channel connections

Bring customers, orders and to-dos into the system — from an Excel file, or by connecting Shopee, Lazada, Zalo OA and Facebook Pages directly.

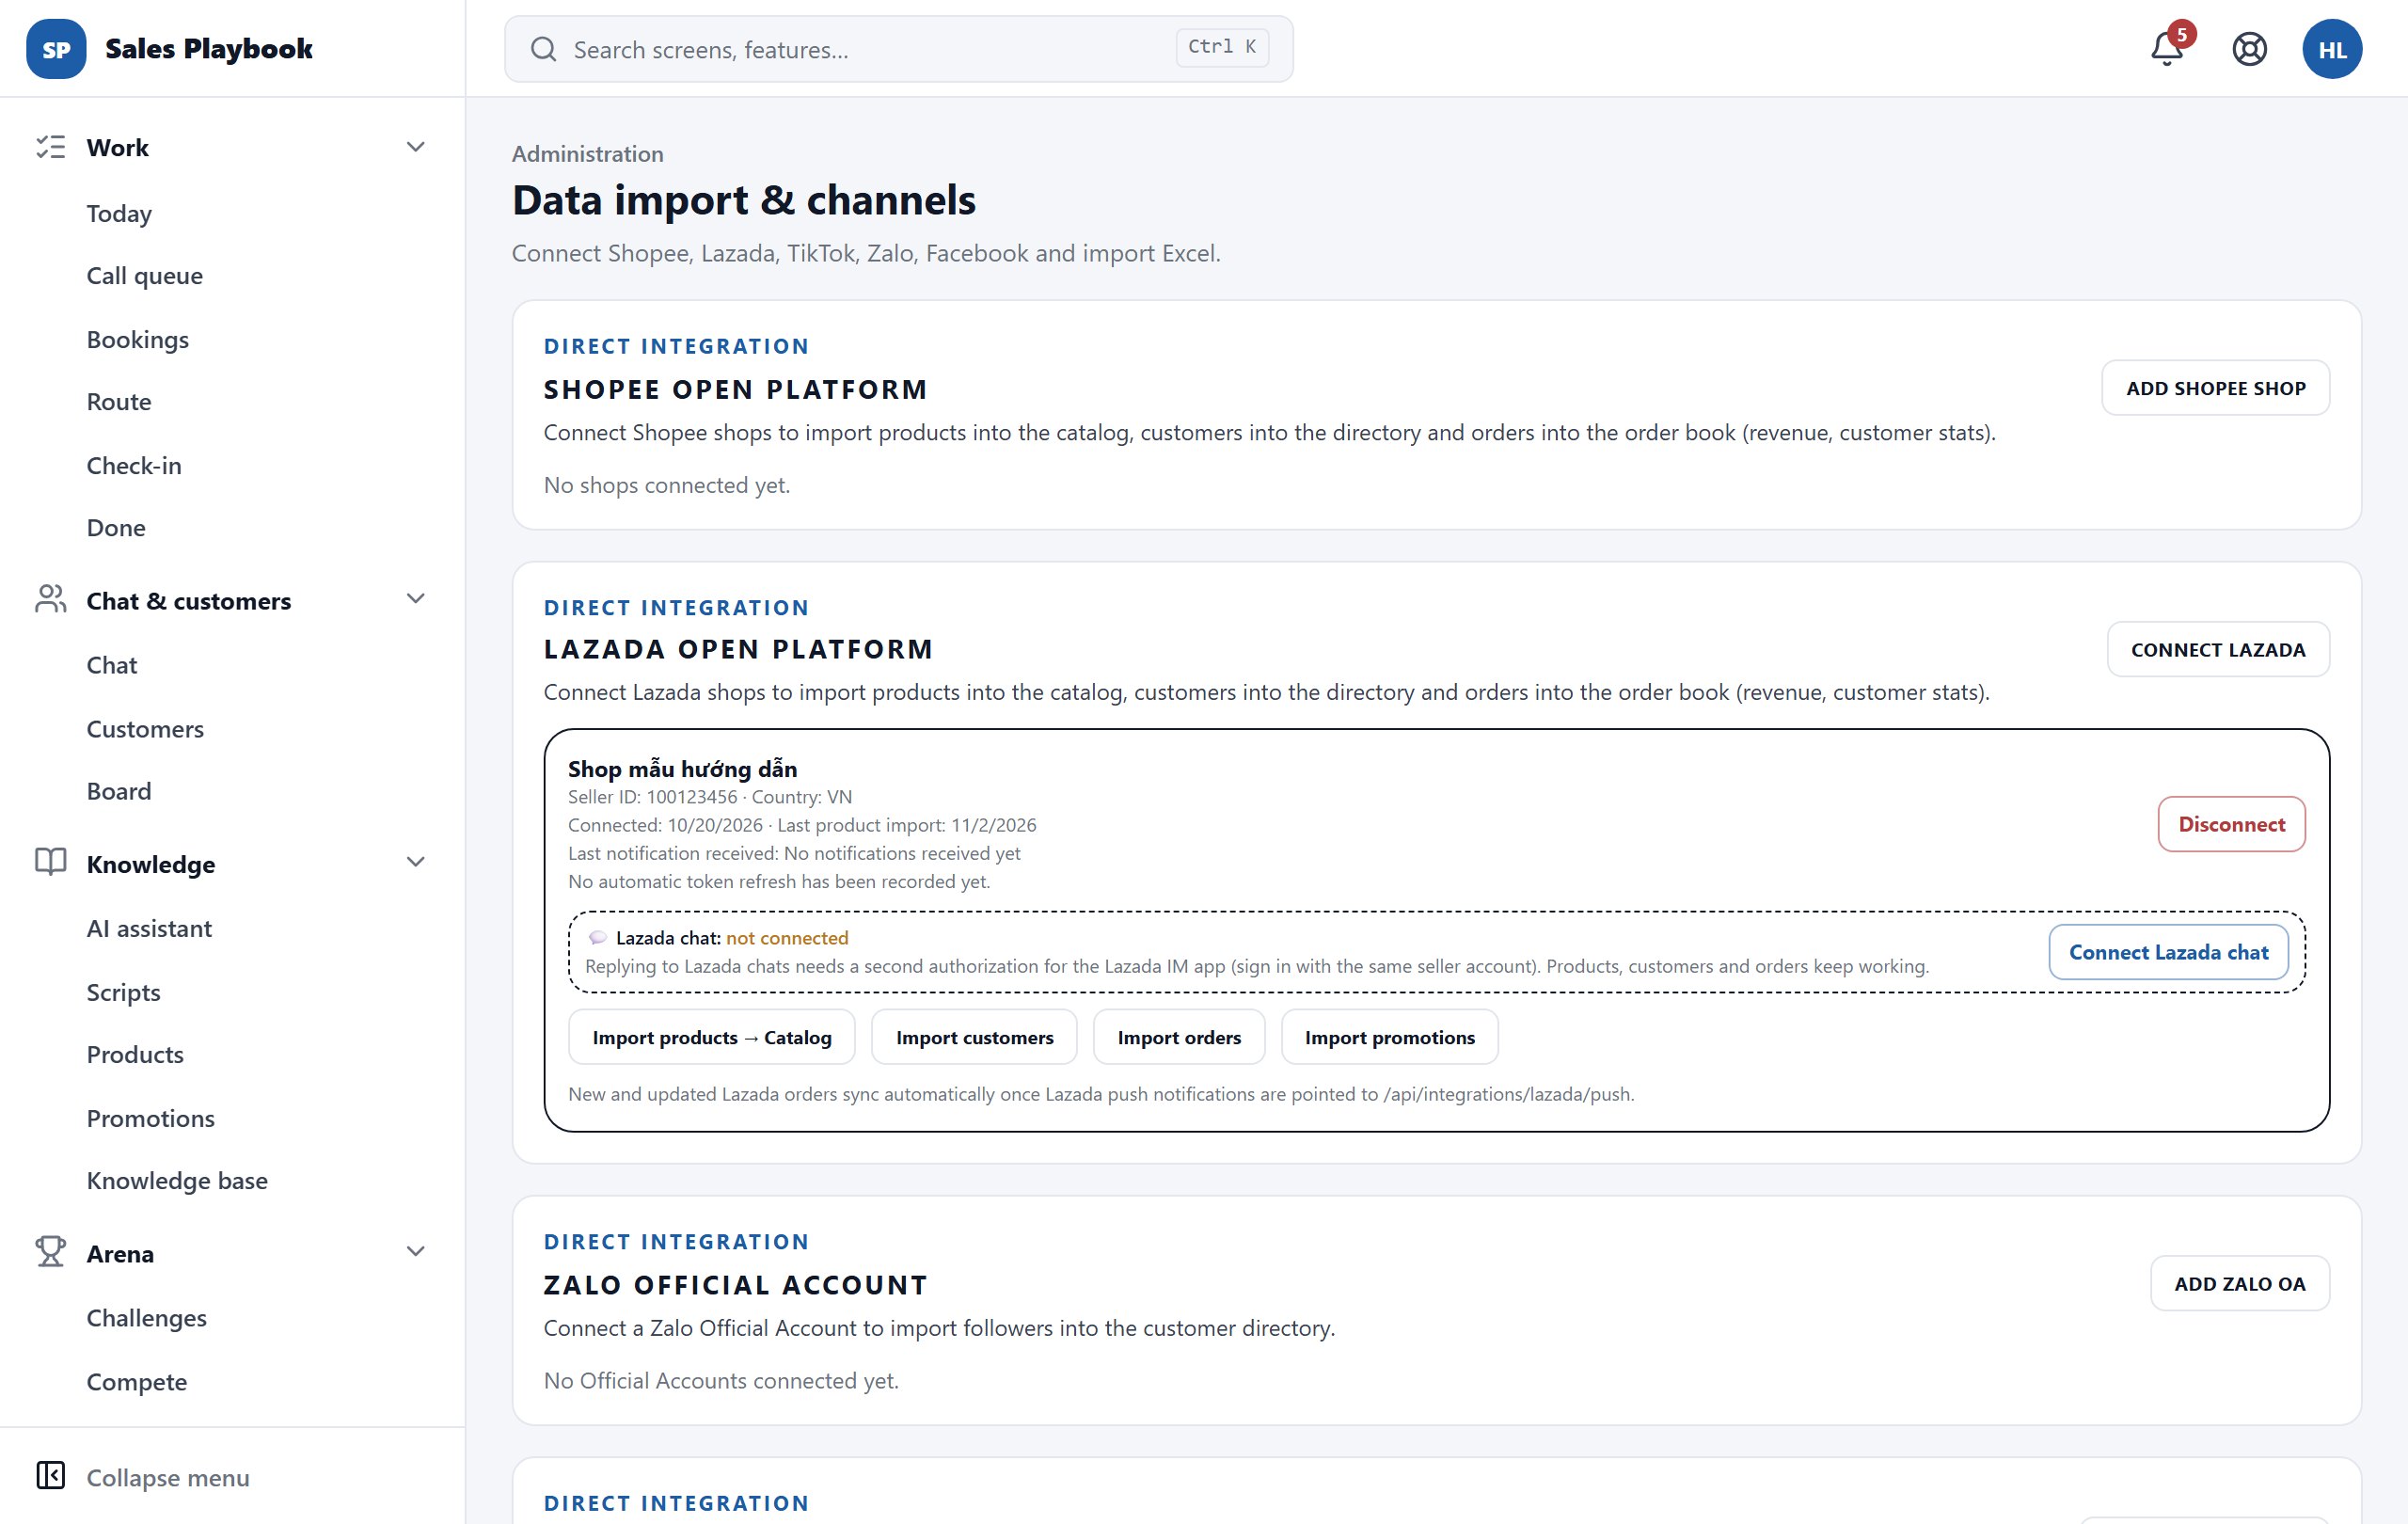
Connect Shopee, Lazada, Zalo OA and Facebook Pages

AdministrationData import & channels

Steps

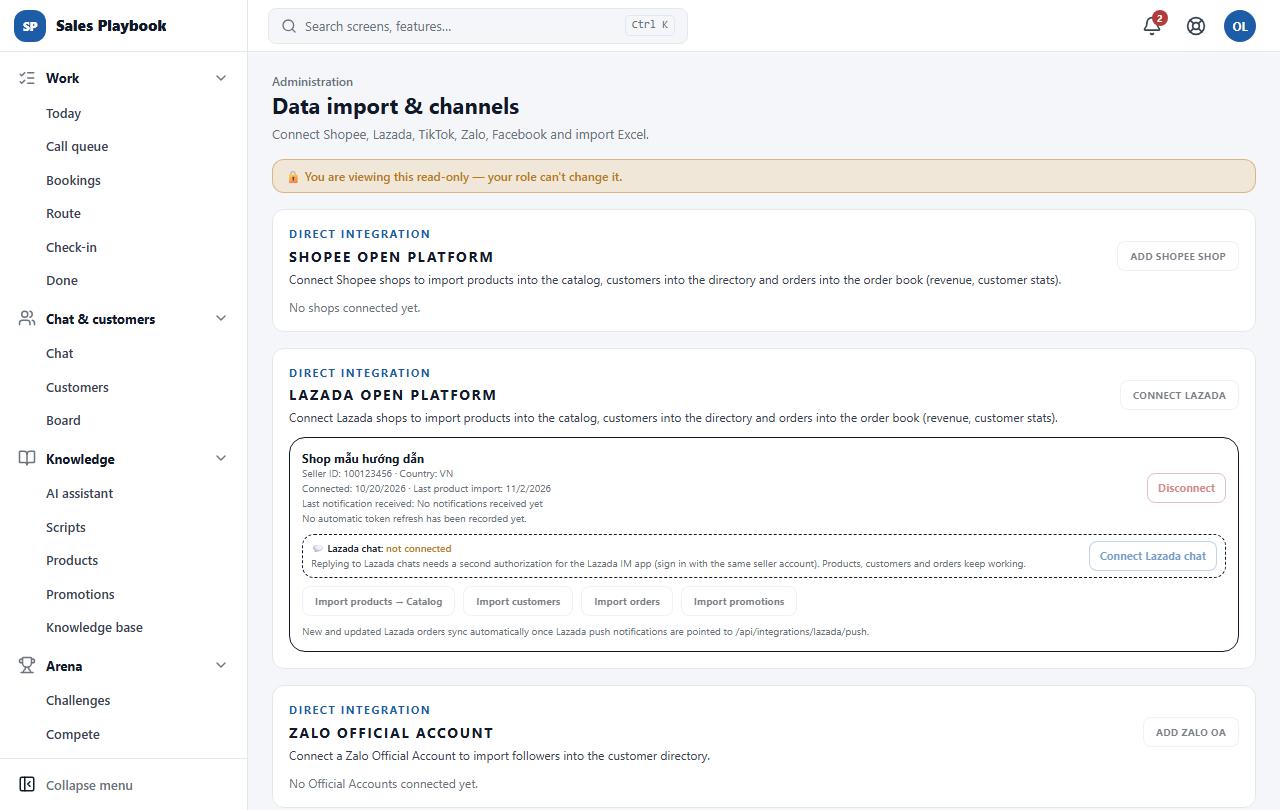
  1. 1Open "Administration" › "Data import & channels". Each channel has its own "Direct integration" card.
  2. 2Shopee: click "Add Shopee shop", sign in with the seller account and grant access; you come back to this page. The shop card has "Import products → Catalog", "Import customers", "Import orders" and "Import promotions".
  3. 3Lazada: click "Connect Lazada" and do the same; the shop card has the same four import buttons. See also Connect Lazada chat.
  4. 4Zalo: click "Add Zalo OA", grant access, then use "Import followers".
  5. 5Facebook: click "Add Facebook Page" and pick the Page to use; Messenger messages arrive in the Chat hub. "Refresh customer profiles" only updates the names of people who have already messaged the Page.
  6. 6When a token expires, the card shows "Token expired — reconnect to refresh": click "Reconnect". To stop for good, click "Disconnect".
Data import & channels page with the Shopee Open Platform, Lazada Open Platform and Zalo Official Account cards, each with its connect button on the right
Each channel's connect button sits in the top-right corner of its card. The Lazada shop shown is sample data.

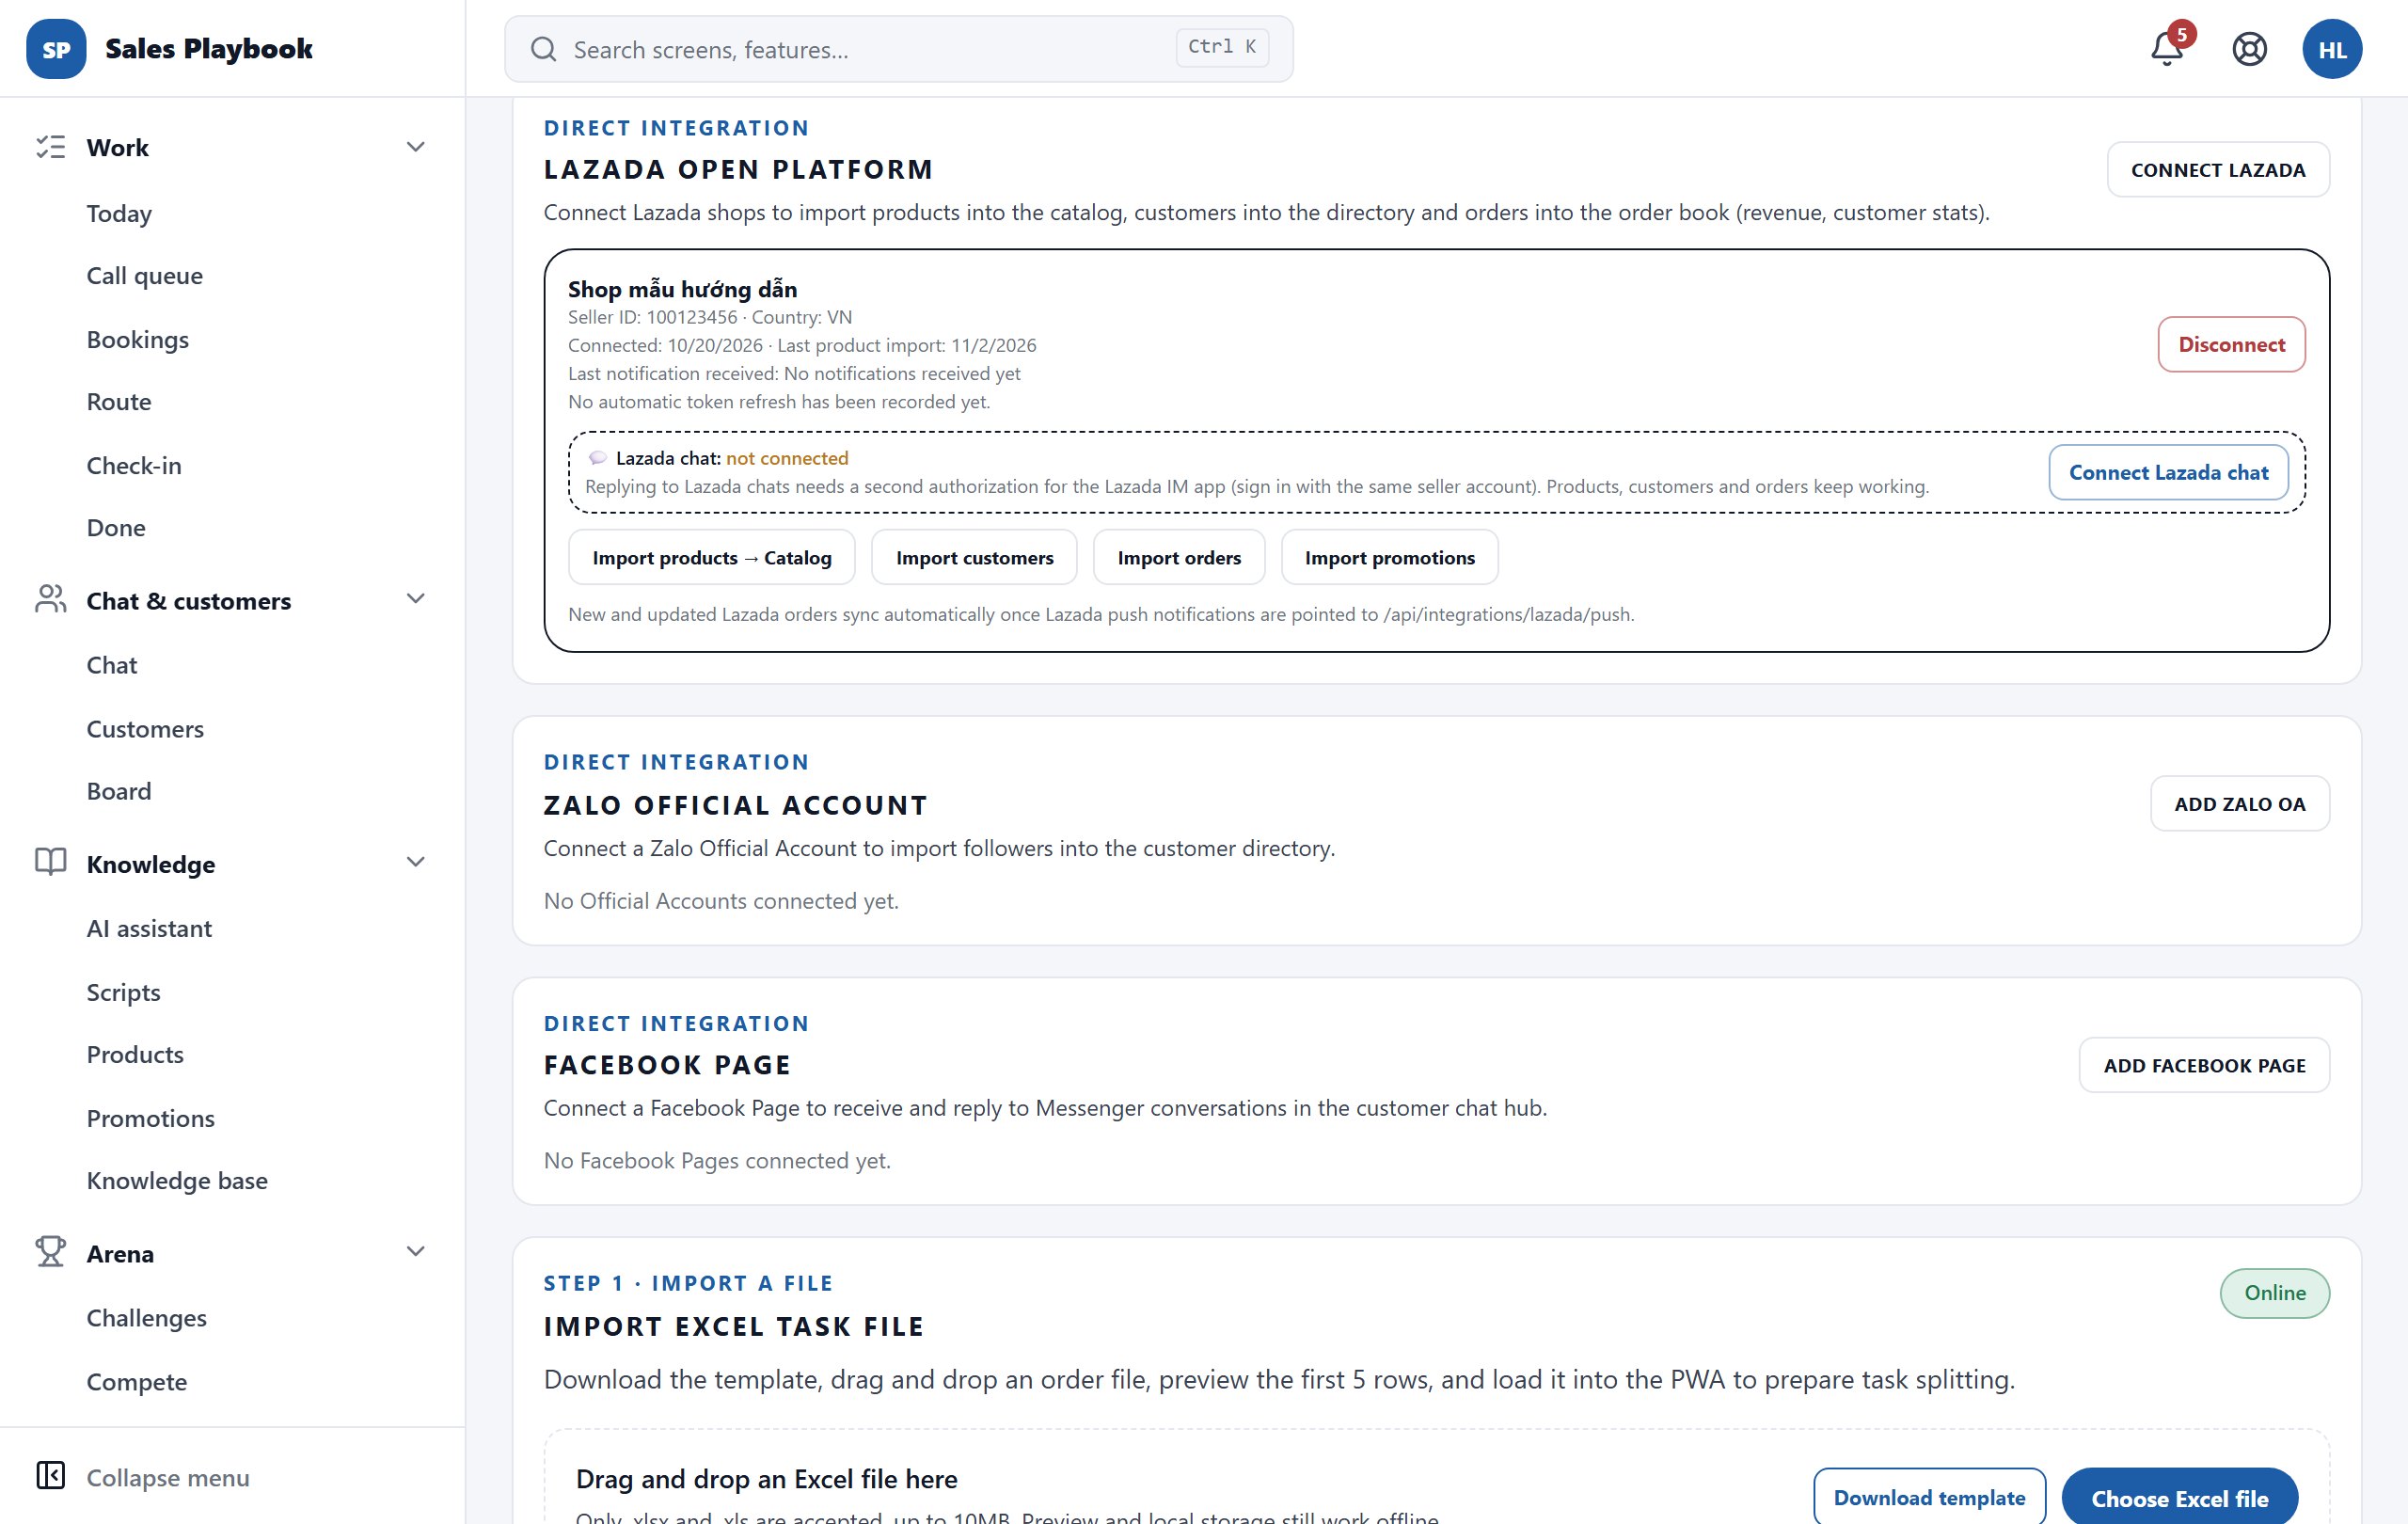
Connect Lazada chat (second authorization)

AdministrationData import & channelsLazada Open Platform

Steps

  1. 1Connect the shop with "Connect Lazada" as usual.
  2. 2On the shop card, check the "💬 Lazada chat" line: "connected", "not connected" or "expired".
  3. 3If it is not connected, click "Connect Lazada chat", sign in again with the same seller account you used in step 1 and accept.
  4. 4When the status is "expired", click "Reconnect chat"; to stop replying to Lazada chats from the system, click "Disconnect chat".
Sample Lazada shop card with the line Lazada chat: not connected, the Connect Lazada chat button and the Import products, Import customers, Import orders, Import promotions buttons
The "💬 Lazada chat: not connected" line with its "Connect Lazada chat" button. The shop shown is sample data.

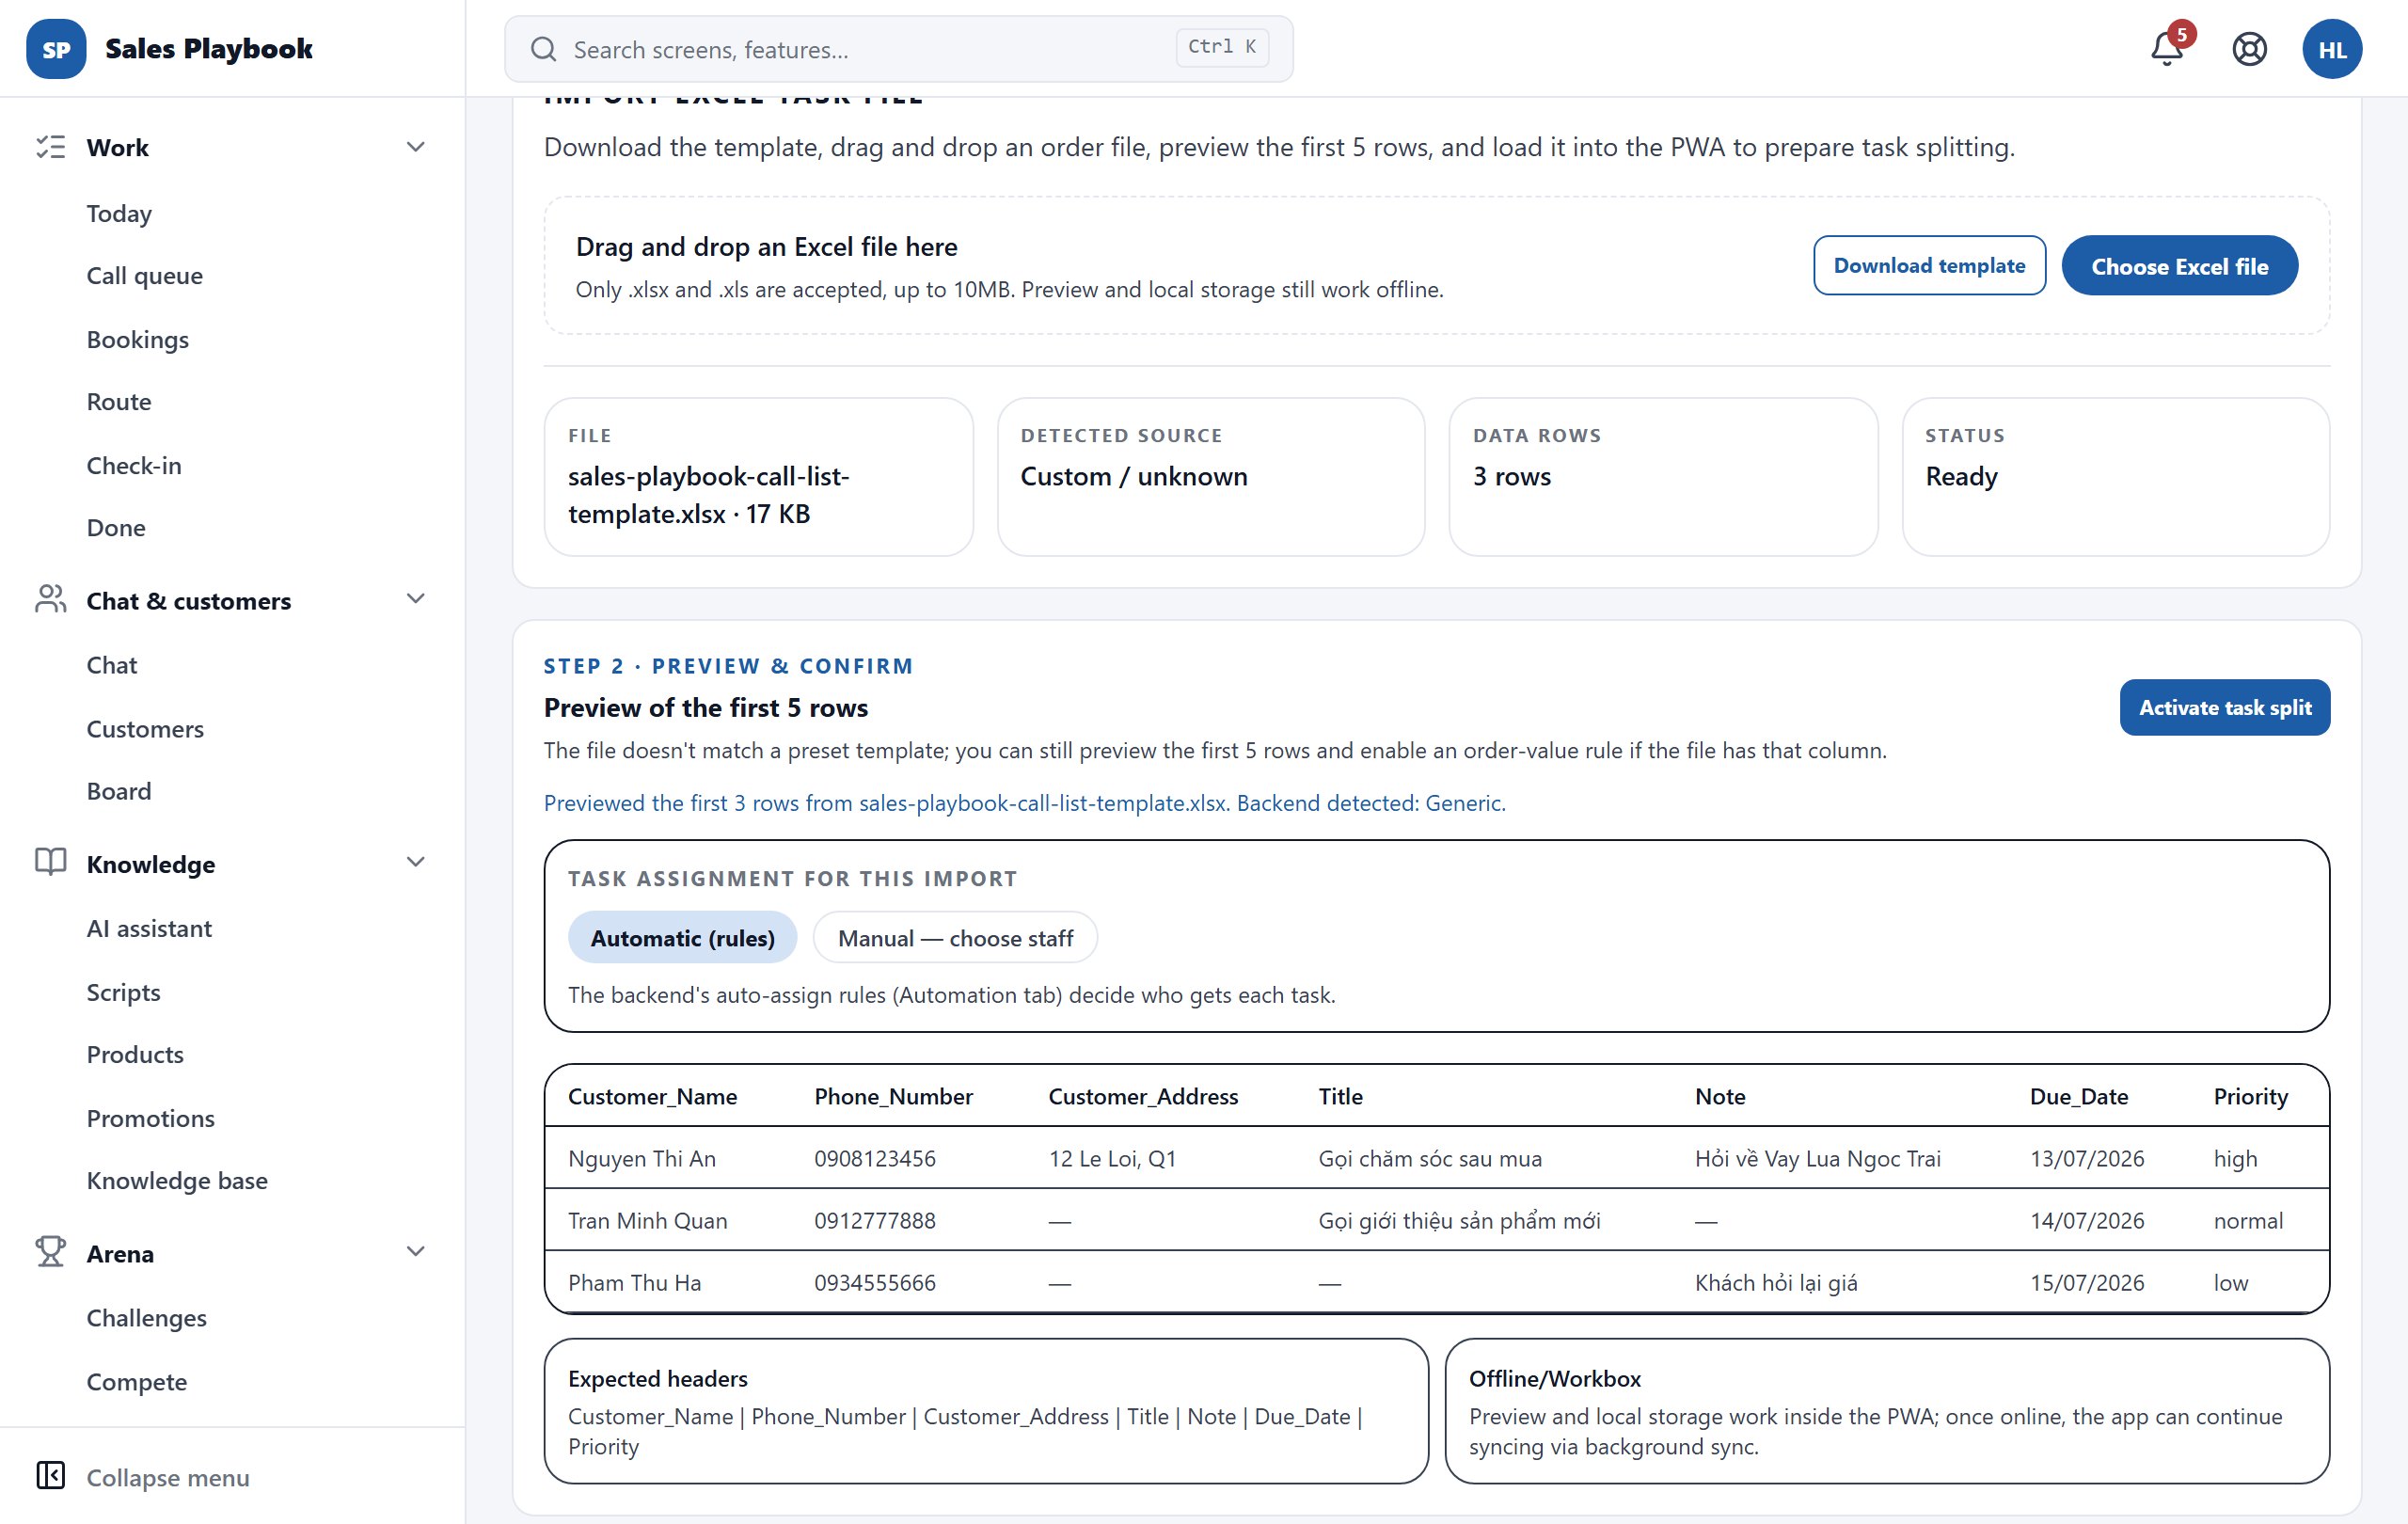
Import an Excel file to create tasks

AdministrationData import & channelsImport Excel task file

Steps

  1. 1In "Step 1 · Import a file", click "Download template" to get the right format (or use a file exported from a marketplace).
  2. 2Drag the file onto "Drag and drop an Excel file here", or click "Choose Excel file". The "Detected source" box shows which format the system recognized, and "Data rows" the number of rows.
  3. 3In "Step 2 · Preview & confirm", check the preview of the first rows against "Expected headers".
  4. 4In "Task assignment for this import", choose "Automatic (rules)" (uses your assignment rules) or "Manual — choose staff".
  5. 5Click "Activate task split".
Import Excel task file after choosing the template: file name, detected source, 3 data rows, status Ready, the preview table and the Activate task split button
After choosing a file: check "Detected source" and "Data rows", then review the preview in Step 2.

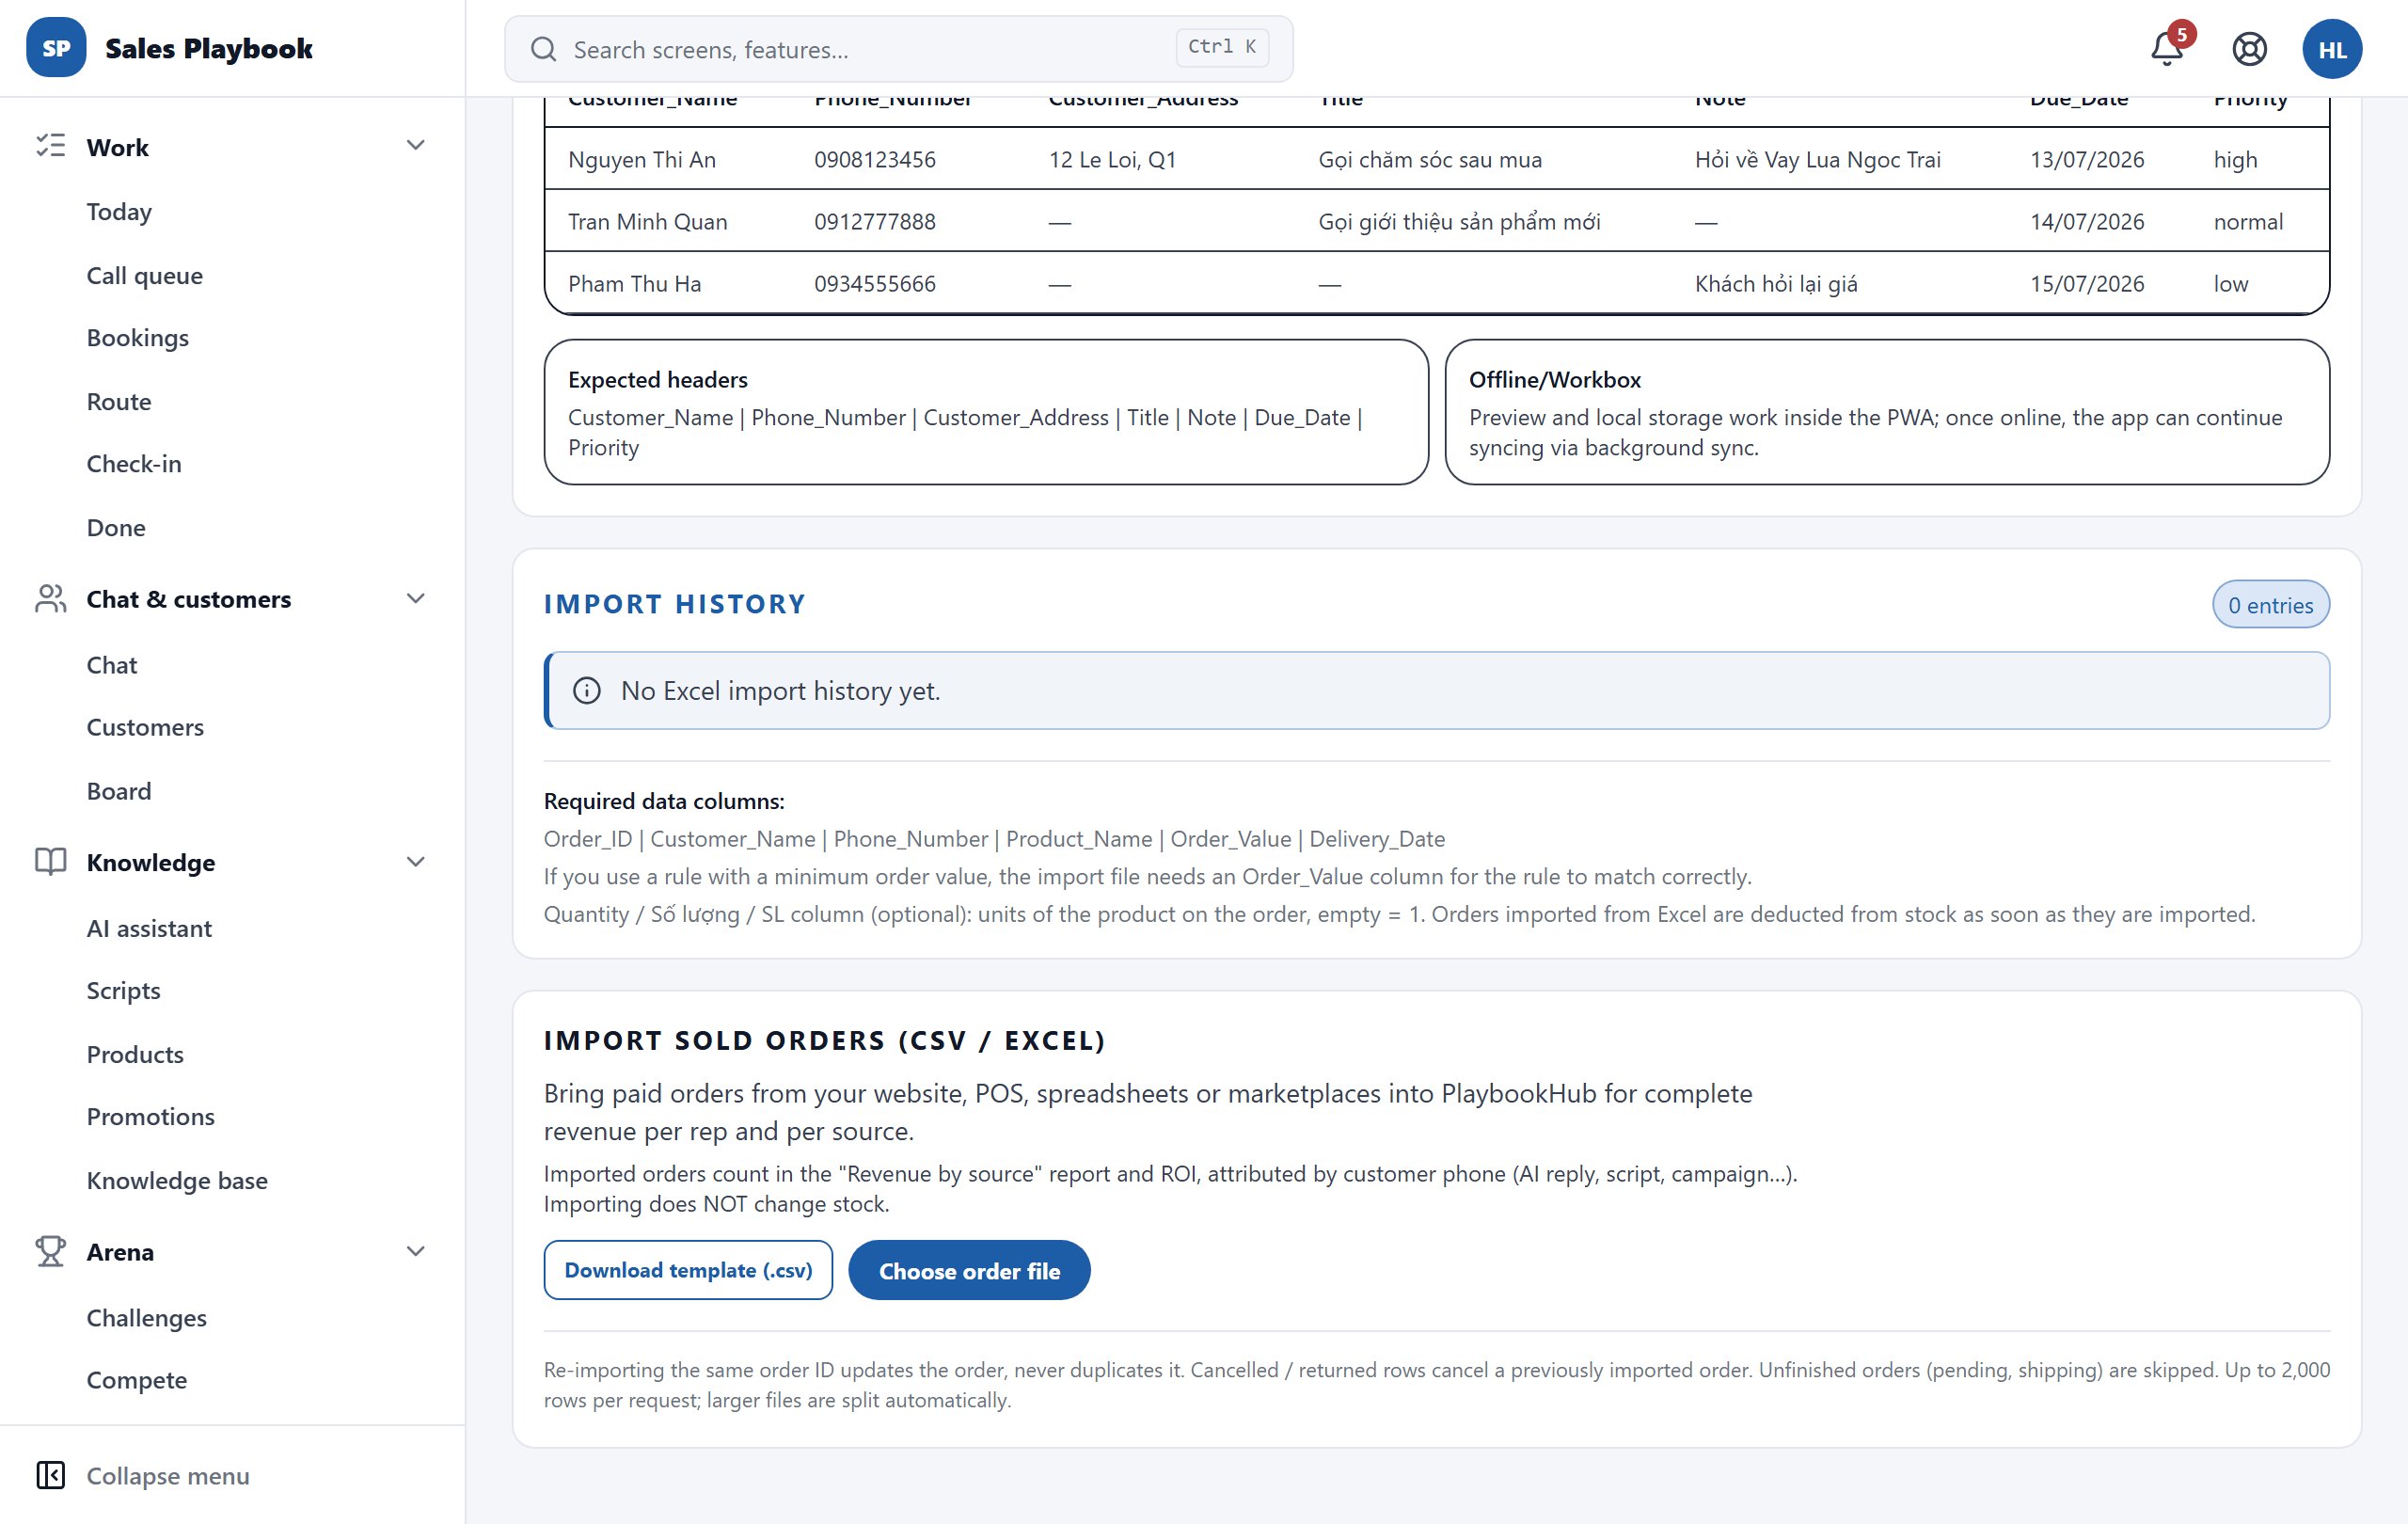
Import sold orders (CSV / Excel)

AdministrationData import & channelsImport sold orders (CSV / Excel)

Steps

  1. 1Scroll down to the "Import sold orders (CSV / Excel)" card.
  2. 2Click "Download template (.csv)" to get the right columns, and fill in your orders.
  3. 3Click "Choose order file" and select the file.
  4. 4Read the import result shown right in the card.
Import sold orders (CSV / Excel) card with the Download template (.csv) and Choose order file buttons
The two buttons in the card: download the template and choose the order file.

17 / 4 features

Scripts: library, draft review, composer and AI tone

Where managers build the team's library of reply scripts: see how each script performs, review replies suggested by staff and AI, write new scripts and set the tone the AI assistant writes in.

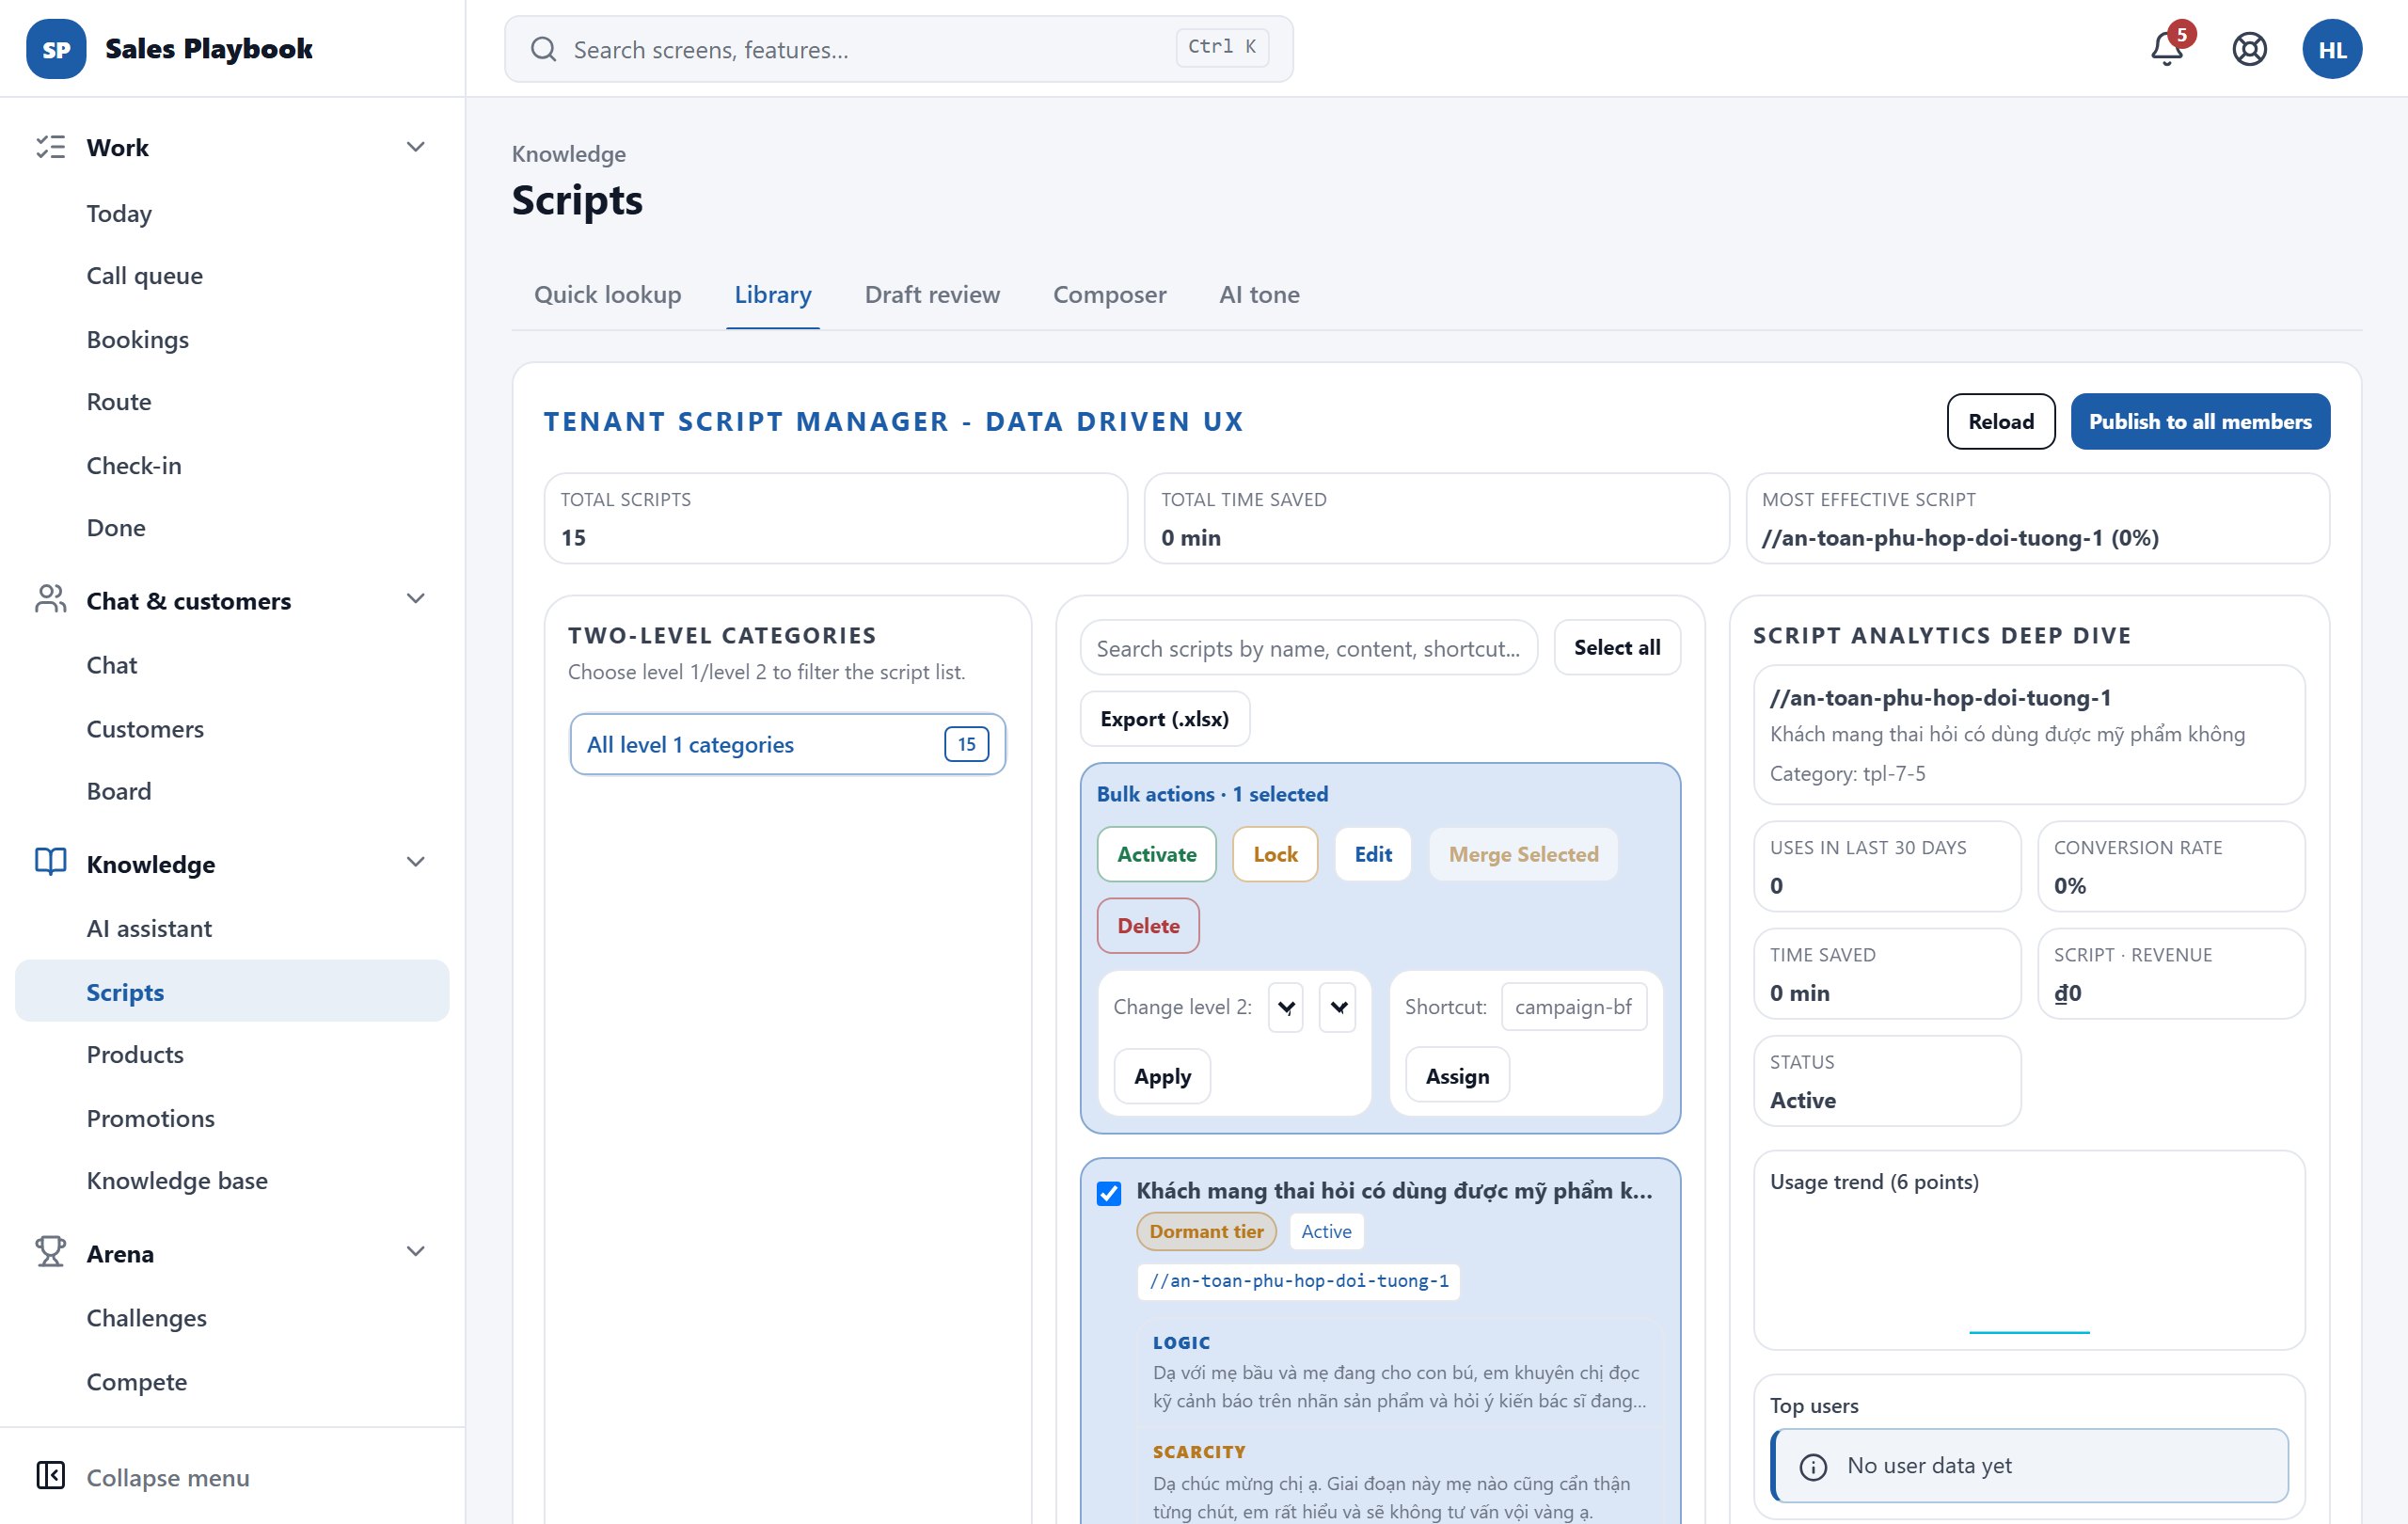
Manage the script library and publish it to the team

KnowledgeScriptsLibrary

Steps

  1. 1Open "Scripts" → "Library" tab. The top row shows "Total scripts", "Total time saved" and "Most effective script".
  2. 2Filter in the "Two-level categories" column (pick level 1, then level 2) or type in "Search scripts by name, content, shortcut...".
  3. 3Click a script to see the "Script Analytics Deep Dive" column: uses in the last 30 days, conversion rate, time saved, status, usage trend, top users and duplicate-content warnings.
  4. 4Tick the checkbox on one or more scripts (or "Select all") to show the "Bulk actions" block: "Activate", "Lock", "Edit" (exactly one script — opens it in the Composer tab), "Merge Selected", "Delete", "Change level 2:" + "Apply", or enter a "Shortcut:" and click "Assign".
  5. 5Click "Export (.xlsx)" to download the script list to Excel.
  6. 6When you are done, click "Publish to all members" to push the latest scripts to your staff's devices.
Scripts Library tab: two-level category tree on the left, one script ticked with the Bulk actions block, Script Analytics Deep Dive column on the right
Tick scripts to show "Bulk actions"; the right column shows the selected script's performance.

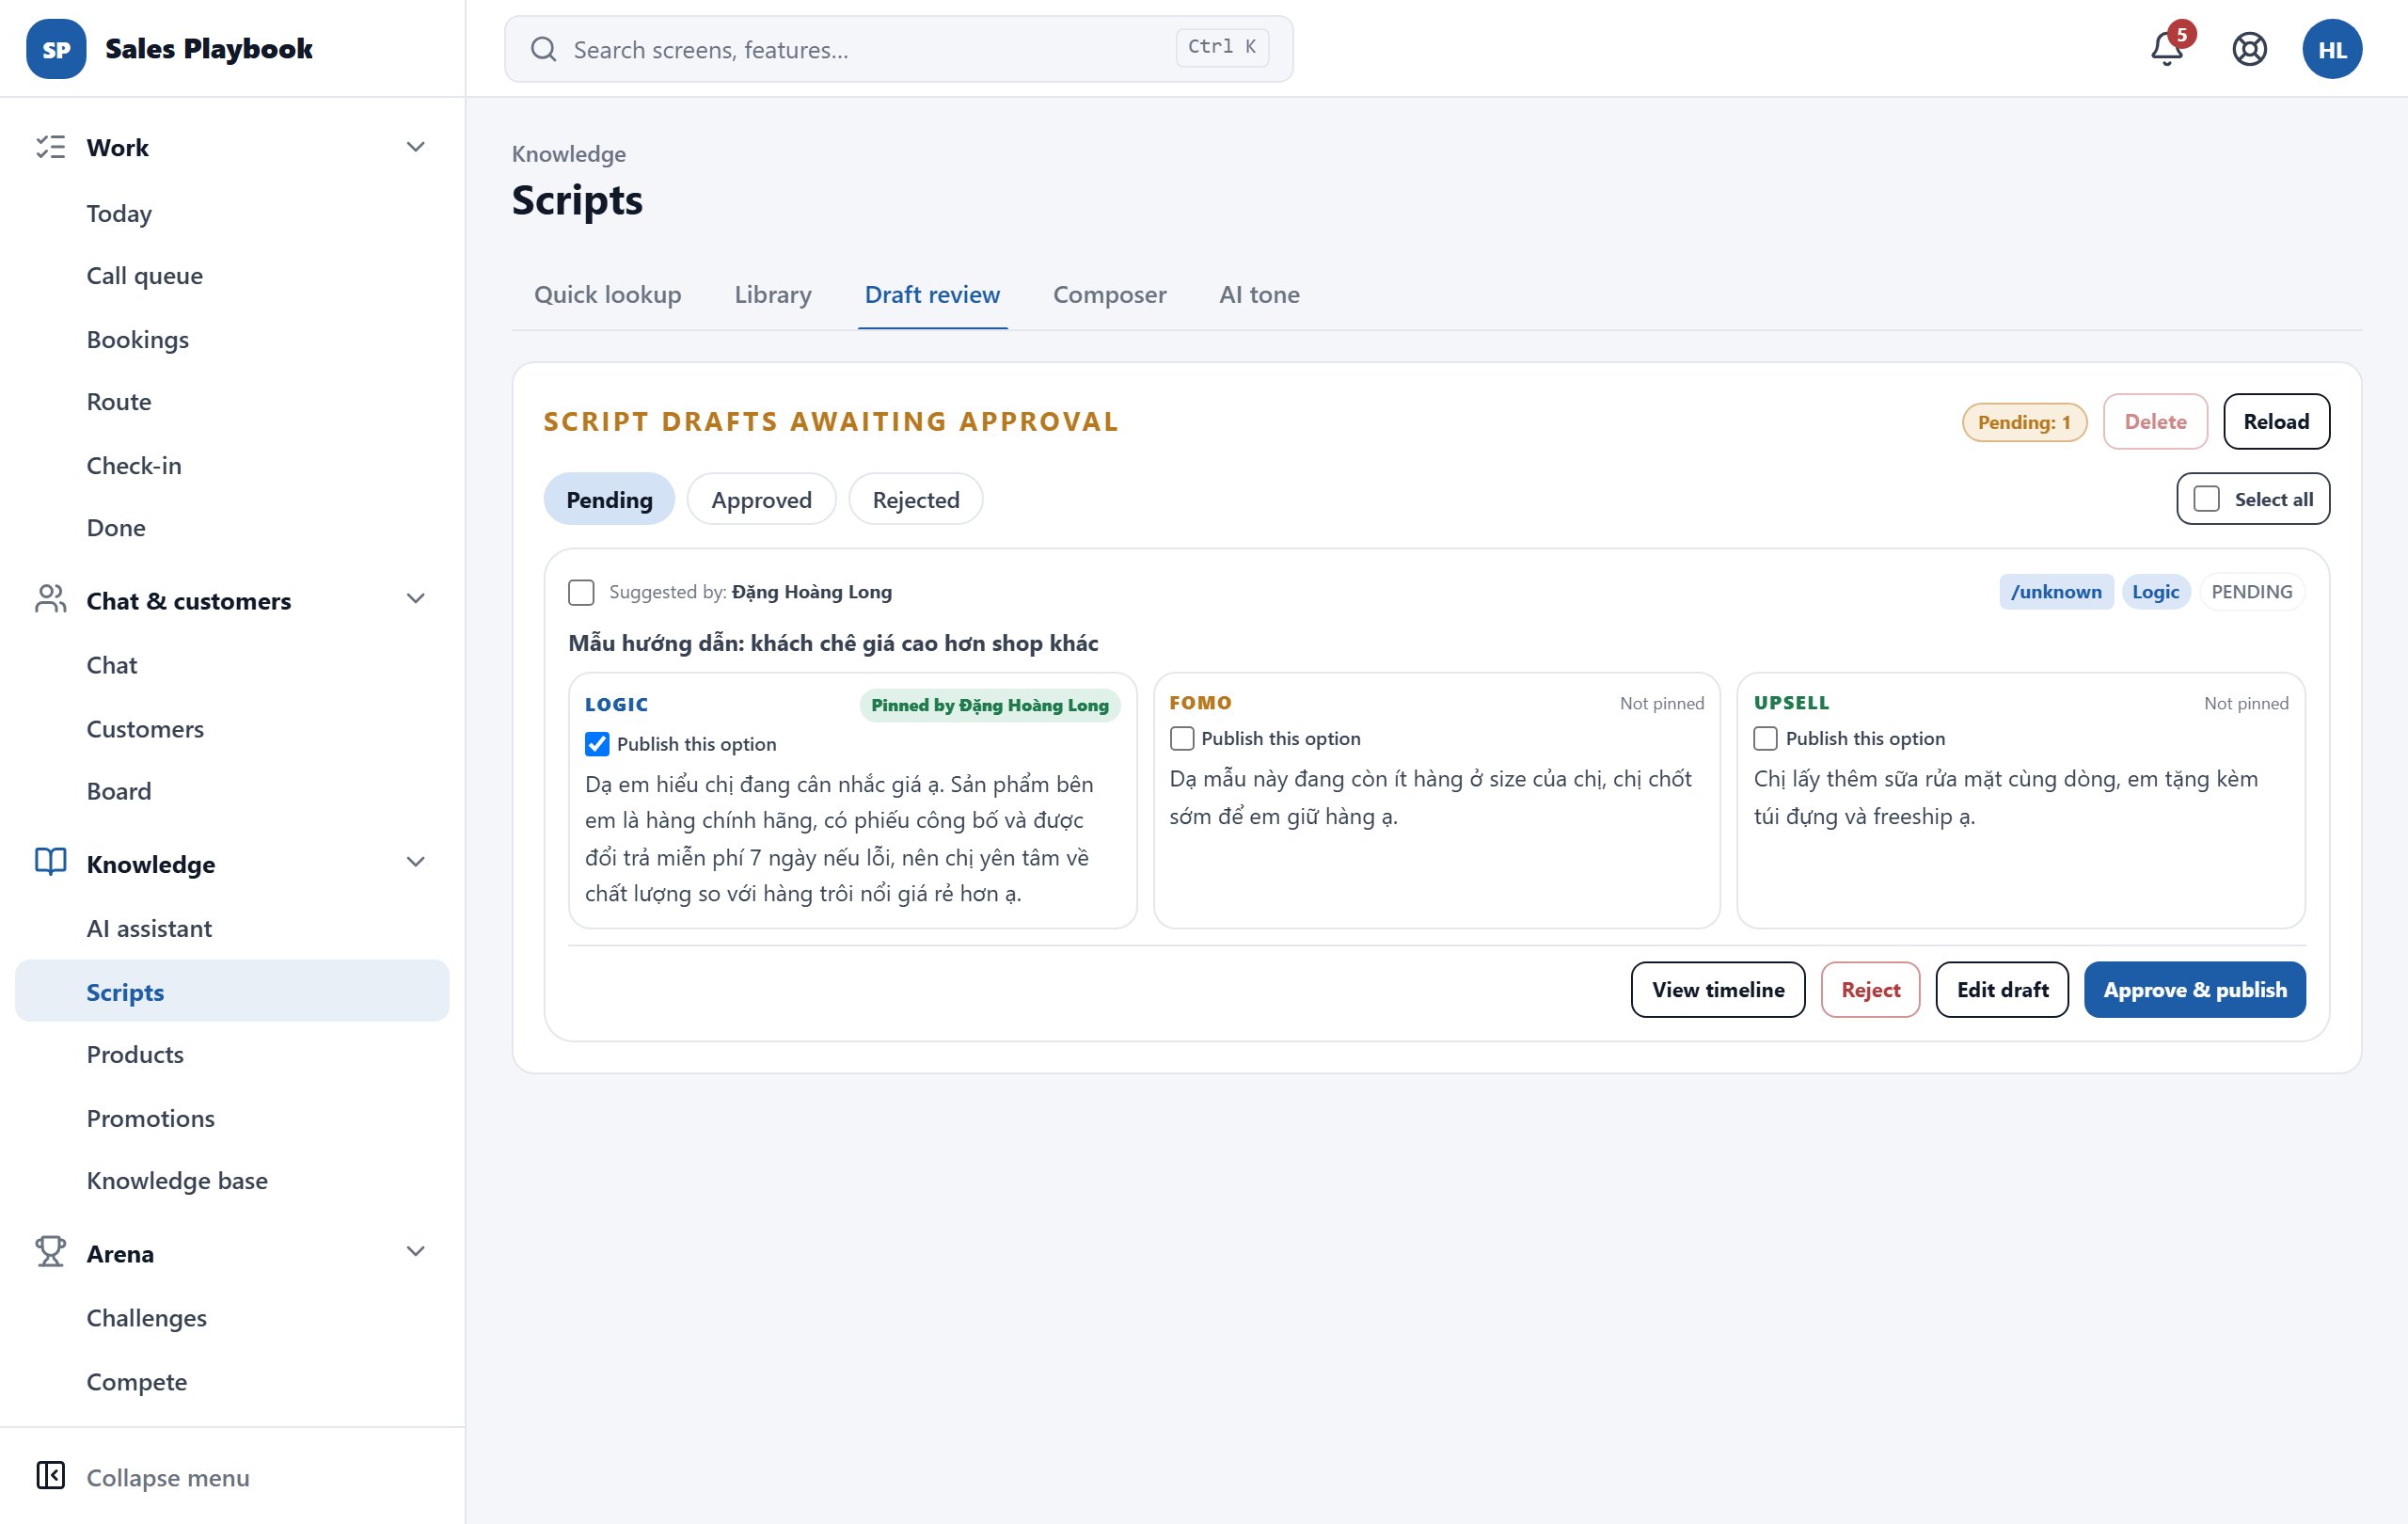
Review script drafts suggested by AI and staff

KnowledgeScriptsDraft review

Steps

  1. 1Open "Scripts" → "Draft review" tab. The "Pending: …" badge shows how many drafts are waiting; the "Pending", "Approved" and "Rejected" filters are below it.
  2. 2Each draft shows "Suggested by:", its level-2 category and three options: "Logic", "FOMO" and "Upsell". Options a rep pinned are labelled "Pinned by …".
  3. 3Tick "Publish this option" on the options you want in the official script.
  4. 4To reword it, click "Edit draft", make your changes and click "Save edit" (the draft stays pending).
  5. 5Click "Approve & publish" to add it to the library, or "Reject" to drop it. When the system warns that the content duplicates an existing script, a "Merge" button also appears to replace the old script's content with this draft.
  6. 6Click "View timeline" to see the draft's history of suggestions, edits and approval. To clean up the list, tick drafts and click "Delete".
Draft review tab: one pending sample draft with three options, the Logic option pinned, and the View timeline, Reject, Edit draft and Approve & publish buttons
Tick "Publish this option" on the options to keep, then click "Approve & publish".

Write a new script with AI or by hand

KnowledgeScriptsComposer

Steps

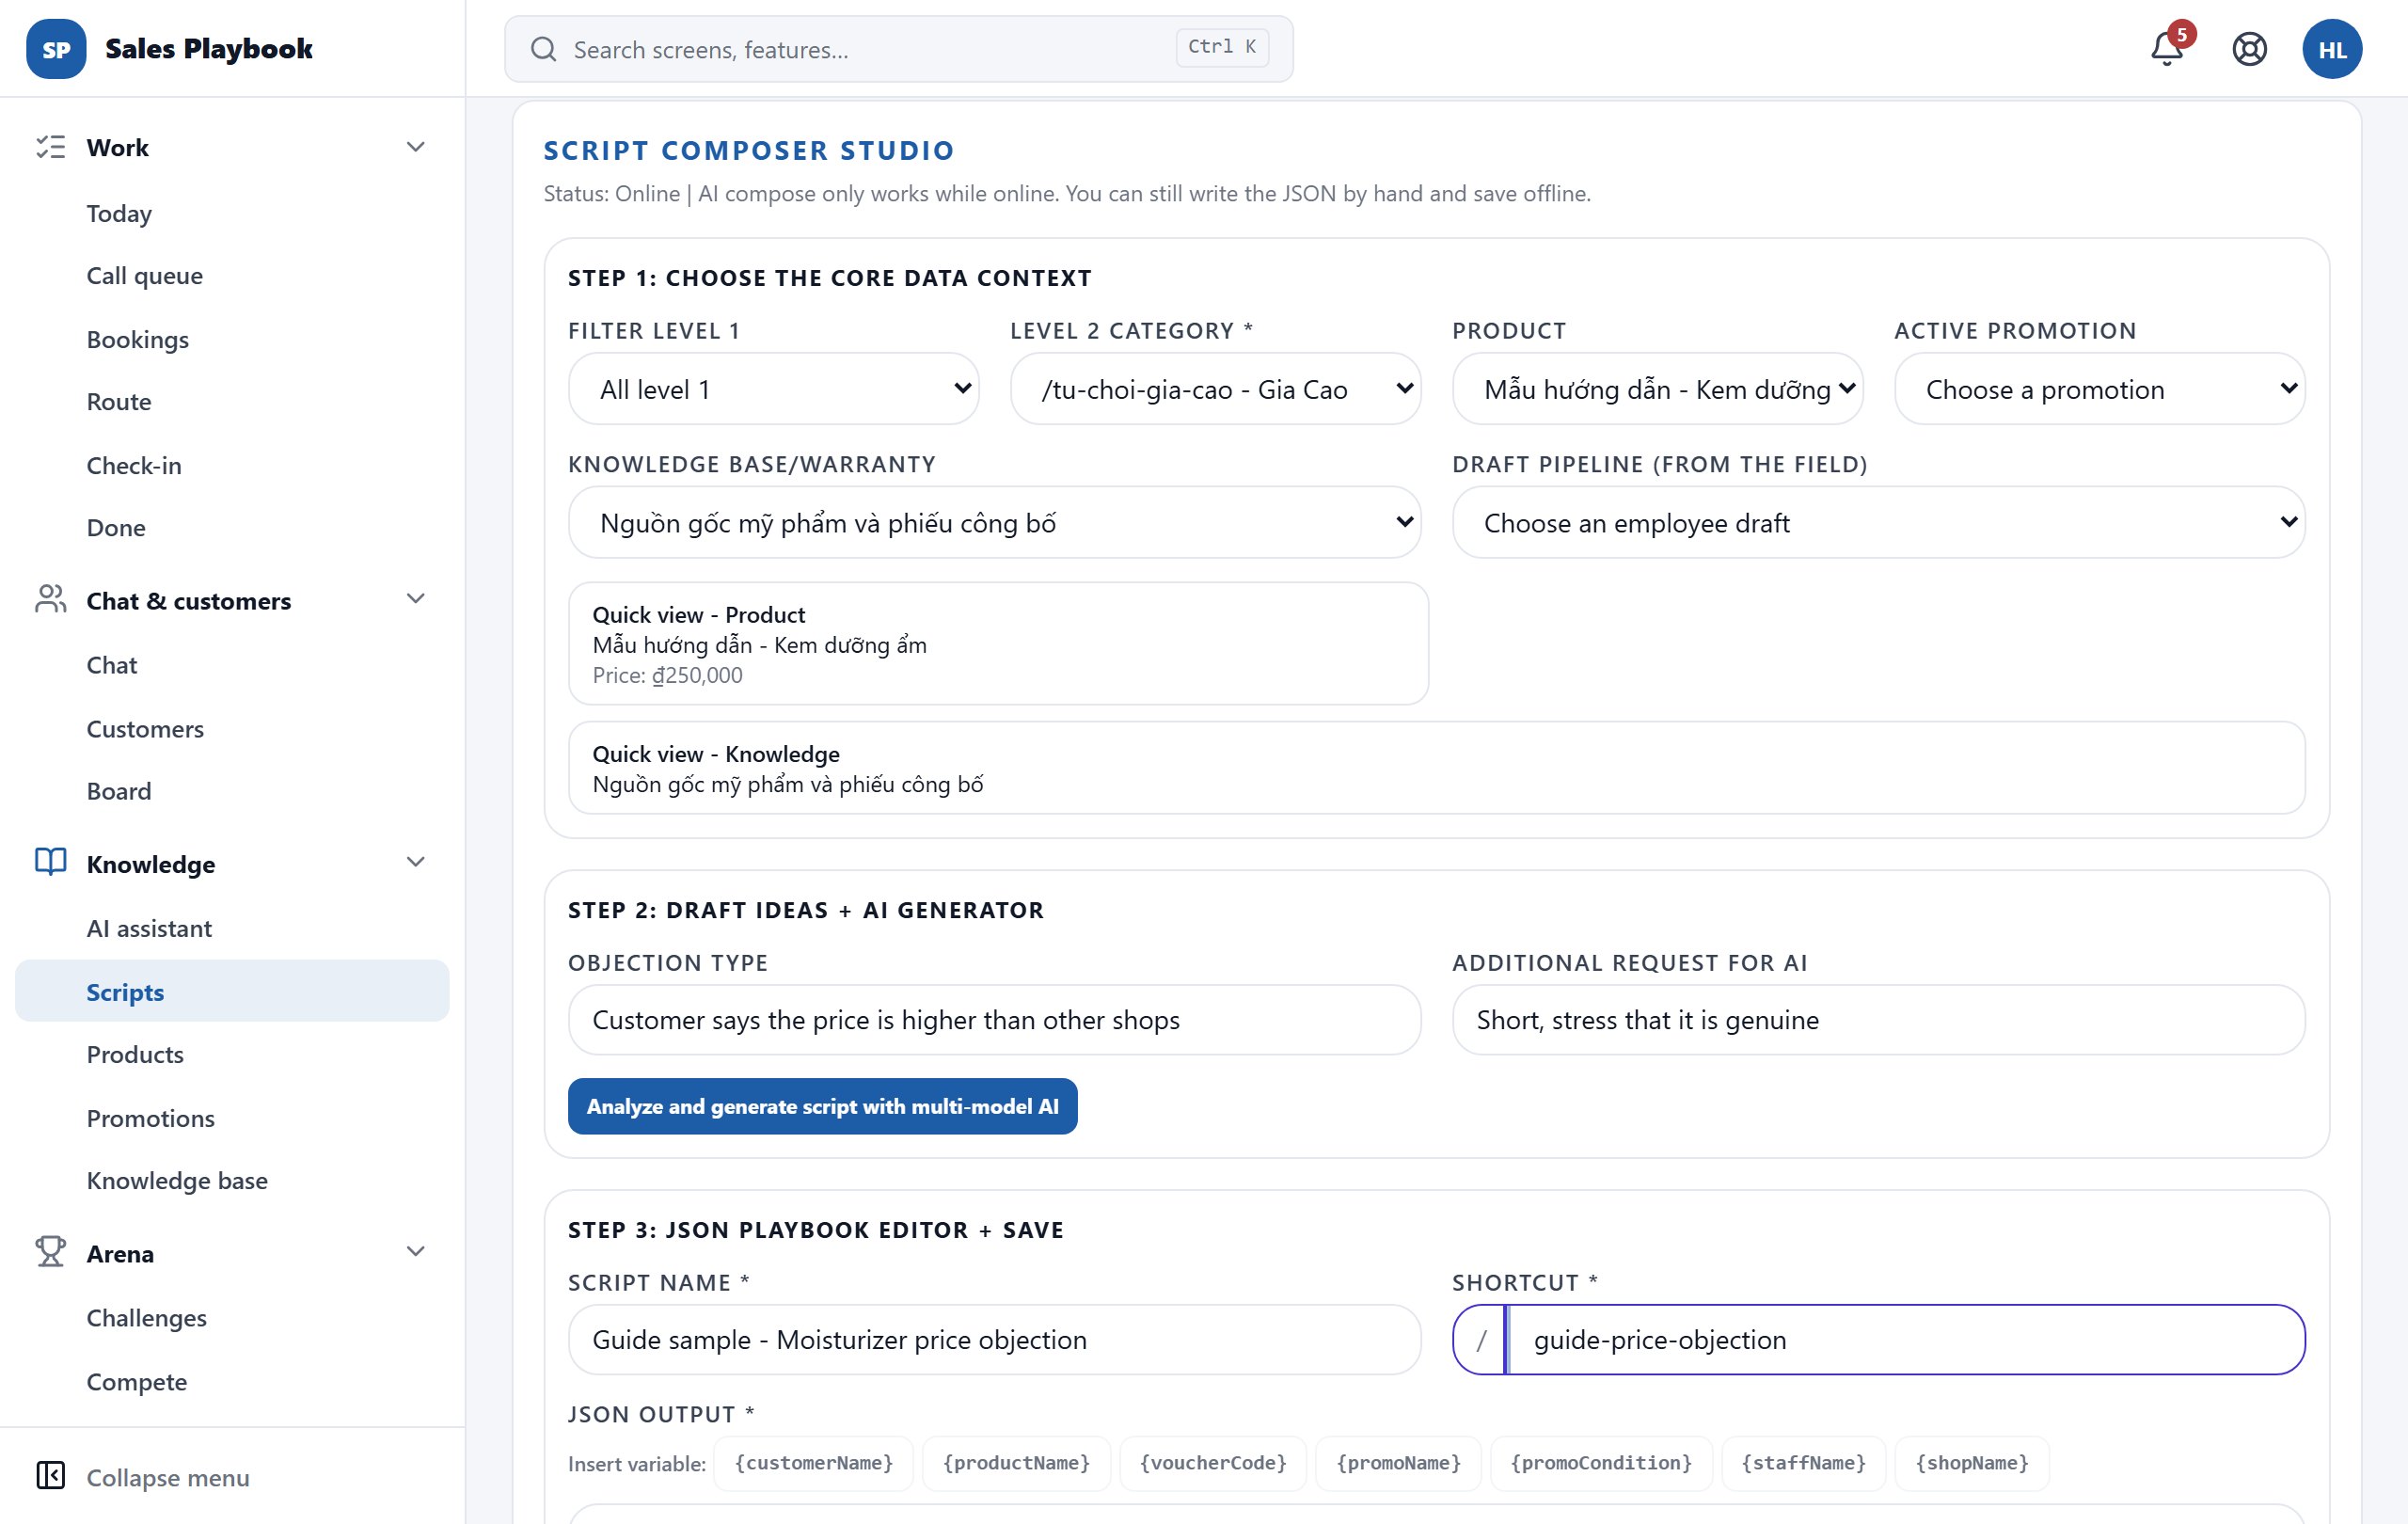
  1. 1Open "Scripts" → "Composer" tab ("Script Composer Studio").
  2. 2"Step 1: Choose the core data context": choose a "Level 2 category *" (you can "Filter level 1" first); optionally add a "Product", an "Active promotion", a "Knowledge base/Warranty" article and a draft from "Draft pipeline (from the field)". Your choices are summarised in the "Quick view" boxes.
  3. 3"Step 2": enter the "Objection type" (type it or pick a suggestion) and an "Additional request for AI" (for example short, quick close), then click "Analyze and generate script with multi-model AI".
  4. 4"Step 3": set the "Script name *" and "Shortcut *" (at least 3 characters, only a-z, 0-9, - and _, and unique). Review and edit the text in "JSON output *"; click the variables after "Insert variable:" such as {customerName}, {productName}, {voucherCode} to insert placeholders that fill in automatically.
  5. 5Click "Save and push to employee devices". When you are editing a script opened from the Library, the button reads "Update script"; click "Cancel editing" to discard.
  6. 6Click "Clear form to start a new one" to write the next script.
Script Composer Studio: Step 1 with a category, the sample product and a knowledge article selected; Step 2 with the objection type filled in; Step 3 with a script name and shortcut
Pick the context in Step 1, let AI write in Step 2, set a name and shortcut in Step 3, then save.

Set the tone of the shop's AI assistant

KnowledgeScriptsAI tone

Steps

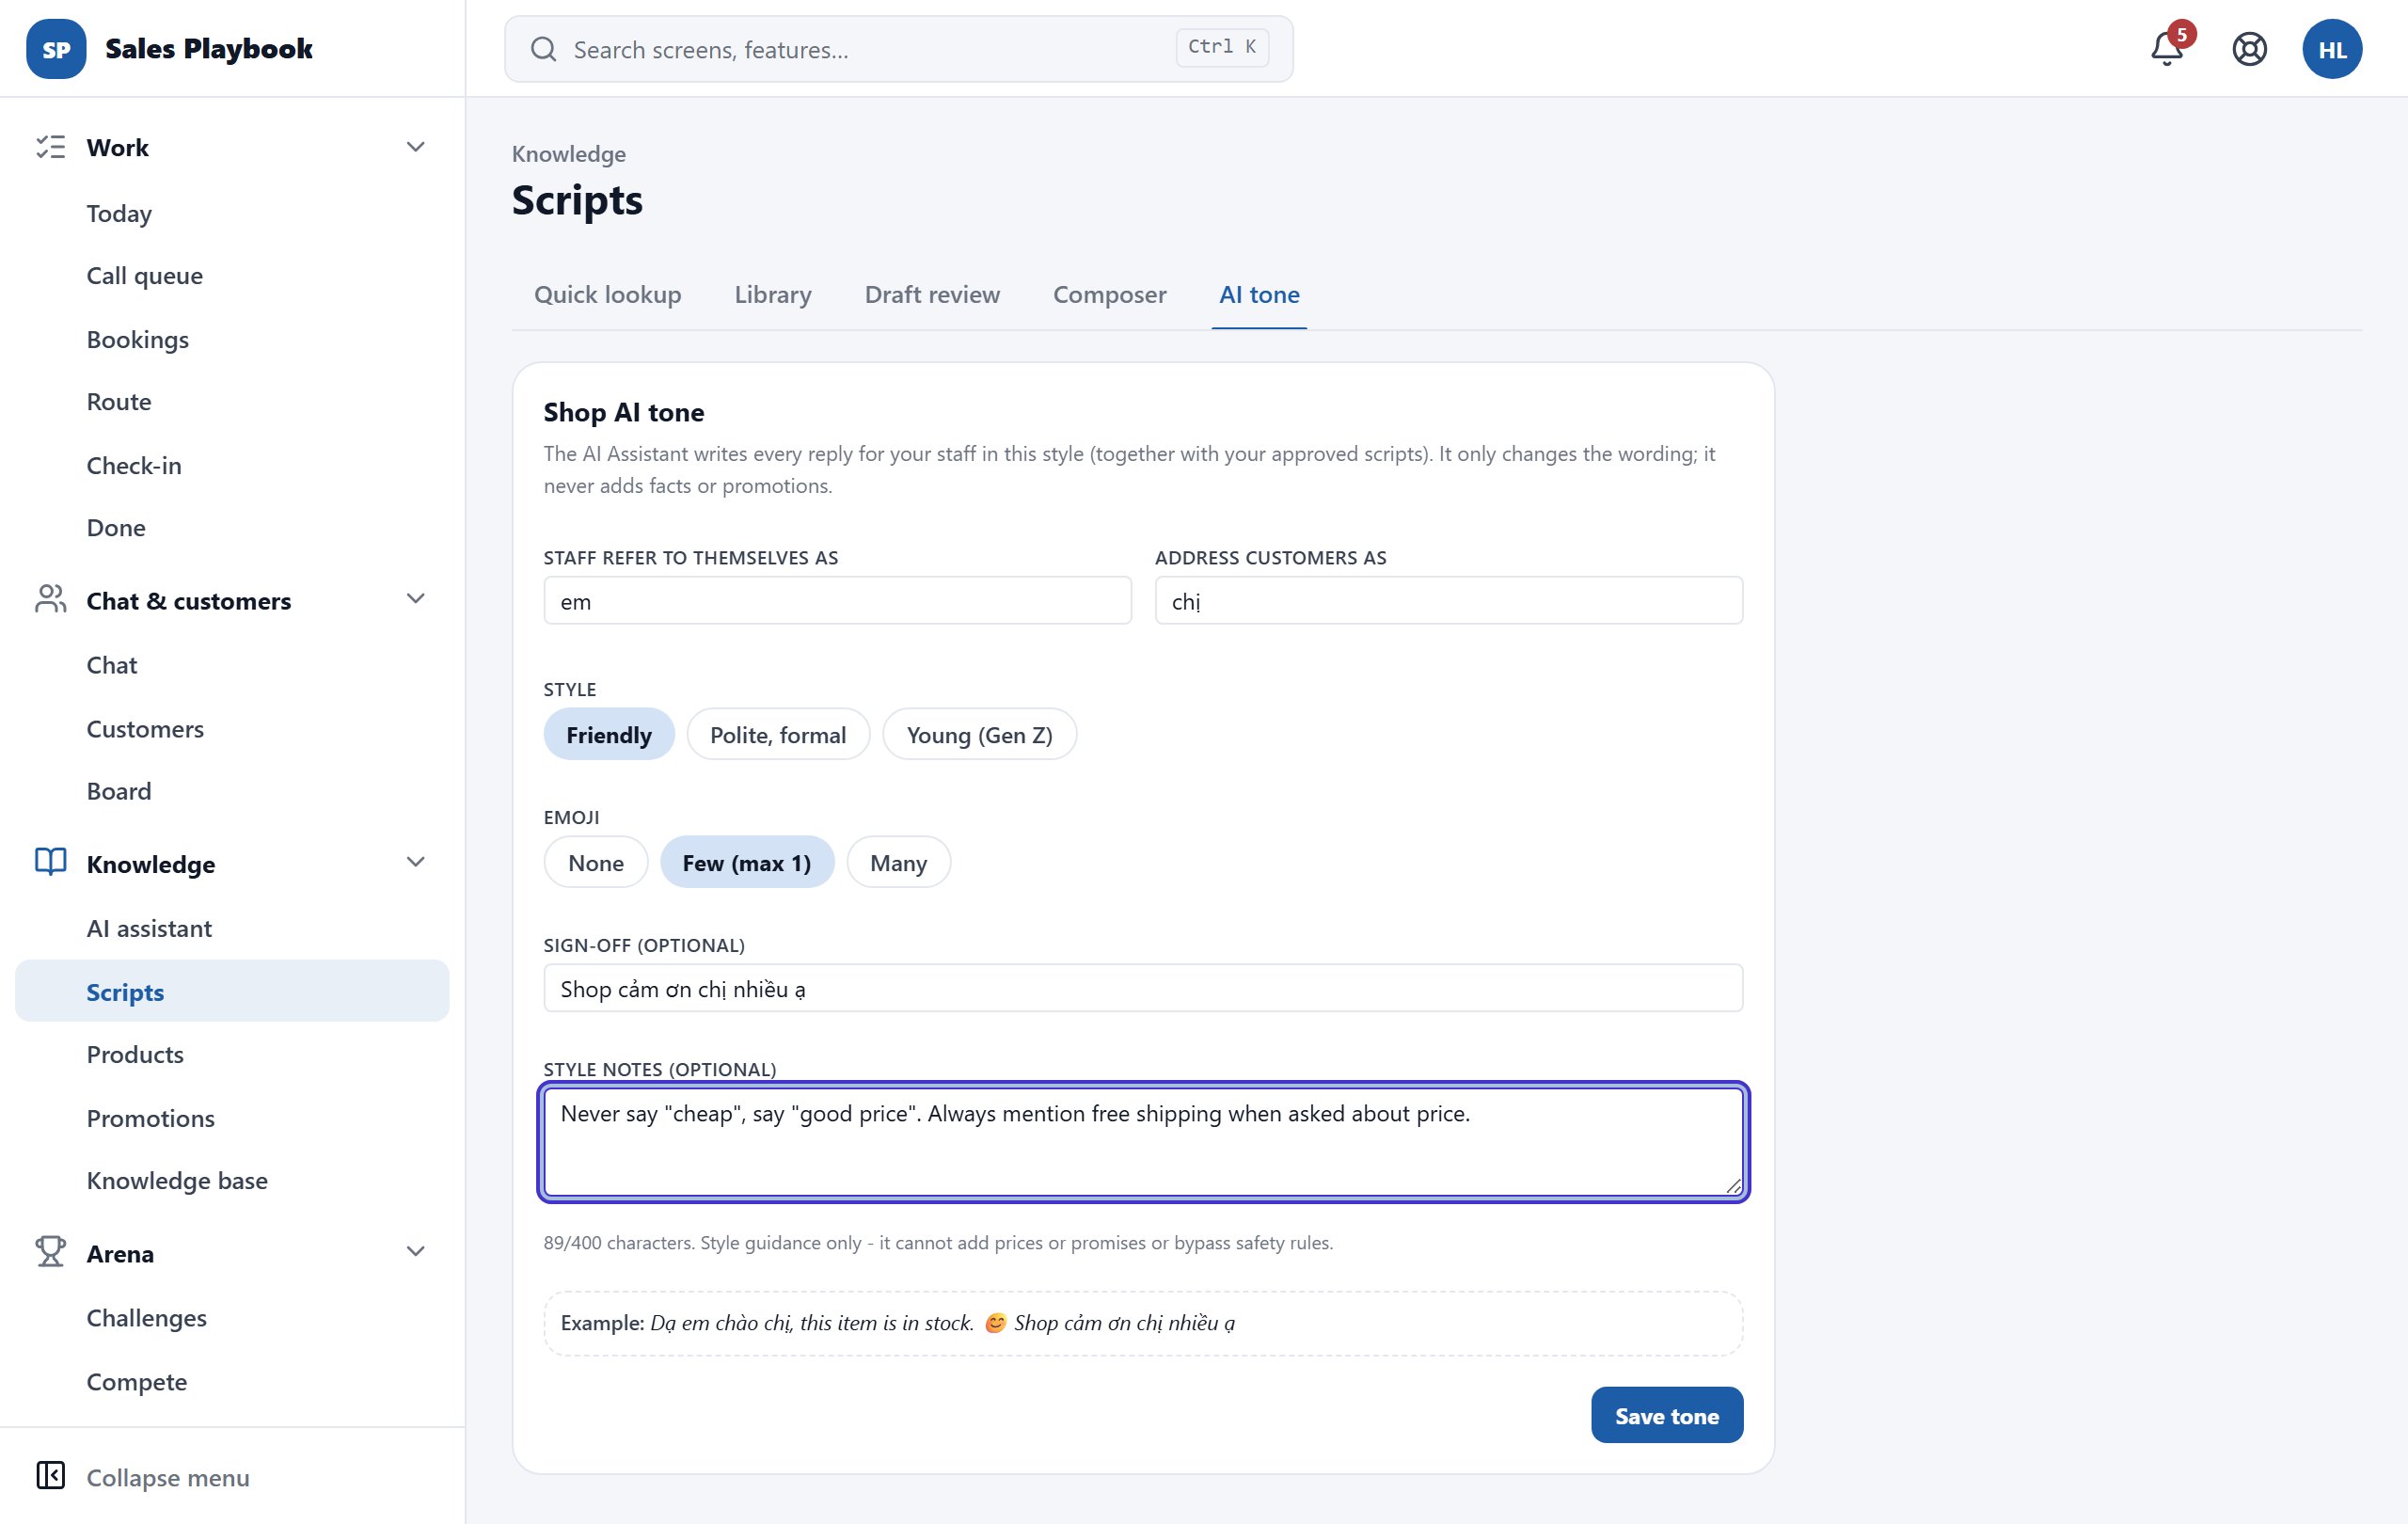
  1. 1Open "Scripts" → "AI tone" tab.
  2. 2Fill in "Staff refer to themselves as" (for example em) and "Address customers as" (for example anh/chị).
  3. 3Choose a "Style": "Friendly", "Polite, formal" or "Young (Gen Z)"; and an "Emoji" level: "None", "Few (max 1)" or "Many".
  4. 4Optional: enter a "Sign-off" and "Style notes" (up to 400 characters, for example: never say "cheap", say "good price").
  5. 5Check the sample sentence on the "Example:" line, then click "Save tone".
AI tone tab: Staff refer to themselves as, Address customers as, Style and Emoji choices, Sign-off, Style notes and the Example sentence
Choose forms of address, style and emoji level; the "Example" line shows how the AI will write.

18 / 5 features

Categories, products, promotions and knowledge base

The source data staff and the AI assistant rely on: the two-level category tree, product details, promotion campaigns and policy / FAQ articles. Changes here reach the whole team's devices.

Manage the two-level category tree

KnowledgeProductsCategories

Steps

  1. 1Open "Products" → "Categories" tab. If you are just starting, click "Show category templates by industry", pick your industry and click "Apply" — existing categories are kept, nothing is overwritten.
  2. 2Add a broad group: click "+ Add tier-1 category", enter a name, short description and sort order, tick "Visible" and click "Add tier 1".
  3. 3Click a tier-1 category in the left column to open it. Edit its name/description/order and click "Save tier 1" (or "Delete tier 1").
  4. 4In the "Tier-2 categories" block, click "+ Add tier-2 category", enter a name, prefix (for example /shipping-fee), short description and order, then click "Add tier 2". For existing tier-2 categories, use "Edit" / "Delete" on each row.
  5. 5When you are done, click "Publish updates" to push the new tree to staff devices.
Categories tab: Tier-1 categories column on the left, the selected tier-1 details and the add tier-2 form filled in with a name, prefix and description
The "+ Add tier-2 category" form filled in; click "Add tier 2", then "Publish updates" to send it to the team.

Add and edit product details

KnowledgeProductsManage & stock

Steps

  1. 1Open "Products" → "Manage & stock" tab. The top shows "Total products", "Missing category" and "With active promotions".
  2. 2Click "+ Add product" to create one, or click a product in the list (find it with "Search products...") to open the "Edit product" form.
  3. 3"Basic information": enter the "Product name *", "SKU", "Price (VND) *" and choose the "Product category *" (a level-2 category).
  4. 4"Media": paste image URLs (one per line) and a video link (e.g. YouTube).
  5. 5"Policies": enter the warranty and after-sales policies, one item per line — this is what appears in the staff product guide.
  6. 6"Related items": choose suggested upsell products, promotions, Knowledge base articles and related scripts (multi-select, with a quick search box).
  7. 7Click "Save" (or "Cancel" to discard). Click "Sync" at the top to reload the latest data from the server.
Manage & stock tab: product list on the left, Edit product form on the right with name, SKU, price, category and the Stock section
Click a product to open the "Edit product" form; "+ Add product" opens an empty one.

Create a promotion campaign

KnowledgePromotions

Steps

  1. 1Open "Promotions" in the "Knowledge" group. Filter the list with "All", "Running", "Upcoming", "Ended" or the "Search campaigns by name..." box.
  2. 2Click "+ Add campaign" (or click an existing campaign to edit it).
  3. 3"Basic information": enter the "Campaign name *" and tick products under "Applicable products" (type a name/SKU to search).
  4. 4"Schedule & discount": choose the "Start date *", "End date *" and "Discount type" — "Percentage (%)", "Fixed amount" or "Free gift" — then enter the discount.
  5. 5"Voucher & automation": enter the "Voucher code" and "Usage condition"; keep "Active" on if the campaign should run.
  6. 6Click "Save".
  7. 7For a saved campaign, open it again and click "Generate Playbook with AI" to jump to Scripts › Composer with the campaign pre-selected.
Add new campaign form: the sample product ticked, start and end dates, percentage discount 10%, voucher code and usage condition
Choose the products, dates, discount and voucher code, then click "Save".

Write and update Knowledge base articles

KnowledgeKnowledge baseManage

Steps

  1. 1Open "Knowledge base" → "Manage" tab.
  2. 2Click "+ Add article", or click an article in the list (find it with "Search topic, tags...") to edit it.
  3. 3Enter the "Topic *" and "Tags (comma-separated)", for example returns, warranty.
  4. 4Write the "Content *" in Markdown; the toolbar has H2/H3 headings, bold, italic, lists, tables, links and more. Switch between "Write", "Preview" and "Side by side" to see how the article will look.
  5. 5When editing an existing article, "Suggested tags:" (if shown) lists words customers actually use when asking — click one to add it to the tags.
  6. 6Click "Save".
Knowledge base Manage tab: article list on the left, the new article form filled in with a topic, tags and Markdown content
Fill in the topic, tags and content, then click "Save"; use "Preview" to check the formatting.

Answer frequent customer questions and approve AI-drafted articles

KnowledgeKnowledge baseCustomer questions

Steps

  1. 1Open "Knowledge base" → "Customer questions" tab.
  2. 2Filter with "Unanswered", "Answered", "Dismissed" or "⚠️ AI had no knowledge" (sorted by how often customers asked); search with "Search question text...".
  3. 3On a question, click "Write answer", enter the standard answer (click "AI Assist" for a suggestion), then click "Save & sync". Click "Dismiss" for questions that need no answer.
  4. 4The "Quick review: knowledge articles (…)" block holds articles drafted by AI. To create more, click "✨ Draft article" on a question, paste your shop's policy page URL and click "🌐 Import from website", or click "💬 Import from Zalo/Facebook chat history".
  5. 5For each draft, click "Edit" if needed, then "Approve & sync" to add it to the Knowledge base, or "Drop".
Customer questions tab: Quick review: knowledge articles block with a website URL filled in, the Import from website and Import from chat history buttons, and the question filters
Paste a policy page URL and click "🌐 Import from website" to have AI draft articles; questions waiting for an answer are below.

19 / 4 features

Stock

Track each product's stock, record goods in and out, see the history and update in bulk with Excel — all in the "Manage & stock" tab of the Products screen.

Turn on stock tracking and set a reorder point

KnowledgeProductsManage & stock

Steps

  1. 1Open "Products" → "Manage & stock" tab and click the product to set up.
  2. 2Scroll to the "Stock" section and tick "Track stock" (untick it for services or items you do not keep stock for).
  3. 3Enter the "Current stock". Empty means not entered, which is different from 0.
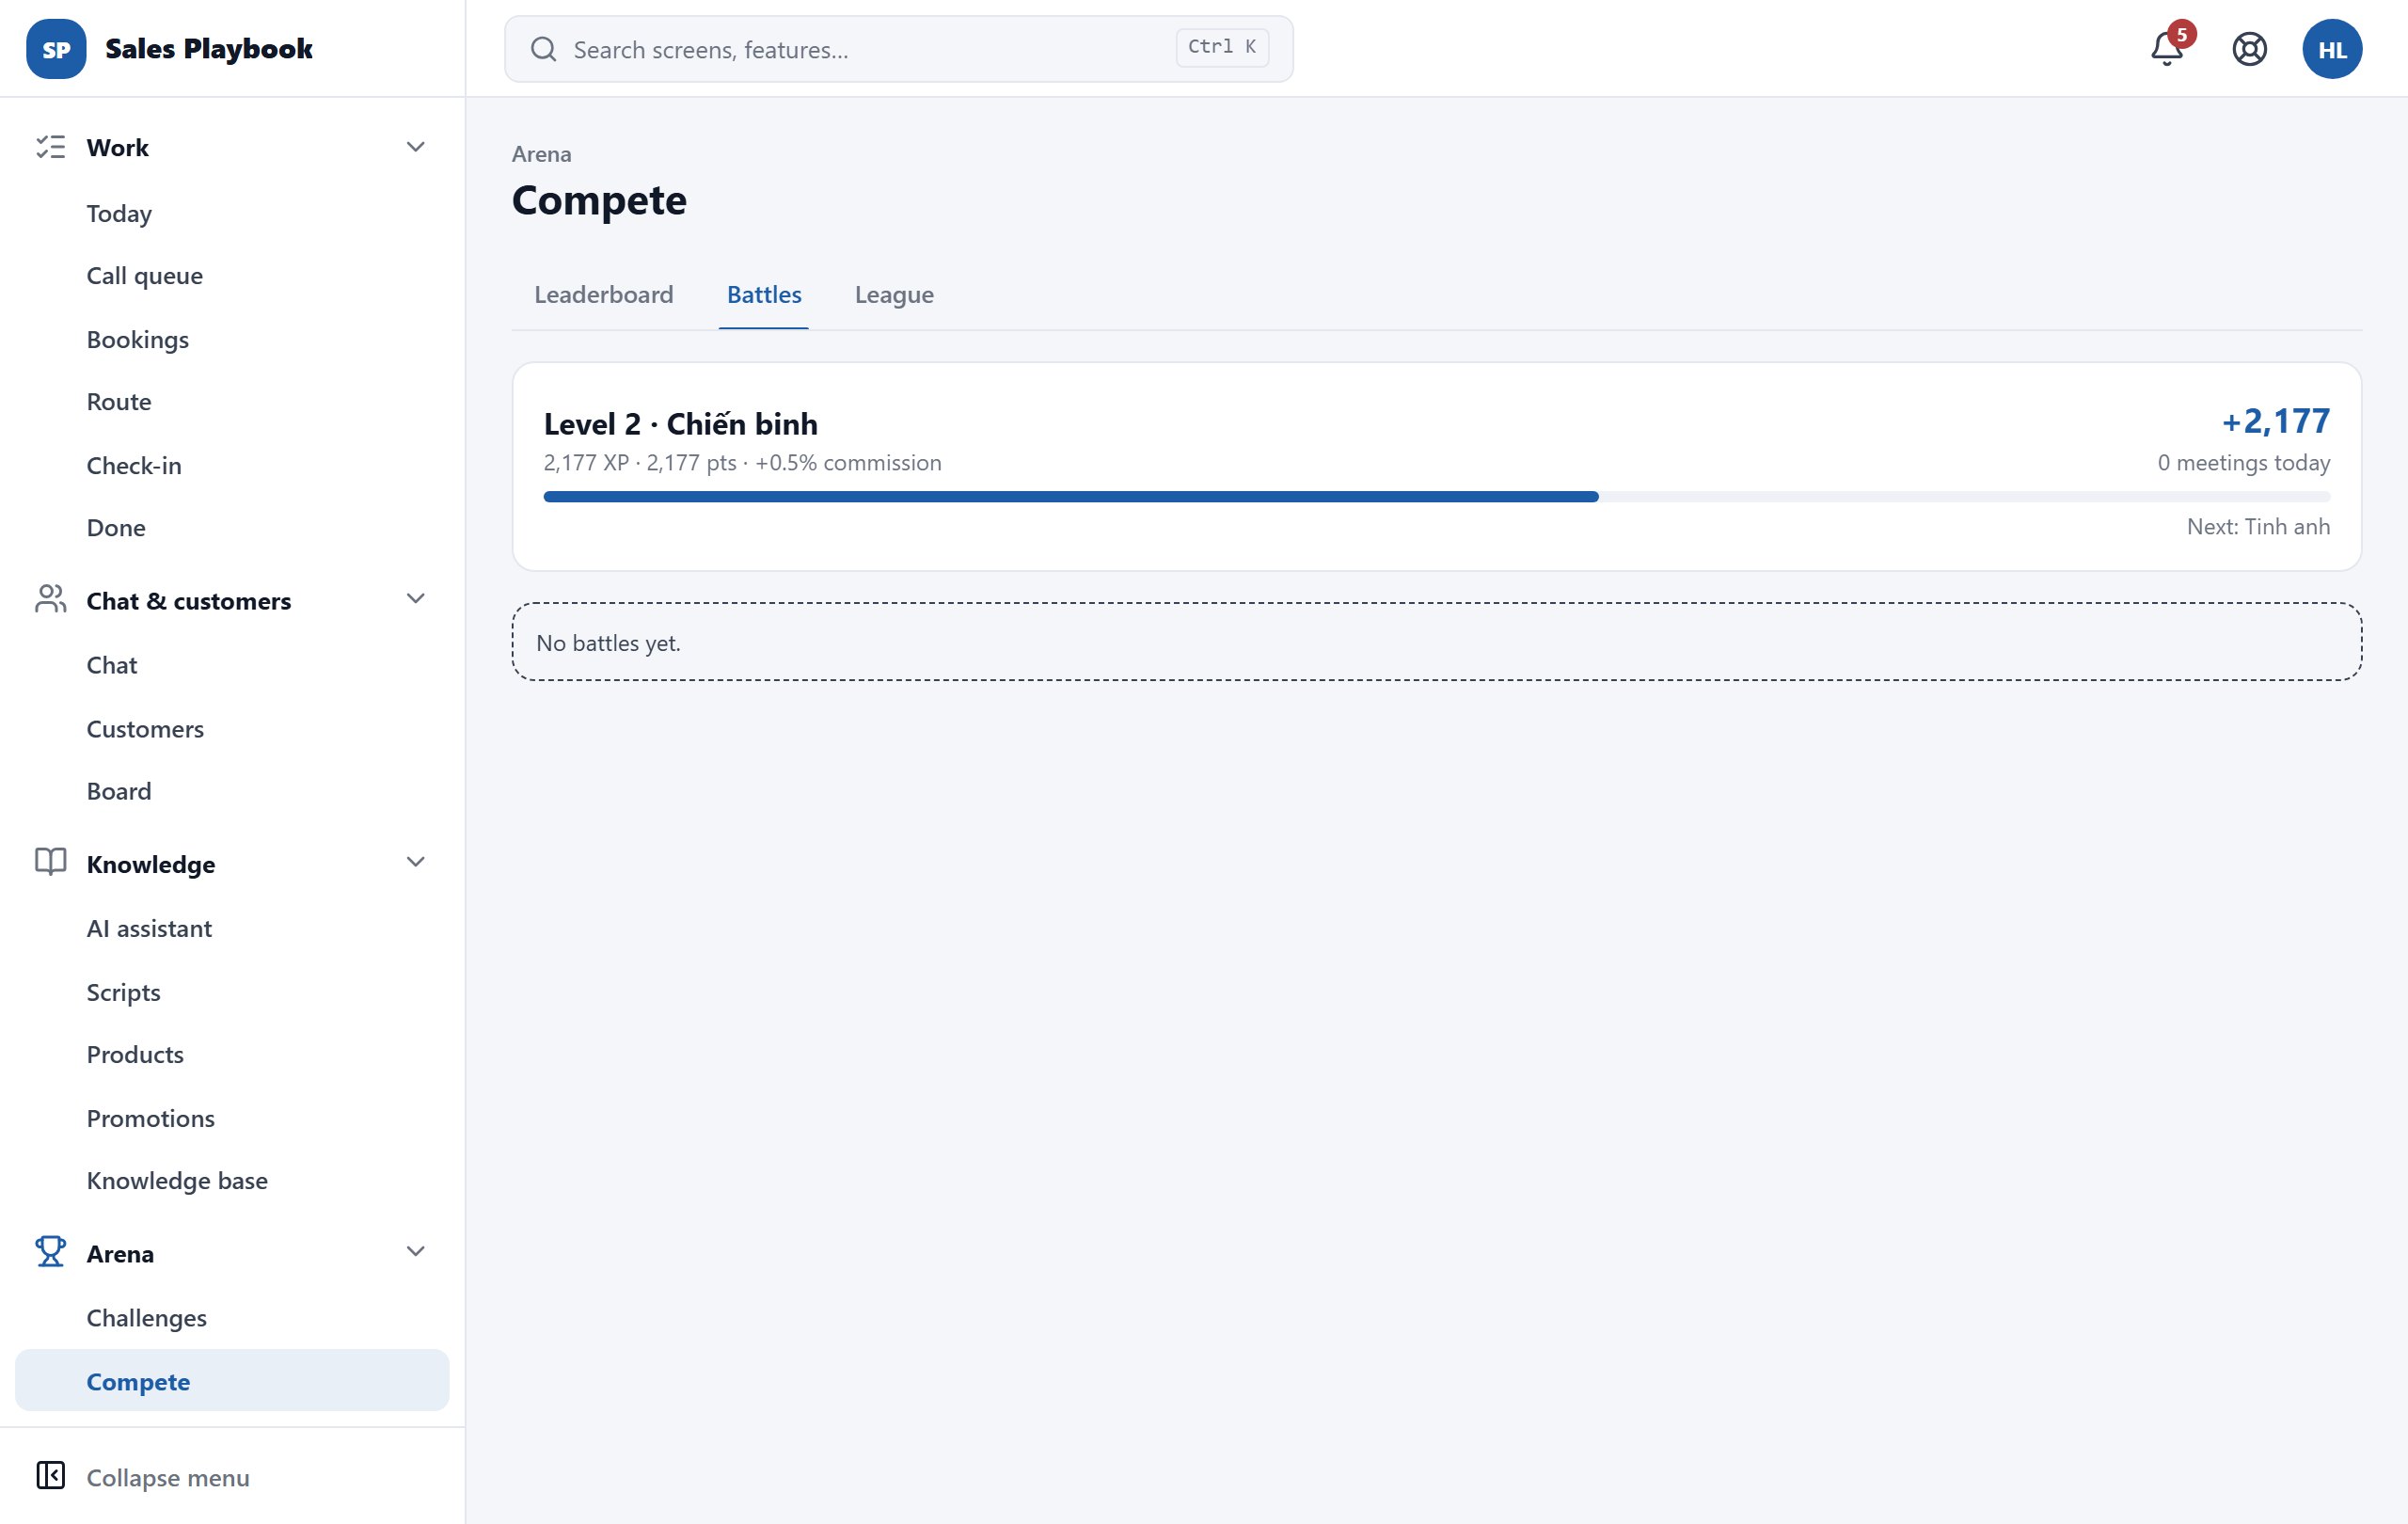
  4. 4Optional: enter a "Reorder point". Leave it empty and the system calculates it from sales during the lead time plus safety stock.
  5. 5Enter the "Lead time (days)" (default 5) and "Safety stock" (units always kept in reserve).
  6. 6Click "Save". The forecast line below shows the sales rate (for example "Sells ~2/day") and how much to restock, and by when.
Stock section of the Edit product form: Track stock ticked, current stock 30, automatic reorder point 5, lead time 7 days, safety stock 5
Leave "Reorder point" empty to have it calculated; the "Stock: 30" badge shows in the list on the left.

Record goods receipts, returns, offline sales, adjustments and stock counts

KnowledgeProductsManage & stock

Steps

  1. 1In the "Manage & stock" tab, click "In/out" on the product row (or the "Stock in/out" button in the product form).
  2. 2Choose the movement type: "Goods receipt", "Customer return", "Offline sale", "Adjustment" or "Stock count". The line under the buttons explains each type.
  3. 3Goods receipt: enter the "Quantity", optionally the "Unit cost (đ)" (used to recalculate the moving-average cost price) and the "Receipt no. / supplier".
  4. 4Adjustment: enter the "Quantity (+/-)" (for example -2 or 5) and choose a required reason (Damaged, Lost, Count discrepancy, Other). Stock count: enter the "Counted stock" — stock is set to that number.
  5. 5Click "Record", then "Close".
Stock in/out dialog for the sample product, Goods receipt type, quantity 10, unit cost 150000 and a receipt number filled in
Choose the movement type, enter the quantity, then click "Record".

View a product's stock history

KnowledgeProductsManage & stock

Steps

  1. 1In the "Manage & stock" tab, click the product to open its form.
  2. 2In the "Stock" section, click "Stock history" to expand the list.
  3. 3Each row shows the change type (Stock count, Receipt, Sale, Customer return, Adjustment), the quantity added or removed, stock before → after, the time and the source; it may also show the reference/order code and unit cost.
Stock history expanded in the product form, listing stock counts with quantity, stock before and after, time and source
Click "Stock history" to see each change and where it came from.

Update stock in bulk with Excel

KnowledgeProductsManage & stock

Steps

  1. 1In the "Manage & stock" tab, find the "Stock via Excel" block.
  2. 2Click "Download template" (or "Export stock (Excel)" to start from your current list).
  3. 3Fill in the file by SKU: Stock, Track inventory (Yes/No), Reorder point, Lead time (days), Safety stock… Empty cells keep the current value; they are not written as 0.
  4. 4Click "Import from Excel" and pick the file. The "Import preview" shows the number of valid rows / rows with errors and a "Check" column for each row.
  5. 5Optional: tick "Create new products for unknown SKUs" (needs a name and category id, or a default category) and "Also update name/price".
  6. 6Click "Import … rows".
Import preview from the template file: 2 valid rows, the Create new products for unknown SKUs and Also update name/price options and the Import 2 rows button
Check the preview, choose any options you need, then click "Import … rows".

20 / 7 features

Customers, conversations and deals

One customer directory merged from every channel, each person's profile and channel accounts, their conversations, the deal board, the sales forecast and approval of large deals.

View, search and export the customer directory

Chat & customersCustomers

Steps

  1. 1Open "Customers". The heading "Customer directory" shows the total number of customers.
  2. 2Type in "Search by name or phone number..." to filter. The table has the columns "Name", "Phone", "Total spend", "Orders", "Last activity" and "Chat"; next to the name are channel badges (Zalo, Shopee…) and status badges such as "Opted out".
  3. 3Click a row to open the customer profile in the right-hand pane.
  4. 4Click "Hide directory" to collapse the list so the profile gets the full width; click "Show directory" to bring it back.
  5. 5Open the ""Same person" suggestions" block to see pairs of customers that look like the same person (same phone, email, near-identical name…). Click "Keep …" to merge, "Dismiss" to never suggest the pair again, or "Scan now" to scan again.
  6. 6Click "Refresh" to reload, or "Export (.xlsx)" to download the directory to Excel.
Directory of 457 customers with the Hide directory, New customer, Refresh and Export buttons and the Same person suggestions block open
The ""Same person" suggestions" block is open (with "Scan now") above the search box; the buttons sit at the top right.

Add a new customer by hand

Chat & customersCustomersNew customer

Steps

  1. 1In "Customers", click "New customer". The "New customer" form opens on the right.
  2. 2Enter "Phone (required)" and "Name (required)".
  3. 3Fill in more if you have it: "Email", "First name", "Last name", "Company", "Age", "Address", "City", "State / Province", "Post code", "Country", "Gender".
  4. 4Click "Create customer" (or "Cancel" to discard).
The New customer form filled in with phone number, name and email
The two required fields are at the top; the rest can be added later.

View the profile and channel accounts, and merge duplicates

Chat & customersCustomersInfo

Steps

  1. 1In the directory, click a customer. The top of the profile shows "Orders", "Total spend", "Avg. order", "Last order" and the AI block (behaviour tags, "Sentiment Meter", next-action suggestion).
  2. 2"Orders" tab: filter by "Order number...", "From" and "To", then click "Search"; each order shows its status, payment and source (AI reply, script, campaign…).
  3. 3"Info" tab: click "Edit" to change name, email, gender, age, company, tax ID, territory, address… then "Save changes". The "Locations (check-in & routes)" section adds the customer's branches, warehouses or sites; "Sales opportunities" lists the customer's deals on the Board with stage, value and probability.
  4. 4"Channel accounts (same person)" lists each account with its conversation count; under "Channel identity", click "Copy" next to the User ID to find the right conversation in the Zalo OA inbox.
  5. 5Customer split into two profiles? Click "Merge customer", search for the other one, click "Pick", then choose which customer to keep.
  6. 6To change the phone number: click "Correct phone", enter the "New phone number" and click "Confirm & save".
Info tab of customer Le Van E3 with Add location, Sales opportunities, two channel accounts FILE and ZALO, and the Merge customer and Correct phone buttons
The directory is hidden so the profile is wider; "Merge customer" sits next to the "Channel accounts (same person)" heading.

Manage a customer's conversations: owner, status, create a deal

Chat & customersCustomersChat

Steps

  1. 1Open the customer profile and choose the "Chat" tab.
  2. 2Pick a person in "Assigned to" to hand the customer to a rep; the customer then appears in that person's Chat and "My customers".
  3. 3Choose a "Customer status": "Normal", "VIP", "Spam" or "Bad customer". Click "Do not disturb" when the customer refuses promotional messages / calls; once opted out, the button reads "Opted out" (a customer texting STOP is recorded automatically too).
  4. 4Pick a conversation in the "Conversations" column (filter by status, or by channel in the channel picker when the customer has several; click "New" to start one), reply in "Type a message... (Type / to insert a script)" and click "Send".
  5. 5Use the buttons above the conversation: "Link task", "Merge", "Link contact" (add a phone/email to a customer who only has a channel account), "Handover summary".
  6. 6When the customer wants to buy, click "Create deal" to put it on the Board; click "Insert booking link" to send the customer a booking link.
  7. 7When done, click "Complete conversation".
Chat tab of a customer profile with the Assigned to field, customer status, conversation list and the Create deal and Insert booking link buttons
"Assigned to" is at the top, this customer is "Opted out", and "Create deal" and "Insert booking link" sit just above the message box.

Track deals and customers on the Board

Chat & customersBoardBoard

Steps

  1. 1Open "Board" › "Board" tab. Pick a board from the row of buttons at the top; the default board has a ★.
  2. 2Deal board: each column is a stage. Click "Add deal" to create a card and drag a card to another column to change its stage (on a phone: open the card → "Move to column"). Filter with "Whole team" / "Mine" and the "All owners" box. The summary line shows the number of deals, value and weighted forecast; the red badge "… card(s) without a next activity" points to the neglected cards (red border).
  3. 3When moving into a Won/Lost column, fill in "Reason" (and "Competitor" if any) and click "Move". A column that needs more data shows a "Quick fill to enter …" form.
  4. 4Click a card to see details: related activities, "Stage history", and "+ Activity" to create the next activity.
  5. 5Lifecycle board ("Customer lifecycle"): customers move between columns by themselves based on purchase data (prospect → first purchase → regular → due to rebuy → at risk → dormant). Each column shows the customer count, "Value" and the 7-day trend; click a column to see the customers.
  6. 6Administrators click "Edit board & columns" to change names, columns and thresholds, or "Add a business line" to create a new board from an industry template.
Board tab showing the drag-and-drop deal board Bán hàng tư vấn with its stage columns and deal cards
Board "Bán hàng tư vấn" (Deals (drag & drop)): each column shows card count, value and probability; the red-bordered card has "No next activity".

See the monthly sales forecast by stage and rep

Chat & customersBoardForecast

Steps

  1. 1Open "Board" › "Forecast" tab.
  2. 2Pick the month in the month box and a board in "All deal boards" (or one specific board).
  3. 3Read the four figures: "Won (month)", "Weighted forecast", "Projected month" and "Gap to target".
  4. 4"By stage" gives the number of deals, value and weighted value of each column.
  5. 5The "By rep" table compares "Target", "Won", "Open (weighted)", "Projected", "Attainment" and "Gap" for each person.
Board Forecast tab with the four totals, the By stage section and the By rep table
"Gap to target" is in the top-right box; the "By rep" table is at the bottom.

Approve large deals before they count for revenue and points

Chat & customersBoardDeal approvals

Steps

  1. 1Open "Board" › "Deal approvals" tab. The line "Approval threshold: …" shows the value that needs approval.
  2. 2Choose "Pending approval" to see deals waiting; "Approved" and "Rejected" show the history.
  3. 3For each deal, check the owner and the won date. If needed, change the "Approved value" (not above the deal value) and add a "Note".
  4. 4Click "Approve" or "Reject".
Board Deal approvals tab with the Pending approval, Approved and Rejected filters and the line Approval threshold ₫50,000,000
The approval threshold sits next to the filters; there are no deals right now ("No deals."). When there are, each card has "Approve" and "Reject".

21 / 2 features

Customer care

Complaint cases with a resolution deadline, a satisfaction survey once resolved, and a dashboard of chat response speed to keep care quality up.

Create and handle customer complaints

Customer careSupport cases

Steps

  1. 1Open "Customer care" › "Support cases". The badges next to the heading show how many cases are open and how many are overdue.
  2. 2Click "+ New complaint", enter "Customer name", "Phone number", "Title (e.g. Wrong colour delivered)" and "Description", then click "Create".
  3. 3Filter the list with "Open", "New", "In progress", "Waiting for customer", "Resolved", "All". Each case shows its priority, status, deadline and number of linked activities / conversations; click ▸ to see the change history.
  4. 4New case: click "Take it". In progress: click "Wait for customer" while waiting for the customer, then "Resume" once they reply.
  5. 5When done, click "Resolved" and add a resolution note (optional). A resolved case can be reopened with "Reopen".
  6. 6Owners/managers click "Support settings" to set "Complaint resolution deadline (hours)" and "Chat reply SLA (minutes)", and to switch the satisfaction survey, chat SLA alerts and AI handover summary on or off.
Support cases screen with a filled-in complaint form and a High-priority complaint in New status
The "+ New complaint" form is filled in at the top; the case below has "Take it" and "Resolved" at the bottom right.

Track satisfaction (CSAT) and chat response speed (SLA)

Customer careSLA & CSAT

Steps

  1. 1Open "Customer care" › "SLA & CSAT". Choose the period "7 days", "30 days" or "90 days".
  2. 2The "Customer satisfaction (CSAT)" box gives the average score out of 5, the number of ratings and the share satisfied (4-5★), split "By rep" and "By channel".
  3. 3The "Chat response SLA" box gives "SLA breaches", "Escalated to manager", "Overdue now" and "Avg first response", split by channel and rep.
  4. 4"CSAT of support cases" lists resolved cases, who resolved them, the note and the customer's score ("Not scored" if the customer has not answered).
  5. 5The bottom part shows your own shift figures: "Chat care" (with "End-of-shift hand-over"), "Response speed (FRT/AHT)" for the last 14 days and "Current workload".
SLA & CSAT screen with Customer satisfaction 5.00/5, the Chat response SLA box and the CSAT of support cases list
Change the period at the top right; CSAT on the left, chat SLA on the right, resolved cases below.

22 / 4 features

Dispatch the whole team's work

See in one place who is doing what, which activities are overdue and which have no owner; reassign, reschedule or cancel in bulk; look up history and manage every booking in the shop.

Monitor and reassign work on the Dispatch board

DispatchDispatch boardTask list

Steps

  1. 1Open "Dispatch" › "Dispatch board", tab "Task list". The summary line shows "N open · N overdue".
  2. 2Choose how to group under "Group by": "Assignee", "Team", "Territory", "Status" or "Due"; filter by kind with "All kinds", "Call", "Visit"… The "Unassigned (shared pool)" group holds activities nobody has picked up.
  3. 3Tick the box in front of each activity, or the box at the top of a group to select the whole group. The "N selected" bar appears.
  4. 4Click "Reassign", pick someone in "Choose a member" (or "↩ Back to the shared pool"), then click "Apply".
  5. 5Or click "Reschedule" (pick a new due time or enter "± hours") or "Cancel" (optionally enter a reason, then click "Cancel N activities").
  6. 6Click "Edit" on an activity to change its title, kind, priority, due time, assignee or note.
Dispatch board: 3 activities in the Unassigned group selected, with the Reassign, Reschedule and Cancel bar above
The whole "Unassigned (shared pool)" group is ticked; choose a member and click "Apply" to reassign.

Add an activity for a team member by hand

DispatchDispatch boardNew task

Steps

  1. 1Click "New task" at the top right (or "+ Add activity" next to the filters). The "Add activity" form opens.
  2. 2Pick the "Kind" (Call, Visit, Message, Appointment, Store audit, Order confirmation, Follow-up) and the "Priority".
  3. 3Enter a "Title" — leave it empty and the system uses "<kind>: <customer name>".
  4. 4Under "Customer", type a name or phone number and pick the customer from the list (click "Change customer" to pick again). For someone not in the system yet, fill in "Customer name (new customer)" and "Customer phone (new customer)".
  5. 5If the customer has several locations, pick the "Visit location" — the rep's check-in for this activity is verified against that location.
  6. 6Pick the "Assignee" (or leave "— Unassigned (shared pool) —"), the "Due" time and "SLA due (optional)", and write the "Note / instructions".
  7. 7Click "Create activity".
Add activity dialog filled in with kind Visit, priority High, customer Le Van E3, an assignee and a note
The "Add activity" form is complete; click "Create activity" to assign it right away.

Look up the team's closed activities

DispatchDispatch boardHistory

Steps

  1. 1Open "Dispatch board" and choose the "History" tab.
  2. 2Pick "From", "To" and the "Assignee" (or "All members").
  3. 3Type in "Search by customer, phone, title..." to narrow the list; click "Refresh" to reload.
  4. 4Each card shows the kind, the status ("Done" / "Cancelled"), the result, "Closed …" with the assignee, the call duration and the result note or cancel reason.
The History tab of the Dispatch board with date, assignee and search filters and a list of closed activities
Date and assignee filters at the top; each card shows the status, result and who closed it.

Turn on the booking page and manage every appointment

DispatchAll bookings

Steps

  1. 1Open "Dispatch" › "All bookings".
  2. 2In the "Customer booking page" block, tick "Turn on appointment booking (off by default)" and fill in "Page title", "Short introduction", "Book up to (days ahead)", "Minimum notice (minutes)" and "Remind before (hours, 0 = off)".
  3. 3Write the "Reminder text" (you can use variables such as {customerName}, {service}, {time}), add "Services (optional)" with "+ Service" if needed, then click "Save settings".
  4. 4Under "Bookable staff / branches", click "+ Add" to add a person or branch who takes bookings — with nobody listed, customers cannot book.
  5. 5Follow the "Appointments in the next 14 days" list and the 30-day stats line (completed, no-shows, cancelled, reminders).
All bookings screen with the Customer booking page block and its settings fields
Tick "Turn on appointment booking", fill in the booking page details and click "Save settings".

23 / 7 features

Manage the field sales team

Follow the field team on a map, hand urgent work to the nearest rep, read route reports, audit outlets, approve expenses, score ride-alongs and set up territories and customer beats.

View the team map and give urgent work to the nearest rep

DispatchField opsTeam map

Steps

  1. 1Open "Dispatch" › "Field ops", tab "Team map". Click "🗺️ Open map" to see the map, and "Refresh" to update it.
  2. 2Each rep has a card: the customer they last checked in with, how long ago, and the day's verified check-ins (e.g. "2/2 verified").
  3. 3Under "⚡ Assign urgent tasks to the nearest rep", find the urgent activity (high priority or due today) and click "Find nearest rep".
  4. 4The list of reps shows distance, travel time and how fresh their position is; click "Assign" next to the right person.
Team map tab: Open map button, cards for two reps and the list of urgent tasks to assign to the nearest rep
Each urgent task has a "Find nearest rep" button on the right.

Read the route report: planned, visited, verified

DispatchField opsRoute report

Steps

  1. 1Open the "Route report" tab and pick the date range and the rep (or "All staff").
  2. 2The "By week" table shows, per rep: "Planned", "Visited", "Verified".
  3. 3The "By day" section summarises each day: customers planned, visited, verified and off-beat visits.
  4. 4Click "Open the automation template →" to view or turn on the "Daily beat plan" automation.
Route report tab with the date pickers, rep selector and the By week and By day tables
Pick the date range and rep at the top; "By week" compares planned with visited.

Create outlet audit templates and read audit reports

DispatchField opsStore audits

Steps

  1. 1Open the "Store audits" tab and click "+ New template". A new template comes with suggested items such as "Shelf photo" and "POSM on display".
  2. 2Set the template name and the "Applicable outlet types (empty = all)".
  3. 3For each item: enter the content, pick the type ("Photo", "Yes / No", "Quantity", "Price", "Note"), link a SKU if needed and tick "Required". Click "+ Item" to add one, × to remove one.
  4. 4Keep "Active" ticked and click "Save template".
  5. 5Under "📊 Report", pick a date range and view "By SKU", "By store" or "Audits".
Retail audit template form with the Shelf photo and POSM on display items and the Save template button
Each item has a type, SKU and "Required"; click "Save template" when done.

Approve expenses and track field mileage

DispatchField opsExpenses

Steps

  1. 1Open the "Expenses" tab. The "🛵 Km in the last 7 days (verified check-ins)" block shows each rep's km and field days.
  2. 2Under "🧾 Expenses", filter by status ("Pending", "Approved", "Rejected", "All"), date and rep.
  3. 3Review each line: amount, system-computed km and the "Receipt" photo.
  4. 4Click "Approve", or type a reason in the note box and click "Reject".
  5. 5Click "⬇ CSV" to export the list for accounting.
Expenses tab with the Km in the last 7 days block, the Pending, date and staff filters and the CSV button
Filter "Pending" to see what needs approval; "⬇ CSV" is to the right of the filters.

Score a ride-along with a rep

DispatchField opsRide-along

Steps

  1. 1Open the "Ride-along" tab and pick the rep in "Choose a rep…". Their check-ins from the last 14 days appear.
  2. 2Click the check-in you joined; the scoring block opens with the rep's report.
  3. 3Score each criterion from 1 to 5. The default criteria are shown in Vietnamese, e.g. "Chuẩn bị trước khi vào điểm" (preparation), "Mở đầu & tạo thiện cảm" (opening), "Chốt đơn & hẹn bước tiếp" (closing).
  4. 4Fill in "Strengths", "Needs improvement" and "Notes", then click "Save review".
Ride-along tab: a rep selected, one check-in open with the 1-5 criteria and the feedback boxes
Score each criterion 1–5, write your feedback and click "Save review".

Set the workday, mileage allowance and ride-along criteria

AutomationTerritories & routes

Steps

  1. 1Open "Automation" › "Territories & routes".
  2. 2Set "Workday start", "Workday end" and "Time per visit (minutes)".
  3. 3Set "Mileage allowance (VND/km)", "Road factor (estimated km)" and "Location valid for “assign nearest” (minutes)"; tick "Km by actual road" to compute km with the routing service.
  4. 4Edit the "Ride-along scoring criteria" — one criterion per line, as "code: text".
  5. 5Click "Save settings".
Territories & routes screen with the working hours, time per visit, mileage allowance, road factor, criteria fields and Save settings
The shared settings are in the top half of the screen; click "Save settings" after editing.

Create territories and give customers a visit beat

AutomationTerritories & routesTerritories

Steps

  1. 1In the "🗺️ Territories" block, fill in "Add territory": the name (e.g. District 7), the code (generated if empty) and the address keywords, comma separated.
  2. 2Click the reps who cover it; pick a primary rep or keep "Primary rep: split evenly"; keep "Active" ticked and click "Save".
  3. 3In the "🧭 Customer beats" block, search customers by name / phone (filter "All territories" or "Only customers on a beat") and click "Search".
  4. 4For each customer: pick the territory, the frequency ("Daily", "Weekly", "Every 2 weeks", "Monthly" or "— Not on a beat —"), the days Mon…Sun and the outlet type, then click "Save".
  5. 5Click "🕘 Opening hours" to enter the customer's opening hours — the route then orders visits by opening time.
Territories block with a filled-in Add territory form and the Customer beats block with customer Le Van E3
Fill in the territory and click "Save"; below, set the territory, frequency and visit days for each customer.

24 / 11 features

Automation: rules, care sequences, campaigns and assignment

Let the system handle repetitive work: "When an event happens → check conditions → the system acts". Covers automation rules (your own or installed from Templates), post-purchase care sequences, message campaigns with an approval queue, automatic assignment of work to staff and the AI autopilot that answers customers.

Manage your list of automation rules

AutomationAutomation rulesRules

Steps

  1. 1Open "Automation" › "Automation rules", tab "Rules".
  2. 2Read the 4 tiles at the top: "Active rules", "Events (24 h)", "Actions run (24 h)" and "Loop guard" (the system stops when rules trigger each other down to this depth).
  3. 3Filter by board with "All", each board name or "No board". A board's rules include its column automations (the ⚙ icon on the Board).
  4. 4On each card, read the "When … if … then …" sentence (the rule text itself is in Vietnamese), the "On" / "Off" badge, the version (v1, v2…), the "System" or "Template" badge and the "Matched · ran · skipped" line.
  5. 5Click "Preview" to simulate: the system shows how many events the rule would have matched over the past days and what it would have created, without writing anything.
  6. 6Click "Turn off" / "Turn on" to stop or restart a rule; click "Edit" to open the editor (system rules have no such button).
Automation rules screen, Rules tab, with 4 stat tiles, the board filter and the rule cards
Each card has "Turn off" / "Preview" buttons and a "Matched · ran · skipped" line.

Create a new automation rule

AutomationAutomation rulesRules

Steps

  1. 1Open "Automation" › "Automation rules" and click "New rule" (top right).
  2. 2Enter a "Rule name" and choose the "Board" ("All boards" or one board; with a board selected, columns in conditions / actions are that board's columns).
  3. 3"1. When does it run?": pick the event, e.g. "Có đơn hàng mới" (new order), "Khách nhắn tin đến" (customer message), "Cơ hội vào giai đoạn" (deal enters a stage), "Việc quá hạn" (activity overdue)… Choosing "Theo lịch (hằng ngày / tuần)" (on a schedule) asks for a cron schedule (e.g. 30 7 * * * = 07:30 every day).
  4. 4"2. Conditions (all must be true)": click "Add condition" to narrow it down; with no conditions it applies to every event.
  5. 5"3. What does the system do?": pick an action ("Tạo việc" create activity, "Gửi tin nhắn" send message, "Bắt đầu chuỗi chăm sóc" start care sequence, "Tạo cơ hội" create deal, "Mở phiếu hỗ trợ" open support case, "Thông báo" notify, "Mở thưởng Arena" open Arena bounty…) and fill in the details. For "Tạo việc" these are "Loại việc" (kind), "Tiêu đề" (title), "Hạn (giờ)" (due in hours), "Giao cho" (assign to) and "Kịch bản gợi ý" (suggested script). Click "Add action" to do more than one thing.
  6. 6Set the safety limits: "Cooldown (days)", "Max customers per run", "Respect quiet hours".
  7. 7Read the "Summary" box, click "Preview" to simulate on past data, then click "Save".
New rule form with a name filled in, the event Có đơn hàng mới and the action Tạo việc with kind Gọi điện
The editor's 3 questions; the "Tạo việc" action adds fields for kind, title, due time and assignee.

Install a rule from Templates

AutomationAutomation rulesTemplates

Steps

  1. 1Open "Automation" › "Automation rules", tab "Templates".
  2. 2Filter by group: "All", "Orders", "Chat", "Activities", "Deals", "Field sales", "CRM", "Retention", "Bookings", "Campaign".
  3. 3Read the template's description and its "When … if … then …" sentence to see what it does.
  4. 4Click "Install". A template installs switched off.
  5. 5An installed template shows an "Installed" badge and a "View in the list" button: click it to go to the "Rules" tab, click "Preview" and then "Turn on".
Templates tab with the group filter and template cards; installed templates have the Installed badge, others have an Install button
Templates not yet installed have a blue "Install" button; installed ones show "Installed" and "View in the list".

Search the event log

AutomationAutomation rulesEvent log

Steps

  1. 1Open "Automation" › "Automation rules", tab "Event log".
  2. 2Filter by event type with "All", "order.*", "activity.*", "deal.*", "case.*", "booking.*", "message.*", "customer.*", "checkin.*", "campaign.*", "rule.*", "inventory.*".
  3. 3Enter a "Customer id" to see one customer's events only, and pick a period (1 / 7 / 30 / 90 days).
  4. 4Read the table: "Time", "Event" (the code plus a name in Vietnamese), "Subject", "Details" and "Depth" (events created by another rule have a depth above 0).
Event log tab with the event type filter, the Customer id field, 7 days selected and the event table
Event type filter at the top; the "Depth" column tells you whether another rule created the event.

View and manage customer care sequences

AutomationCare sequences

Steps

  1. 1Open "Automation" › "Care sequences".
  2. 2Each sequence card shows its status ("On"), version, "Starts when", the steps (e.g. "Day 1 · Message" → "Day 7 · Message" → "Day 30 · Message · If no new order") and "Stops when".
  3. 3Click "Customers in sequence" to see who is enrolled, their progress and next step; click "Stop" on a row to take that customer out of the sequence.
  4. 4Click "Turn off" to pause the whole sequence, "Edit" to change its steps, or the bin icon to delete it.
  5. 5The start condition is stored as a "Sequence trigger" rule; click "Open automation rules →" to preview it or check its log.
Care sequences screen with the New sequence box and the Chăm sóc sau mua (Ngày 1 → 7 → 30) sequence card
A sequence card with its Day 1 → 7 → 30 steps and the "Turn off", "Customers in sequence" and "Edit" buttons.

Create a new care sequence

AutomationCare sequences

Steps

  1. 1Open "Automation" › "Care sequences". In the "New sequence" box, click "Blank sequence" or one of the presets.
  2. 2Enter the "Sequence name", "Sequence key" (letters, digits and _) and "Description"; choose the "Board" and tick "Active" if it should run right away.
  3. 3"1. When does a customer enter?": pick the start event (e.g. "Đơn hàng đạt trạng thái", order reaches a status), or keep "Only when a rule calls "Start sequence"".
  4. 4"2. Steps": for each step enter a name, then choose the "Action" ("Message", "ZNS", "Call"), "After (days)", "Counted from" ("Entering the sequence" / "Previous step") and "Condition" ("Always", "If no new order", "If no reply").
  5. 5For a message step: type the "Message text" (use {customerName}, {productName}, {shopName}) or tick "AI writes the message from the customer context"; choose the "Message type" and what to do "Outside the chat window". Click "Add step" for more steps.
  6. 6"3. When does it stop?": tick conditions such as "Stop when the customer orders again", "Stop while the customer has an open complaint", "Stop when the customer opts out", "Stop when the customer replies". Click "Save".
New care sequence form with name, sequence key, description, start event and step 1
The "New care sequence" form: each step has Action / After (days) / Counted from / Condition.

Turn on automatic message campaigns

AutomationCampaigns & queue

Steps

  1. 1Open "Automation" › "Campaigns & queue". The "Automatic campaigns" box lists the rules that send messages with their "ON" / "OFF" status and "Matched · done" counts.
  2. 2Click the "OFF" / "ON" badge on a card to turn the campaign on or off.
  3. 3No campaigns yet? Open "Automation rules" › "Templates", filter "Campaign" and click "Install" (or use a template button in the "Install template:" box, when it is shown).
  4. 4Set "Quiet hours (no proactive messages)" with the 2 time fields and click "Save": scheduled messages that fall in this window are sent when quiet hours end.
  5. 5To change a campaign's conditions, cooldown or suggested content, click "Open automation rules →".
Templates filtered by the Campaign group, with templates for at-risk customers, dormant customers and restock / low stock
Templates filtered on "Campaign": AI-written message campaigns, each stating its cooldown.

Approve campaign messages in the queue

AutomationCampaigns & queue

Steps

  1. 1Open "Automation" › "Campaigns & queue" and scroll down to "Approval queue".
  2. 2Read the "…% of customers reachable" box (click "Re-check channels" to recount) and "Last 30 days" (reached, handed to rep, waiting for customer, unreachable, expired).
  3. 3Filter by status: "Pending approval", "AI composing", "Approved · waiting to send", "Sent", "Send failed (will retry)", "Expired"…
  4. 4For each pending message: click "Edit" to change the text or the running promotion, then "Save changes"; click "Approve & send" to send it; click "Skip" to reject it.
  5. 5With many messages pending, click "Approve all" and confirm "Approve & send to … customers".
  6. 6Click "Clean up processed items >30 days" to delete old rejected / expired items (nothing is sent).
Approval queue with the 99.8% of customers reachable box, Last 30 days results and the Pending approval status filter
Status filter ("Pending approval" selected); an empty queue offers an "Install a campaign template" link.

Understand the order of automatic assignment

AutomationAuto assignment

Steps

  1. 1Open "Automation" › "Auto assignment".
  2. 2Read the "Order of automatic assignment (activities / customers)" box: 1. the customer's current owner (if still active) → 2. the rep of the customer's territory → 3. the first matching policy, lowest priority number first → 4. nothing matches → unassigned, and the manager dispatches it.
  3. 3The "Assignment policies" column lists the policies with their priority number, assignment method, events, number of members and the "On" status.
  4. 4Click a policy to view / edit its details in the right-hand column.
Auto assignment screen with the 4-step assignment order box and the Live RR policy open
The blue box: the 4-step order the system uses to pick who gets the work.

Add an assignment policy

AutomationAuto assignment

Steps

  1. 1Open "Automation" › "Auto assignment" and click "Add policy".
  2. 2Enter a "Name", a "Priority" (lower numbers are checked first; the first matching policy decides) and a "Description", and tick "Active".
  3. 3"1. Which work does it apply to?": choose the "Board" and "Team (candidates = team members)", then click to select "Events", "Order / chat channel", "Activity source", "Activity kind", "Customer status", "Amount from (VND)" / "Amount to (VND)". Nothing selected in a group = any value.
  4. 4"2. Who gets it?": choose the method ("Round robin", "Least loaded", "VIP → senior staff", "Online first") and the "Members (empty = every member / the whole team)".
  5. 5Optional: "Online members only", "Max open activities per member (0 = no cap)" and "When everyone is full".
  6. 6Click "Preview" to simulate the last 7 days (how many events match, who would get them), then click "Save".
New policy form with name, priority 20, Active, the Board and Team pickers and the Events and Order / chat channel buttons
An unsaved policy shows "… is not saved yet." on the left; fill in "Which work does it apply to?" and "Who gets it?".

Turn on the AI autopilot for customer replies

AutomationAI autopilot

Steps

  1. 1Open "Automation" › "AI autopilot".
  2. 2If your plan does not include it, the screen only shows the "AI Autopilot - answers customers automatically" introduction: Starter can add it in Billing > Add-on modules, or upgrade to Pro / Business.
  3. 3Once it is included, Autopilot starts in "Preview (no sending)": the AI drafts an answer to every customer question and puts it next to your reps' replies, sending nothing to customers and using no AI credits. Under "Mode", choose "Auto-reply on" when you are happy (the first time it runs a further 14-day trial), or "Off" to spend no AI credits. Also switchable in Shop settings › AI & costs.
  4. 4Under "Mode per channel", choose "Off", "Outside business hours" or "Always on" for each channel, and set the "Business hours".
  5. 5Choose the "Question types the AI may answer", "Always hand off to a rep when" and "Maximum automatic replies per conversation"; tick "Send a holding message (once per conversation) when the AI hands off to a rep" and "Add an automatic-reply disclosure line", then click "Save settings".
  6. 6Follow the "Resolved by AI", "Handed to a rep" and "Answers corrected" tiles and the list of recent questions.
AI autopilot screen when the plan does not include the Autopilot module, showing only the introduction and plan information
Without Autopilot in your plan, the screen tells you which plans include it and where to buy it.

25 / 6 features

Rewards & payouts

One screen for every reward: track spending, create hot-reward campaigns, approve and pay out rewards, stock the points shop and calculate monthly commission.

View reward spending at a glance

Rewards & payoutsRewards & payoutsOverview

Steps

  1. 1Open "Rewards & payouts" in the sidebar, tab "Overview".
  2. 2Pick the granularity: "Week", "Month", "Quarter" or "Year".
  3. 3The "TOTAL SPEND PER PERIOD" chart shows the reward money paid out in each period.
  4. 4The "PUBLISHED VS. IN-PROGRESS BOUNTIES" chart compares the number of published reward programs with the number running.
  5. 5"TOP 5 EARNERS THIS …" lists the five people who earned the most rewards in the current period.
Overview tab of Rewards & payouts with the total spend per period chart
Pick Week / Month / Quarter / Year on the right; the spend chart and the Top 5 earners below.

Create and publish a hot-reward campaign (bounty)

Rewards & payoutsRewards & payoutsBounties & campaigns

Steps

  1. 1Open "Rewards & payouts" › tab "Bounties & campaigns". Click "Show setup guide" to see the 3 steps of the bounty lifecycle.
  2. 2Click "+ New campaign". The "CREATE REWARD CAMPAIGN" panel opens on the right.
  3. 3Fill in "Reward name", "Reward value" and "Target count".
  4. 4Fill in "Activity purpose" (a purpose code, e.g. care_call, callback) and "Required result" (an outcome code, e.g. reached_ok, won) — only activities matching both codes count.
  5. 5Pick the "Start date" and "End date", then click "Activate campaign in studio". The campaign goes to the "Draft" list.
  6. 6Check it, fix it with "Edit campaign" if needed, then click "Publish" and confirm.
  7. 7A published campaign can be paused with "Pause campaign" or resumed with "Reactivate campaign"; when it ends, find it in the "REWARD BOUNTY ARCHIVE".
Bounties & campaigns tab with the Create reward campaign panel
Campaigns by Draft / Published / Archived on the left; the create form on the right.

Approve reward claims and issue voucher codes

Rewards & payoutsRewards & payoutsApprove & pay

Steps

  1. 1Open the "Approve & pay" tab. "REWARD AUDIT LEDGER" shows the monthly spend, pending claims and approved/claimed claims.
  2. 2Pick a status in the filter ("Pending", "Approved", "Rejected", "Claimed"); you can also type in "Filter userId" or "Filter reward". Click "Refresh" to reload.
  3. 3For a pending claim, enter a "Voucher code (optional)" if there is one, then click "Approve" or "Reject".
  4. 4Once the reward has actually been handed over, click "Mark as claimed".
  5. 5Click "Load more" at the bottom of the list for older claims.
Approve & pay tab with the Reward audit ledger and the status filter
Three stat boxes at the top; the status filter and the claim list below.

Pay cash rewards through payroll and confirm days off

Rewards & payoutsRewards & payoutsApprove & pay

Steps

  1. 1On the "Approve & pay" tab, scroll down to "💼 REWARD PAYOUTS & DAYS OFF".
  2. 2"💵 Cash rewards to pay" lists the approved cash amounts. Click "⬇ Export payroll sheet" to get a file for accounting.
  3. 3Once paid, click "Mark paid" on each item and enter a payment reference (payroll period, transfer id) if you have one.
  4. 4"🌴 Days off to confirm" lists the days off staff redeemed, with the date they prefer. Click "Confirm day off" (or "Change date") to book it.
  5. 5Click "⬇ Export leave list" to get the list of days off.
Reward payouts & days off section with cash rewards to pay and days off to confirm
Two lists, "Cash rewards to pay" and "Days off to confirm", each with its own export button.

Add rewards to the points shop

Rewards & payoutsRewards & payoutsPoints shop

Steps

  1. 1Open the "Points shop" tab. In the "🛍️ ADD REWARD" panel, fill in "Reward name", "Description" and "Image URL (optional)".
  2. 2Enter "Price (points)" and pick a "Kind": "Voucher", "Cash", "Day off", "Merchandise", "Experience" or "Other".
  3. 3Enter "Value (VND / days)" — the amount, or the number of days for a day-off reward.
  4. 4Set "Stock", "Limit per person / month" and "Minimum level" if you want limits.
  5. 5Keep "Needs manager handover (unchecked = instant)" ticked if you want to approve each redemption; leave "On sale" ticked and click "Save".
  6. 6Use the "All gift types" filter and the search box to manage the list; click "Edit" on a reward to change its price or stock or take it off sale.
Points shop tab with the Add reward panel
The "Add reward" panel: point price, kind, stock, per-person limit and the "Needs manager handover" box.

Set up commission and export the monthly statement

Rewards & payoutsRewards & payoutsCommission

Steps

  1. 1Open the "Commission" tab. Tick "Calculate commission".
  2. 2Enter the "Base rate (%)" (used while revenue has not reached any tier) and the "Minimum revenue to qualify (VND)" (leave 0 for no minimum).
  3. 3Click "+ Add tier" to add a revenue tier: "Revenue from (VND)" and "Rate (%)". The rate of the tier reached applies to the whole month's revenue.
  4. 4Tick "Add level bonus" to add the extra commission % of each employee's level.
  5. 5Click "Save plan".
  6. 6In "📄 MONTHLY COMMISSION STATEMENT", pick a month to see each person's revenue, deals, rate, level bonus and commission; click "Download CSV" to get the file.
Commission tab with the commission plan and the monthly statement
Set the rates and revenue tiers at the top and click "Save plan"; the per-person statement and "Download CSV" below.

26 / 11 features

Run the KPI Arena

For managers: spot who is falling behind, assign support challenges, launch Happy Hours, pair battles, set up teams and seasons, approve big deals, fight cheating and tune the points rules.

Track pacing against targets and follow the coach's advice

KPI ArenaArena consolePacing & coach

Steps

  1. 1Open "KPI Arena" › "Arena console", tab "Pacing & coach".
  2. 2The four boxes at the top count people "ON TRACK", "AT RISK", "OFF TRACK" and with "ENERGY DROPS"; the line below says what % of the month has elapsed. Click "Refresh" to recalculate.
  3. 3Each employee card shows the % achieved for "Meetings", "Revenue" and "Deals" against the monthly target, with the coach's advice.
  4. 4Click the action button in the advice (e.g. "Assign support challenge →", "Pair a battle", "Launch Happy Hour", "Review flags") to open the right screen with that employee already picked.
  5. 5Click "Edit individual targets" to set "Meetings/month", "Revenue/month" and "Deals/month" for that person, then "Save".
Pacing & coach tab: four status boxes and a pacing card per employee
Each card shows % meetings, revenue and deals, the coach's advice and the "Assign support challenge →" and "Edit individual targets" buttons.

Assign a support challenge to an employee

KPI ArenaArena consoleSupport challenges

Steps

  1. 1Open the "Support challenges" tab. In "ASSIGN A SUPPORT CHALLENGE", pick the "Employee" and the "Ride-along buddy (optional)".
  2. 2Enter the "Challenge name" and "Description".
  3. 3Pick the "Metric": "Meetings", "Closed deals" or "QA-standard conversations".
  4. 4Enter the "Target", "Bonus points" and "Duration (days)", then click "Assign challenge".
  5. 5In the list below, click "Edit" to change the due date or add/remove customers in the challenge, then "Save changes"; click "Cancel" to cancel the challenge.
  6. 6If there are "Calls waiting for approval" (calls the employee logged themselves), click "Approve" or "Reject".
Support challenges tab with the Assign a support challenge form filled in
Pick the employee, buddy, metric and target, then click "Assign challenge".

Launch a Happy Hour (flash challenge)

KPI ArenaArena consoleHappy hours

Steps

  1. 1Open the "Happy hours" tab. Click a preset to fill the form quickly: "2 golden hours: 20M deal or meet 2 customers", "Meeting sprint" or "Big deal hunt 50M".
  2. 2Adjust the "Event name" and "Description"; for "Start" pick "Right now" or "Schedule", and enter the "Duration (minutes)".
  3. 3Set the condition: "Minimum deal (VND)" and/or "Minimum meetings", then choose the "Rule": "Meet any condition" or "Meet all conditions". You can also set a "Check-in point multiplier".
  4. 4Set the reward: "Reward", "Reward value (VND)", "Bonus points", "Max winners" and "Budget cap (VND)".
  5. 5Click "⚡ Launch now".
  6. 6In the event list, follow the winners and the budget spent; click "End now" or "Cancel event" when needed.
Happy hours tab with the presets and the launch form
Three preset buttons at the top; the condition, reward and "Launch now" button below.

Pair a 1v1 battle

KPI ArenaArena consoleBattles

Steps

  1. 1Open the "Battles" tab. In "⚔️ PAIR A 1V1 BATTLE", pick "Player A" and "Player B" (two different people).
  2. 2Pick the "Metric": "Meetings", "Revenue", "Field revenue", "Deals" or "KPI points"; enter the number of "Days".
  3. 3Enter the "Stake per player (pts)" and "Company bonus (pts)". The "Pot: … pts" line updates as you type.
  4. 4To add a prize, fill in "Prize (optional)" and "Prize value (VND)".
  5. 5Click "Start battle".
  6. 6In the battle list, click "Cancel & refund" if you need to stop a battle.
Battles tab with the Pair a 1v1 battle form
Pick two players, the metric and the stakes; the pot is shown just above "Start battle".

Set up teams and start a team battle

KPI ArenaArena consoleTeams

Steps

  1. 1Open the "Teams" tab. In "👥 NEW TEAM", enter the "Team name", tick the members and pick the "Captain", then click "Save".
  2. 2Repeat for the second team. Each person can be in only one team (people already in another team are marked "in another team").
  3. 3In "🛡️ NEW TEAM BATTLE", pick "Team A" and "Team B", the metric and the scoring: "average per member" or "team total".
  4. 4Enter the "Days", "Bonus per winning member" and "Team prize (optional)", then click "Start battle".
  5. 5Use "Edit" to change members and "Disband" to break up a team.
Teams tab with the New team and New team battle panels
Tick the members, pick the captain and click "Save"; the "New team battle" panel is right below.

Create a season with promotion and relegation

KPI ArenaArena consoleSeasons

Steps

  1. 1Open the "Seasons" tab. In "🏆 NEW SEASON", enter the "Season name" and pick the "Start" and "End".
  2. 2Pick "Ranked by": KPI points, revenue, meetings or deals; enter the promoted % (▲) and the relegated % (▼).
  3. 3Under "Divisions (lowest to highest)", name each "Division" and set "Points for 1,2,3" (prize points by rank, comma separated) and the "Champion prize".
  4. 4Click "Create season".
  5. 5In the season list, click "Cancel event" if you need to cancel a season.
Seasons tab with the New season form and the division setup
Pick the ranking metric, the promoted/relegated % and the prize points for each division.

Approve big deals before they score

KPI ArenaArena consoleDeal approvals

Steps

  1. 1Open the "Deal approvals" tab. The "Approval threshold: …" line shows the value that needs approval.
  2. 2Pick "Pending approval", "Approved" or "Rejected" to filter.
  3. 3Each deal shows its owner and the date it was won. If needed, change the "Approved value (≤ …)" (it cannot exceed the deal value) and enter a "Note".
  4. 4Click "Approve" or "Reject".
Deal approvals tab with the status filter and the approval threshold
Filter Pending approval / Approved / Rejected; the approval threshold is shown next to it.

Handle check-in fraud flags

KPI ArenaAnti-cheatFlags

Steps

  1. 1Open "KPI Arena" › "Anti-cheat", tab "Flags".
  2. 2Filter by employee ("All employees") and status ("Open", "Violation confirmed", "Valid"); keep "Highest risk first" ticked to see the worst cases first.
  3. 3Each flag shows its severity, risk %, distance from the customer, photo, report quality and the employee's appeal (if any). Click "Compare on the map" to see the locations.
  4. 4Enter a penalty (leave it empty for the default) and a "Review note", then click "Confirm violation" or "Valid".
  5. 5Use the "Check-ins" tab to review every check-in and click "Flag as suspicious" when needed; the "Customer locations", "Devices" and "AI model" tabs let you dig deeper.
Anti-cheat screen, Flags tab with the employee and status filters
Six tabs at the top; the filters and an explanation of when flags appear.

Add or deduct points manually

KPI ArenaAnti-cheatAdjust points

Steps

  1. 1Open "Anti-cheat", tab "Adjust points".
  2. 2In "Manual point adjustment", pick the employee.
  3. 3Enter "Points (negative to deduct)" and a "Reason".
  4. 4Click "Apply".
Adjust points tab with the manual point adjustment form filled in
Pick the employee, enter the points and the reason, then click "Apply".

Set the points, anti-cheat and prize rules

KPI ArenaRules & economy

Steps

  1. 1Open "KPI Arena" › "Rules & economy".
  2. 2"POINTS" and "POINTS FROM CALLS, ORDERS & SUPPORT": points for a GPS-verified / unverified check-in, the report bonus, a closed deal, every 1M of revenue, a qualified call, a case resolved within SLA…
  3. 3"ANTI-CHEAT" and "AI & RISK MODEL": verification radius, max GPS error, max travel speed, require a photo, biometric confirmation ("Off", "Encouraged", "Required"), enable AI Coach…
  4. 4"DEAL APPROVAL & SEASONS", "INSTANT REWARDS", "RE-ENGAGEMENT CHALLENGE", "PACING THRESHOLDS" and "DEFAULT MONTHLY KPI TARGETS".
  5. 5"PRIZE TABLES": edit each row of "🎡 Lucky wheel" and "🎁 Mystery chest" (label, kind Points / Voucher / Cash / Day off / Miss, value, weight); "+ Add prize", or "✕" to remove one.
  6. 6"🌳 CAREER TREE": level name, minimum XP, extra commission %; "+ Add level".
  7. 7Click "Save" at the bottom of the page.
Rules & economy screen with the points and anti-cheat settings groups
The settings groups run from top to bottom; the prize tables and career tree are at the end of the page, with the "Save" button.

Measure the Arena's ROI and export the points ledger

AdministrationOpen API & CRM

Steps

  1. 1Open "Administration" › "Open API & CRM". The "📈 RETURN ON INVESTMENT" block is at the top.
  2. 2Pick the period: "7 days", "30 days" or "90 days".
  3. 3Read the boxes: "REVENUE", "MEETINGS" (vs the previous period), "REWARD SPEND" (with revenue per 1 VND of reward), "PARTICIPANTS", "GPS VERIFIED RATE", "CHECK-INS BLOCKED", "POINTS PENALIZED" and "REWARDS PENDING".
  4. 4Click "⬇ Export points ledger (audit)" to get every points movement.
  5. 5Click "⬇ Export levels & commission" so accounting can add each level's extra commission % to payroll.
Open API & CRM screen with the Return on investment block and the two export buttons
Pick 7 / 30 / 90 days on the right; the "Export points ledger (audit)" and "Export levels & commission" buttons below the boxes.

27 / 2 features

Quality & compliance: banned phrases and conversation QA

Keep every reply within the rules: block banned phrases in AI replies and score the quality of each rep's chats and calls for coaching.

Add a banned phrase to the filter

Quality & complianceCompliance & QAViolations

Steps

  1. 1Open "Quality & compliance" › "Compliance & QA", tab "Violations".
  2. 2Under "Add a new banned phrase", type the word or phrase to block (e.g. "guaranteed 20%/year return").
  3. 3Choose its group: "Off-platform diversion", "Guaranteed rate/return" or "Unverified medical claim".
  4. 4Click "Add phrase". The phrase appears in the list below.
  5. 5For an existing phrase: click "Disable" to pause it, "Re-enable" to use it again, or "Delete" (and confirm) to remove it. Click "Refresh" to reload the list.
Violations tab: Banned-keyword filter with "private bank transfer" typed in, the Off-platform diversion group and the Add phrase button
Type the phrase, choose its group, then click "Add phrase".

Score conversation quality and open coaching packs

Quality & complianceCompliance & QAConversation QA

Steps

  1. 1Open "Quality & compliance" › "Compliance & QA", tab "Conversation QA".
  2. 2In "Settings", tick "Score conversations" (nightly and when a conversation completes; 100% of conversations with an order / complaint, the rest are sampled). Optional: "Count toward Arena", "Allow call recording uploads", "Score calls".
  3. 3Set the "Sample rate (%)", "Low QA threshold", "Good score threshold", "Max Arena points / week" and "Min conversations / week", then click "Save settings".
  4. 4Pick "7 days" / "30 days" / "90 days" and "Chat + calls" / "Chat only" / "Calls only". Once scoring is on, click "Score now" to score straight away instead of waiting for the night.
  5. 5The "By rep" table shows each rep's conversations, average score and conversations below standard; click a name to see their 3 conversations that most need improving.
  6. 6Click "Coaching pack" (or choose a rep in the "Coaching pack for rep…" box) to open a coaching pack. Under "Recently scored conversations" you can "Re-score" a conversation or "Save as draft script" a better answer.
Conversation QA tab: 30 days and Chat + calls pickers, the Coaching pack for rep box, and the Settings box with thresholds and the Save settings button
The "Settings" box: tick "Score conversations", then "Save settings" to start scoring.

28 / 2 features

CRM/ERP integration: Open API & webhooks

Let other software (CRM, ERP, POS, warehouse software, automation tools) send data in and receive events from the system — you only create a key and hand it to your IT team.

Create an API key and choose its scopes

AdministrationOpen API & CRMAPI keys for CRM/ERP

Steps

  1. 1In the "🔑 API keys for CRM/ERP" card, type a name in the "Connection name" box (e.g. KiotViet store 1).
  2. 2Under "Scopes (what this key may call)", keep only what that system needs: "Push arena events", "Read player profiles", "Read points ledger", "Read inventory", "Update inventory", "Push orders". All are ticked by default.
  3. 3Click "Create key". Copy the key right away ("Copy this key now - it is only shown once") and click "Saved, close".
  4. 4Give your IT team the key plus the "📘 Open API" and "📦 Stock sync (Open API)" instructions just below (with sample commands and a "Copy" button).
  5. 5When a key is no longer used, click "Revoke". The "last used …" line helps you spot forgotten keys.
API keys for CRM/ERP card: the Connection name box filled with KiotViet store 1, the Create key button and 6 scope boxes, all ticked
Name the connection, untick the scopes it doesn't need, then click "Create key".

Receive events through webhooks

AdministrationOpen API & CRMEvent webhooks

Steps

  1. 1In the "🪝 Event webhooks" card, enter a "Webhook name" and the receiving address your IT team gives you (https://…).
  2. 2Click the events you want (e.g. deal.won, order.created, inventory.low). "Select no events to receive all of them."
  3. 3Click "Create webhook". Copy the "Signing secret (shown once)" and give it to IT so they can verify signatures.
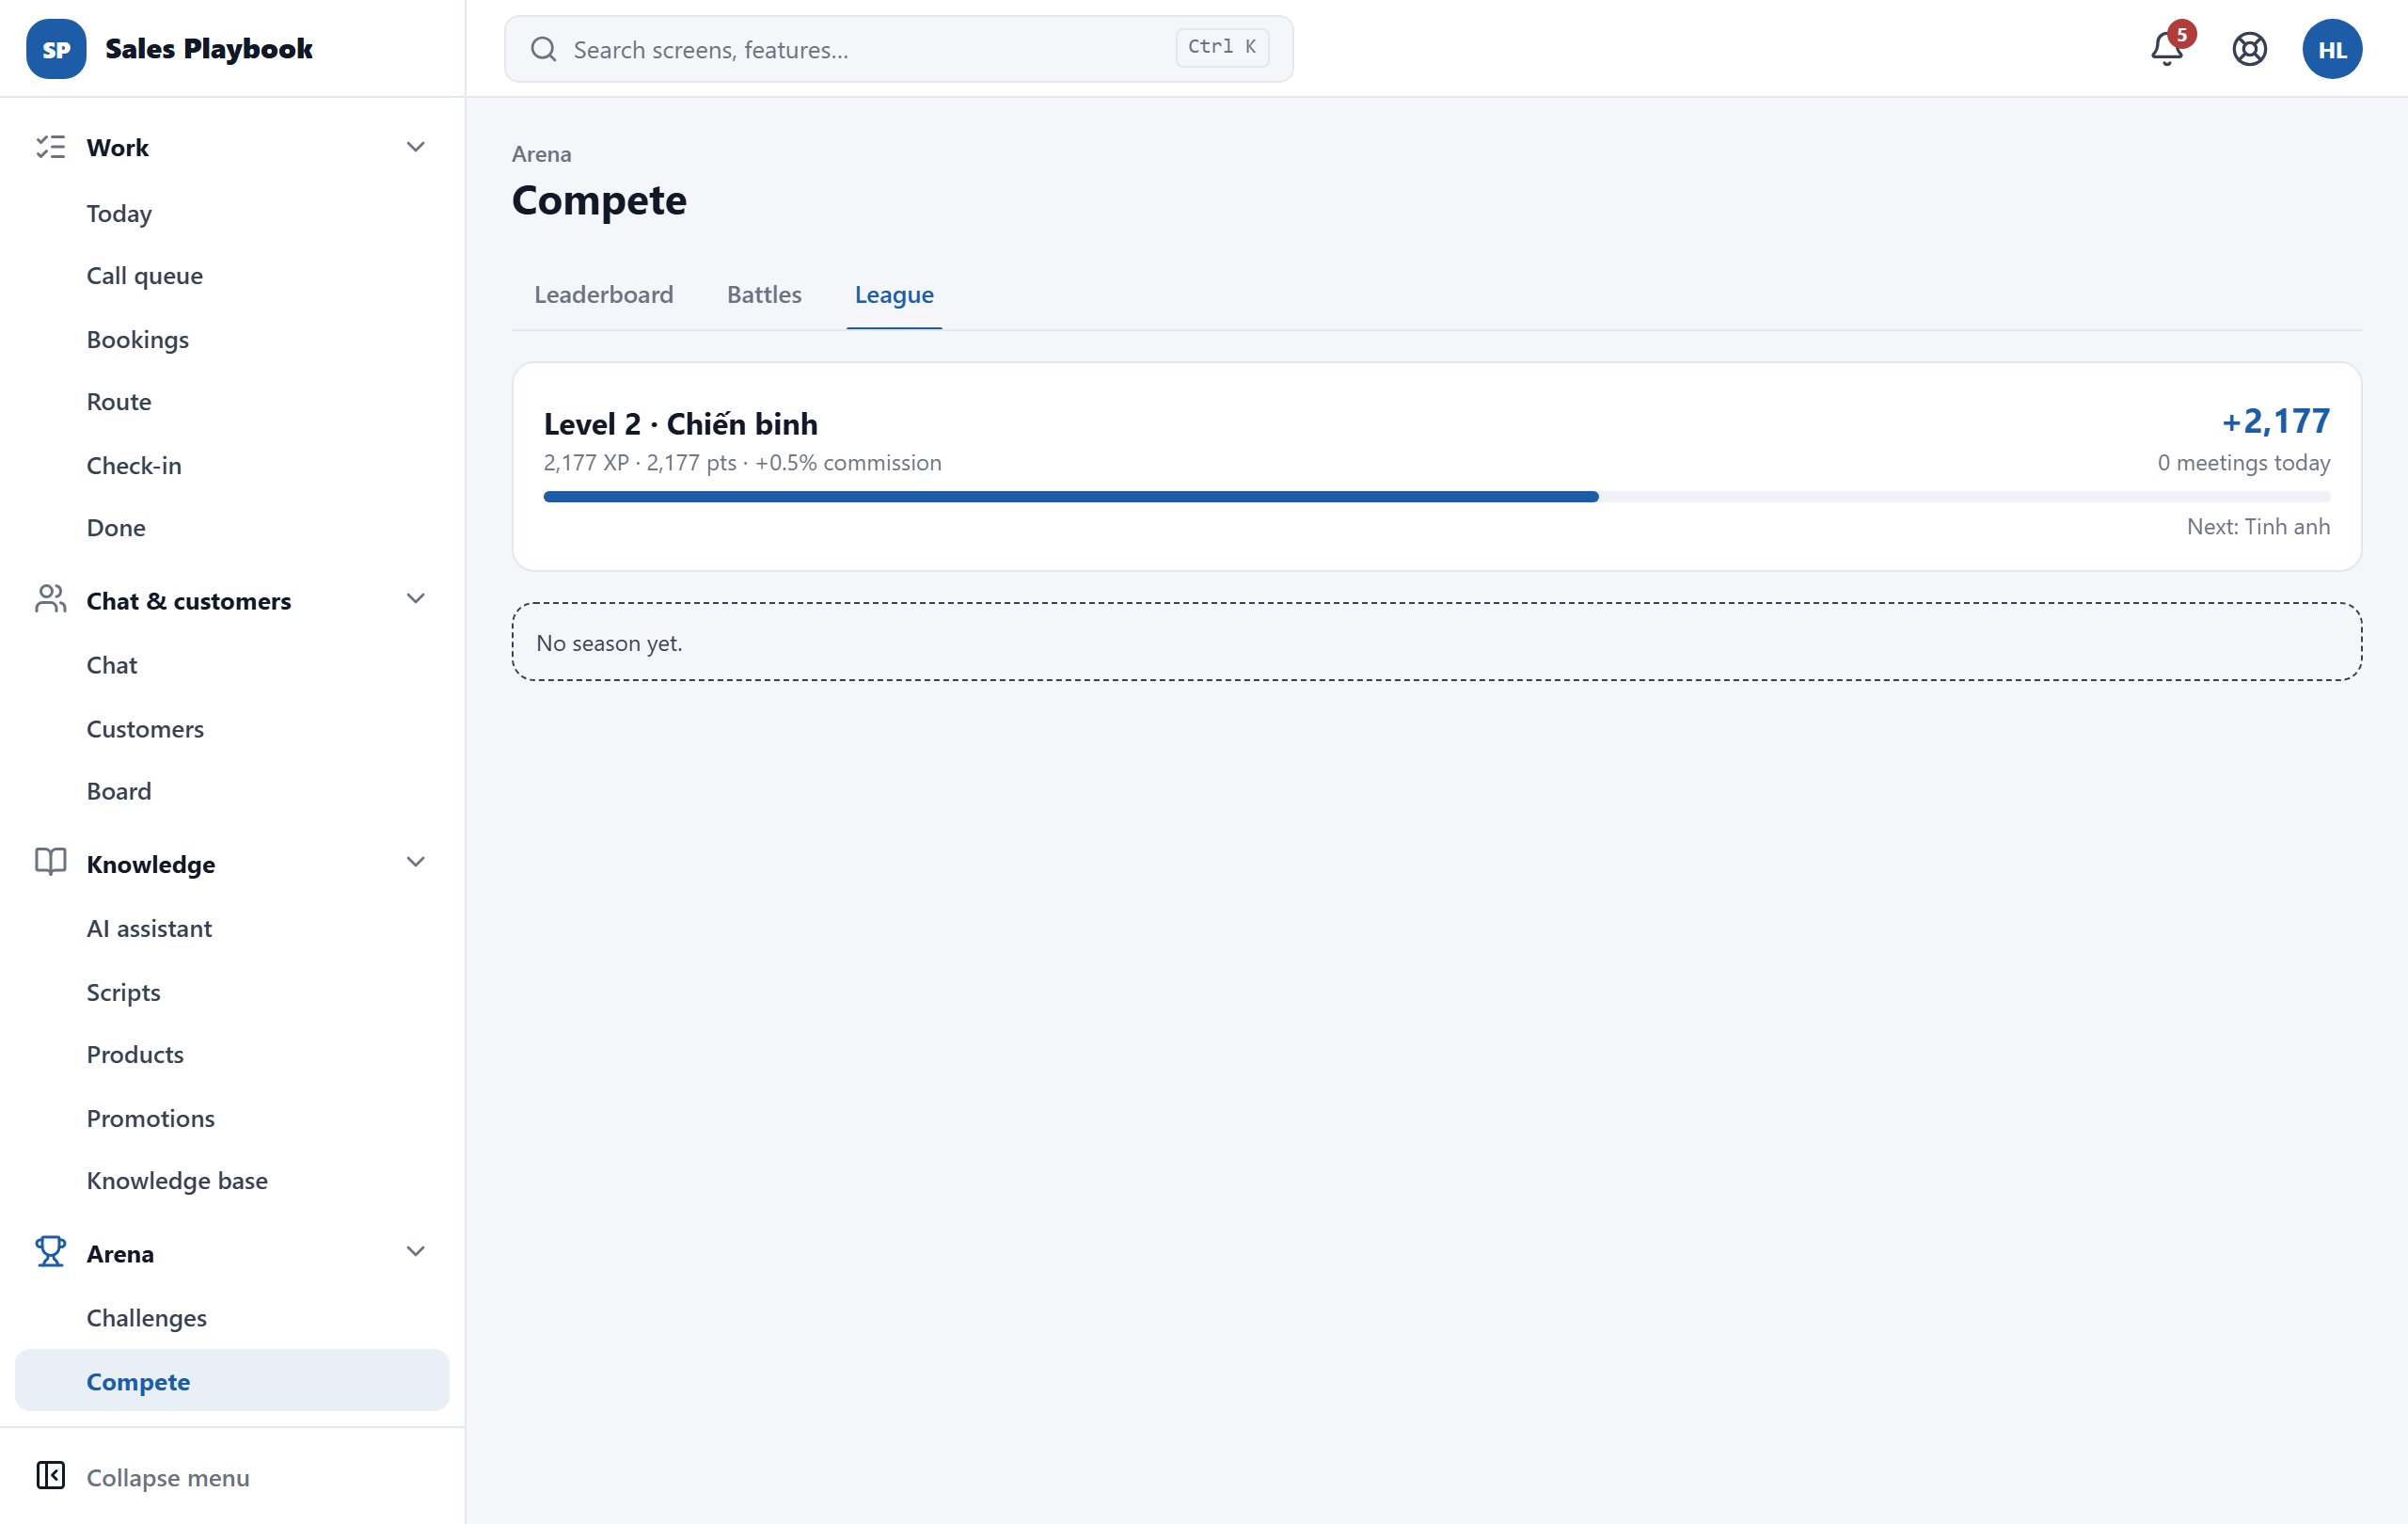
  4. 4On a created webhook, use "Send test" to check the connection; "Pause" / "Resume" or "Rotate secret" when needed.
  5. 5Check the "📬 Webhook delivery log" to see which events were sent or failed; click "Refresh" to update it and ↻ to redeliver manually.
Event webhooks card: webhook name and https address filled in, the events deal.won, inventory.low and order.created selected, the Create webhook button; the Webhook delivery log below
Selected events are highlighted. Selecting none means you receive all of them.

29 / 4 features

Plan, AI quota & invoices

Follow your plan and AI quota, buy more AI requests, seats and modules, pay by QR, renew, downgrade, pause and look up invoices.

Track your current plan, AI quota and seats

AdministrationPlan & invoices

Steps

  1. 1Open "Administration" › "Plan & invoices" (Billing Hub). The "Recommended from your real usage" card suggests the plan that fits your shop based on real AI requests and active users.
  2. 2The "Current plan status" card: plan name, status, "Expiry date" (days left) and employees / slots. Buttons "Renew plan", "View plans", "Add 1 seat".
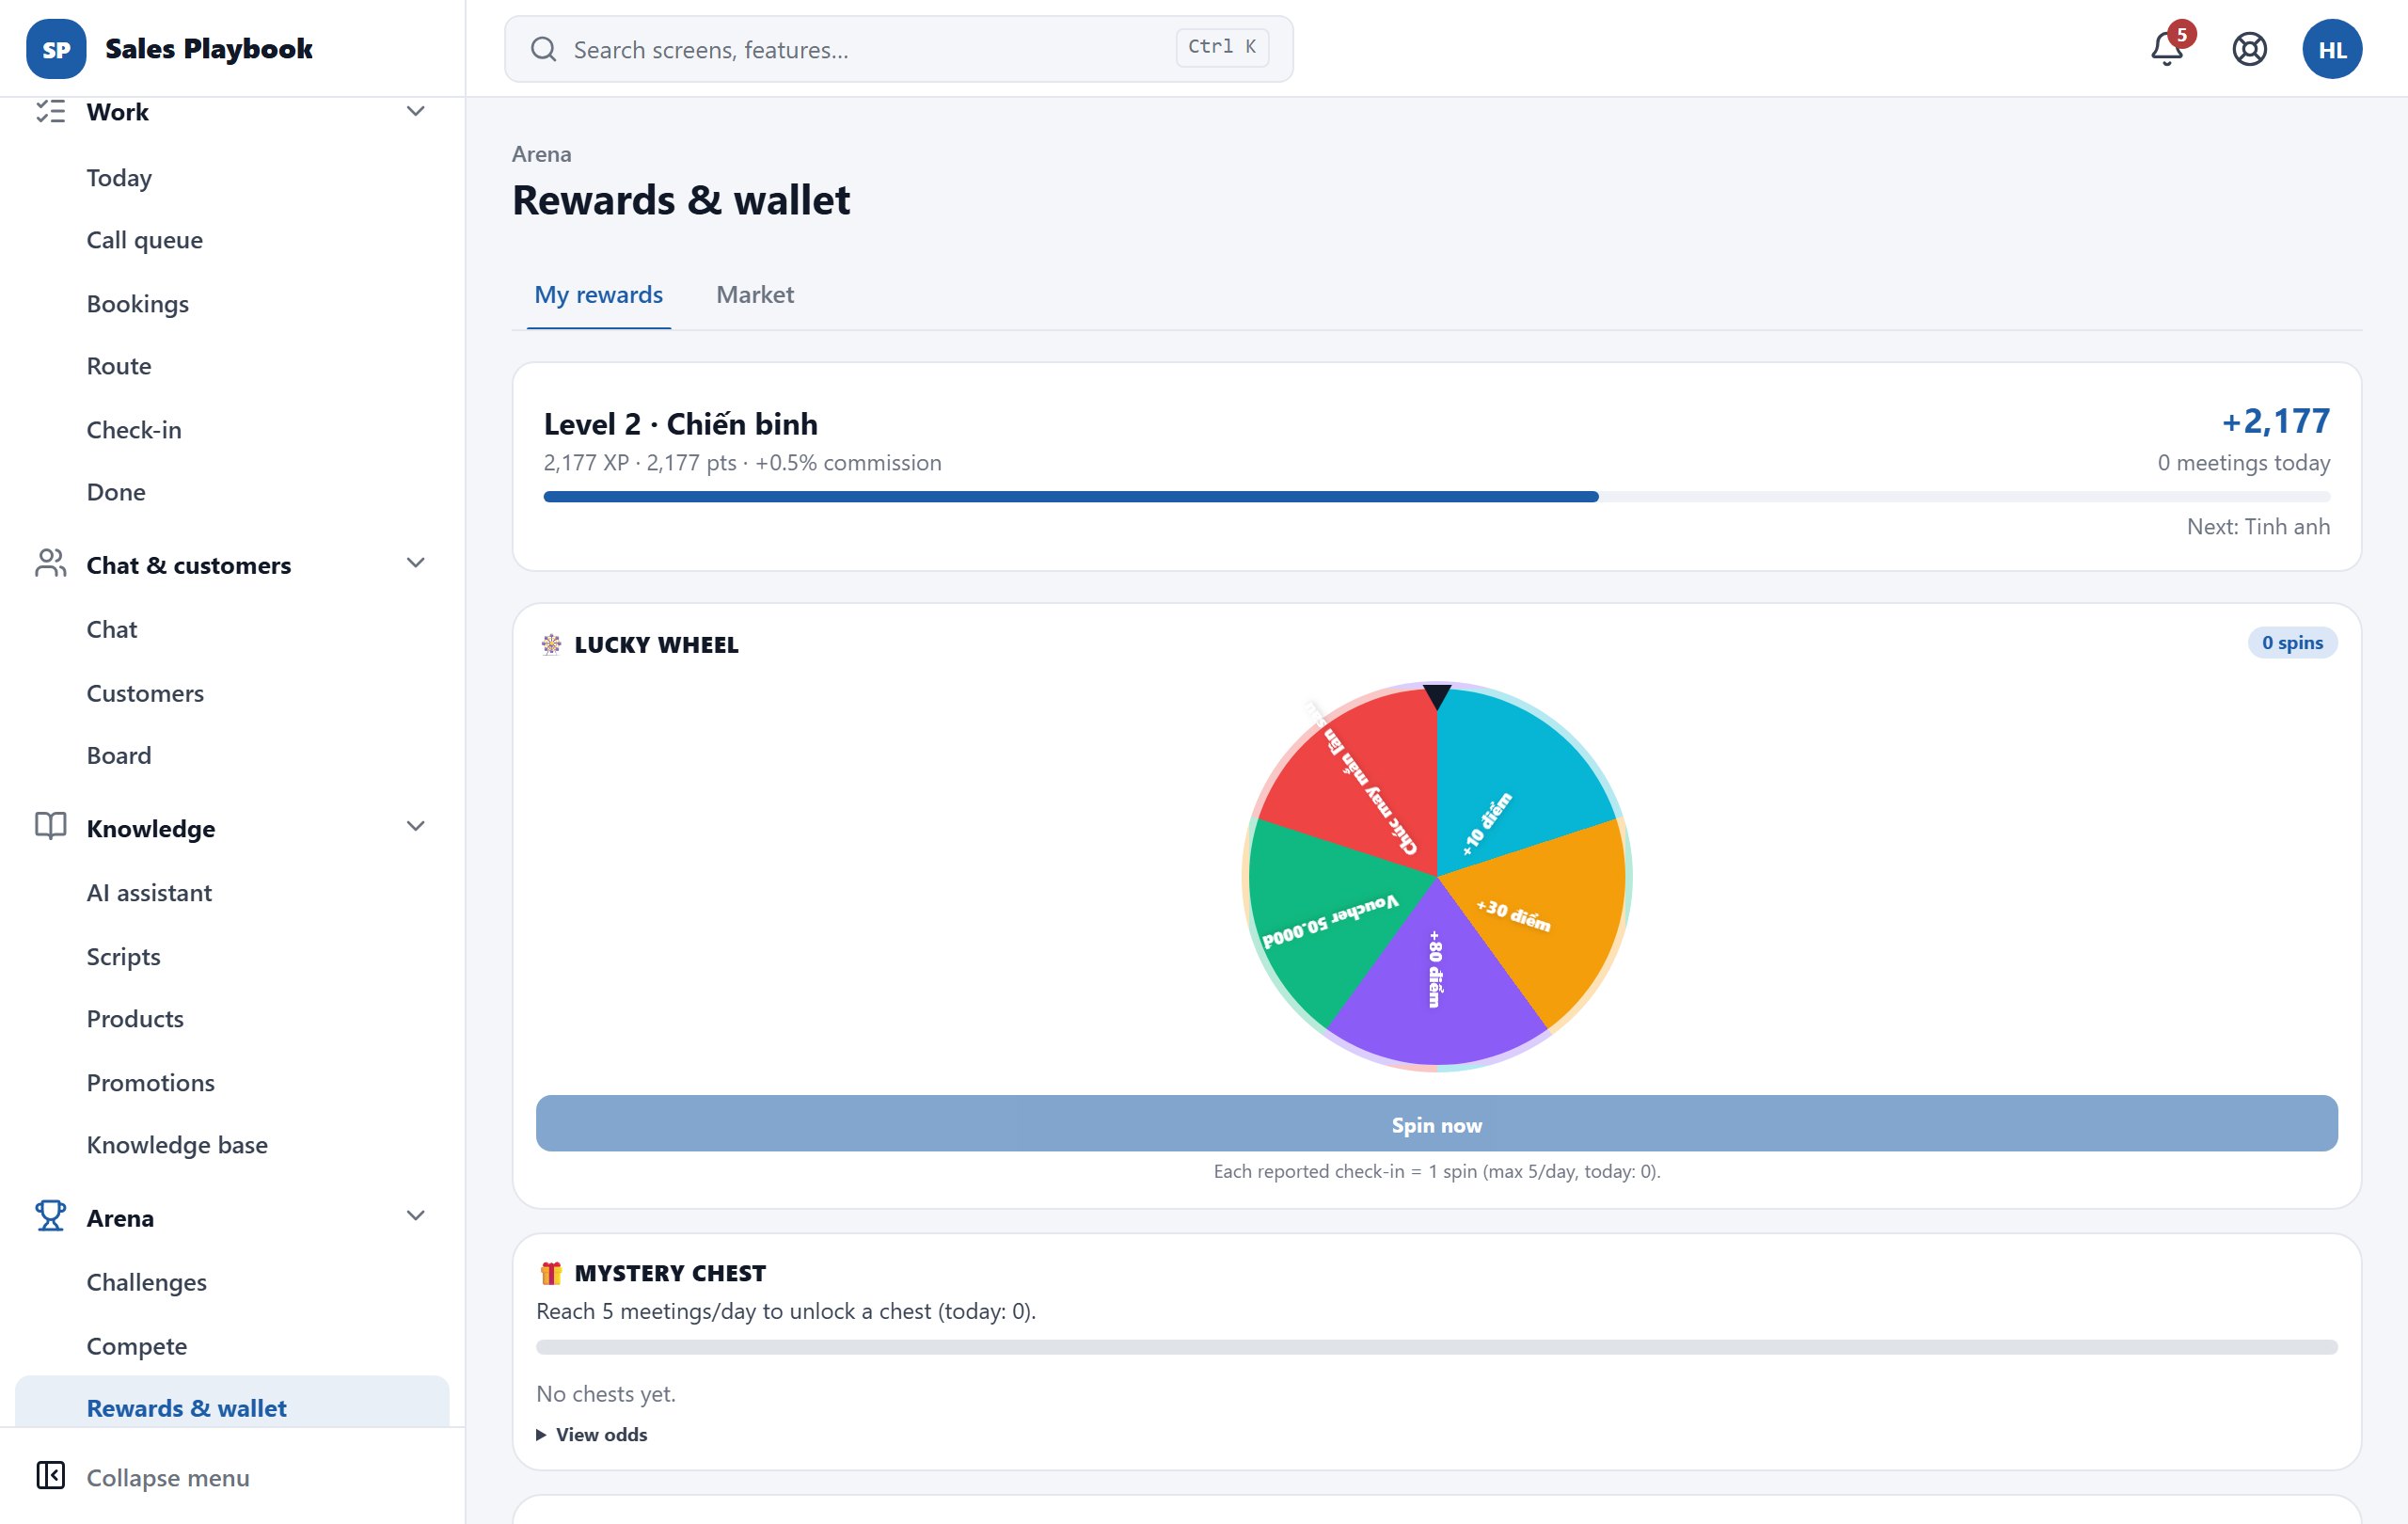
  3. 3The "AI quota usage" card: used / total requests, requests left and how many days they should last. Click "Open AI top-up options" to buy more.
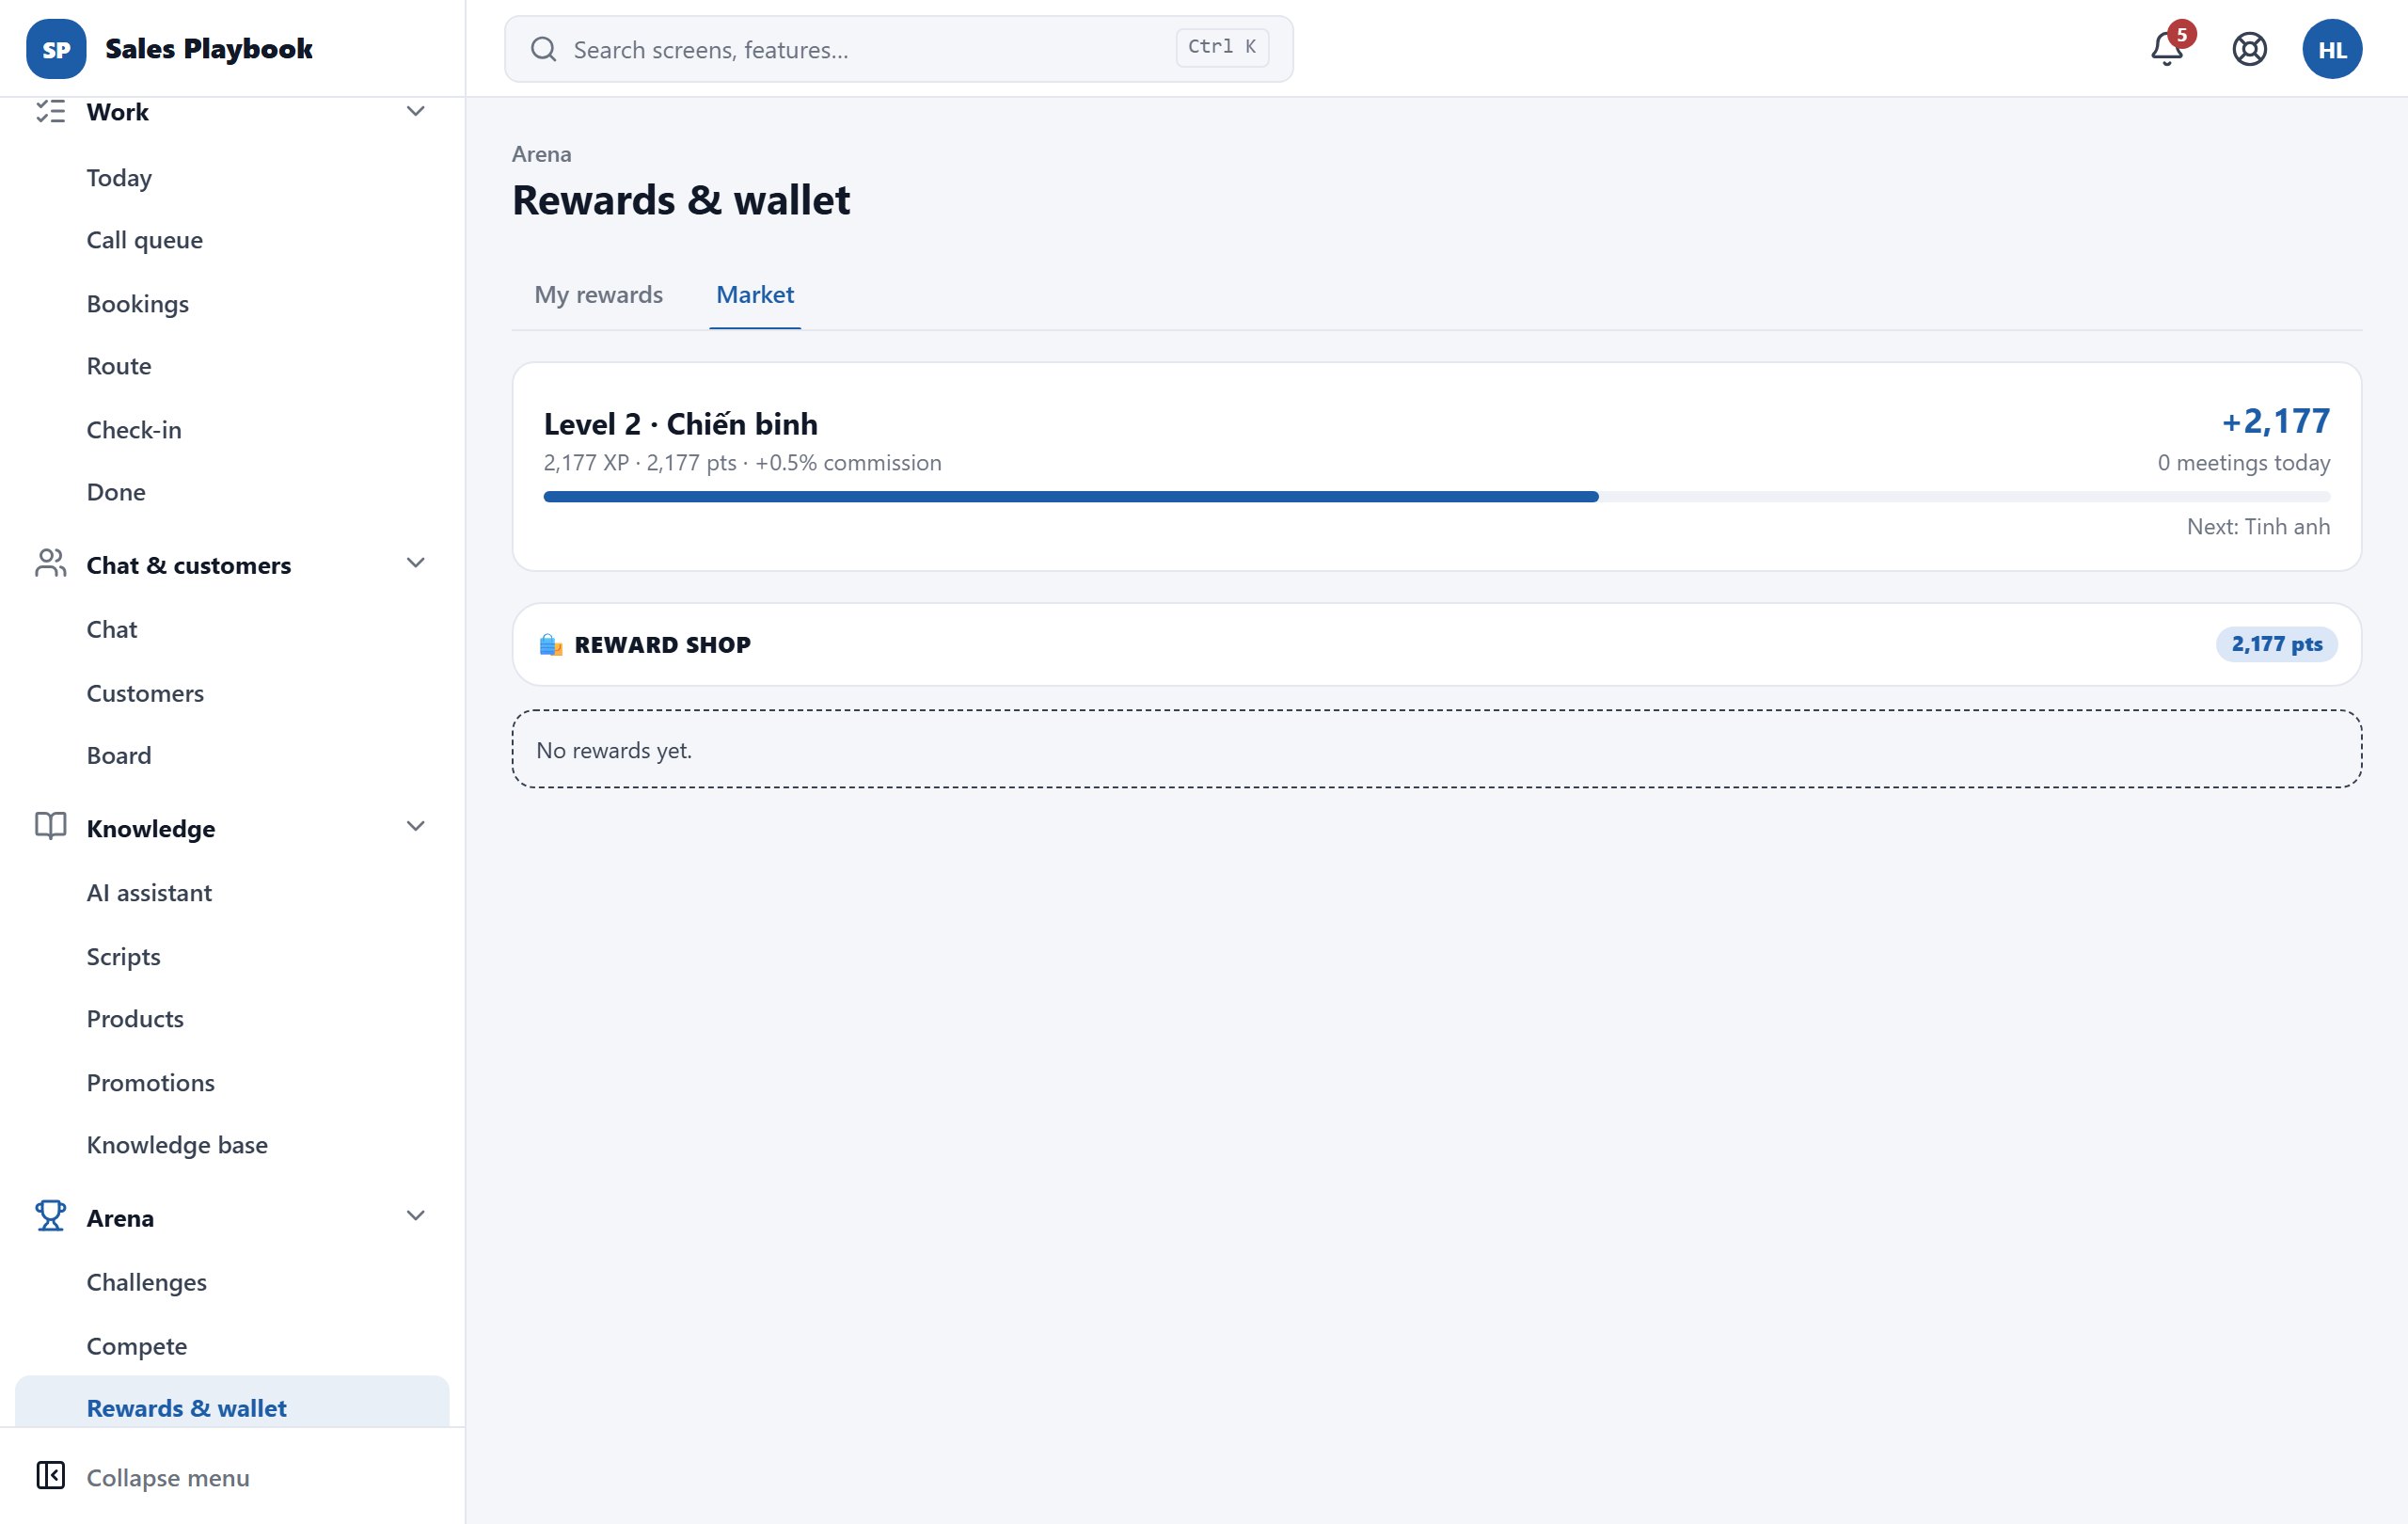
  4. 4The "Staff seats" block: the seat breakdown (included in the plan, purchased), who holds a seat, and the "Next renewal". To reduce purchased seats from the next cycle, enter a number in "From next cycle keep N extra seats" and click "Save for next cycle".
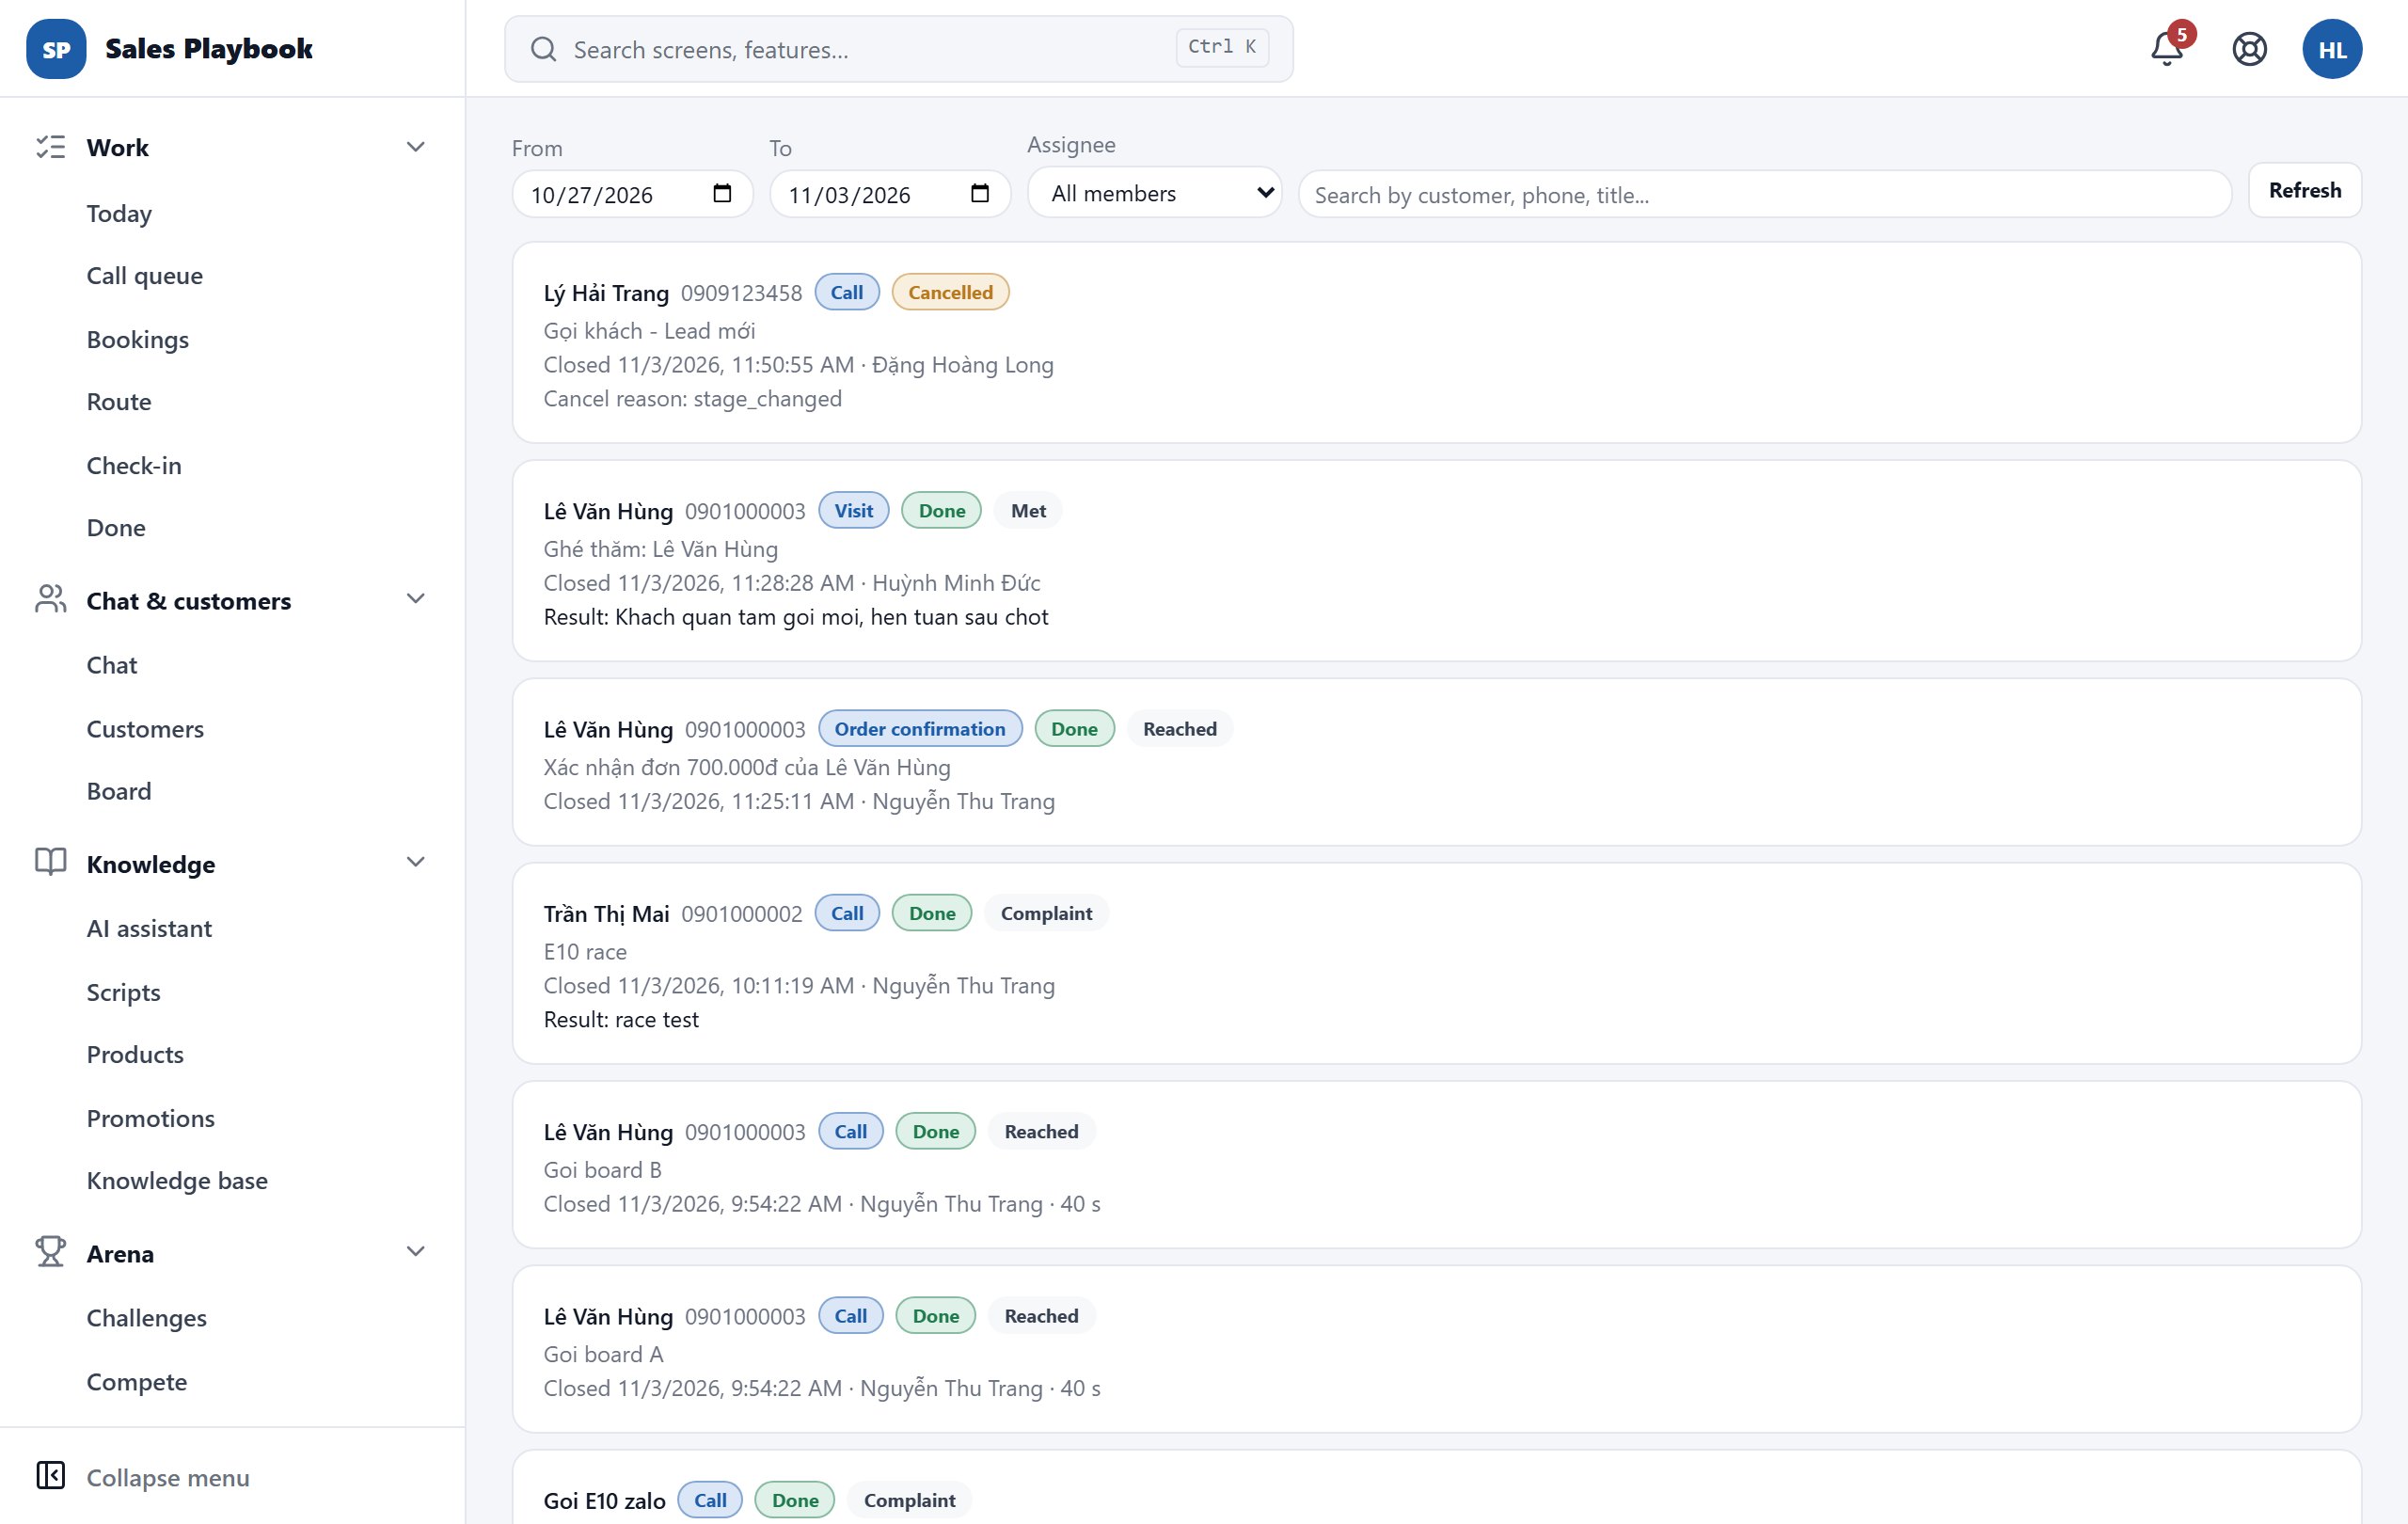
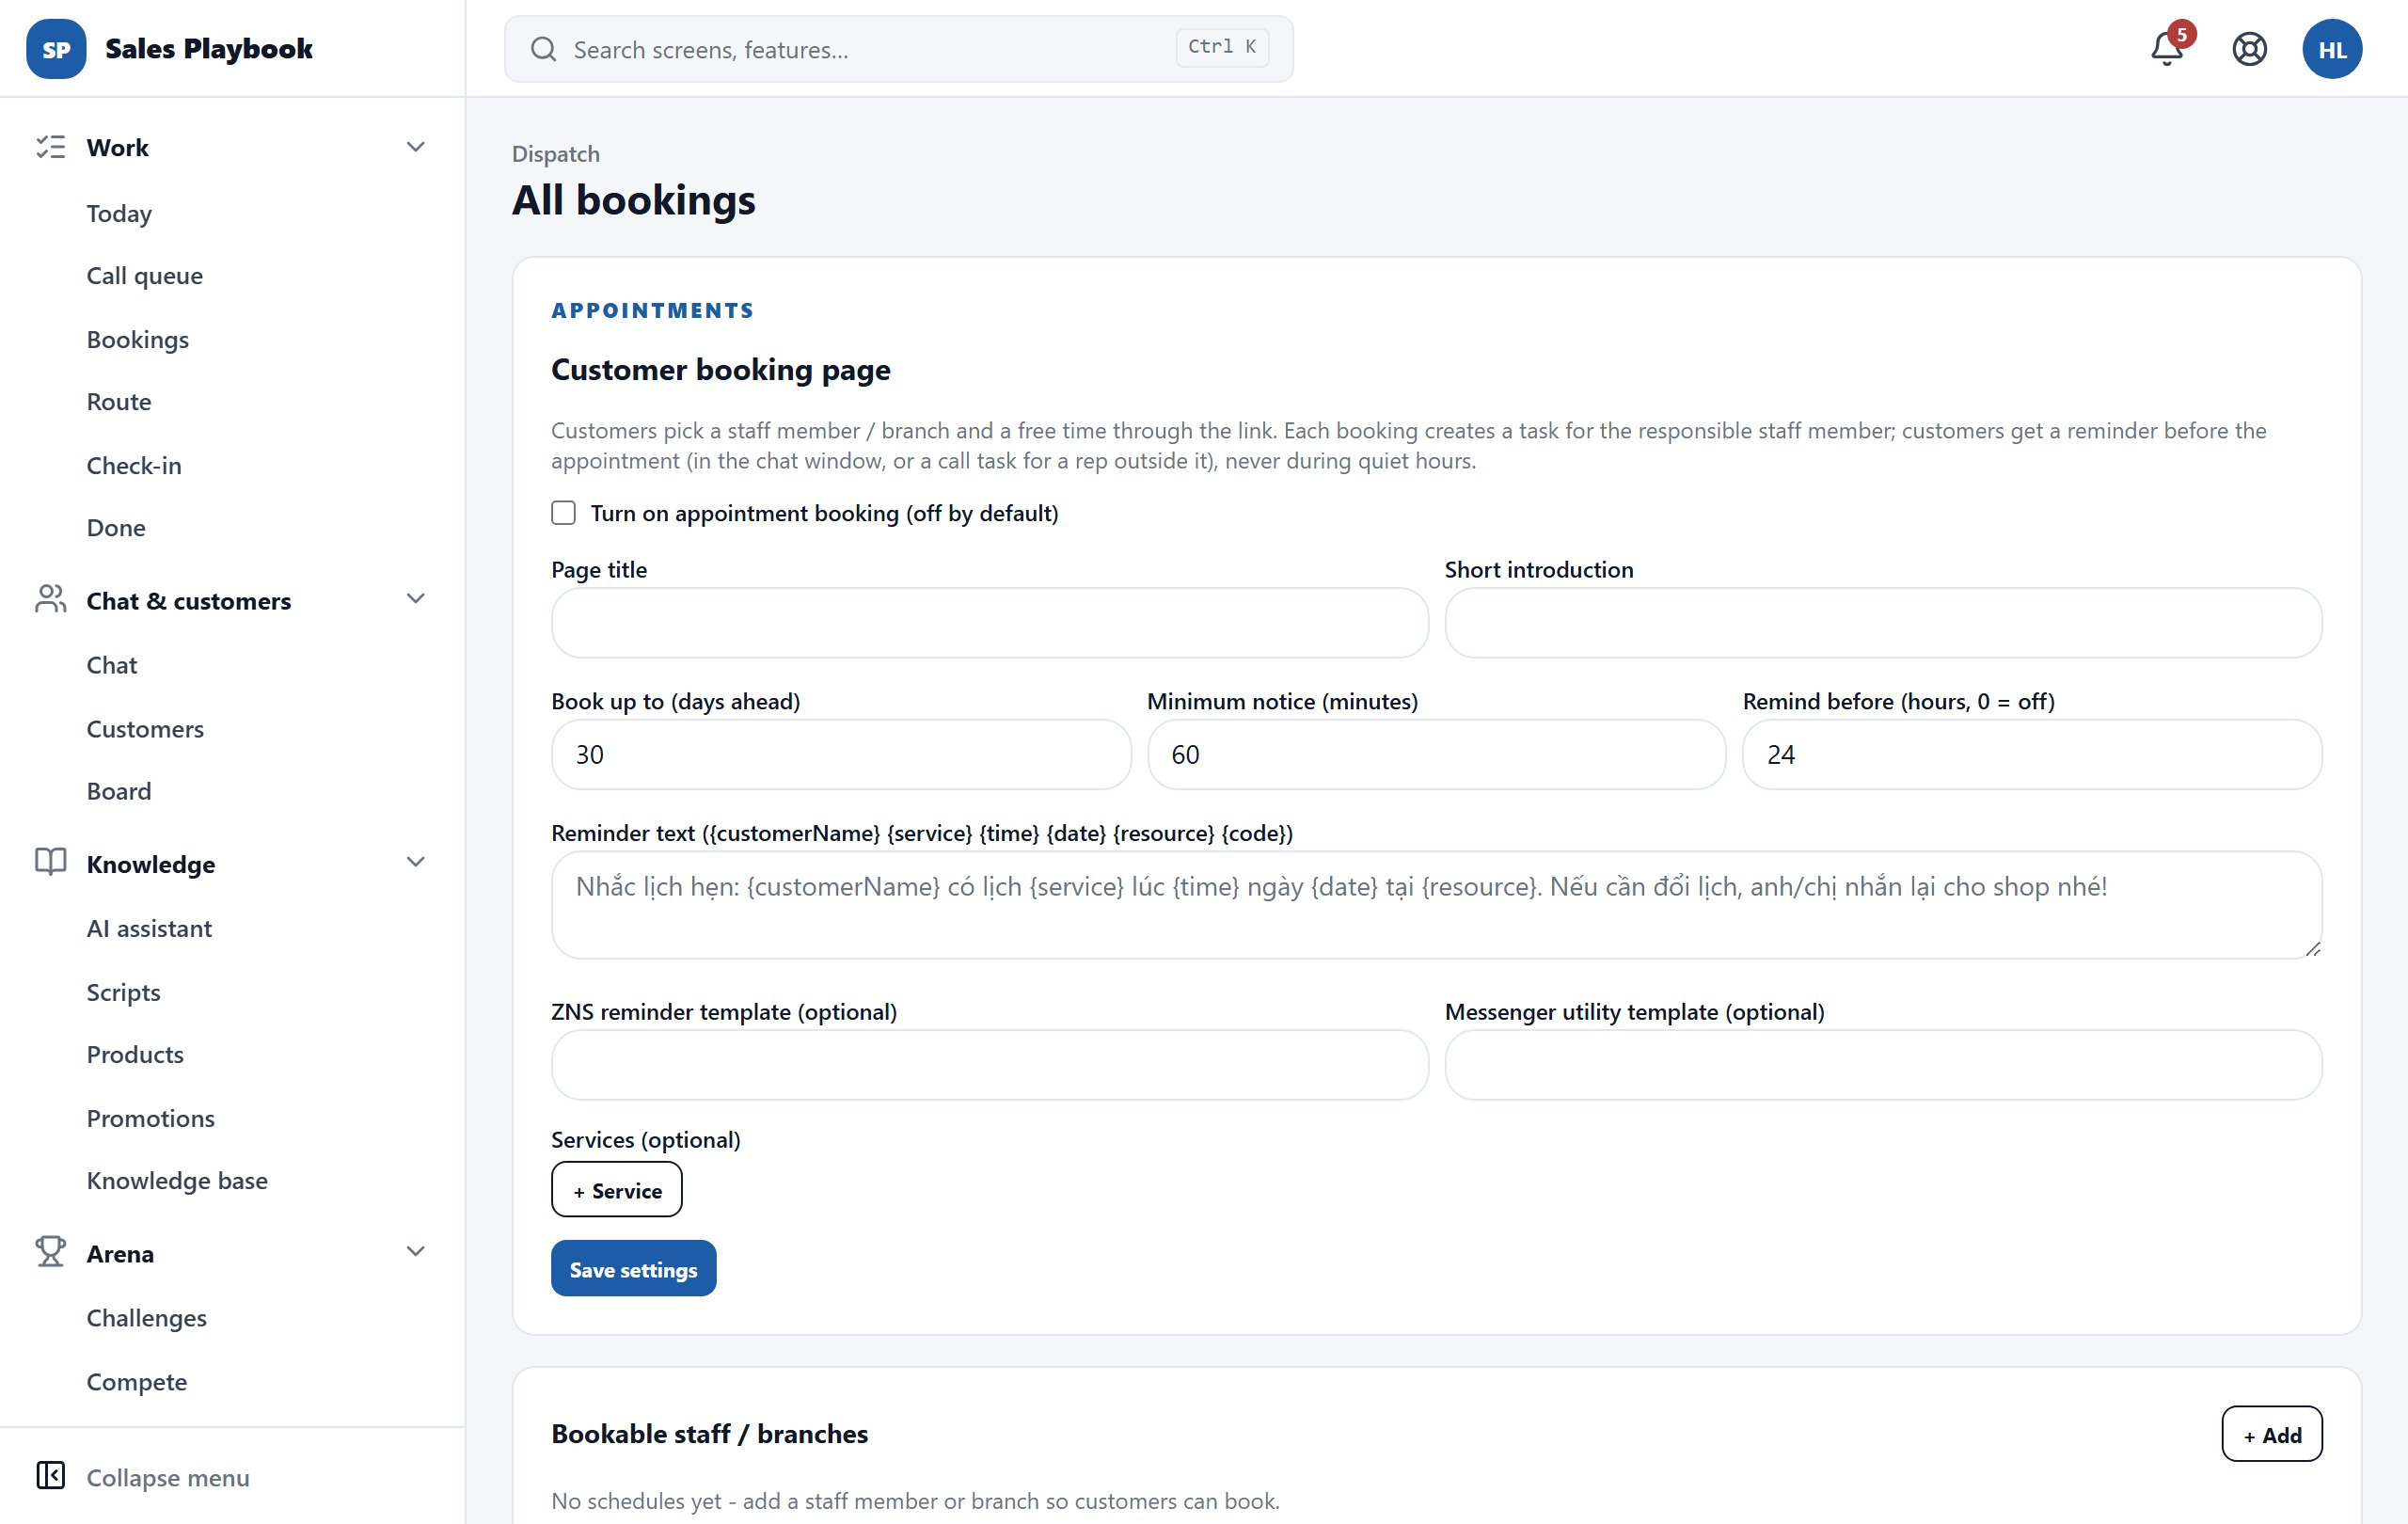
  5. 5Scroll down to "Subscription plans" to compare plans billed "Monthly", "3 months", "6 months" or "Annual (2 months free)".
Billing Hub: the Recommended from your real usage card suggesting Pro, the Current plan status card (trial plan, 14 days left, 3/3 slots), the AI quota usage card and the Staff seats block
The "AI quota usage" card estimates how many days your requests will last at the current pace.

Buy a plan, AI requests, seats or modules and pay by QR

AdministrationPlan & invoices

Steps

  1. 1Choose what to buy: "Choose this plan" on a plan in "Subscription plans"; a pack in "Top-up AI requests" (e.g. "AI +500 lượt"); "Buy 1 more seat" in "Seat add-on"; or "Buy & activate" on a module in "Add-on modules".
  2. 2The "Subscription payment" dialog opens with a SePay QR code, "Amount to transfer" and "Transfer content".
  3. 3Scan the QR with your banking app. The amount on the QR includes 10% VAT — e.g. the "AI +500 lượt" pack costs ₫79,000 + ₫7,900 VAT = ₫86,900.
  4. 4Keep the amount and transfer content unchanged (click "Copy code" if you transfer by hand). Click "Close" to do something else while you wait.
  5. 5When the money arrives, SePay notifies the system and the invoice status updates automatically; there is no need to send a receipt.
Subscription payment dialog for a pending invoice: the SePay QR showing 86.900 VND, the Transfer content box with the Copy code button and four instruction steps
The amount on the QR (86.900 VND) includes VAT; keep the amount and transfer content unchanged.

Invoice details, downgrade, pause and cancel renewal

AdministrationPlan & invoicesManage subscription

Steps

  1. 1Scroll down to "Manage subscription". Under "Billing contact" fill in name, phone, email and address; under "VAT invoice details (optional)" fill in the company / business name, tax code, registered address and invoice email. Click "Save contact info".
  2. 2"Downgrade plan": pick a lower plan in "Choose a plan..." and click "Schedule downgrade" — it takes effect from the next cycle.
  3. 3"Seasonal pause": choose 1, 2 or 3 months and click "Schedule pause".
  4. 4"Cancel renewal": click "Don't renew after this period"; you can keep using the plan until its expiry date.
Manage subscription: the billing contact and VAT invoice fields, the Save contact info button, and the Downgrade plan, Seasonal pause and Cancel renewal sections
The three cost controls sit below the invoice details.

Look up invoices, reopen the QR and download PDFs

AdministrationPlan & invoicesInvoice & payment history

Steps

  1. 1Scroll to the bottom of the page to "Invoice & payment history". Each row shows the invoice number, status (e.g. PENDING), date, type and amount.
  2. 2Pending invoice: click "Reopen QR" to finish paying.
  3. 3Paid invoice: click "Download PDF" to keep the document.
  4. 4Expired invoice you no longer need: click "Delete permanently".
Invoice & payment history with one PENDING TOPUP invoice of ₫79,000 and the Reopen QR button
A pending invoice has a "Reopen QR" button.

30 / 3 features

Shop settings

Shop-wide settings: call outcomes and callback schedule, customer loyalty points, and the receiving account for chat orders. Shop details (name, address, contact) live under Account › Profile & shop.

Set up call outcomes and automatic callbacks

AdministrationShop settingsCalls

Steps

  1. 1Open "Administration" › "Shop settings", the "Calls" tab, then open the "📞 Call outcomes & callback schedule" block.
  2. 2Each row is one outcome button: "Code", "Button label" (the text staff see), "Outcome" (the reporting group), "Call back" ("None", "By rule" or "Pick a time"), the "DNC" box (put the number on the do-not-call list) and the "On" box.
  3. 3Click "+ Add code" if you need an extra outcome button.
  4. 4Tick "Automatically schedule a callback when the customer is busy / does not answer" and set "1st retry after (minutes)", "then next morning at" and "up to … attempts".
  5. 5Click "Save".
Calls tab: the call outcome codes table with Code, Button label, Outcome, Call back, DNC and On columns; automatic callback after 120 minutes, next morning at 09:00, up to 3 attempts
The "do_not_call" row has DNC ticked: that customer's number will not be called again.

Turn on customer loyalty points

AdministrationShop settingsLoyalty

Steps

  1. 1Open the "Loyalty" tab and tick "Turn on loyalty points (off by default)".
  2. 2Set "Amount per point (VND)", "Value of 1 point when redeemed (VND)", "Minimum redemption (points)" and "Voucher validity (days)".
  3. 3Choose whether to "Also award points when an order is completed (DONE), not only when paid by transfer".
  4. 4Tick "Send the voucher code to the customer when they redeem points" if you want the system to message the code to the customer (chat / Zalo OA / ZNS).
  5. 5Click "Save".
Loyalty tab: the Turn on loyalty points box, Amount per point 10000, Value of 1 point when redeemed 100, Minimum redemption 100, Voucher validity 30 days and the Save button
The worked example in small print above "Save" lets you check the reward level quickly.

Set up the receiving account for chat orders

AdministrationShop settingsPayments

Steps

  1. 1Open the "Payments" tab. Fill in "Bank (BIN or code)" (e.g. 970436 / VCB), "Account number" and "Account holder".
  2. 2Under "Transfer notifications" choose "SePay" or "Casso", and paste the "Webhook secret" from that service.
  3. 3Copy the "Webhook URL to configure" line and register that URL in your SePay/Casso account.
  4. 4Set "Remind unpaid orders after (hours)" (0 = off) and "Labor cost (VND/hour)", used by the ROI report.
  5. 5Click "Save settings".
Payments tab: Bank, Account number, Account holder, Transfer notifications set to SePay, Webhook secret, Webhook URL to configure, Remind unpaid orders after 24 hours and the Save settings button
Copy the "Webhook URL to configure" into SePay/Casso so orders switch to "Paid" automatically.

Can't find what you need, or hit an error? Email our support team and attach a screenshot if you have one.

support@playbookhub.vn